概要
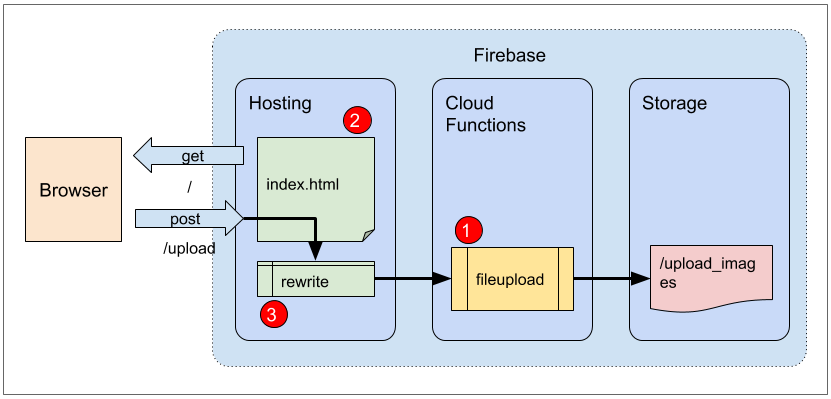
FirebaseのHosting、Cloud Functions(Beta)、Storageを利用して、Hostingにデプロイした静的サイトからファイルをアップロードし、そのファイルをCloud FunctionsのHTTP関数でStorageのバケットへ保存するデモアプリケーションです。
静的サイトの実装はVue.jsを利用します。
実装する機能
- Cloud FunctionsのHTTP関数でpostリクエストされたファイルをStorageに保存する処理を実装します。
- Vue.jsアプリケーションでファイルをアップロードするフォームを実装します。
- アップロードURLをHostingのrewrite機能でHTTP関数のエンドポイントへディスパッチします。
構成図
補足
このデモアプリケーションではアップロードファイルの処理にHostingのrewriteとHTTP関数を利用していますが、これらを利用しなくてもStorageへファイルを直接アップロードすることは可能です。
またHTTP関数もそれ自体エンドポイントを持っているのでHTTP関数へ直接Postリクエストを発行するということでも実現できます。
デモアプリケーションをこのような構成にしているのは、Firebaseのプロダクトをいろいろ使ったアプリケーションを実装したいという理由です。
開発環境
- Windows 10 Professional
- Node.js 6.11.5
- Firebase CLI 3.18.4
- Vue.js 2.5.16
- Visual Studio Code 1.23.0
参考
- [Firebase Hosting] (https://firebase.google.com/docs/hosting/)
- [Cloud Functions for Firebase] (https://firebase.google.com/docs/functions/?hl=ja)
アプリケーション開発の事前準備
Node.jsのインストール
Windows環境なのでNode.jsのバージョン管理にnodistを利用しています。
> nodist + 6.11.5

> nodist 6.11.5
6.11.5
Default global pacakge update dsuccessful.
バージョンの確認
> node -v
v6.11.5
vue-cliのインストール
> npm install --global vue
> npm install --global vue-cli
vue-cliのバージョン確認
> vue --version
2.9.3
firebase-toolsのインストール
プロジェクトの初期化やデプロイに使用するfirebase-toolsというコマンドラインツールをインストールします。
> npm install firebase-tools --global
バージョンの確認
> firebase -V
3.18.4
firebaseの認証
firebase-toolsをインストールしたら、Googleアカウントで認証します。途中でブラウザが立ち上がり認証画面が表示されるので認証するGoogleアカウントを選択(または入力)します。
> firebase login
Firebaseにプロジェクトを作成
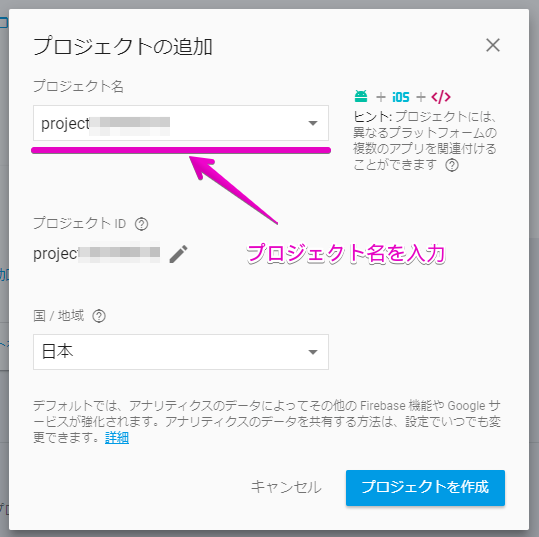
Hosting、Cloud Functions、Storageを利用するにはFirebaseにプロジェクトを作成する必要があります。
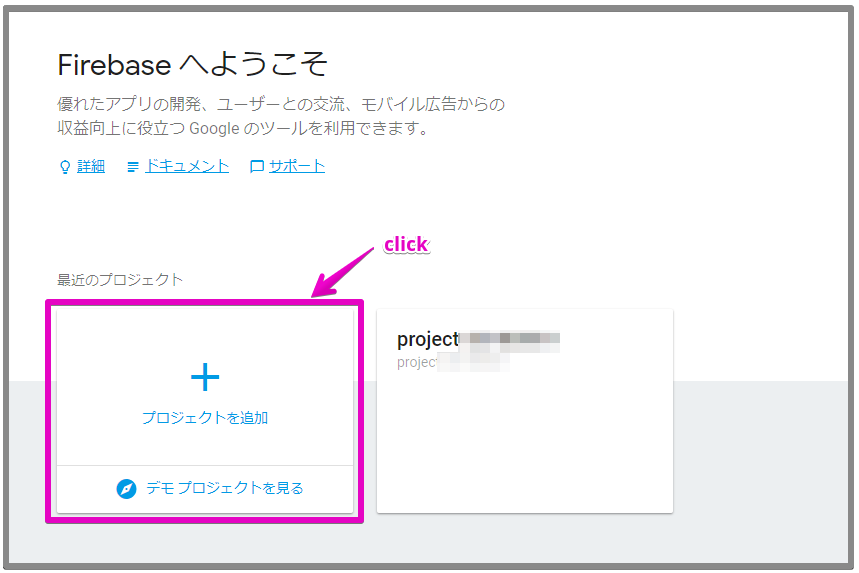
[Firebase Console] (https://console.firebase.google.com/)から「プロジェクトを追加」します。
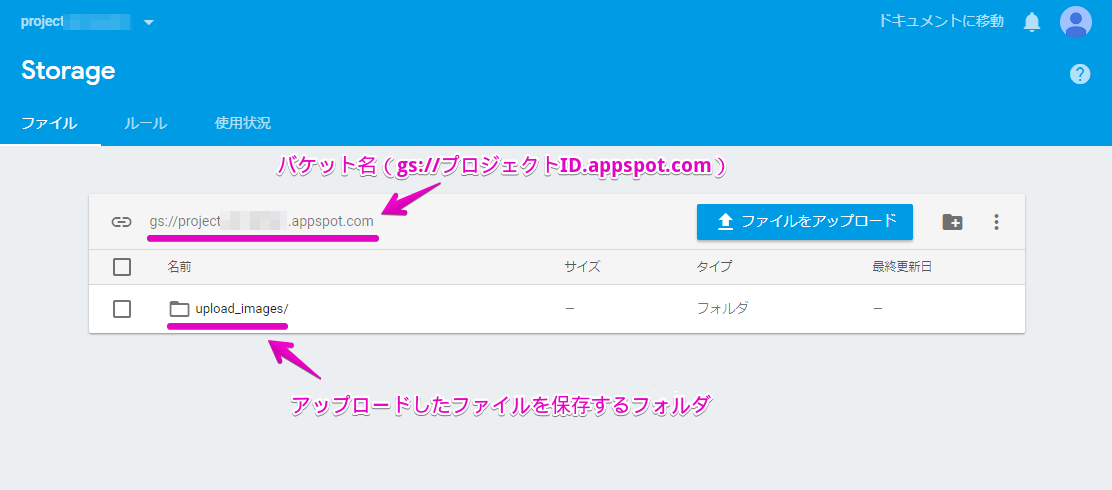
Storageにアップロードファイルの保存フォルダを作成する
プロジェクトに1つ、デフォルトのバケットが用意されています。(利用プランをアップグレードすると複数のバケットを作ることができるようです)
そのままだとバケットのルートにファイルが保存されてしまうので、アップロードされたファイルを保存するフォルダを作成します。
「ファイルをアップロード」という青いボタンの横にあるフォルダアイコンをクリックしてフォルダを作成します。
これで基本的なアプリケーション開発の事前準備が整いました。HTTP関数や静的サイトの実装で必要なモジュールは、必要になった時点でインストールするようにします。
プロジェクトディレクトリの作成と初期化
プロジェクト名は「demo-fileupload-vue」としました。
この名前でプロジェクトのディレクトリを作成し、
> mkdir demo-fileupload-vue
> cd demo-fileupload-vue
ディレクトリ内でfirebase initコマンドを実行して初期化します。途中でいくつか選択肢がありますがこの後で補足します。
> firebase init


     ######## #### ########  ######## ########     ###     ######  ########
     ##        ##  ##     ## ##       ##     ##  ##   ##  ##       ##
     ######    ##  ########  ######   ########  #########  ######  ######
     ##        ##  ##    ##  ##       ##     ## ##     ##       ## ##
     ##       #### ##     ## ######## ########  ##     ##  ######  ########

You're about to initialize a Firebase project in this directory:

  D:\dev\firebase-workspace\demo-fileupload-vue

? Are you ready to proceed? Yes
? Which Firebase CLI features do you want to setup for this folder? Press Space to select features, then Enter to confirm your choices. Functions: Configure and deploy Cloud Functions, Hosting: Confi
gure and deploy Firebase Hosting sites

=== Project Setup

First, let's associate this project directory with a Firebase project.
You can create multiple project aliases by running firebase use --add,
but for now we'll just set up a default project.

? Select a default Firebase project for this directory: project********* (project*********)

=== Functions Setup

A functions directory will be created in your project with a Node.js
package pre-configured. Functions can be deployed with firebase deploy.

? What language would you like to use to write Cloud Functions? JavaScript
? Do you want to use ESLint to catch probable bugs and enforce style? Yes
+  Wrote functions/package.json
+  Wrote functions/.eslintrc.json
+  Wrote functions/index.js
? Do you want to install dependencies with npm now? Yes

// ...省略...

=== Hosting Setup

Your public directory is the folder (relative to your project directory) that
will contain Hosting assets to be uploaded with firebase deploy. If you
have a build process for your assets, use your build's output directory.

? What do you want to use as your public directory? dist
? Configure as a single-page app (rewrite all urls to /index.html)? Yes
+  Wrote dist/index.html

i  Writing configuration info to firebase.json...
i  Writing project information to .firebaserc...

+  Firebase initialization complete!
選択肢について
利用する機能の選択では、"Functions" (Cloud Functions)と"Hosting"にチェックを入れました。
? Which Firebase CLI features do you want to setup for this folder? Press Space to select features, then Enter to confirm your choices.
 ( ) Database: Deploy Firebase Realtime Database Rules
 ( ) Firestore: Deploy rules and create indexes for Firestore
 (*) Functions: Configure and deploy Cloud Functions
>(*) Hosting: Configure and deploy Firebase Hosting sites
 ( ) Storage: Deploy Cloud Storage security rules
このプロジェクトとFirebase上のプロジェクトの紐づけを行います。
? Select a default Firebase project for this directory:
  [don't setup a default project]
> project********* (project*********)
  [create a new project]
Cloud Functionsの実装言語に"JavaScript"を選択しました。
? What language would you like to use to write Cloud Functions?
> JavaScript
  TypeScript
ESLintを有効にしました。
? Do you want to use ESLint to catch probable bugs and enforce style? (Y/n)
hostingで公開(アップロード)するディレクトリを"dist"にしました。これはVue.jsアプリケーションのデフォルトのビルド先ディレクトリが"dist"だからです。
? What do you want to use as your public directory? (public) dist
以上でプロジェクトディレクトリの初期化は完了です。
プロジェクトディレクトリの構成
初期化直後のディレクトリは下記のようになっています。HTTP関数はfunctions/index.jsに実装します。
関数が依存するモジュールを追加する場合はfunctionsディレクトリでnpm installします。
/demo-fileupload-vue
  |
  +--- /dist
  |      |
  |      +--- index.html
  |
  +--- /functions
  |      |
  |      +--- /node_modules
  |      +--- .eslintrc.json
  |      +--- index.js
  |      +--- package.json
  |
  +--- .firebaserc
  |
  +--- firebase.json
firebase.jsonの修正
Windows環境ではデプロイ時にエラーが起きるので、firebase.jsonの下記の箇所を$RESOURCE_DIRから%RESOURCE_DIR%へ修正します。
{
  "functions": {
    "predeploy": [
      // "npm --prefix \"$RESOURCE_DIR\" run lint"
      // ↓ change to
      "npm --prefix \"%RESOURCE_DIR%\" run lint"
    ]
  },

  // ...省略...

}
Cloud FunctionsでアップロードファイルをStorageへ保存する処理を実装する
利用モジュールのインストール
functionsディレクトリで以下のモジュールをインストールします。
> npm install @google-cloud/storage --save
アップロードファイルの処理にbusboyというモジュールを利用しました。
> npm install busboy --save
環境依存情報の設定
ソースコードに直接記述できない情報はプロジェクトの環境設定にキー名=値のペアで登録し、関数からキー名でその値を参照することができます。
設定
キー名=値の登録はfunctions:config:setコマンドで行います。
> firebase functions:config:set fileupload.bucket.name="gs://*********.appspot.com"
+  Functions config updated.

Please deploy your functions for the change to take effect by running firebase deploy --only functions
確認
登録した情報はfunctions:config:getコマンドで確認できます。
> firebase functions:config:get
{
  "fileupload": {
    "bucket": {
      "name": "gs://*********.appspot.com"
    }
  }
}
削除
設定の削除はfunctions:config:unsetコマンドで行います。
> firebase functions:config:unset fileupload.bucket.name
関数
関数から参照する場合はfunctions.config()メソッドにキー名を続けます。
functions.config().fileupload.bucket.name
HTTP関数の実装
関数名は「fileupload」としました。
OPTIONSメソッドのチェックは、開発環境(ローカルサーバー)からPostリクエストできるようにするCORS対応です。
'use strict';
const functions = require('firebase-functions');
const storage = require('@google-cloud/storage')();
const Busboy = require('busboy');
const path = require('path');
const os = require('os');
const fs = require('fs');

exports.fileupload = functions.https.onRequest((req, res) => {
  // ↓ CORS
  if (req.method === 'OPTIONS') {
    res.header('Access-Control-Allow-Origin', '*');
    res.header('Access-Control-Allow-Headers', 'Content-Type');
    res.header('Access-Control-Allow-Methods', 'POST');
    res.status(200).end();
    return;
  }
  // ↑ CORS
  if (req.method !== 'POST') {
    res.status(405).send('Method Not Allowed');
    return;
  }

  const busboy = new Busboy({ headers: req.headers });
  // This object will accumulate all the uploaded files, keyed by their name.
  const uploads = {};
  const allowMimeTypes = ['image/png', 'image/jpg'];
  // file upload bucket
  const bucket = storage.bucket(functions.config().fileupload.bucket.name);

  // This callback will be invoked for each file uploaded.
  busboy.on('file', (fieldname, file, filename, encoding, mimetype) => {
    if (!allowMimeTypes.includes(mimetype.toLocaleLowerCase())) {
      console.warn('disallow mimetype: ' + mimetype);
      return;
    }
    // Note that os.tmpdir() is an in-memory file system, so should
    // only be used for files small enough to fit in memory.
    const tmpdir = os.tmpdir();
    const filepath = path.join(tmpdir, filename);
    file.pipe(fs.createWriteStream(filepath));

    file.on('end', () => {
      console.log('upload file: ' + filepath + ' metadata: ' + mimetype);
      uploads[fieldname] = { filepath, mimetype };
      bucket.upload(filepath, { destination: `upload_images/${path.parse(filepath).base}`, metadata: { contentType: mimetype } })
        .then(() => {
          console.log('file upload success: ' + filepath);
          return new Promise((resolve, reject) => {
            fs.unlink(filepath, (err) => {
              if (err) {
                reject(err);
              } else {
                resolve();
              }
            });
          });
        })
        .catch(err => {
          console.error(err);
          // TODO error handling
        });
    });
  });

  // This callback will be invoked after all uploaded files are saved.
  busboy.on('finish', () => {
    if (Object.keys(uploads).length === 0) {
      res.status(200).send('success: 0 file upload');
      return;
    }
    console.log('finish : ' + JSON.stringify(uploads));
    res.status(200).send(JSON.stringify(uploads));
  });

  // The raw bytes of the upload will be in req.rawBody. Send it to
  // busboy, and get a callback when it's finished.
  busboy.end(req.rawBody);
});
デプロイ
index.jsには複数の関数を定義することができます。以下のコマンドでデプロイすると定義された関数がすべてデプロイされます。
> firebase deploy --only functions
特定の関数のみデプロイするには:に続けて関数名を指定します。
> firebase deploy --only functions:fileupload

=== Deploying to 'project*********'...

i  deploying functions
Running command: npm --prefix "%RESOURCE_DIR%" run lint

> functions@ lint D:\dev\firebase-workspace\demo-fileupload-vue\functions
> eslint .

+  functions: Finished running predeploy script.
i  functions: ensuring necessary APIs are enabled...
+  functions: all necessary APIs are enabled
i  functions: preparing functions directory for uploading...
i  functions: packaged functions (2.88 KB) for uploading
+  functions: functions folder uploaded successfully
i  functions: current functions in project: addMemo, fileupload, helloWorld
i  functions: uploading functions in project: fileupload
i  functions: updating function fileupload...
+  functions[fileupload]: Successful update operation.

+  Deploy complete!

Project Console: https://console.firebase.google.com/project/project*********/overview
- current functions in project:にaddMemo, fileupload, helloWorldと3つ表示されていますが、他の2つは勉強用に実装したもので今回の記事とは関係ありません。
Firebase ConsoleのFunctionsダッシュボードで確認する
デプロイした関数はFunctionsダッシュボードで、エンドポイントや実行回数、実行ログなどが確認できるようになります。
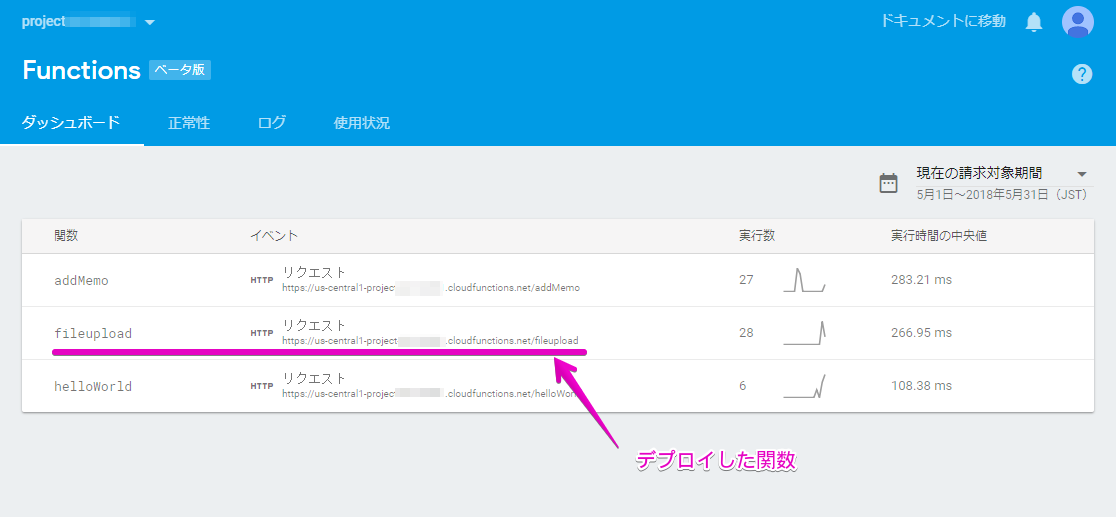
(何度か動作確認を行った後のSSなので実行数がカウントされています。)
動作確認
curlでファイルをアップロードし、ストレージに保存されるか動作確認を行います。
それと、感覚的なことなので不確かですがデプロイ直後に動作確認すると、関数が正しく動作しない場合があったのでデプロイしてから暫く(2,3分くらい)時間をおいて動作確認するようにしていました。
> curl -X POST "https://us-central1-project********.cloudfunctions.net/fileupload" -F "file=@logo.png;type=image/png"
{"file":{"filepath":"/tmp/logo.png","mimetype":"image/png"}}
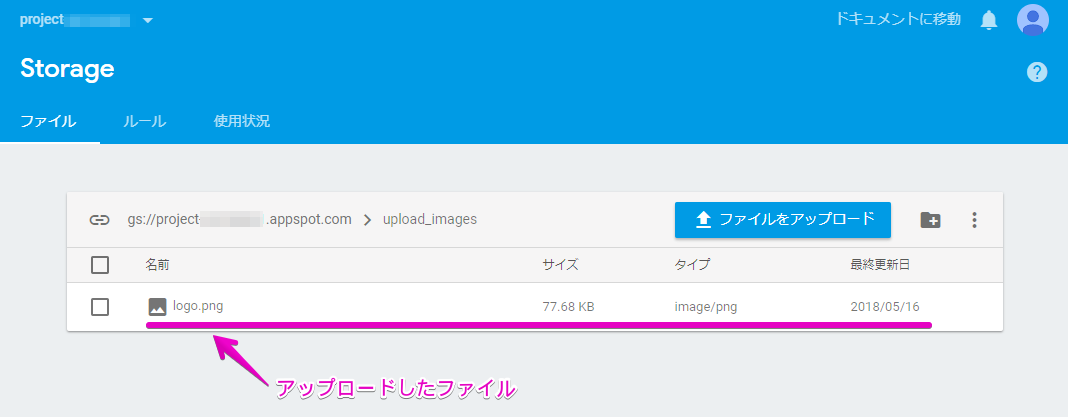
アップロードしたファイルがStorageに保存されていれば確認終了です。
Vue.jsでファイルをアップロードするフォームを実装する
Vue.jsアプリケーションのひな型を作成
プロジェクトディレクトリでvue-cliのvue init webpackコマンドでVue.jsアプリケーションのひな型を生成します。プロジェクトテンプレートにはwebpackを利用しました。
> vue init webpack .

? Generate project in current directory? Yes
? Project name demo-fileupload-vue
? Project description A Vue.js project
? Author rubytomato <email address>
? Vue build standalone
? Install vue-router? Yes
? Use ESLint to lint your code? Yes
? Pick an ESLint preset Standard
? Set up unit tests No
? Setup e2e tests with Nightwatch? No
? Should we run `npm install` for you after the project has been created? (recommended) npm

   vue-cli · Generated "demo-fileupload-vue".


# Installing project dependencies ...
# ========================

// ...省略...

Running eslint --fix to comply with chosen preset rules...
# ========================

> demo-fileupload-vue@1.0.0 lint D:\dev\firebase-workspace\demo-fileupload-vue
> eslint --ext .js,.vue src "--fix"


# Project initialization finished!
# ========================

To get started:

  npm run dev

Documentation can be found at https://vuejs-templates.github.io/webpack
プロジェクトディレクトリの構成
この時点でのプロジェクトディレクトリの状態です。 "// add"と付いているディレクトリ、ファイルがVue.jsアプリケーションの初期化で追加されたものです。
気を付けないといけない点は、Vue.jsとCloud Functionsでnode_modulesの管理が別々になっていることです。
/demo-fileupload-vue
  |
  +--- /build           // add
  +--- /config          // add
  +--- /dist
  |
  +--- /functions
  |      |
  |      +--- /node_modules
  |      +--- .eslintrc.json
  |      +--- index.js
  |      +--- package.json
  |
  +--- /node_modules    // add
  |
  +--- /src             // add
  |      |
  |      +--- /assets
  |      +--- /components
  |      +--- /router
  |      +--- App.vue
  |      +--- main.js
  |
  +--- /static          // add
  |
  +--- .babelrc         // add
  +--- .editorconfig    // add
  +--- .eslintrc.js     // add
  +--- .firebaserc
  +--- .postcssrc.js    // add
  +--- firebase.json
  +--- index.html       // add
  +--- package.json     // add
モジュールのインストール
プロジェクトディレクトリで以下のモジュールをインストールします。
ファイルをpostリクエストするための通信モジュールにaxiosを利用します。
> npm install axios --save
ファイルアップロードページの追加
<template>
  <div class="upload">
    <h1>File Upload</h1>
    <div>
      <form>
        <input type="file" @change="onFileSelected">
        <button @click.prevent="onUpload">Upload</button>
      </form>
      <div class="progress">
        <p>upload progress</p>
        <p>{{ uploadProgress }}</p>
      </div>
    </div>
  </div>
</template>

<script>
import axios from 'axios'

const instance = axios.create({
  baseURL: process.env.SITE_URL,
  timeout: 10000
})

export default {
  name: 'FileUploadForm',
  data () {
    return {
      selectedFile: null,
      uploadProgress: '0%'
    }
  },
  methods: {
    onFileSelected (event) {
      this.selectedFile = event.target.files[0]
    },
    onUpload () {
      const fd = new FormData()
      fd.append('file', this.selectedFile, this.selectedFile.name)
      instance.post('/upload', fd, {
        onUploadProgress: (uploadEvent) => {
          const progress = Math.round(uploadEvent.loaded / uploadEvent.total * 100) + '%'
          this.uploadProgress = progress
        }
      })
        .then(res => {
          this.uploadProgress = 'upload completed'
        })
        .catch(err => {
          console.error(err)
          this.uploadProgress = 'upload error'
        })
    }
  }
}
</script>
axios.postに指定するURLは静的サイトのアドレスになりますが、/uploadというリソースは存在しないのでrewriteを設定していないこの時点でアクセスするとNot Foundになります。
ルーターにルートを追加
ファイルアップロードページへ遷移できるようにルートを追加します。
import Vue from 'vue'
import Router from 'vue-router'
import HelloWorld from '@/components/HelloWorld'
import FileUploadForm from '@/components/FileUploadForm'

Vue.use(Router)

export default new Router({
  routes: [
    {
      path: '/',
      name: 'HelloWorld',
      component: HelloWorld
    },
    {
      path: '/form',
      name: 'FileUploadForm',
      component: FileUploadForm
    }
  ]
})
Hostingのリライトの設定
Hostingは特定のリクエストをCloud Functionsで実装した関数で処理することができます。
下記のようにfirebase.jsonに、静的サイトの/uploadへのpostリクエストをCloud Functionsの"fileupload"というHTTP関数へディスパッチする設定を追加します。
この設定でhostingにデプロイすると/uploadへpostリクエストできるようになります。
また、開発環境(ローカルサーバー)からpostできるようにCORSの設定を追加します。
{

  // ...省略...

  "hosting": {
    "public": "dist",
    "ignore": [
      "firebase.json",
      "**/.*",
      "**/node_modules/**"
    ],
    // ↓ 追加 CORS
    "headers": [
      {
        "source": "**/upload",
        "headers": [
          {
            "key": "Access-Control-Allow-Origin",
            "value": "*"
          }
        ]
      }
    ],
    // ↑ 追加 CORS
    "rewrites": [
      // ↓ 追加
      {
        "source": "/upload",
        "function": "fileupload"
      },
      // ↑ 追加
      {
        "source": "**",
        "destination": "/index.html"
      }
    ]
  }
}
開発用サーバーの起動
> npm run dev

or

> npm start
ビルド
> npm run build

Running eslint --fix to comply with chosen preset rules...
# ========================

> demo-fileupload-vue@1.0.0 lint D:\dev\firebase-workspace\demo-fileupload-vue
> eslint --ext .js,.vue src "--fix"


# Project initialization finished!
# ========================

To get started:

  npm run dev

Documentation can be found at https://vuejs-templates.github.io/webpack
firebaseのローカルサーバーで動作確認
firebase serveコマンドでビルドしたファイルの動作確認を行います。
> firebase serve

=== Serving from 'D:\dev\firebase-workspace\demo-fileupload-vue'...

i  functions: Preparing to emulate functions.
i  hosting: Serving hosting files from: dist
+  hosting: Local server: http://localhost:5000

+  functions: addMemo: http://localhost:5001/project*********/us-central1/addMemo
+  functions: helloWorld: http://localhost:5001/project*********/us-central1/helloWorld
+  functions: fileupload: http://localhost:5001/project*********/us-central1/fileupload
HostingにVue.jsアプリケーションをデプロイ
デプロイ
HTMLタグやJavaScriptのコードを修正してデプロイしたのに、静的サイトに反映されていないときはビルドしたか確認します。
デプロイされるのはビルドして生成されたdistディレクトリなので注意が必要です。
> npm run build
distディレクトリが最新の状態であることを確認してdeployコマンドでデプロイを行います。
> firebase deploy --only hosting

=== Deploying to 'project*********'...

i  deploying hosting
i  hosting: preparing dist directory for upload...
+  hosting: 15 files uploaded successfully

+  Deploy complete!

Project Console: https://console.firebase.google.com/project/project*********/overview
Hosting URL: https://project*********.firebaseapp.com
Cloud Functionsも含めてプロジェクト全体をデプロイするには単にfirebase deployとします。
D:\dev\firebase-workspace\demo-fileupload-vue>firebase deploy

=== Deploying to 'project*********'...

i  deploying functions, hosting
Running command: npm --prefix "%RESOURCE_DIR%" run lint

> functions@ lint D:\dev\firebase-workspace\demo-fileupload-vue\functions
> eslint .

+  functions: Finished running predeploy script.
i  functions: ensuring necessary APIs are enabled...
+  functions: all necessary APIs are enabled
i  functions: preparing functions directory for uploading...
i  functions: packaged functions (3.71 KB) for uploading
+  functions: functions folder uploaded successfully
i  hosting: preparing dist directory for upload...
+  hosting: 15 files uploaded successfully
i  functions: updating function helloWorld...
i  functions: updating function addMemo...
i  functions: updating function fileupload...
+  functions[helloWorld]: Successful update operation.
+  functions[fileupload]: Successful update operation.
+  functions[addMemo]: Successful update operation.

+  Deploy complete!

Project Console: https://console.firebase.google.com/project/project*********/overview
Hosting URL: https://project-20180501.firebaseapp.com
動作確認
コンソールに出力されているHosting URLのアドレスにアクセスして動作確認します。
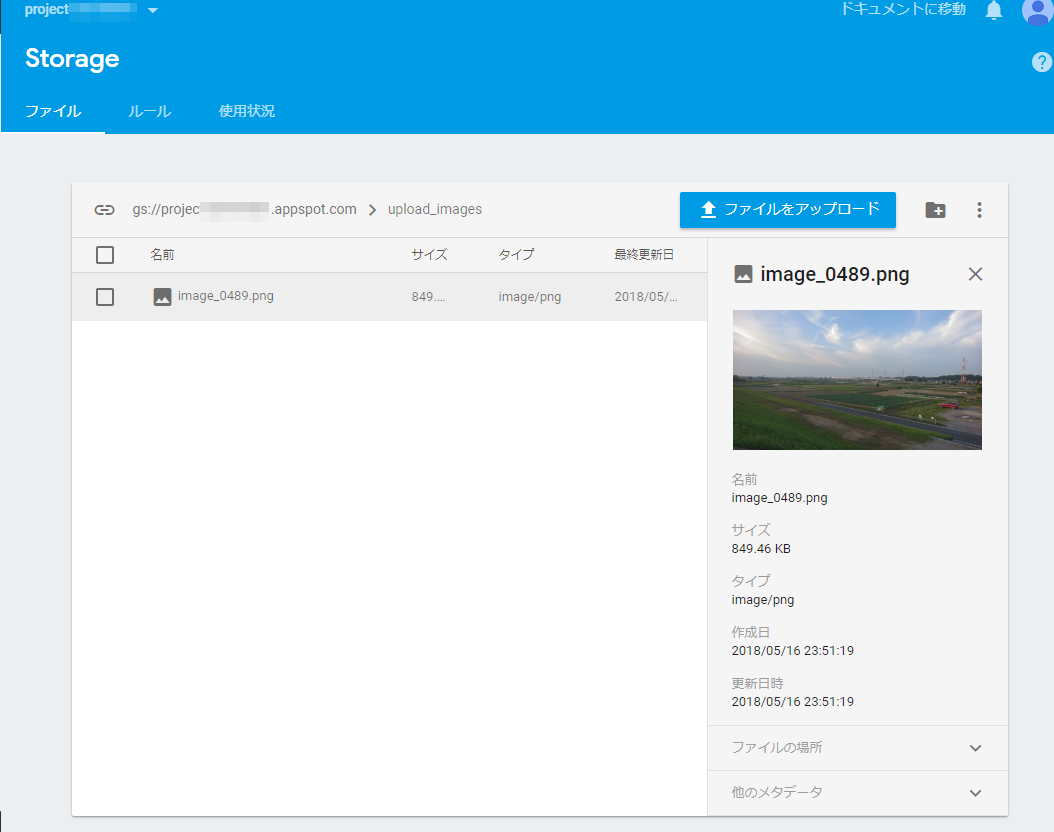
操作している様子をgifアニメーションにしました。
849KBの画像ファイルをアップロードしています。
Firebase ConsoleのStorageダッシュボードでファイルが保存されているか確認します。