1. はじめに
私生活を可視化することで、生活の乱れの改善につなげたいと思います。
お部屋に設置したセンサーから得られたデータ(光、音、温度)をKibanaでダッシュボード化しました。
- 書いたこと:データ取得用のスクリプトや、設定ファイルの内容 (ざっくり)
- 書いていないこと:諸々のインストールの方法
2. 全体の構成
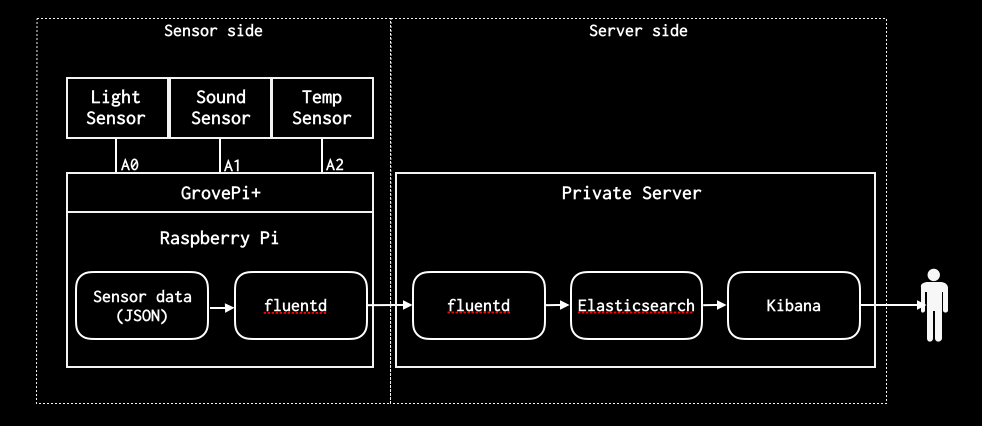
3. Sensor side
3-1. 環境
本体をテレビの影に隠しています。
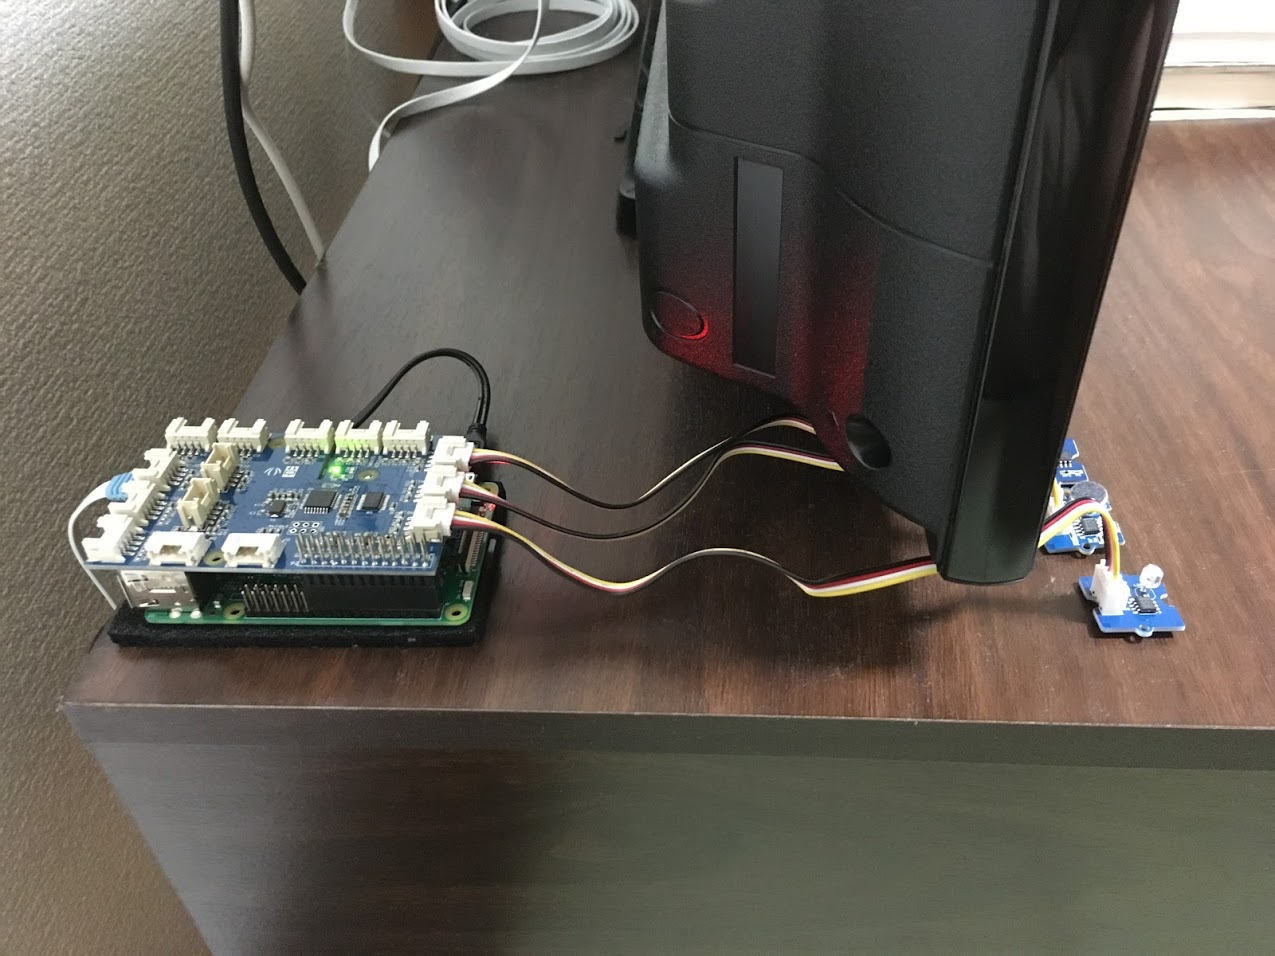
- ハードウェア
- Raspberry Pi 3 ModelB
- GrovePi+
- Grove - Light Sensor
- Grove - Sound Sensor
- Grove - Temperature Sensor V1.2
- OS
- RASPBIAN STRETCH LITE 9.1
- fluentd 0.12.40
3-2. センサーデータの取得
センサーデータを読み込むためのスクリプトを準備します。
myroom.py
# !/usr/bin/python -u

from datetime import datetime
import numpy
import time
import grovepi
import math
import json

light_sensor = 0  # A0
sound_sensor = 1  # A1
temp_sensor  = 2  # A2

light_sensor_samples = 10
sound_sensor_samples = 5000
temp_sensor_samples  = 10
temp_sensor_version  = "1.2"

def get_light_level(analog_sensor):
    samples = []
    for i in range(light_sensor_samples):
        samples.append(grovepi.analogRead(analog_sensor))
    return numpy.median(samples)

def get_sound_level(analog_sensor):
    samples = []
    for i in range(sound_sensor_samples):
        samples.append(grovepi.analogRead(analog_sensor))
    return max(samples)

def get_temp_level(analog_sensor, version):
    samples = []
    for i in range(temp_sensor_samples):
        samples.append(grovepi.temp(analog_sensor, version))
    return numpy.median(samples)

if __name__ == '__main__':
    grovepi.pinMode(light_sensor,"INPUT")
    grovepi.pinMode(sound_sensor,"INPUT")
    grovepi.pinMode(temp_sensor,"INPUT")

    while True:
        light = get_light_level(light_sensor)
        sound = get_sound_level(sound_sensor)
        temp  = get_temp_level(temp_sensor, temp_sensor_version)
        timestamp = datetime.now().strftime("%Y-%m-%d %H:%M:%S")
        date = datetime.now().strftime("%Y-%m-%d")
        hour = int(datetime.now().strftime("%H"))
        wday = int(datetime.now().weekday())

        json_data = {
                "timestamp": timestamp,
                "hour": hour,
                "wday": wday,
                "light": light,
                "sound": sound,
                "temp": temp
                }
        encode_json_data = json.dumps(json_data)
        print encode_json_data
上記のスクリプトを実行して、標準出力をファイルに書き出します。
sudo python -u ./myroom.py >> /home/pi/myroom.log &
出力は以下のようになります。
$ tail /home/pi/myroom.log
{"sound": 255, "hour": 1, "temp": 18.82680514639611, "timestamp": "2017-10-18 01:18:37", "light": 566.0, "wday": 2}
{"sound": 255, "hour": 1, "temp": 18.82680514639611, "timestamp": "2017-10-18 01:19:10", "light": 554.0, "wday": 2}
{"sound": 375, "hour": 1, "temp": 18.82680514639611, "timestamp": "2017-10-18 01:19:43", "light": 564.0, "wday": 2}
{"sound": 255, "hour": 1, "temp": 18.82680514639611, "timestamp": "2017-10-18 01:20:16", "light": 554.0, "wday": 2}
{"sound": 255, "hour": 1, "temp": 18.82680514639611, "timestamp": "2017-10-18 01:20:48", "light": 566.5, "wday": 2}
{"sound": 259, "hour": 1, "temp": 18.82680514639611, "timestamp": "2017-10-18 01:21:21", "light": 557.5, "wday": 2}
{"sound": 255, "hour": 1, "temp": 18.82680514639611, "timestamp": "2017-10-18 01:21:54", "light": 568.0, "wday": 2}
{"sound": 255, "hour": 1, "temp": 18.82680514639611, "timestamp": "2017-10-18 01:22:27", "light": 555.0, "wday": 2}
{"sound": 255, "hour": 1, "temp": 18.82680514639611, "timestamp": "2017-10-18 01:22:59", "light": 555.0, "wday": 2}
{"sound": 255, "hour": 1, "temp": 18.82680514639611, "timestamp": "2017-10-18 01:23:32", "light": 552.0, "wday": 2}
3-3. fluentdの設定
fluentdの設定ファイルを準備します。
上記で出力したデータの増分を Server side の fluentd に forward します。
/home/pi/fluent/fluent.conf
<source>
  @type tail
  format json
  path /home/pi/myroom.log
  pos_file /home/pi/myroom.log.pos
  tag log.myroom
</source>

<match log.myroom>
  @type forward
  buffer_type file
  buffer_path /tmp/testlog-tmp.log
  <server>
    host [ホスト名]
    port 24224
  </server>
</match>
4. Server side
4-1. 環境
- さくらVPS 1GBプラン
- CentOS 7.4
- fluentd(td-agent) 0.12.40
- Elasticsearch 5.6.2
- Kibana 5.6.2
4-2. fluentd(td-agent)の設定
Sensor side から送られてきたデータをElasticsearchに格納します。
/etc/td-agent/td-agent.conf
<source>
  type forward
  port 24224
  bind 0.0.0.0
</source>

<match log.myroom>
  type elasticsearch
  host localhost
  port 9200
  index_name myroom
  logstash_format true
  logstash_prefix myroom
</match>
4-3. Elasticsearchの設定
ほとんどデフォルトのまま使っています。
/etc/elasticsearch/elasticsearch.yml
(空)
4-4. Kibanaの設定
アクセス元IPを制限しないように設定します。
/etc/kibana/kibana.yml
server.host: "0.0.0.0"
5. 完成したダッシュボード
私生活の乱れが可視化されました。
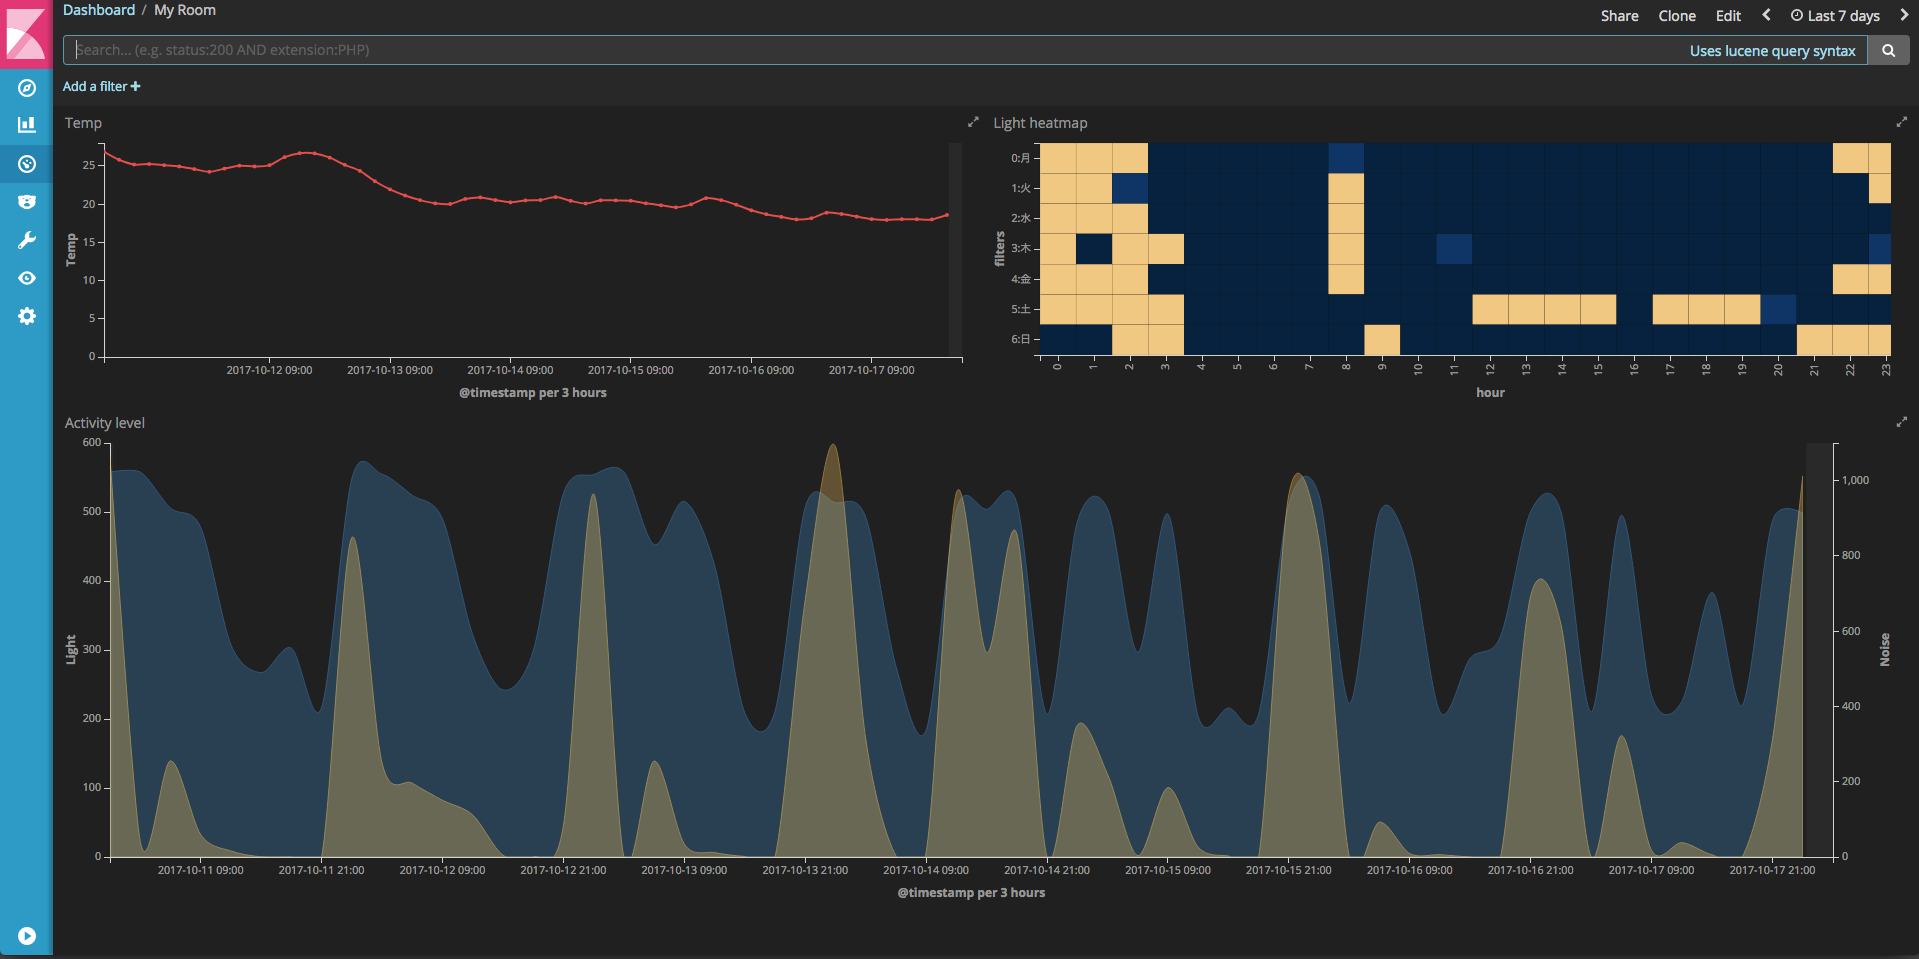
説明を省いていますが、別途認証を入れています。公開すると防犯上よくないので気をつけましょう。