はじめに
ReactでFullcalenderを使って、カレンダーアプリっぽいことをする機会があったので、使い方など書いていきます。
使ったもの
- react(v16.13.1)
- react-datepicker(v2.16.0)
- @fullcalendar/daygrid(v4.4.0)
- @fullcalendar/interaction(v4.4.0)
- @fullcalendar/react(v4.4.0)
- @fullcalendar/timegrid(v4.4.0)
作りたいもの
以下機能を入れる
- スケジュールの保存
- スケジュールの変更
- スケジュールの削除
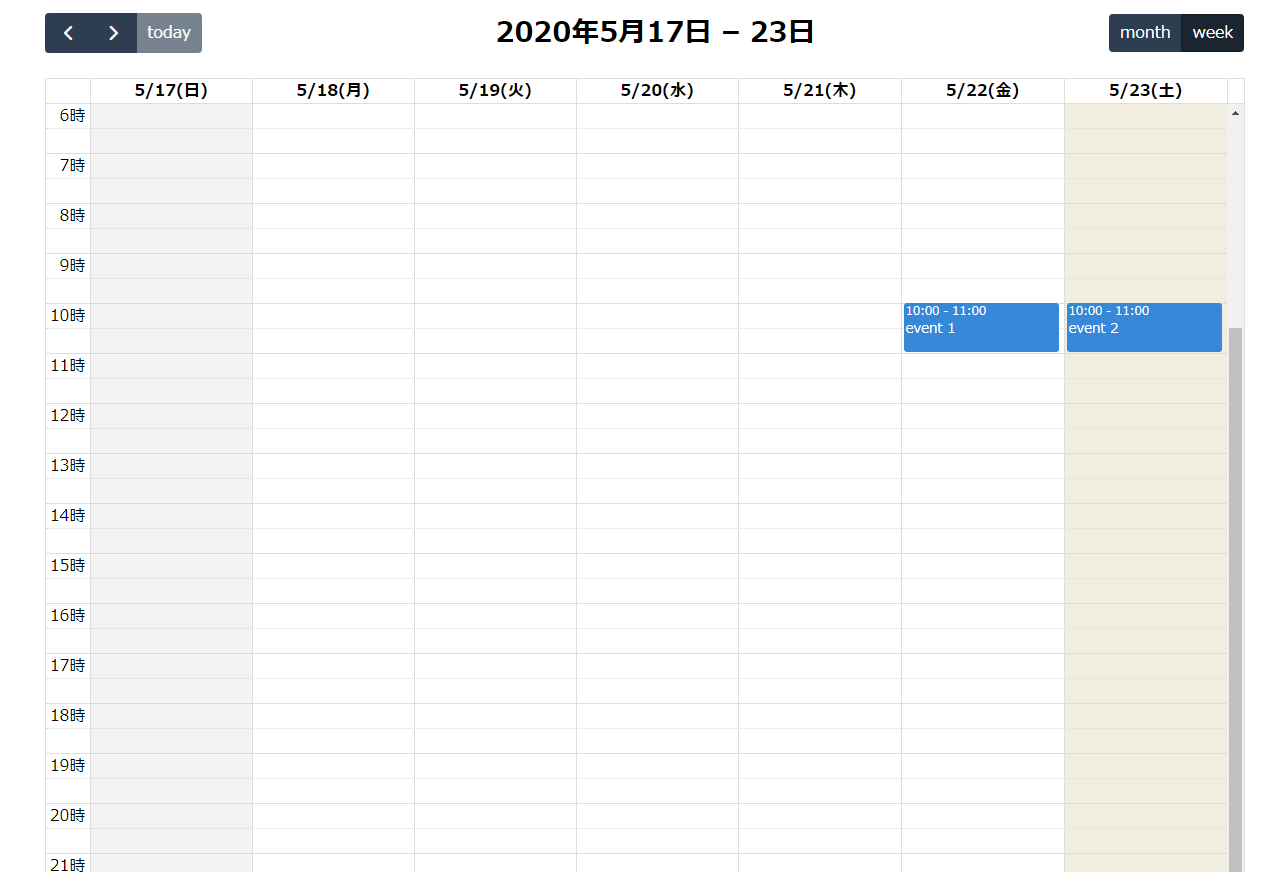
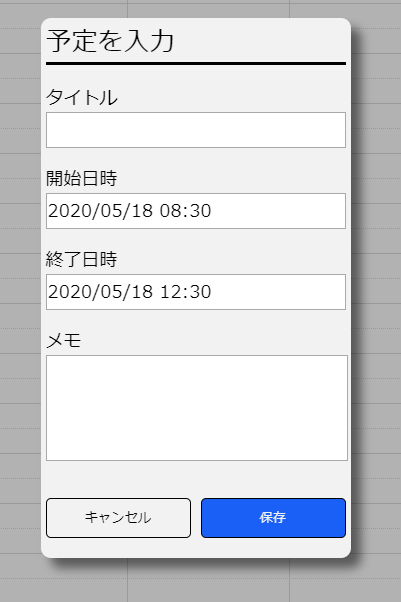
- カレンダーを範囲選択してその時間が初期入力された入力フォームを出す
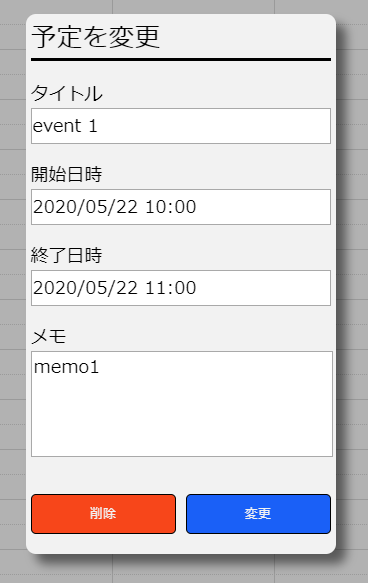
- イベントをクリックでそのイベントの内容が初期入力された変更フォームを出す
デモはこちら
スマホ対応してません・・・
プロジェクト作成
create-react-appでReactのプロジェクトを作成して、上記のとおり必要なパッケージをインストールします。(react以外)
create-react-app app
npm install --save
カレンダー部分を作る
インポート
Fullcalenderに必要なパッケージをインポートします。
import FullCalendar from "@fullcalendar/react";
import dayGridPlugin from "@fullcalendar/daygrid";
import timeGridPlugin from "@fullcalendar/timegrid";
import interactionPlugin from "@fullcalendar/interaction";
import "@fullcalendar/core/main.css";
import "@fullcalendar/daygrid/main.css";
import "@fullcalendar/timegrid/main.css";
カレンダーを実装
カレンダーを表示したいところに以下置いていく。
他にもいろいろ設定できたりしますので、公式ページを参照してください。
<FullCalendar
  locale="ja" // 日本語
  defaultView="timeGridWeek" // 基本UI
  slotDuration="00:30:00" // 表示する時間軸の最小値
  selectable={true} // 日付選択可能
  allDaySlot={false} // alldayの表示設定
  titleFormat={{
    year: "numeric",
    month: "short",
    day: "numeric",
  }} // タイトルに年月日を表示
  header={{
    left: "prev,next,today",
    center: "title",
    right: "dayGridMonth,timeGridWeek",
  }}
  businessHours={{
    daysOfWeek: [1, 2, 3, 4, 5],
    startTime: "0:00",
    endTime: "24:00",
  }}
  plugins={[dayGridPlugin, timeGridPlugin, interactionPlugin]}
  ref={this.ref}
  weekends={true} // 週末表示
  events={this.myEvents} // 起動時に登録するイベント
  select={this.handleSelect} // カレンダー範囲選択時
  eventClick={this.handleClick} // イベントクリック時
/>
this.myEventsはカレンダーに表示するイベントの配列で、titleとstartとendがあればだいたいいい感じに表示されます。
endがない場合は1時間と範囲になります。
ここではmemoを追加して予定に関するメモを残せるようにしています。
    this.myEvents = [
      {
        id: 0,
        title: "event 1",
        start: "2020-05-22 10:00:00",
        end: "2020-05-22 11:00:00",
        memo: "memo1",
      },
      {
        id: 1,
        title: "event 2",
        start: "2020-05-23 10:00:00",
        end: "2020-05-23 11:00:00",
        memo: "memo2",
      },
    ];
入力・変更フォームを実装する
this.state.isChangeで入力or変更の切り替えをしています。
- カレンダーの範囲選択時→入力
- イベントクリック時→変更
this.state.formInviewでフォームの表示・非表示の切り替えをしています。
  renderForm() {
    return (
      <div
        className={
          this.state.formInview ? "container__form inview" : "container__form"
        }
      >
        <form>
          {this.state.isChange  ? (
            <div className="container__form__header">予定を変更</div>
          ) : (
            <div className="container__form__header">予定を入力</div>
          )}
          <div>{this.renderTitle()}</div>
          <div>{this.renderStartTime()}</div>
          <div>{this.renderEndTime()}</div>
          <div>{this.renderMemo()}</div>
          <div>{this.renderBtn()}</div>
        </form>
      </div>
    );
  }
フォームの中身は以下の通りになります。
- タイトル
- 開始日時
- 終了日時
- メモ
- キャンセルor削除ボタン
- 保存or変更ボタン
フォームの内容に変更があった場合に、stateで管理しているものをonChangeで更新しています。
日時部分の実装にはDatePicker を使用しています。開始日時が終了日時より遅くなったときに終了日時を開始日時に合わせるみたいな処理をいれたほうがいいですが、とりあえずこんな感じで。。
  renderTitle() {
    return (
      <React.Fragment>
        <p className="container__form__label">タイトル</p>
        <input
          className="container__form__title"
          type="text"
          value={this.state.inputTitle}
          onChange={(e) => {
            this.setState({ inputTitle: e.target.value });

            if (e.target.value === "") {
              this.setState({ isInputTitle: false });
            } else {
              this.setState({ isInputTitle: true });
            }
          }}
        />
      </React.Fragment>
    );
  }
  renderMemo() {
    return (
      <React.Fragment>
        <p className="container__form__label">メモ</p>
        <textarea
          className="container__form__memo"
          rows="3"
          value={this.state.inputMemo}
          onChange={(e) => {
            this.setState({ inputMemo: e.target.value });
          }}
        />
      </React.Fragment>
    );
  }
  renderStartTime() {
    return (
      <React.Fragment>
        <p className="container__form__label">開始日時</p>
        <DatePicker
          className="container__form__datetime"
          locale="ja"
          dateFormat="yyyy/MM/d HH:mm"
          selected={this.state.inputStart}
          showTimeSelect
          timeFormat="HH:mm"
          timeIntervals={10}
          todayButton="today"
          onChange={(time) => {
            this.setState({ inputStart: time });
          }}
        />
      </React.Fragment>
    );
  }
  renderEndTime() {
    return (
      <React.Fragment>
        <p className="container__form__label">終了日時</p>
        <DatePicker
          className="container__form__datetime"
          locale="ja"
          dateFormat="yyyy/MM/d HH:mm"
          selected={this.state.inputEnd}
          showTimeSelect
          timeFormat="HH:mm"
          timeIntervals={10}
          todayButton="today"
          onChange={(time) => {
            this.setState({ inputEnd: time });
          }}
        />
      </React.Fragment>
    );
  }
  renderBtn() {
    return (
      <div>
        {!this.state.isChange ? (
          <div>
            <input
              className="container__form__btn_cancel"
              type="button"
              value="キャンセル"
              onClick={() => {
                this.setState({ formInview: false });
              }}
            />
            <input
              className="container__form__btn_save"
              type="button"
              value="保存"
              disabled={!this.state.isInputTitle}
              onClick={this.onAddEvent}
            />
          </div>
        ) : (
          <div>
            <input
              className="container__form__btn_delete"
              type="button"
              value="削除"
              onClick={this.onDeleteEvent}
            />
            <input
              className="container__form__btn_save"
              type="button"
              value="変更"
              onClick={this.onChangeEvent}
            />
          </div>
        )}
      </div>
    );
  }
カレンダー範囲選択時の処理を実装する
カレンダーの範囲選択時に指定した時間で入力フォームを初期表示するために、stateで管理しているタイトル・開始日時・終了日時・メモの値を更新します。
  handleSelect = (selectInfo) => {
    let start = new Date(selectInfo.start);
    let end = new Date(selectInfo.end);
    start.setHours(start.getHours());
    end.setHours(end.getHours());

    this.setState({ inputTitle: "" });
    this.setState({ inputMemo: "" });
    this.setState({ isInputTitle: false });
    this.setState({ inputStart: start });
    this.setState({ inputEnd: end });
    this.setState({ isChange: false });
    this.setState({ formInview: true });
  };
イベントクリック時処理を実装する
イベントクリック時に保存されている値で変更フォームを初期表示するために、stateで管理しているタイトル・開始日時・終了日時・メモの値を更新します。
  handleClick = (info) => {
    this.selEventID = info.event.id;
    const selEvent = this.myEvents[info.event.id];
    const title = selEvent.title;
    const memo = selEvent.memo;
    const start = new Date(selEvent.start);
    const end = new Date(selEvent.end);

    this.setState({ inputTitle: title });
    this.setState({ inputMemo: memo });
    this.setState({ isInputTitle: true });
    this.setState({ inputStart: start });
    this.setState({ inputEnd: end });
    this.setState({ isChange: true });
    this.setState({ formInview: true });
  };
追加時の処理を実装する
登録したいイベントをeventに一旦いれていき、addEventで登録します。
  onAddEvent() {
    const starttime = this.changeDateToString(this.state.inputStart);
    const endtime = this.changeDateToString(this.state.inputEnd);

    if (starttime >= endtime) {
      alert("開始時間と終了時間を確認してください。");
      return;
    }
    const event = {
      title: this.state.inputTitle,
      memo: this.state.inputMemo,
      start: starttime,
      end: endtime,
    };
    if (this.addEvent(event) === true) {
      window.alert("設定しました");
      this.setState({ formInview: false });
    }
  }
this.myEventsにpushして、表示も更新するために、this.ref.current.getApi().addEvent(ev);を呼びます。
  addEvent = (ev) => {
    ev.id = this.getID();
    this.myEvents.push(ev);
    this.ref.current.getApi().addEvent(ev);
    return true;
  };
いい感じにidを取得できる関数たち
  sortEventID = (a, b) => {
    return a.id < b.id ? -1 : a.id > b.id ? 1 : 0;
  };
  getID = () => {
    this.myEvents.sort(this.sortEventID);
    let i;
    for (i = 0; i < this.myEvents.length; i++) {
      if (this.myEvents[i].id !== i) {
        break;
      }
    }
    return i;
  };
いい感じに時間表示を変換する関数たち
  changeDateToString(dt) {
    const year = dt.getFullYear();
    const month = this.getdoubleDigestNumer(dt.getMonth() + 1);
    const date = this.getdoubleDigestNumer(dt.getDate());
    const hour = this.getdoubleDigestNumer(dt.getHours());
    const minutes = this.getdoubleDigestNumer(dt.getMinutes());

    const retDate = `${year}-${month}-${date} ${hour}:${minutes}:00`;
    return retDate;
  }
  getdoubleDigestNumer(number) {
    return ("0" + number).slice(-2);
  }
変更時の処理を実装する
変更したいイベントをeventに一旦いれていき、changeEventで変更します。
  onChangeEvent(values) {
    if (window.confirm("変更しますか?")) {
      const starttime = this.changeDateToString(this.state.inputStart);
      const endtime = this.changeDateToString(this.state.inputEnd);

      if (starttime >= endtime) {
        alert("開始時間と終了時間を確認してください。");
        return;
      }

      const event = {
        title: this.state.inputTitle,
        memo: this.state.inputMemo,
        start: starttime,
        end: endtime,
        id: this.selEventID,
      };
      if (this.changeEvent(event) === true) {
        window.alert("イベントを変更しました。");
        this.setState({ formInview: false });
      }
    } else {
      return;
    }
  }
this.myEventsの指定したidの内容を書き換えて、一旦表示を消してから再登録します。
  changeEvent = (ev) => {
    this.myEvents[ev.id].title = ev.title;
    this.myEvents[ev.id].memo = ev.memo;
    this.myEvents[ev.id].start = ev.start;
    this.myEvents[ev.id].end = ev.end;

    this.ref.current.getApi().getEventById(ev.id).remove();
    this.ref.current.getApi().addEvent(this.myEvents[ev.id]);

    return true;
  };
削除時の処理を実装する
削除したいイベントにisDel = trueを設定しています。一応DB連携した時に何を削除したかをわかるようにthis.myEventsから削除しないようにしています。
  onDeleteEvent() {
    if (window.confirm("削除しますか?")) {
      if (this.selEventID < this.EVENT_SEL_NON) {
        let EventID = this.selEventID;
        let delevent = this.ref.current.getApi().getEventById(EventID);
        delevent.remove();
        this.selEventID = this.EVENT_SEL_NON;
        this.myEvents[EventID].isDel = true;
      }
      this.setState({ formInview: false });
      alert("イベントを削除しました。");
    } else {
      return;
    }
  }
まとめ
これでだいたいできたと思います。
入力フォーム表示時に他をクリックすると消えたり、スタイル調整とかは割愛します。
DB連携とログイン機能を入れるだけで簡単にそれなりのカレンダーアプリができてしまいますので結構いいですね!
間違っていたり、こうしたほうがいいよとかありましたら、コメントお願いします!!


