目的
LaravelとVueJSの開発において、
LaravelではWebとAPIのルーティング、
VueJSではVueRouter(Component)を使用してルーティングを行い、
LaravelとVueJSの機能を組み合わせて使用するときがあると思います。
それらのルーティングの設定が複雑なので、備忘録用にまとめました。
前提
で構築した環境を基にしています。
Laravel Web Routing
Route::get('/', function () {
	return view('welcome');
});
Laravelの初期設定のroutes/web.phpです。
まず、Route::getでHTTPのメソッドを指定しています。
今回はGetメソッドを指定しています。
'/'で、アクセスしてきたURLとの一致の条件を指定しています。
今回であれば、http://localhost:8000/ が一致します。
return view('welcome')で welcome.blade.phpを返します。
return view('[ビュー名]')は,
resources/views/内の[ビュー名]に一致する[ビュー名].blade.phpファイルを返します。
流れとしては、Getメソッドでhttp://localhost:8000/にリクエストがきたら、
ルーティングの条件と一致したwelcome.blade.phpを返す、のような感じになると思います。
本記事用の設定
Route::get('/{any}', function() {
    return view('app');
})->where('any', '.*');
routes/web.phpを本記事のテスト用に上記の様に変更します。
この書き方では、'/{any}'と条件を指定し、
また、)->where('any', '.*');の句がついています。
{any}は、ルートパラメータと呼び、ルーティングの条件一致の際に使える変数の様なものと理解しています。
->where内で'any', '.*'と記述することで、アクセスしてきたURLに対して正規表現による条件一致が使用できます。
この記述では'.*'と正規表現の指定があるので、どのようなURLでアクセスしても、app.blade.phpを返します。
http://localhost:8000/.*とも書けると思います。
もし、条件が一致しない場合、例えば正規表現に'a-Z'が設定されており、http://localhost:8000/1でアクセスした場合、
条件が一致しないのでreturn view('app')で app.blade.phpを返しません。
その後、他のルーティングの条件のいずれにも一致しなければ何も返さず、ブラウザ上で404が表示されます。
<!doctype html>
<html lang="{{ str_replace('_', '-', app()->getLocale()) }}">
<head>
    <meta charset="utf-8">
    <meta name="viewport" content="width=device-width, initial-scale=1">

    <meta name="csrf-token" content="{{ csrf_token() }}">

    <title>{{ config('app.name', 'Vue Laravel Routing') }}</title>

    <link href="{{ mix('/css/app.css') }}" rel="stylesheet">
</head>
<body>

<div id="app">

</div>

<script src="{{ mix('/js/app.js') }}" defer></script>
</body>
</html>
resources/views/app.blade.phpを上記の内容で新たに作成します。
Vue Component Setting
<template>
    <div class="container">
      TEST
    </div>
</template>

<script>
    export default {}
</script>
まず読み込むコンポーネントの作成をします。
import TestComponent from "./components/TestComponent.vue";

require('./bootstrap');
window.Vue = require('vue');

Vue.component('test-component', TestComponent);

const app = new Vue({
    el: '#app',
});
次に、resources/js/app.jsを上記の様に記述します。
import TestComponent from "./components/TestComponent.vue";で、作成したコンポーネントを読み込みます。
require('./bootstrap');とwindow.Vue = require('vue');でVueなどのJavascriptの依存関係を読み込んでいます。
Vue.component('test-component', TestComponent);でVueのコンポーネントを定義し、Laravel(php)から使えるようにします。
const app = new Vue({});で新しいVueのインスタンスを生成します。
el: '#app',でインスタンスのAPIのid(名前)を設定します。
ここで設定した名前(今回であればapp)が、Laravel(php)からコンポーネントを使用する際に紐づきます。
<div id="app">
  <test-component></test-component>
</div>

<script src="{{ mix('/js/app.js') }}" defer></script>
resources/views/app.blade.php内の記述を上記の様に変更します。
<script src="{{ mix('/js/app.js') }}" defer></script>で/js/app.jsを読み込みます。
<div id="app"></div>で/js/app.jsで作成したVueインスタンスを設定します。
今回はel:プロパティに#appを設定しているので、<div id="app">と指定します。
el:プロパティが#hogeであれば、<div id="hoge">と指定します
<div id="app"></div>内の、
<test-component></test-component>で/js/app.jsで設定したコンポーネントを使用します。
Vue Router Setting
<template>
    <div class="container">
      TEST
    </div>
</template>

<script>
    export default {}
</script>
まず読み込むコンポーネントの作成をします。(前項で作成したものをそのまま使っています。)
import VueRouter from 'vue-router';
import TestComponent from "./components/TestComponent.vue";

require('./bootstrap');

window.Vue = require('vue');

Vue.use(VueRouter);

const router = new VueRouter({

    mode: 'history',
    routes: [
        {
            path: '/test',
            name: 'test',
            component: TestComponent
        },
    ]


});

const app = new Vue({
    el: '#app',
    router
});
次に、resources/js/app.js内で、
import VueRouter from 'vue-router'; でVue-Routerを読み込み、
import TestComponent from "./components/TestComponent.vue";で作成したコンポーネントを読み込みます。
Vue.use(VueRouter);で、Routerを使用する準備をします。
const router = new VueRouter({});で新しいVueRouterのインスタンスを生成します。
mode: 'history',でページ遷移時のURLの処理を設定します。三種類の設定値があります。
| 値 | 動作 |
|---|---|
| hash | ページ遷移時のURLにhttp://localhost:8000/#/hogeのような#が入る。 |
| history | ページ遷移時のURLがhttp://localhost:8000/hogeのようになる(#が入らない。)。 |
| abstarct | URLが変わらない。ページを遷移してもURLはhttp://localhost:8000/のまま。 |
path: '/test',で、VueRouter内に設定したコンポーネントを呼び出すURLを設定します。
今回であれば,http://localhost:8000/testです。
name: 'test',で、VueRouter内に設定したコンポーネントを、
ほかのページから呼び出す際の名前を設定します。(名前付きルート)
今回であれば、 <router-link :to="{ name: 'test' }">test</router-link>の記載で呼び出す(ページ遷移)ができます。
component: TestComponentで、作成したコンポーネントを読み込んでいます。
el: '#app',でインスタンスのAPIのid(名前)を設定します。
routerで、VueからRouterを使用する設定をしています。
<div id="app">
  <router-view></router-view>
  <router-link v-bind:to="{name: 'test'}">Jump to Test</router-link>
</div>

<script src="{{ mix('/js/app.js') }}" defer></script>
<router-view></router-view>の記述よって、
http://localhost:8000/testにアクセスした際、testにルーティングされたコンポーネントを読み込みます。
http://localhost:8000/testにアクセスすると、resources/js/app.jsのrouterのpathに/testが設定されたコンポーネントを表示します。
<router-link v-bind:to="{name: 'test'}">Jump to Test</router-link>の記述によって、リンクをクリックした際に、testの名前がつけられたコンポーネントを表示します。
http://localhost:8000/testにアクセスするか、
http://localhost:8000/にアクセスし、Jump to Testをクリックすると、
TESTの文字列の表示が確認できると思います。
Laravel API Routing
php artisan make:controller TestController
Dockerに構築したローカルサーバー上でphp artisan make:controller TestControllerを実行します。
<?php

namespace App\Http\Controllers;

use Illuminate\Http\Request;
use Illuminate\Support\Facades\View;

class TestController extends Controller
{
    public function index()
    {
        $data = [
            'test'=>'Test data from controller',
        ];
        return view('app', $data);
    }
}
\app\Http\Controllers\にTestController.phpが作成されます。
上記の様に記述を変更します。
namespace App\Http\Controllers;で名前空間を指定しています。
名前空間は、クラス名などが重複しないために、このクラスはこの名前空間のもの、といった定義をするためのものです。
use ~~で指定した名前空間にあるクラスなどを読み込んでいます。
今回は、Illuminate下にある\Http\Requestと\Support\Facades\Viewを読み込んでいます。
class TestController extends Controller{~}でTestControllerクラスを定義し、かつextendsでControllerクラスを継承しています。
ControllerクラスはLaravelに最初からあるもので、ミドルウェアの登録などをやってくれています。
return view('app', $data);にてapp.blade.phpに戻り、かつ$dataの配列を渡します。
<?php
Route::get('/test', 'TestController@index');
\routes\のapi.phpを上記の様に変更します。
このファイルで、LaravelのAPIのルーティングの設定をします。
Route::get('/test',の記述は、routes/web.phpと同じです。
また、api.phpで設定したルーティングはhttp://localhost:8000/api/(設定したパス)として設定されます。
今回は'/test'を設定していますので、実行する際はhttp://localhost:8000/api/testにアクセスします。
'TestController@index'のTestControllerで呼び出したいコントローラークラスの名前を指定し、
indexで呼び出し時に実行したい関数名を指定します。
<div id="app">
</div>

<p>
    Received:{{ $test }}
</p>
app.blade.phpに{{ $test }}と記述すると、
TestController.phpから送られてきた配列($data)の中の、
キー(test)が一致する値(Test data from controller)を表示します。
この変数はVueJSとは関係ないので、<div id="app"></div>内に記述する必要はありません。
http://localhost:8000/api/testにアクセスし、動作が確認できると思います。
Laravel(API)からデータを受け取りVueで描画
Laravelは、MVCモデルに基づいて構成されたフレームワークだと思いますので、
そちらにのっとったような感じでやっていきたいと思います。
テストデータの作成・設定
php artisan make:migration create_tests_table
Dockerに構築したローカルサーバー上でphp artisan make:migration create_tests_tableを実行します。
Laravelでは、モデルクラス内で明示的にテーブル名を指定しない限り、
モデルのクラス名にsを合わせた名前が指定されるテーブル名になります。
今回はTestの名前でモデルを作りますので、テーブル名は自動的にtestsが指定されます。
ゆえにそれに合わせる形でtestsの名前でテーブルを作成しています。
<?php

use Illuminate\Database\Migrations\Migration;
use Illuminate\Database\Schema\Blueprint;
use Illuminate\Support\Facades\Schema;

class CreateTestTable extends Migration
{
    public function up()
    {
        Schema::create('tests', function (Blueprint $table) {
            $table->bigIncrements('id');
            $table->string('title', 100);
            $table->string('content', 100);
            $table->timestamps();
        });
    }

    public function down()
    {
        Schema::dropIfExists('tests');
    }
}
database\migrations\にYYYY_MM_DD_[0-9]{6,6}_create_test_table.phpが作成されますので、上記の様に内容を変更します。
Schema::create('test',の'test'で、作成するテーブル名を指定します。
$table->でテーブル内に作成するカラムを指定します。
bigIncrements('id');は、idというカラムを、Bigint型で自動で増分(1->2->3...)していくように設定しています。
string('title', 100);は、String型で100(文字?バイト?)と指定しています。
timestamps();は、データが作成、更新された年月日時分秒(Datetime)を指定しています。
php artisan make:model Test
Dockerに構築したローカルサーバー上でphp artisan make:model Testを実行します。
<?php

namespace App;

use Illuminate\Database\Eloquent\Model;

class Test extends Model
{
    protected $fillable = [
        'title',
        'content',
    ];
}
app/にTest.phpが作成されますので、上記の様に内容を変更します。
Laravelでは、Eloquentというものでデータベースの操作ができます。
データの操作をする前に、モデルに対してfillableかguardedという属性をつけないといけない様です。
今回は、protected $fillableでfillableという属性をつけ、
titleとcontentのカラムを編集していいよ、といった設定をしています。
guardedをつけると、逆にtitleとcontentのカラムが編集できないようになる様です。
php artisan make:seeder TestTableSeeder
Dockerに構築したローカルサーバー上でphp artisan make:seeder TestTableSeederを実行します。
<?php
use App\Test;
use Illuminate\Database\Seeder;

class TestTableSeeder extends Seeder
{
    public function run()
    {
        for ($i = 1; $i <= 3; $i++) {
            Test::create([
                'title' => 'title' . $i,
                'content' => 'content' . $i,
            ]);
        }
    }
}
database\seeds\にTestTableSeeder.phpが作成されますので、上記の様に内容を変更します。
For文を回し、Task::create([で生成したテストデータをデータベース上のtestテーブルに格納します。
 public function run()
 {
  $this->call(TestTableSeeder::class);
 }
database/seeds/DatabaseSeeder.phpを上記の様に変更します。
$this->call(TestTableSeeder::class);で、先ほど作成したTestTableSeeder.phpを呼ぶようにします。
php artisan migrate --seed
migrateコマンドを実行します。
php artisan tinker
Test::all();
php artisan tinkerで、Laravel搭載のデバッグ用の対話シェルであるtinkerを起動します。
tinker内でTest::all();を実行することで、migrationによって作成されたテーブルに挿入されたデータが確認できると思います。
LaravelとVueの連携
<?php

namespace App\Http\Controllers;

use Illuminate\Http\Request;
use Illuminate\Support\Facades\View;
use App\Test;

class TestController extends Controller
{
    public function index()
    {
        $data = [
            'test'=>'Test data from controller',
        ];
        return view('app', $data);
    }

    public function getAllRecords()
    {
        return Test::all();
    }
}
\app\Http\Controllers\TestController.phpにgetAllRecords関数を追加します。
Test::all();で、取得したtestsテーブル内の全レコードを、returnで返します。
<?php
Route::get('/test', 'TestController@getAllRecords');
\routes\api.phpを上記の様に変更して、
http://localhost:8000/api/testで作動する関数をgetAllRecordsに変更します。
<template>
    <div class="container">
        <table>
            <tbody>
            <tr v-for="test in tests">
                <th scope="row">{{ test.id }}</th>
                <td>{{ test.title }}</td>
                <td>{{ test.content }}</td>
            </tr>
            </tbody>
        </table>
    </div>
</template>

<script>
    export default {

        data: function () {
            return {
                tests: []
            }
        },

        methods: {
            getAllRecords() {

                axios.get('/api/test')

                .then((res) => {
                    this.tests= res.data;
                 });
            }
        },

        mounted() {
            this.getAllRecords();
        }

    }
</script>
\resources\js\components\TestComponent.vueを上記の様に変更します。
書き方上、<template></template>から書いていますが、実際に先に動くのは<script></script>です。
data: functionでtestsの配列を定義しています。
このtestsがtemplate内で読み込むときの名前になります。
methods:にgetAllRecords()という関数を定義します。
axios.get('/api/test')で、/api/testのパスに対してGetメソッドでリクエストを投げています。
.then((res) => {~});に``axios.get`が成功した際の処理を書いています。
this.tests= res.data;でres(HTTPレスポンス)の中のdataをtestsに代入しています。
流れでいうと、/api/testのパスに対してGetメソッドでリクエストを投げ、
routes/api.phpのtestに指定されたクラスの関数を実行し、
成功した場合、実行の結果(testsテーブルの全レコード)がresに格納され、
testの中に実行の結果(testsテーブルの全レコード)が代入される、という感じです。
mounted() {~}で、DOMが作成された直後の処理を定義しています。
this.getAllRecords();を記述しているので、このクラスのgetAllRecords()を実行します。
<div id="app">
    <router-view></router-view>
</div>
VueRouterの動作確認用に、
resources/views/app.blade.phpの<div id="app"></div>に<router-view></router-view>を記述してください。
動作確認
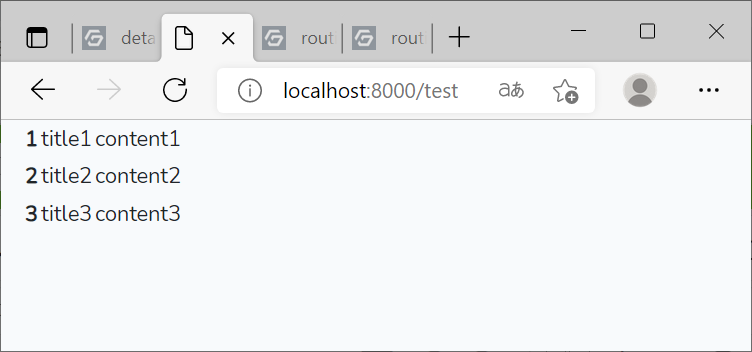
ソースをビルドnpm run devしてから、http://localhost:8000/testにアクセスします。
***http://localhost:8000/api/test*** ではありません。
http://localhost:8000/api/testにアクセスすると、Json形式のレコードデータが見れると思います。
おわりに
複雑だな~、と思って軽くまとめようとおもったら激重な内容になりました。
複雑すぎる。
