まず、本記事はもともと
「101匹AutoLayoutちゃん大行進」
とする予定だったが、筆者の時間と根気の問題により、解説規模を大幅に縮小させてもらった。なんとなくお詫びしておきたい。
さて、iOS/Macアプリ向けのAutoLayout制約については、筆者の知る限り、少なくとも5通りの設定方法が存在する。
- InterfaceBuilder(IB)を利用してStoryBoard上で設定する
- Visual Format Language(VFL)を利用してコードで記述する
- NSLayoutConstraint(item: 〜)を利用してコードで記述する
- NSLayoutAnchorを利用してコードで記述する (17/7/19追加。@rika-tawashiさんに感謝!)
- 他の開発者に丸投げする
AutoLayoutを解説した素晴らしい記事は無数にあるが、
結局のところ、どれを使えば良いの…?
うわっ…私のAutoLayoutスキル、低すぎ…?
そんなお悩みに対する解決の一助となれば幸甚と考えまとめたのが、本記事である。
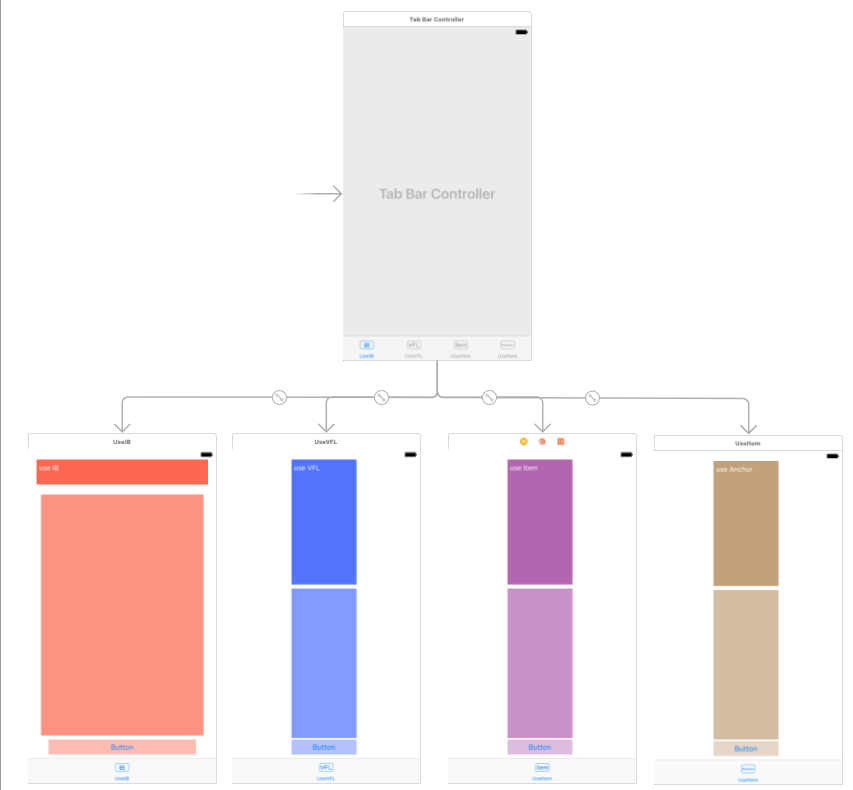
サンプルソースについて
色違いでほぼ同じレイアウトのパーツを、上記四通りの手法でそれぞれ実装した実装例を以下に紹介する。
なお、お題の性質上やむを得ないが、実行結果があまりにも地味で物足りなかった為、単体でGet Wild可能なボタンパーツを衝動的に取り付けてしまった。本題とズレるので特に気にしない事を推奨する。
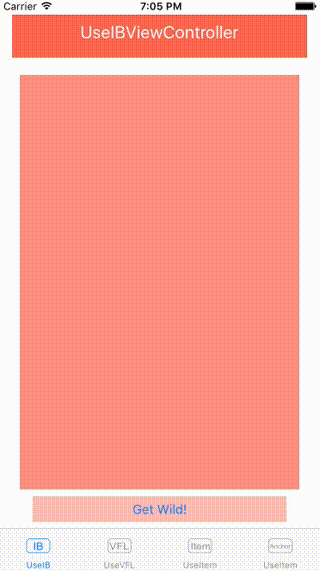
実行結果
記述例
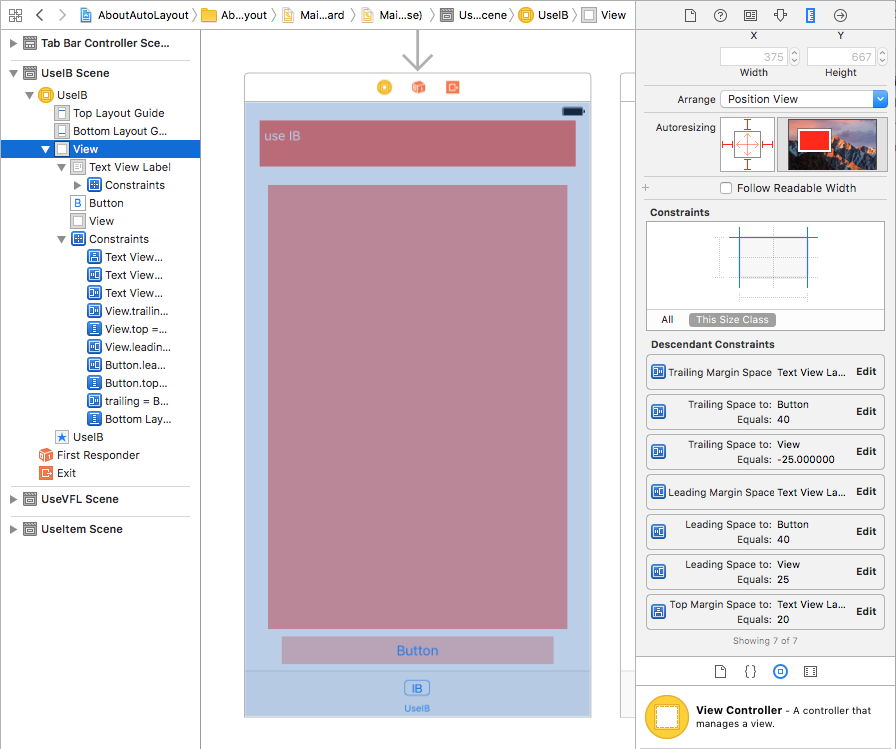
StoryBoard上の全体構成
1. UseIBViewController
UseIBViewController.swift
import UIKit

class UseIBViewController: UIViewController {

    @IBOutlet weak var textViewLabel: UITextView!

    override func viewDidLoad() {

        super.viewDidLoad()

        self.textViewLabel.font = .systemFont(ofSize: 20)
        self.textViewLabel.text = "\(Mirror(reflecting: self).subjectType)"
        self.textViewLabel.textAlignment = NSTextAlignment.center

    }

}
2. UseVFLViewController
UseVFLViewController.swift
import UIKit

class UseVFLViewController: UseIBViewController {

    @IBOutlet weak var middleFrame: UIView?
    @IBOutlet weak var bottomButton: UIButton?

    override func viewDidLoad() {
        super.viewDidLoad()
        self.setUpConstraint()
    }

    func setUpConstraint() {

        textViewLabel.translatesAutoresizingMaskIntoConstraints = false
        middleFrame?.translatesAutoresizingMaskIntoConstraints = false
        bottomButton?.translatesAutoresizingMaskIntoConstraints = false

        let horizontalConstraintsTop = NSLayoutConstraint.constraints(
            withVisualFormat: "H:|-[textViewLabel]-|", // use Standard Space.
            options: NSLayoutFormatOptions(),
            metrics: nil,
            views: ["textViewLabel": textViewLabel])
        NSLayoutConstraint.activate(horizontalConstraintsTop)

        let horizontalConstraintsMiddle = NSLayoutConstraint.constraints(
            withVisualFormat: "H:|-25-[middleFrame]-25-|",
            options: NSLayoutFormatOptions(),
            metrics: nil,
            views: ["middleFrame": middleFrame!,
                    "": self.edgesForExtendedLayout])
        NSLayoutConstraint.activate(horizontalConstraintsMiddle)

        let horizontalConstraintsBottom = NSLayoutConstraint.constraints(
            withVisualFormat: "H:|-40-[bottomFrame]-40-|",
            options: NSLayoutFormatOptions(),
            metrics: nil,
            views: ["bottomFrame": bottomButton!])
        NSLayoutConstraint.activate(horizontalConstraintsBottom)

        let verticalConstraints = NSLayoutConstraint.constraints(
            withVisualFormat: "V:|-20-[textViewLabel(==50)]-20-[middleFrame]-[bottomFrame]-[bottomLayoutGuide]|",
            options: NSLayoutFormatOptions(),
            metrics: nil,
            views: ["textViewLabel": textViewLabel,
                    "middleFrame": middleFrame!,
                    "bottomFrame": bottomButton!,
                    "bottomLayoutGuide": self.bottomLayoutGuide,
                    ])

        NSLayoutConstraint.activate(verticalConstraints)

    }

}
3. UseItemViewController
UseItemViewController.swift
import UIKit

class UseItemViewController: UseIBViewController {

    @IBOutlet weak var middleFrame: UIView?
    @IBOutlet weak var bottomButton: UIButton?

    override func viewDidLoad() {
        super.viewDidLoad()
        self.setUpConstraint()
    }

    func setUpConstraint() {

        textViewLabel.translatesAutoresizingMaskIntoConstraints = false
        middleFrame?.translatesAutoresizingMaskIntoConstraints = false
        bottomButton?.translatesAutoresizingMaskIntoConstraints = false

        if let view = self.view {

            // for TextViewLabel

            let traingSpaceTextViewLabel = NSLayoutConstraint(item: textViewLabel,
                                                         attribute: .trailing,
                                                         relatedBy: .equal,
                                                         toItem: view,
                                                         attribute: .trailingMargin,
                                                         multiplier: 1,
                                                         constant: 0)

            let leadingSpaceTextViewLabel = NSLayoutConstraint(item: textViewLabel,
                                                         attribute: .leading,
                                                         relatedBy: .equal,
                                                         toItem: view,
                                                         attribute: .leadingMargin,
                                                         multiplier: 1,
                                                         constant: 0)

            let topSpaceTextViewLabel = NSLayoutConstraint(item: textViewLabel,
                                                         attribute: .top,
                                                         relatedBy: .equal,
                                                         toItem: view,
                                                         attribute: .topMargin,
                                                         multiplier: 1,
                                                         constant: 20)

            let heightTextViewLabel = NSLayoutConstraint(item: textViewLabel,
                                                         attribute: .height,
                                                         relatedBy: .equal,
                                                         toItem: nil,
                                                         attribute: .height,
                                                         multiplier: 1,
                                                         constant: 50)

            // for middleFrame

            let trailingSpaceMiddleFrame = NSLayoutConstraint(item: middleFrame!,
                                                         attribute: .trailing,
                                                         relatedBy: .equal,
                                                         toItem: view,
                                                         attribute: .trailing,
                                                         multiplier: 1,
                                                         constant: -25)

            let leadingSpaceMiddleFrame = NSLayoutConstraint(item: middleFrame!,
                                                         attribute: .leading,
                                                         relatedBy: .equal,
                                                         toItem: view,
                                                         attribute: .leading,
                                                         multiplier: 1,
                                                         constant: 25)

            let topSpaceMiddleFrame = NSLayoutConstraint(item: middleFrame!,
                                                         attribute: .top,
                                                         relatedBy: .equal,
                                                         toItem: textViewLabel,
                                                         attribute: .bottom,
                                                         multiplier: 1,
                                                         constant: 20)

            // for bottomButton

            let trailingSpaceBottomButton = NSLayoutConstraint(item: bottomButton!,
                                                         attribute: .trailing,
                                                         relatedBy: .equal,
                                                         toItem: view,
                                                         attribute: .trailing,
                                                         multiplier: 1,
                                                         constant: -40)


            let leadingSpaceBottomButton = NSLayoutConstraint(item: bottomButton!,
                                                         attribute: .leading,
                                                         relatedBy: .equal,
                                                         toItem: view,
                                                         attribute: .leading,
                                                         multiplier: 1,
                                                         constant: 40)

            let topSpaceBottomButton = NSLayoutConstraint(item: bottomButton!,
                                                         attribute: .top,
                                                         relatedBy: .equal,
                                                         toItem: middleFrame!,
                                                         attribute: .bottom,
                                                         multiplier: 1,
                                                         constant: 8)

            let bottomSpaceBottomButton = NSLayoutConstraint(item: bottomButton!,
                                                         attribute: .bottom,
                                                         relatedBy: .equal,
                                                         toItem: bottomLayoutGuide,
                                                         attribute: .top,
                                                         multiplier: 1,
                                                         constant: -8)

            NSLayoutConstraint.activate([

                traingSpaceTextViewLabel,
                leadingSpaceTextViewLabel,
                topSpaceTextViewLabel,
                heightTextViewLabel,

                trailingSpaceMiddleFrame,
                leadingSpaceMiddleFrame,
                topSpaceMiddleFrame,

                trailingSpaceBottomButton,
                leadingSpaceBottomButton,
                topSpaceBottomButton,
                bottomSpaceBottomButton,

                ])

        }

    }

}
4. UseAnchorViewController
UseAnchorViewController.swift
import UIKit

class UseAnchorViewController: UseIBViewController {

    @IBOutlet weak var middleFrame: UIView?
    @IBOutlet weak var bottomButton: UIButton?

    override func viewDidLoad() {
        super.viewDidLoad()
        self.setUpConstraint()
    }

    func setUpConstraint() {

        textViewLabel.translatesAutoresizingMaskIntoConstraints = false
        middleFrame?.translatesAutoresizingMaskIntoConstraints = false
        bottomButton?.translatesAutoresizingMaskIntoConstraints = false

        if let view = self.view {

            // for TextViewLabel
            textViewLabel.trailingAnchor.constraint(equalTo: view.layoutMarginsGuide.trailingAnchor,
                                              constant: 0).isActive = true
            textViewLabel.leadingAnchor.constraint(equalTo: view.layoutMarginsGuide.leadingAnchor,
                                              constant: 0).isActive = true
            textViewLabel.topAnchor.constraint(equalTo: view.topAnchor,
                                              constant: 20).isActive = true
            textViewLabel.heightAnchor.constraint(equalToConstant: 50).isActive = true

            // for middleFrame
            middleFrame?.trailingAnchor.constraint(equalTo: view.trailingAnchor,
                                              constant: -25).isActive = true
            middleFrame?.leadingAnchor.constraint(equalTo: view.leadingAnchor,
                                              constant: 25).isActive = true
            middleFrame?.topAnchor.constraint(equalTo: textViewLabel.bottomAnchor,
                                              constant: 20).isActive = true

            // for bottomButton
            bottomButton?.trailingAnchor.constraint(equalTo: view.trailingAnchor,
                                              constant: -40).isActive = true
            bottomButton?.leadingAnchor.constraint(equalTo: view.leadingAnchor,
                                              constant: 40).isActive = true
            bottomButton?.topAnchor.constraint(equalTo: middleFrame!.bottomAnchor,
                                              constant: 8).isActive = true
            bottomButton?.bottomAnchor.constraint(equalTo: bottomLayoutGuide.topAnchor,
                                              constant: -8).isActive = true
        }

    }

}
5. GetWildButton
GetWildButton.swift
import UIKit

class GetWildButton: UIButton {


    init() {
        super.init(frame: .zero)
    }

    required init?(coder aDecoder: NSCoder) {

        super.init(coder: aDecoder)

        self.setTitle("Get Wild!", for: .normal)
        self.titleLabel?.textAlignment = .center
        self.addTarget(self, action: #selector(self.getWild), for: .touchUpInside)

    }

    func getWild() {

        let alert = UIAlertController(title: nil, message: "Get wild and tough!", preferredStyle: .alert)
        alert.addAction(UIAlertAction(title: "OK", style: .default, handler: nil))
        self.window?.rootViewController?.present(alert, animated: true, completion: nil)

    }

}
まとめ
結局は「ケースバイケース」「適材適所」となると思うが、個人的には短くまとめる事ができ、さりげなくStandard ValueもサポートしているVFLの利用を推したい。
なお、それぞれの細かい解説については大胆に割愛するので、各自、コードと対話して欲しい(一旦丸投げするスタイル)。
バージョン情報
Swift:3.1
Xcode:8.3.3