エクセルで在庫管理やめたい!
親の会社が大阪、東京、兵庫、通販の4つの場所で商売展開することになった。
在庫管理はエクセルでやってドロップボックスで同期させてたけど毎回手動でファイルの複製をしたり、ファイルの破損とかでだるいのでリアルタイム同期する必要が発生。お金はないので業者に頼むなら勉強も兼ねてまず俺がやってみたら良くね?タダだから失敗してもいいし何より暇なので。
ということでブラウザで在庫管理したい!
始めた時はおもちゃ算数プログラミングしかしたことないのでインターネット何も分からないンゴ。状態です。
ググっても「在庫管理システムはムズイ」とかばっかで、なんか、「ああ、業者が高い金巻き上げてるから企業秘密的な?誰も情報出さんのかな」と思った。知らんけど。そんな気がする。
これが使えたらうれしい人はどんな人?
これを使えたらうれしいのは4人以上で在庫管理する人全員です。エクセル在庫管理は3人以下単拠点でメリットがある(証明略)のでそれ以外の人はエクセルをやめましょう。
使う言語、ライブラリと理由
使うのはpython3,flask,sqlite3,jinja2,HTMLです。
理由は
1:単純に神たたき台を見つけた。
2:pythonならopencvとかの画像認識で商品の読み込みとflaskのwebアプリを繋げて高額なPOSシステムの真似事もできる!
3:色んなデータを貯めて分析したい!となってもpythonなら親和性が抜群!
何も知らない人が最初にやるべきこと
何も知らない人はまず初めに僕の敬愛する推し神vtuberであるさぷーさんのこの神動画を見てください。私のコードは全部これをたたき台にして勝手に改造したものです。僕が基礎を解説するよりこの元動画を見たほうが500000倍すべてを理解できます。500000回見て写経実験して全て理解しよう!
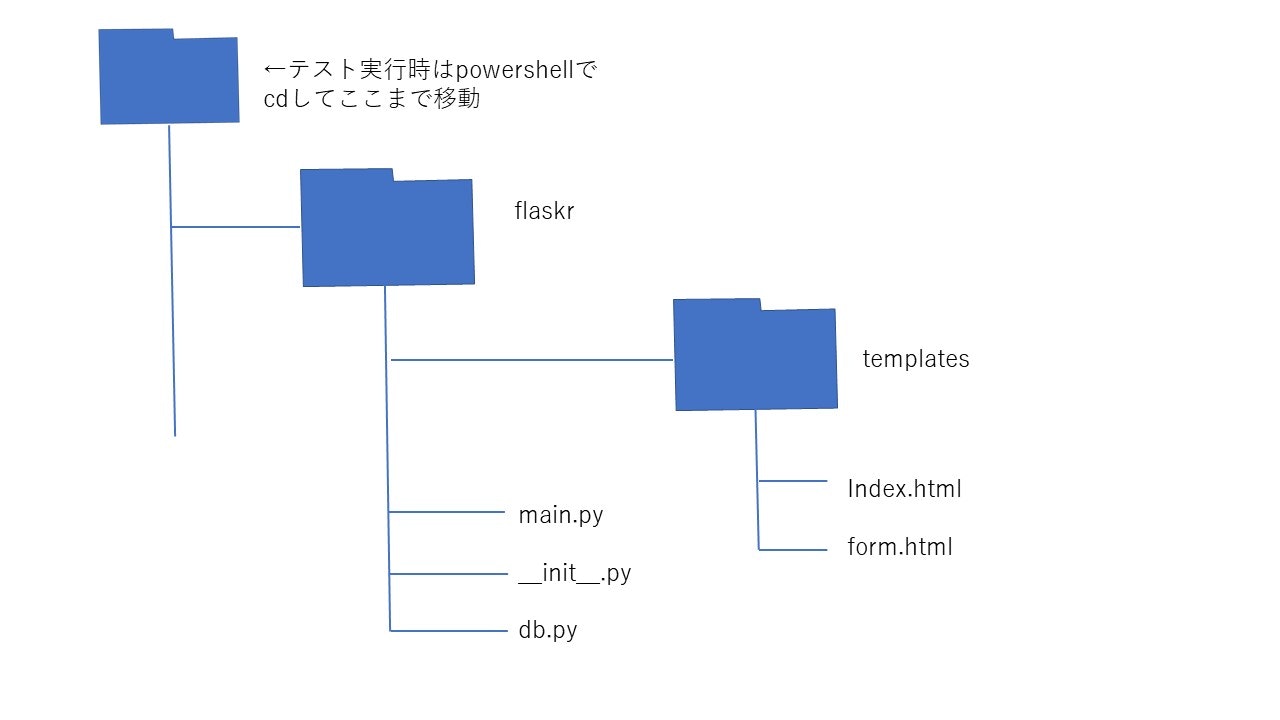
フォルダ構成
名前はflaskrの所だけxxxに変えてもいいけど、その時はコードの中身のflaskrも全部xxxに変えないと動きませんので注意。
僕は気づかず20分溶かしましたので注意。
テスト環境実行
アナコンダpowershellでやる時は、フォルダ構成の画像の通りflaskrフォルダの1個上までcdして
$env:FLASK_APP="flaskr"
$env:FLASK_ENV="development"
flask run
を順に打ち込むと実行できる。ほか環境はサプーさんの動画を見てね。
コード
以下のコードを同じ名前、拡張子にしてフォルダ構成の通りに保存すると動かせるはず。
from flaskr import app
from flask import render_template, request,redirect,url_for
import sqlite3

DATABASE="database.db"


@app.route('/')
def index():#トップ画面にアクセスした時に表示される画面
    con=sqlite3.connect(DATABASE)
    db_goods=con.execute("SELECT*FROM goods").fetchall()
    con.close()
    goods=[]
    for row in db_goods:
        goods.append({
            "maker":row[0],
            "goods_number":row[1],
            "ID":row[2],
            "Description":row[3],
            "price":row[4],
            "arrival_day":row[5],
            "stock_quantity":row[6]
        })
    return render_template(
        'index.html',
        goods=goods
    )
@app.route('/form')
def form():
    return render_template(
        'form.html'
    )

@app.route('/register',methods=['post'])
def register():
    maker = request.form["maker"]   #request.formでテキストボックスに入力できる
    goods_number = request.form["goods_number"]
    ID = request.form["ID"]
    Description = request.form["Description"]
    price = request.form["price"]
    arrival_day = request.form["arrival_day"]
    stock_quantity = request.form["stock_quantity"]

    con=sqlite3.connect(DATABASE)
    #conをこのように作ると,下のようにexecuteメソッドでsql文を実行できる.
    con.execute("INSERT INTO goods VALUES(?,?,?,?,?,?,?) ",
                [maker,goods_number,ID,Description,price,arrival_day,stock_quantity])#?に配列の中身が割り当てられる
    con.commit()
    con.close()
    return redirect(url_for("index"))

@app.route('/shusei',methods=['post'])
def shusei():#データの更新
    #更新するマスを決定しないとupdate使えない
    #行ごとにまとめて更新する。更新ページには既に登録されたデータをテキストボックスに格納してページを表示して修正したい箇所を自分で書き換えるようにする
    #更新するマスを格納
    i = int(request.form["i_num"])
    maker = request.form["maker"]   #request.formでテキストボックスに入力できる
    goods_number = request.form["goods_number"]
    ID = request.form["ID"]
    Description = request.form["Description"]
    price = request.form["price"]
    arrival_day = request.form["arrival_day"]
    stock_quantity = request.form["stock_quantity"]
    #まずdatabaseにアクセス
    con=sqlite3.connect(DATABASE)
    #excuteでsql文を実行
    con.execute("UPDATE goods SET (maker,goods_number,ID,Description,price,arrival_day,stock_quantity)=(?,?,?,?,?,?,?) where rowid=?",
                [maker,goods_number,ID,Description,price,arrival_day,stock_quantity,i])
    #?に配列の中身が割り当てられる
    con.commit()
    con.close()
    return redirect(url_for("index"))
import sqlite3

DATABASE="database.db"

def create_goods_table():
    con=sqlite3.connect(DATABASE)
    con.execute("CREATE TABLE IF NOT EXISTS goods(maker,goods_number,ID,Description,price,arrival_day,stock_quantity)")
    con.close
from flask import Flask
app = Flask(__name__)#Flaskアプリケーションオブジェクト
import flaskr.main  #flaskrはmain.pyの入ってるフォルダの名前

from flaskr import db
db.create_goods_table()
<!DOCTYPE html>
<html lang="ja">
<head>
    <meta charset="UTF-8">
    <meta name="viewport" content="width=device-width, initial-scale=1.0">
    <title>在庫管理システム</title>
    <link rel="stylesheet" href="{{ url_for('static',filename='style.css') }}">
</head>
<body>
    <h1>在庫一覧</h1>
        <h2>パーツ在庫</h2>
            {% if goods==[] %}
                <p>在庫はありません</p>
            {% else %}
                <table border="1">
                    <tr>
                        <th>行数</th>
                        <th>メーカー</th>
                        <th>品番</th>
                        <th>ID</th>
                        <th>説明</th>
                        <th>金額(円で数字だけ)</th>
                        <th>入荷日</th>
                        <th>在庫数</th>
                        <th>編集</th>
                    </tr>

                    {% for i in range(goods | length) %}
                    <form method="post" action="{{ url_for('shusei') }}">
                        <!--input type="submit"を動かすための呪文,formの部分はメソッド名なのでファイルの名前とは無関係,
                                    url_for('xxx')のxxxはmain.pyの@app.route('/xxx')のxxxだけでなくデコレートされた関数の名前とも一致させないとダメ -->

                        <tr>
                            <td> <input type="text" name="i_num" value={{ i+1 }}> </td>
                            <td> <input type="text" name="maker" value={{ goods[i].maker }}></td>
                            <td> <input type="text" name="goods_number" value={{ goods[i].goods_number }}></td>
                            <!--input文の最後のvalueにg.goods_numを代入することでformの初期値をすでに登録されているデータを代入でき,変更したい
                                場所を直接書き換える方法を確立できる。なおvalue={{ g.goods_number }}という書き方はvscodeの色がおかしいのでもし
                                かすると正しい文法ではない可能性もある。そしてこの方法は最後登録を押さなければならないのでコレクターのページでや
                                るべきかもしれない-->
                            <td> <input type="text" name="ID" value={{ goods[i].ID }}></td>
                            <td> <input type="text" name="Description" value={{ goods[i].Description }}> </td>
                            <td> <input type="text" name="price" value={{ goods[i].price }}> </td>
                            <td> <input type="text" name="arrival_day" value={{ goods[i].arrival_day }}> </td>
                            <td> <input type="text" name="stock_quantity" value={{ goods[i].stock_quantity }}> </td>

                            <td><input type="submit" value="更新ボタン"></td>
                            <!--更新ボタンを押すと,行番号をmain.pyに送信するようにする.-->

                        </tr>
                    </form>
                    {% endfor %}
                </table>
            {% endif %}
    <a href="{{ url_for('form') }}">追加</a>
</body>
</html>
<!DOCTYPE html>
<html lang="ja">
<head>
    <meta charset="UTF-8">
    <meta name="viewport" content="width=device-width, initial-scale=1.0">
    <title>在庫管理システム</title>
    <link rel="stylesheet" href="{{ url_for('static',filename='style.css') }}">
</head>
    <body>
        <h1>在庫管理システム</h1>
        <form method="post" action="{{ url_for('register') }}">
            <table border="1">
               <tr>
                    <!--trは「table row」の略で表の行部分(横方向)を指定するタグ -->
                    <!--thは「table head」の略-->
                    <th>メーカー</th>
                    <th>品番</th>
                    <th>ID</th>
                    <th>Description</th>
                    <th>金額</th>
                    <th>入荷日</th>
                    <th>在庫数</th>
                </tr>
                <tr>
                    <!--tdは「table data」の略で、テーブルセルの内容を指定します。-->
                    <td>
                        <select name="maker">
                        <!--selectでプルダウンメニューを作る-->
                            <option value="null" disabled selected>選択して下さい</option>
                                <option value="fl">fl</option>
                                <option value="rc">rc</option>
                                <option value="an">an</option>
                                <option value="ma">ma</option>
                        </select>
                    </td>
                    <td><input type="text" name="goods_number" value="初期値"></td>
                    <td><input type="text" name="ID"></td>
                    <td><input type="text" name="Description"></td>
                    <td><input type="text" name="price"></td>
                    <td><input type="text" name="arrival_day"></td>
                    <td><input type="text" name="stock_quantity"></td>
                </tr>

            </table>
            <br>
            <input type="submit" value="登録">
            <!-- submit型はボタンとして描画され、valueはボタンに表示されるテキストで、
            クリックするとサーバーへフォームを送る -->
        </form>
    </body>
</html>
実行結果

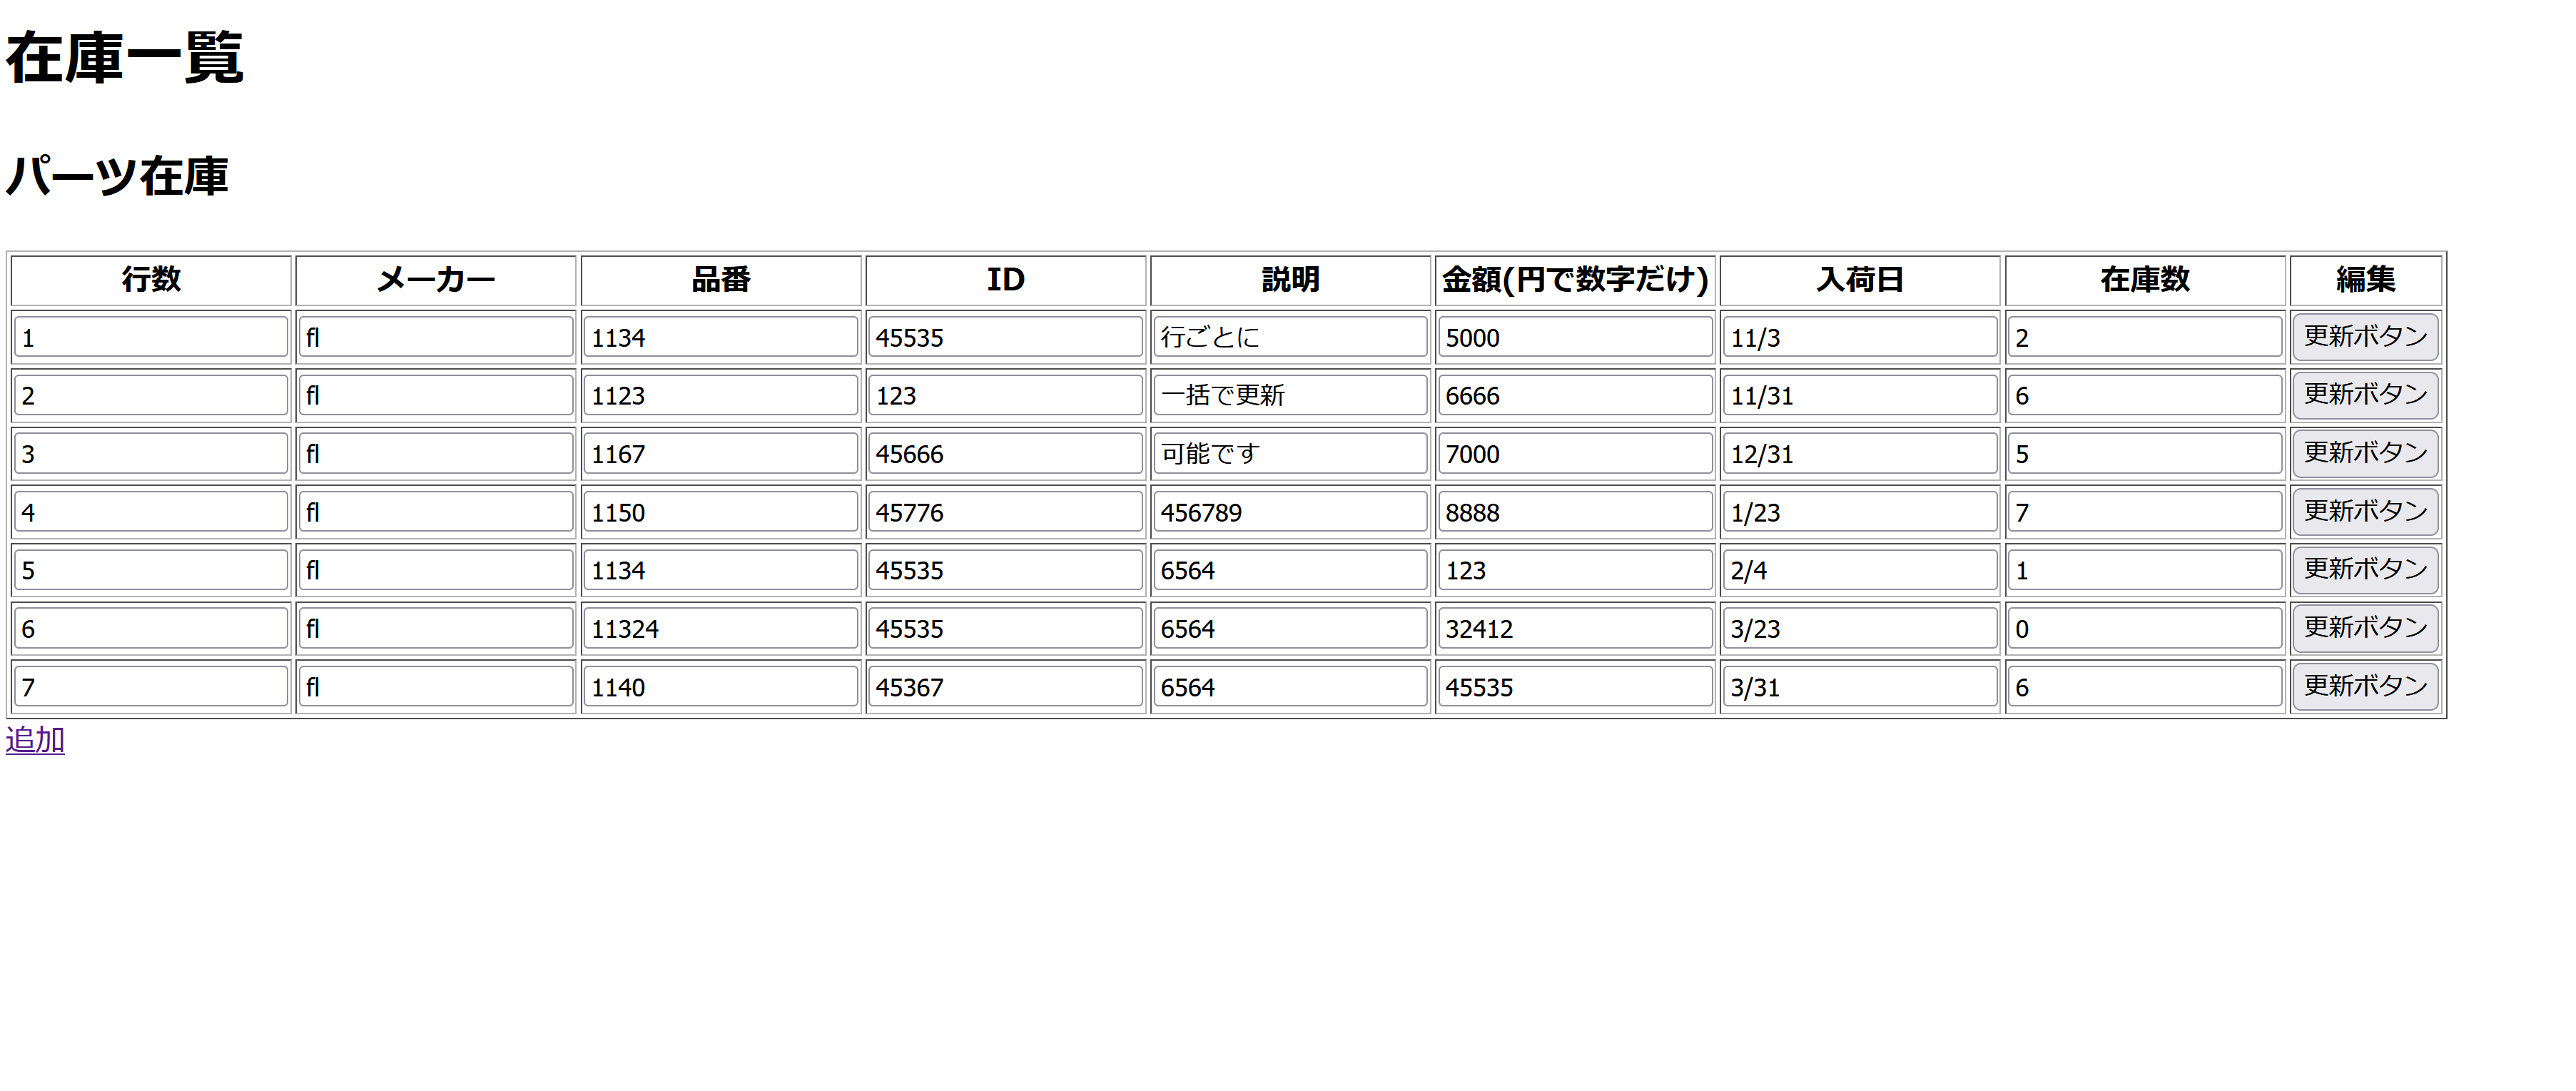
サプーさんのコードにデータ更新機能を付けました。在庫一覧の表示ページから直接変更したいマスを書き換えて更新ボタンを押せばそのままデータベースに反映されて表示ページも書き換わります。
行ごとであれば一括で直観的に変更できます。
例えば行数2の金額、入荷日、在庫数を書き換えて行数2の更新ボタンを押せば行数2が書き換わります。
下の追加ボタンを押せばサプーさんの元コードと同じく新しいデータを追加できます。しかしこのボタンは下ではなく横とかに置いとくべきかもしれない。
課題
1:3行目のマスを書き換えても2行目の更新ボタンを押すと3行目で書き換えは取り消されます。必ず行ごとに更新を確定させなければなりません。
全体で一括更新をする方法よくわからない。HTMLのfor文の内側でfor文1週ごとにpost methodを実行してるので行ごとに更新ボタンを実装することが可能になってるが、逆に一括更新との両立は素人目には不可能に見える。
しかし、自分で使っても行ごとにしか更新できないのは少しイライラしたので一括更新も考えた方が良いと思った。
2:行数の数字を書き換えるとバグります。htmlの中で回したfor文のインデックスをpythonに値渡しする方法がformに無理やりぶち込むしか調べても分からなかったので今の所どうすればいいか分からない。
次回
データの削除とか検索、絞り込みとか種々の計算機能とかエクセルでできることを追加していきたい
