Storyboardを使えば、画面遷移にSegueを利用することができます。
NavigationControllerを使った遷移で利用するsegueは組み込みのpushを使いますが、
Custom Segueを定義して画面遷移のアニメーションを独自のものに変更する場合、いくつか考えなければならないことがあります。
- 遷移した画面から戻るSegue(unwind segue)も定義するか、Segueに頼らず戻るボタンを押したアクションメソッドに自前で戻るアニメーションを記述するか
- NavigationBarの戻るボタンを別途用意する
- UINavigationControllerで遷移している場合、いくつかのunwind segueのメソッドはコンテナViewControllerとなっているUINavigationControllerのものが呼ばれる
ここでは、unwind segueを用意して画面遷移してみます。
Custom Segue作成
Segue/Unwind segue両方対応したCustom Segueを作成します。Apple sample codeを参考にしました。
# import <UIKit/UIKit.h>

@interface NavigateFlipSegue : UIStoryboardSegue

@property (nonatomic) BOOL unwind;  // unwind segueのインスタンスを作成時に設定するflag

@end
# import "NavigateFlipSegue.h"

@implementation NavigateFlipSegue

- (void)perform
{
    UIViewController *sourceViewController = self.sourceViewController;
    UIViewController *destinationViewController = self.destinationViewController;
    UINavigationController *navigationController = sourceViewController.navigationController;

    if (self.unwind) {  // Unwind segueの場合は、右からflipするアニメーション
        [UIView transitionWithView:navigationController.view duration:0.3f options:UIViewAnimationOptionTransitionFlipFromRight animations:^{
            [navigationController popToRootViewControllerAnimated:NO];
        } completion:nil];
    } else {    // segueの場合は、左からflipするアニメーション
        [UIView transitionWithView:navigationController.view duration:0.3f options:UIViewAnimationOptionTransitionFlipFromLeft animations:^{
            [navigationController pushViewController:destinationViewController animated:NO];
        } completion:nil];
    }
}
Custom NavigationControllerの作成
NavigationControllerベースの画面遷移の場合、unwind segue用Custom segueを返すメソッドはNavigationControllerのものが呼ばれるので、処理をchildViewControllerに委譲するようにします。
実装的には、委譲用のProtocolを定義して、戻り先のChildViewControllerに適用します。
unwind segue用メソッドが呼ばれたら、委譲用Protocolが適用されているChildViewControllerのメソッドを呼び出しsegueが生成されてかえってきたら、そのsegueを返すようにします。
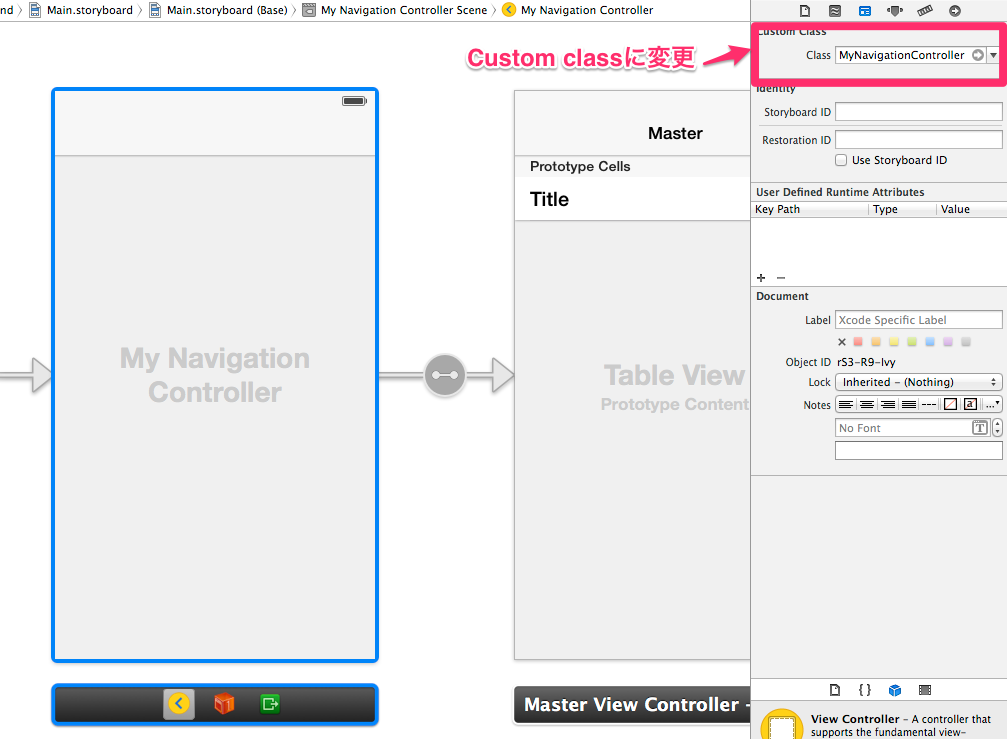
そして、Storyboardに配置したUINavigationControllerは、このCustom NavigationControllerを使うように変更します。
# import <UIKit/UIKit.h>

// ChildViewControllerで実装
@protocol MyNavigationControllerDelegate <NSObject>

/*!
    @method segueInNavigationControllerForUnwindingToViewController:fromViewController:identifier:
    @abstract NavigationControllerによる遷移でunwindする場合、custom segueを使いたい場合に実装する
    @discussion 戻る側のViewControllerでunwind segueの実装してNavigationControllerでは何もしない(委譲)
    @return Custom Segueを生成して返すように実装
 */
- (UIStoryboardSegue *)segueInNavigationControllerForUnwindingToViewController:(UIViewController *)toViewController fromViewController:(UIViewController *)fromViewController identifier:(NSString *)identifier;

@end

@interface MyNavigationController : UINavigationController

@end
# import "MyNavigationController.h"

@interface MyNavigationController ()

@end

@implementation MyNavigationController

- (UIStoryboardSegue *)segueForUnwindingToViewController:(UIViewController *)toViewController fromViewController:(UIViewController *)fromViewController identifier:(NSString *)identifier
{
    // MARK: 実際の戻り先ChildViewControllerに処理を任せる
    if ([toViewController conformsToProtocol:@protocol(MyNavigationControllerDelegate)]) {
        id <MyNavigationControllerDelegate> destinationViewController = (id <MyNavigationControllerDelegate>)toViewController;
        UIStoryboardSegue *segue = [destinationViewController segueInNavigationControllerForUnwindingToViewController:toViewController fromViewController:fromViewController identifier:identifier];
        if (segue) {
            return segue;
        }
    }

    return [super segueForUnwindingToViewController:toViewController fromViewController:fromViewController identifier:identifier];
}

@end
Unwind segueの定義と委譲用プロトコルメソッドの実装
戻り先のChildViewControllerで、unwind segueの定義とプロトコルメソッドの実装を行います。
# import "MasterViewController.h"

# import "DetailViewController.h"
# import "MyNavigationController.h"
# import "NavigateFlipSegue.h"

@interface MasterViewController () <MyNavigationControllerDelegate> // 委譲用プロトコルの適用
- (void)configureCell:(UITableViewCell *)cell atIndexPath:(NSIndexPath *)indexPath;
@end

@implementation MasterViewController

- (void)prepareForSegue:(UIStoryboardSegue *)segue sender:(id)sender
{
    if ([[segue identifier] isEqualToString:@"showDetail"]) {
        NSIndexPath *indexPath = [self.tableView indexPathForSelectedRow];
        NSManagedObject *object = [[self fetchedResultsController] objectAtIndexPath:indexPath];
        [[segue destinationViewController] setDetailItem:object];
    }
}

// unwind segueの定義
- (IBAction)exitToMasterView:(UIStoryboardSegue *)segue
{
    // XXX: No-op. unwind segue.
}

# pragma mark - MyNavigationControllerDelegate

// 委譲用プロトコルメソッドの実装
- (UIStoryboardSegue *)segueInNavigationControllerForUnwindingToViewController:(UIViewController *)toViewController fromViewController:(UIViewController *)fromViewController identifier:(NSString *)identifier
{
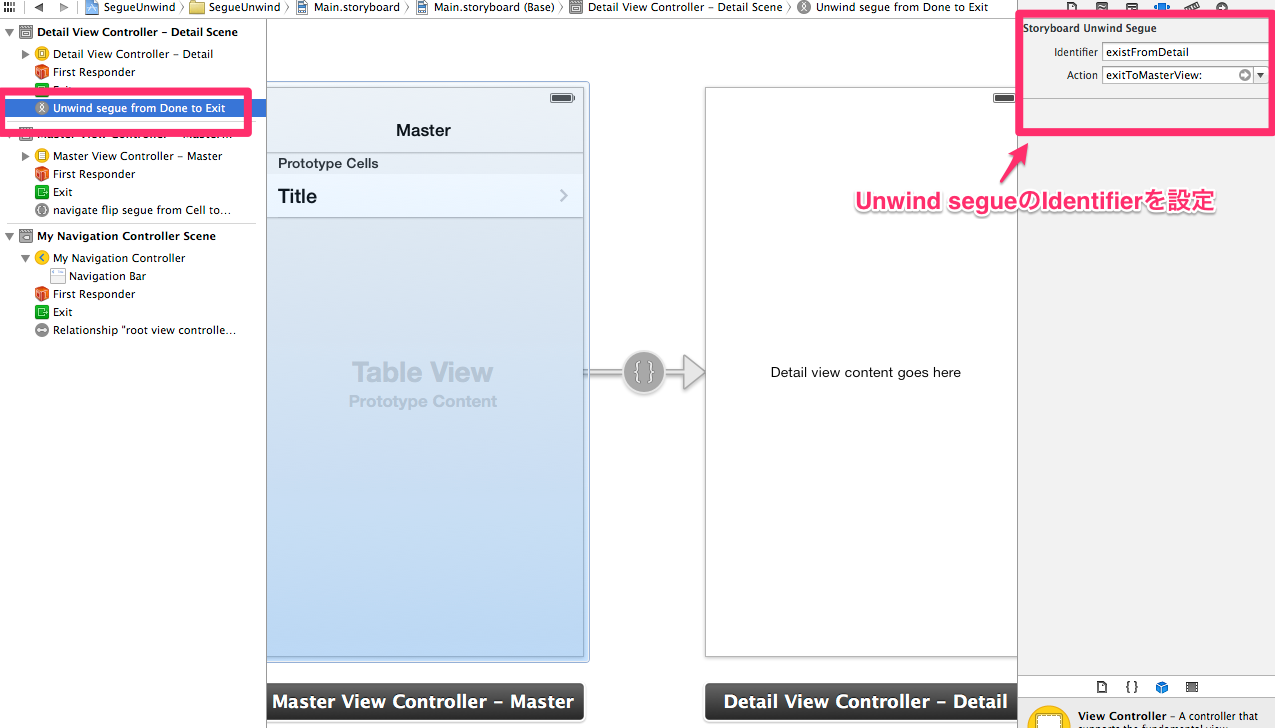
    if ([identifier isEqualToString:@"existFromDetail"]) {  // custom segueの生成
        NavigateFlipSegue *segue = [[NavigateFlipSegue alloc] initWithIdentifier:identifier source:fromViewController destination:toViewController];
        segue.unwind = YES; // unwind segueなのでセット
        return segue;
    }
    return nil;
}
Storyboardでsegueの設定
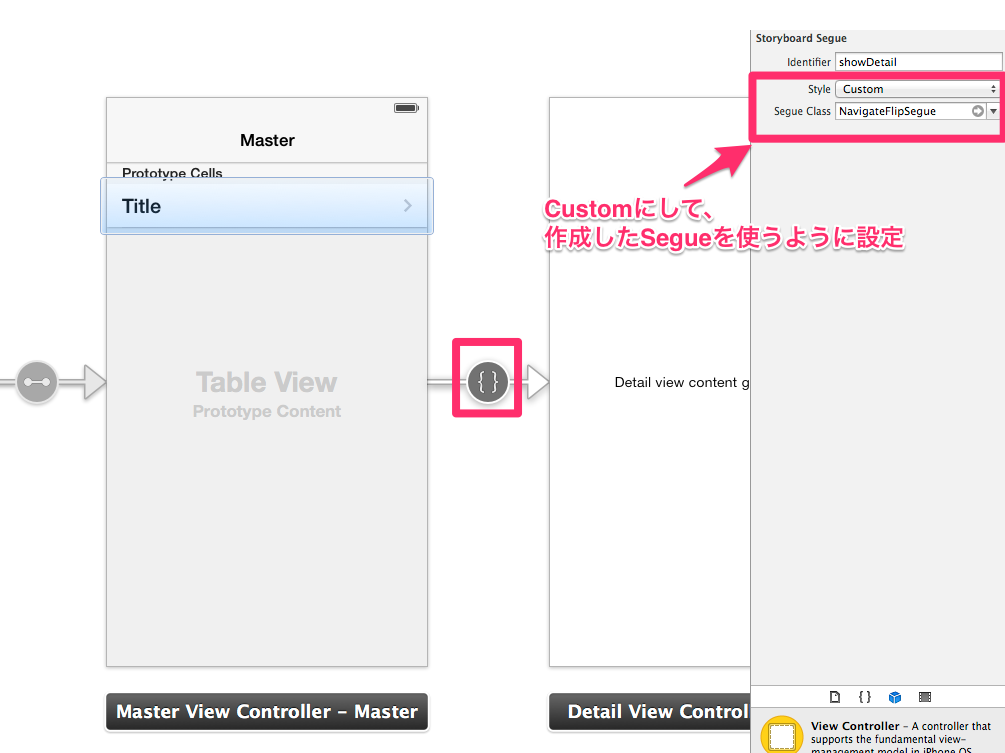
まず、SegueのStyleはcustomにして、作成したCustom segueクラスを使うように設定します。
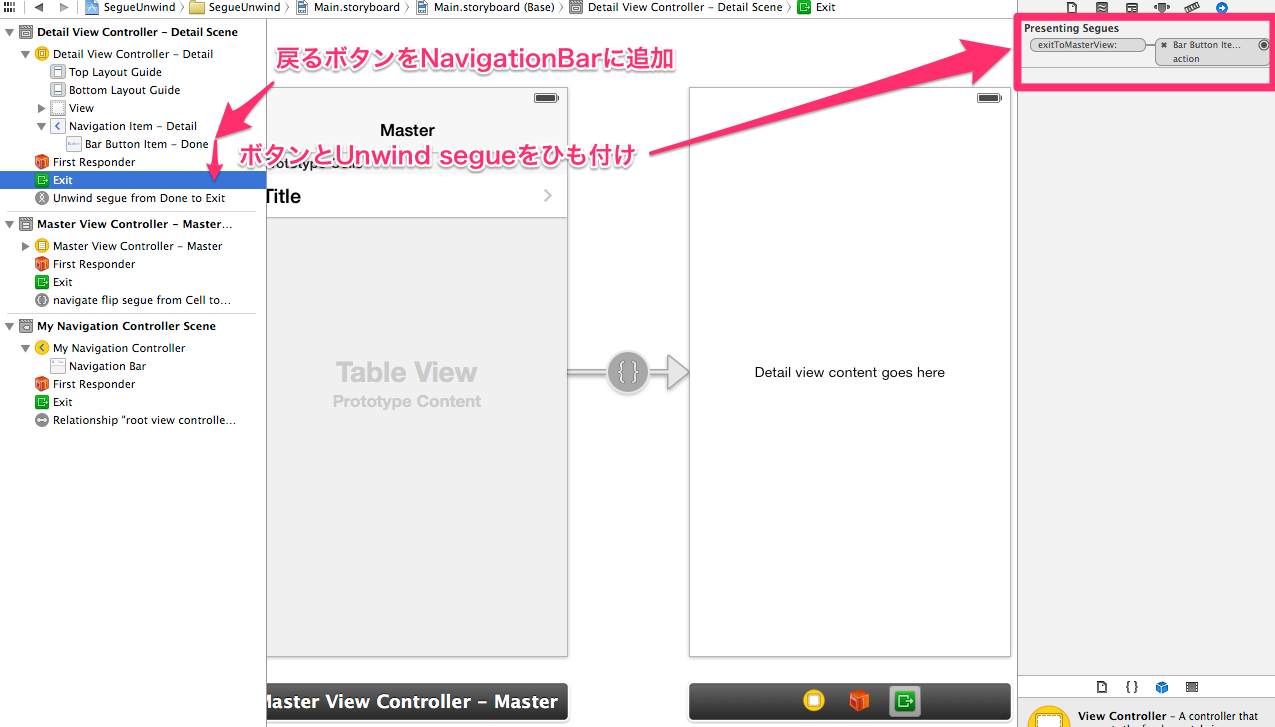
あとは、戻るボタンを追加してそれにunwind segueをひも付けます。


