GUIテストの自動化と結果の可視化
本稿では、GUIテストが実行し、その結果をキレイに可視化するような環境の構築法を紹介する。あくまで環境構築の手順のみ紹介し、各ライブラリの詳細な利用方法についての詳しい説明は省く。
Allureによるテスト結果の可視化はこんな感じ。
対象者
- テスト自動化をしたことがない人
- テスト結果をグラフなどで可視化したい人
- Javaの知識がある人
セットアップ環境
Windows10
必要なソフトウェアのインストールと設定
たくさんある。
JDK8
Javaプログラムの開発に必要。Oracle製を使う。インストーラーでインストール。バージョンは執筆時の最新版を使用している。
以下にインストール。
C:\Program Files\Java\jdk1.8.0_201
以下にPathを通す。
C:\Program Files\Java\jdk1.8.0_201\bin
環境変数JAVA_HOMEを以下のように設定する。
C:\Program Files\Java\jdk1.8.0_201
ここまで出来たら以下のコマンドで確認。
C:\>java -version
java version "1.8.0_201"
Java(TM) SE Runtime Environment (build 1.8.0_201-b09)
Java HotSpot(TM) 64-Bit Server VM (build 25.201-b09, mixed mode)
Maven
Java用のビルドツール。パッケージのダウンロードや依存性解決を自動で行ってくれる。以下のサイトからZIPをダウンロード。今回はバージョン3.6.0を使う。
ダウンロード後、解凍したものを以下に配置。
C:\Program Files\apache-maven-3.6.0
以下にPathを通す。
C:\Program Files\apache-maven-3.6.0\bin
ここまで出来たら以下のコマンドで確認。
c:\>mvn --version
c:\
Apache Maven 3.6.0 (97c98ec64a1fdfee7767ce5ffb20918da4f719f3; 2018-10-25T03:41:47+09:00)
Maven home: C:\Program Files\apache-maven-3.6.0\bin\..
Java version: 1.8.0_201, vendor: Oracle Corporation, runtime: C:\Program Files\Java\jdk1.8.0_201\jre
Default locale: ja_JP, platform encoding: MS932
OS name: "windows 10", version: "10.0", arch: "amd64", family: "windows"
次にローカルリポジトリを設定する。ここにMavenがダウンロードしたパッケージが配置される。
まず、ローカルリポジトリ用のフォルダを作成する。
c:\>mkdir "c:\Program Files\apache-maven-3.6.0\local-repository"
次に設定ファイルC:\Program Files\apache-maven-3.6.0\conf\settings.xmlに以下を追記する。
<localRepository>C:\Program Files\apache-maven-3.6.0\local-repository</localRepository>
なお、デフォルトのローカルリポジトリは${user.home}\.m2\repositoryである。デフォルトのままでもいい。
プロキシ下で環境構築する場合はこのsettings.xmlにproxyの設定を必ず行う。
<proxies>
    <proxy>
      <id>http_proxy</id>
      <active>true</active>
      <protocol>http</protocol>
      <username>proxyuser</username>
      <password>proxypasswd</password>
      <host>proxy.example.com</host>
      <port>8080</port>
    </proxy>
    <proxy>
      <id>https_proxy</id>
      <active>true</active>
      <protocol>https</protocol>
      <username>proxyuser</username>
      <password>proxypasswd</password>
      <host>proxy.example.com</host>
      <port>8080</port>
    </proxy>
  </proxies>
Allure
テスト結果をグラフなどで可視化するツール。以下のサイトからZIPをダウンロード("Links"->"Download")。今回はバージョン2.10.0を使う。
ダウンロード後、解凍したものを以下に配置。
C:\Program Files\allure-2.10.0
以下にPathを通す。
C:\Program Files\allure-2.10.0\bin
以下のコマンドで確認。
c:\>allure --version
2.10.0
IntelliJ IDEA
主にJavaの開発で使用するIDE。Community版を使う。以下のサイトからインストーラーをダウンロードして実行。
ひとまず、以上でダウンロードは終わり。
IntelliJでCucumberテストコード作成
Cucumberはテストを自然言語風に記述できるようにするフレームワークである。featureファイルにテストの流れを記述し、ステップ定義に実際の処理を書く。
まず、Cucumberを使って実際にテストを書いてみる。次に、Selenideを使ったGUIテストを書いてみる。
プロジェクトの作成
左ペインで"Maven"を選択し、Nextをクリック。"Create from archetype"にはチェックを入れない。

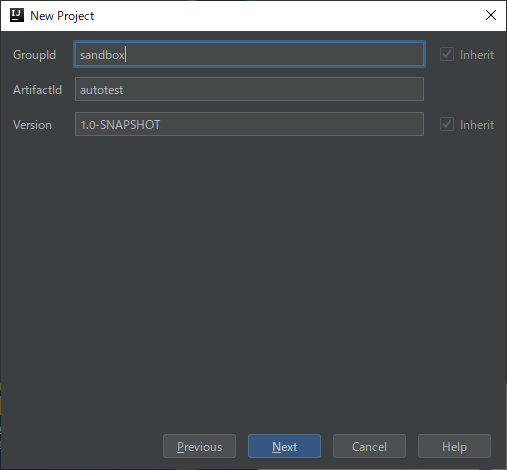
以下のように設定し、Nextをクリック。ここの入力欄は何でもよい。
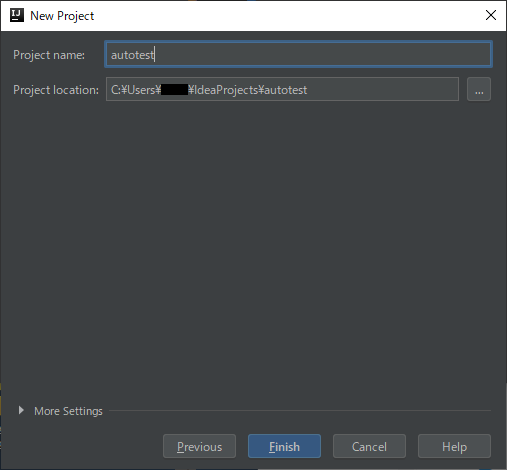
そのまま"Finish"をクリック。プロジェクトが作成される。
文字コードの設定
"File"->"Settings"->"Editor"->"File Encodings"
- Global Encoding: UTF-8
- Project Encoding: ShiftJIS
Project EncodingはShiftJISにしないと、コンソールへの日本語出力が文字化けする。

フォントの設定
"File"->"Settings"->"Editor"->"Font"
日本語対応フォントを選ぶ。ここではMeiryo UIを選択した。この設定をしないと日本語が文字化けする可能性がある。

Mavenの設定
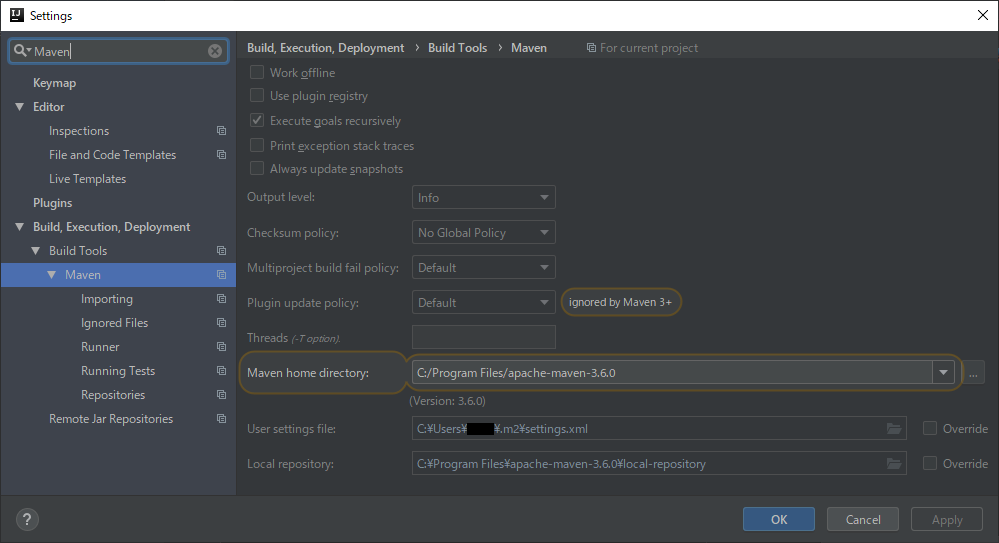
"File"->"Settings"->"Maven"
先ほどインストールしたMavenの場所を"Maven home directory"に設定する。
pom.xmlの編集
pom.xmlを以下のようにする。<properties>と<dependencies>を追加する。
各パッケージのバージョンはそれぞれの依存関係を考慮して設定する。依存関係は例えばここで調べられる。
<?xml version="1.0" encoding="UTF-8"?>
<project xmlns="http://maven.apache.org/POM/4.0.0"
         xmlns:xsi="http://www.w3.org/2001/XMLSchema-instance"
         xsi:schemaLocation="http://maven.apache.org/POM/4.0.0 http://maven.apache.org/xsd/maven-4.0.0.xsd">
    <modelVersion>4.0.0</modelVersion>

    <groupId>sandbox</groupId>
    <artifactId>test</artifactId>
    <version>1.0-SNAPSHOT</version>

    <properties>
        <!-- java8で書く -->
        <maven.compiler.source>1.8</maven.compiler.source>
        <maven.compiler.target>1.8</maven.compiler.target>

        <!-- 文字コードはUTF-8 -->
        <project.build.sourceEncoding>UTF-8</project.build.sourceEncoding>
        <project.reporting.outputEncoding>UTF-8</project.reporting.outputEncoding>

        <!-- バージョン指定 -->
        <cucumber.version>4.2.5</cucumber.version>
        <selenide.version>5.1.0</selenide.version>
        <allure.version>2.10.0</allure.version>
        <junit.version>4.12</junit.version>
    </properties>

    <dependencies>
        <!-- Java用Cucumber -->
        <dependency>
            <groupId>io.cucumber</groupId>
            <artifactId>cucumber-java</artifactId>
            <version>${cucumber.version}</version>
            <scope>test</scope>
        </dependency>

        <!-- JUnitでCucumberを使うためのパッケージ -->
        <dependency>
            <groupId>io.cucumber</groupId>
            <artifactId>cucumber-junit</artifactId>
            <version>${cucumber.version}</version>
            <scope>test</scope>
        </dependency>

        <!-- Selenide -->
        <dependency>
            <groupId>com.codeborne</groupId>
            <artifactId>selenide</artifactId>
            <version>${selenide.version}</version>
            <scope>test</scope>
        </dependency>

        <!-- AllureでCucumberテストをうまく出力するためのパッケージ -->
        <dependency>
            <groupId>io.qameta.allure</groupId>
            <artifactId>allure-cucumber4-jvm</artifactId>
            <version>${allure.version}</version>
            <scope>test</scope>
        </dependency>

        <!-- AllureでSelenideテストをうまく出力するためのパッケージ -->
        <dependency>
            <groupId>io.qameta.allure</groupId>
            <artifactId>allure-selenide</artifactId>
            <version>${allure.version}</version>
            <scope>test</scope>
        </dependency>
    </dependencies>
</project>
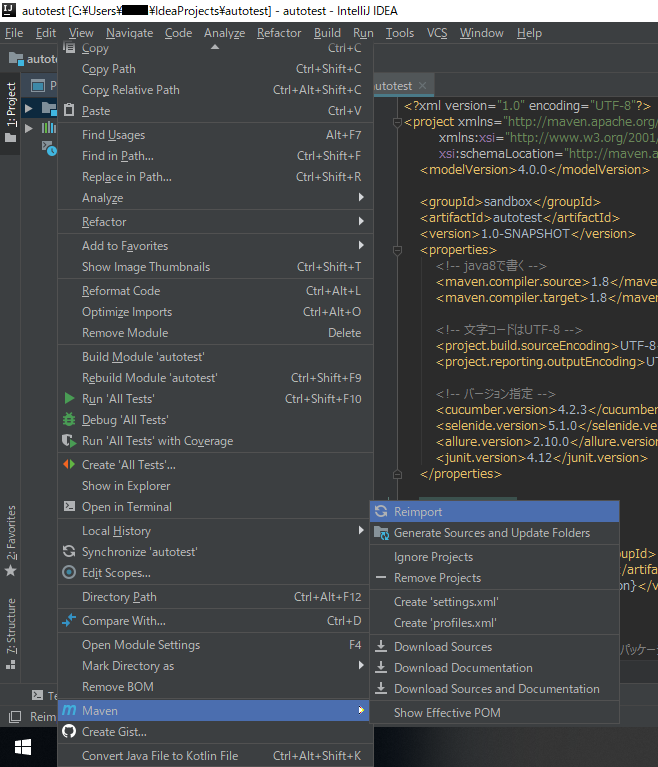
追加したら、autotestプロジェクトを右クリック->"Maven"->"Reimport"
Mavenがパッケージのダウンロードを開始する。
Cucumberプラグインのインストール
IntelliJにCucumberプラグインをインストールすることによってfeatureファイルの編集が容易になる。
"File"->"Settings"->"Plugins"->"Marketplace"
検索窓に"Cucumber"を入力して"Cucumber for Java"を見つける。そのまま"Install"をクリック。終わったらIDEを再起動する。

featureファイルの追加
featureファイルとは
featureファイルは機能ごとにテストの流れを記述するファイルである。自然言語風であり、非技術者でも読みやすい。Gherkinという言語で記述される。なお、ここではGherkinの文法を解説しない。
featureファイルの例を以下に示す。この例では1つの機能に対して3つのシナリオが存在する。ここではどのシナリオも4つのステップから成る。最後のシナリオはテンプレート化されているため、テストケースは全部で5つとなる。
# language: ja
  機能: ログイン

    @正常系
    シナリオ:ログインに成功する
      前提 ログインページにアクセスする
      もし 正しいIDを入力する
      かつ 正しいパスワードを入力する
      ならば ログインに成功する

    @異常系
    シナリオ: ログインに失敗する
      前提 ログインページにアクセスする
      もし 正しいIDを入力する
      かつ 間違ったパスワードを入力する
      ならば ログインに失敗する

    @正常系
    シナリオテンプレート: ログインAPI
      もし <id>のIDを設定する
      かつ <pass>のパスワードを設定する
      かつ API実行する
      ならば ログインに成功する

      サンプル:
      | id | pass|
      |"hoge"|"hogepass"|
      |"fuga"|"fugapass"|
      |"piyo"|"piyopass"|
featureファイルの作成
autotest\src\test\resourcesに動作試験.featureを作成する(フォルダを右クリック->"New"->"File")。resourcesフォルダがなければ作成する。内容は以下のようにする。
3つのステップから成るシナリオが1つだけ存在している。
# language: ja
機能: 動作確認
  シナリオ: テストシナリオ
    前提 ここは地球である
    もし 今日も日が昇る
    ならば 明日も日が昇る
ステップ定義の追加
autotest\src\test\javaにStepdefs.javaファイルを作成する。内容は以下のようにする。
これは動作試験.featureで記述した3つのステップの実装である。
import cucumber.api.java.ja.ならば;
import cucumber.api.java.ja.もし;
import cucumber.api.java.ja.前提;

public class Stepdefs {
    @前提("ここは地球である")
    public void ここは地球である() {
        System.out.println("ここは水の星、地球である");
    }

    @もし("今日も日が昇る")
    public void 今日も日が昇る() {
        System.out.println("今日もいつものように日が昇る");
    }

    @ならば("明日も日が昇る")
    public void 明日も日が昇る() {
        System.out.println("望まずとも、明日も日が昇るだろう");
    }
}
ここでは簡単のため、標準出力するだけの実装とする。実際はアサーションコ―ドなどを記述する。
エントリポイントの作成
JUnitテストとして実行するので、エントリポイントを作成する。autotest\src\test\javaにRunCucumberTest.javaファイルを作成する。内容は以下。
import cucumber.api.CucumberOptions;
import cucumber.api.junit.Cucumber;
import org.junit.runner.RunWith;

@RunWith(Cucumber.class)
@CucumberOptions(features="src/test/resources", plugin = {"pretty"}, monochrome = true)
public class RunCucumberTest {
}
Cucumberテストの実行
プロジェクトルート(pom.xmlのあるディレクトリ)上でmvn testを実行。または右の"Maven"タブを展開して"test"をダブルクリックする。

実行結果は以下のようになる。
-------------------------------------------------------
 T E S T S
-------------------------------------------------------
Running RunCucumberTest
ここは水の星、地球である
今日もいつものように日が昇る
望まずとも、明日も日が昇るだろう
機能: 動作確認

  シナリオ: テストシナリオ # src/test/resources/動作確認.feature:3
    前提ここは地球である  # Stepdefs.ここは地球である()
    もし今日も日が昇る   # Stepdefs.今日も日が昇る()
    ならば明日も日が昇る  # Stepdefs.明日も日が昇る()

1 Scenarios (1 passed)
3 Steps (3 passed)
0m0.179s

Tests run: 1, Failures: 0, Errors: 0, Skipped: 0, Time elapsed: 0.531 sec

Results :

Tests run: 1, Failures: 0, Errors: 0, Skipped: 0
Selenideの導入
SelenideはGUIテストに特化したウェブブラウザ操作ライブラリである。Seleniumのラッパー。
今回はGoogleのページを開いて、検索機能を使うデモを書く。ブラウザはGoogle Chromeを使用する。
Webdriverのダウンロード
ブラウザの操作にはWebDriverが必要である。以下よりChrome用をダウンロードする。インストールされているChromeのバージョンにあったものを選ぶ。
ダウンロードしたらchromedriver.exeを、autotest\driver以下に配置。
Selenideのバージョンによっては、テスト実行時にWebDriverのダウンロードを自動で行ってくれる。しかし、インストールされているChromeのバージョンに合わないことがあるため、手動でダウンロードする。
プロジェクトのファイルを編集
以下の3ファイルを編集する。
# language: ja
機能: 動作確認
  シナリオ: テストシナリオ
    前提 Googleのページを開く
    ならば ネコで検索する
import com.codeborne.selenide.Selenide;

import cucumber.api.java.ja.ならば;
import cucumber.api.java.ja.前提;

public class Stepdefs {
    @前提("Googleのページを開く")
    public void googleのページを開く() {
        // Googleのページを開く
        Selenide.open("https://www.google.com/");
    }

    @ならば("ネコで検索する")
    public void ネコで検索する() {
        // 検索窓に"ネコ"と入力して検索
        Selenide.$("input[name=q]").setValue("ネコ").pressEnter();
    }
}
import com.codeborne.selenide.Configuration;
import com.codeborne.selenide.WebDriverRunner;
import cucumber.api.CucumberOptions;
import cucumber.api.junit.Cucumber;
import org.junit.BeforeClass;
import org.junit.runner.RunWith;

@RunWith(Cucumber.class)
@CucumberOptions(features="src/test/resources", plugin = {"pretty"}, monochrome = true)
public class RunCucumberTest {
    // テスト前に一度だけ行う処理
    @BeforeClass
    public static void setUp(){
        // ブラウザをChromeに設定
        Configuration.browser = WebDriverRunner.CHROME;

        // ブラウザのサイズを1024x768に設定
        Configuration.browserSize = "1024x768";

        // webdriverの場所を指定
        System.setProperty("webdriver.chrome.driver", "driver/chromedriver.exe");
    }
}
Selenideテストの実行
先ほどと同様にmvn testで実行。ChromeでGoogleのページが開いて、"ネコ"が検索されれば成功。
Allureによる結果出力
Allureによる結果出力を行う。先ほどのSelenideのテストの結果を成型する。
Allure対応
RunCucumberTest.javaに以下の修正を加える。
-
@CucumberOptionsのpluginにio.qameta.allure.cucumber4jvm.AllureCucumber4Jvmを追加。 -
SelenideLogger.addListener("AllureSelenide", new AllureSelenide().screenshots(true).savePageSource(false));をsetUp()メソッドの末尾に追加。
import com.codeborne.selenide.Configuration;
import com.codeborne.selenide.WebDriverRunner;
import com.codeborne.selenide.logevents.SelenideLogger;
import cucumber.api.CucumberOptions;
import cucumber.api.junit.Cucumber;
import io.qameta.allure.selenide.AllureSelenide;
import org.junit.BeforeClass;
import org.junit.runner.RunWith;

@RunWith(Cucumber.class)
@CucumberOptions(features="src/test/resources", plugin = {"pretty", "io.qameta.allure.cucumber4jvm.AllureCucumber4Jvm"}, monochrome = true)
public class RunCucumberTest {
    // テスト前に一度だけ行う処理
    @BeforeClass
    public static void setUp(){
        // ブラウザをChromeに設定
        Configuration.browser = WebDriverRunner.CHROME;

        // ブラウザのサイズを1024x768に設定
        Configuration.browserSize = "1024x768";

        // webdriverの格納先を指定
        System.setProperty("webdriver.chrome.driver", "driver/chromedriver.exe");

        // テスト失敗時にスクリーンショットをレポートに添付する設定
        SelenideLogger.addListener("AllureSelenide", new AllureSelenide().screenshots(true).savePageSource(false));
    }
}
わざとテストを失敗させるため、Stepdef.javaのネコで検索する()を書き換える。誤ったCSSセレクタを指定させる。
    @ならば("ネコで検索する")
    public void ネコで検索する() {
        // 検索窓に"ネコ"と入力して検索
        // 誤ったセレクタを指定することで、テストを失敗させる
        Selenide.$("#Bad-Selector").setValue("ネコ").pressEnter();
    }
実行後、autotestフォルダにallure-resultsがあることを確認する。
Allureレポートの閲覧
コマンドプロンプトでautotestフォルダに移動して、以下のコマンドを実行。
allure serve -h localhost -p 8080`
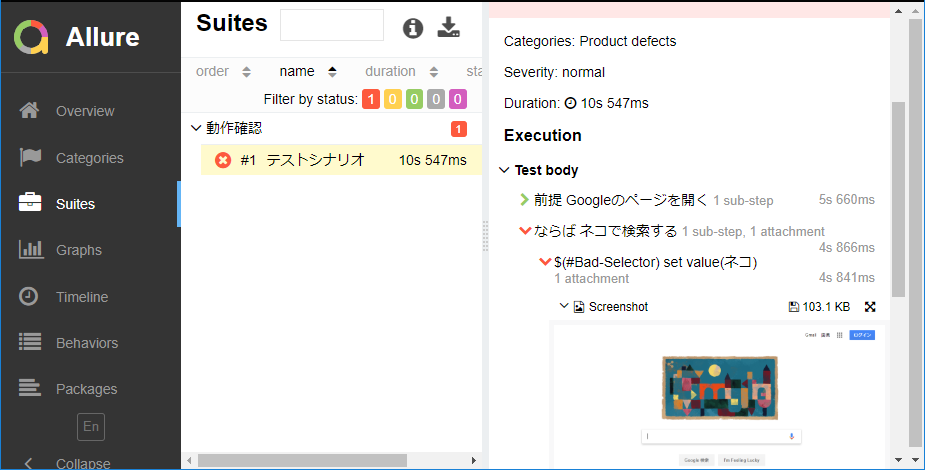
うまくいけばブラウザが立ち上がり、成形された結果を閲覧できる。Selenideのテスト失敗時にはスクリーンショットの確認も可能となっている。
Generating report to temp directory...
Report successfully generated to C:\Users\<秘密>\AppData\Local\Temp\771554680061245798\allure-report
Starting web server...
2019-03-17 21:14:53.865:INFO::main: Logging initialized @8327ms to org.eclipse.jetty.util.log.StdErrLog
Server started at <http://localhost:8080/>. Press <Ctrl+C> to exit
以上で基本的なことは終了です。
最後に
本稿ではCucumberでテストシナリオを作成し、SelenideでWebブラウザの操作を行い、Allureで結果の可視化を行う手順を示した。各ライブラリについて詳細を知りたければ、それぞれの公式サイトが参考になる。
そのうち、以下についての記事も製作しようと思う。
- Jenkinsを使ったAllureレポートの管理
- Allureレポートへのファイルの添付
- 各ステップ間のオブジェクト受け渡し
