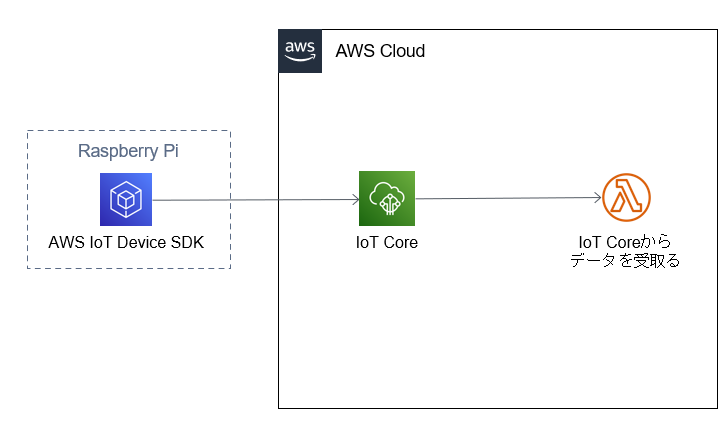
RaspberryPiからIoT Coreを経由してLambdaまで到達する構成をCDKで構築してみました。ここではAWS側を主に扱うため、RaspberryPi自身の設定は扱いません。
全コードはGithubを参照してください。
Githubはここ
前提条件
- AWS CDK v.2 がインストールされていること
- Python 3.x がインストールされていること
- AWSアカウントがあり、AWS CLIが設定されていること
※Cloud9を使うとこの辺りがPassできるため、Cloud9を使って今回の記事の内容は作成しています。
構築手順
1. CDKアプリの初期化
先ずはCDKアプリの初期化を行います。
$ mkdir cdk-iot
$ cd cdk-iot
$ cdk init --language python
2.必要なパッケージをインストール
続いて必要パッケージのインストールになります。
ここでは、CDKアプリを初期化した際に作成された.venvを有効化しています。
$ source .venv/bin/activate
$ pip install -r requirements.txt
3.証明書の作成
CDKで証明書を作成することもできますが少し煩雑に見えたため、今回はコマンドで証明書の作成を行っています。
詳しくは↓↓を参照してください。
AWS IoT 証明書の作成 (CLI)
AWS CLIを使って証明書を作成するコマンドは以下です。
$ aws iot create-keys-and-certificate \
    --set-as-active \
    --certificate-pem-outfile certificate_filename.pem \
    --public-key-outfile public_filename.key \
    --private-key-outfile private_filename.key
ここでは、3つのファイルが作成されますので、Raspberry Pi上で実行していない場合はRaspberry Pi上にファイルを転送する必要があります。
また、ここで作成されるファイル以外にCA証明書ファイルが必要になりますが、上記のコマンドでは作成されないため別でダウンロードします。
ルートCA証明書のダウンロード
$ wget https://www.amazontrust.com/repository/AmazonRootCA1.pem -O AmazonRootCA1.pem
4. スタックの記述
「3.証明書の作成」で作成したIoTの証明書のARNを直接書き込んでいます。ARNについてはコンソール等で確認してください。
from aws_cdk import (
    Stack,
    aws_iam as iam,
    aws_iot as iot,
    aws_lambda as lambda_,
)
from constructs import Construct


class CdkIotStack(Stack):
    def __init__(self, scope: Construct, construct_id: str, **kwargs) -> None:
        super().__init__(scope, construct_id, **kwargs)

        # 今回は簡単のため、証明書をCLIで作成している
        cert_arn = 'xxxxxxxxx'

        region = 'ap-northeast-1'
        account_id = 'xxxxxxxxx'

        topic_name = 'test/topic'

        # モノ
        # https://docs.aws.amazon.com/cdk/api/v2/python/aws_cdk.aws_iot/CfnThing.html
        thing = iot.CfnThing(
            self,
            'MyThing',
            thing_name='my-first-thing',
        )

        # モノと証明書の紐づけ
        # https://docs.aws.amazon.com/cdk/api/v2/python/aws_cdk.aws_iot/CfnThingPrincipalAttachment.html
        thing_principal_attachment = iot.CfnThingPrincipalAttachment(
            self,
            'AttachCertificateToMyThing',
            principal=cert_arn,
            thing_name=thing.thing_name,
        )

        # ポリシー
        # https://docs.aws.amazon.com/cdk/api/v2/python/aws_cdk.aws_iot/CfnPolicy.html
        # https://docs.aws.amazon.com/ja_jp/iot/latest/developerguide/pub-sub-policy.html
        policy = iot.CfnPolicy(
            self,
            'IotPolicy',
            policy_document={
                "Version":"2012-10-17",
				"Statement":[
					{
						"Effect":"Allow",
						"Action":[
							"iot:Connect"
						],
						"Resource":[
							f"arn:aws:iot:{region}:{account_id}:client/*"
						]
					},
					{
						"Effect": "Allow",
						"Action": [
							"iot:Publish",
							"iot:Receive"
						],
						"Resource": [
							f"arn:aws:iot:{region}:{account_id}:topic/{topic_name}"
						]
				    },
					{
						"Effect": "Allow",
						"Action": [
							"iot:Subscribe"
						],
						"Resource": [
							f"arn:aws:iot:{region}:{account_id}:topicfilter/{topic_name}"
						]
				    }
				]
            },
			policy_name='iot-policy',
        )

        # ポリシーと証明書の紐づけ
        # https://docs.aws.amazon.com/cdk/api/v2/python/aws_cdk.aws_iot/CfnPolicyPrincipalAttachment.html
        policy_principal_attachment = iot.CfnPolicyPrincipalAttachment(
            self,
            'AttachCertificateToPolicy',
            policy_name=policy.policy_name,
            principal=cert_arn,
        )

        # 依存関係の挿入
        thing_principal_attachment.add_dependency(thing)
        policy_principal_attachment.add_dependency(policy)

        # Test lambda function
        test_function = lambda_.Function(
            self,
            'TestFunction',
            code=lambda_.Code.from_inline(
                code='def lambda_handler(event, context): print(f"Event: {event}\nContext: {context}", )',
            ),
            handler='index.lambda_handler',
            runtime=lambda_.Runtime.PYTHON_3_10,
            function_name='test-function-iot-core'
        )

        # Topic Rule
        topic_rule = iot.CfnTopicRule(
            self,
            'TopicRule',
            topic_rule_payload=iot.CfnTopicRule.TopicRulePayloadProperty(
                actions=[
                    iot.CfnTopicRule.ActionProperty(
                        lambda_=iot.CfnTopicRule.LambdaActionProperty(
                            function_arn=test_function.function_arn,
                        ),
                    )
                ],
                sql=f"SELECT * FROM '{topic_name}'",
                aws_iot_sql_version='2016-03-23',
            ),
            rule_name='test_topic_rule',
        )

        # add lambda trigger
        test_function.add_permission(
            'AddIotTopicRuleTrigger',
            principal=iam.ServicePrincipal(service='iot.amazonaws.com'),
            source_arn=topic_rule.attr_arn,
        )
5. CDKのデプロイ
cdk deploy
以上で構築完了です。
6. Raspberry Piから接続検証
Raspberry Piからの接続検証については、下の記事が分かりやすいためご参照ください。
AWS IoT CoreをRaspberry Piで使ってみた その2
今回はTopicRuleにて特定のTopicに対してクエリを行っているため、この部分ででプログラム実行を行う際に下のようにTopicを指定して下さい。
python3 basicPubSub.py \
    --endpoint <endpoint> \
    --rootCA <Root CA file path> \
    --cert <cert file path> \
    --key  <key file path> \
    --topic <topic name>   ←←追加
まとめ
この記事では、Raspberry PiからIoT Coreを経由してLambdaまで到達する構成をCDKで構築した際の記録を残しております。
どなたかの参考になれば幸いです。