はじめに
こちらの記事で紹介したエージェントベースのインストール方式ではOCPの各ノードが直接インターネットにアクセスできる構成でした。
本記事では各ノードがProxyを経由してインターネットにアクセスできる構成で検証を行った結果を紹介します。
初めに結論ですが、インストールの流れは同じでinstall-config.yamlファイルにProxyの設定を追記する点が異なります。
検証環境
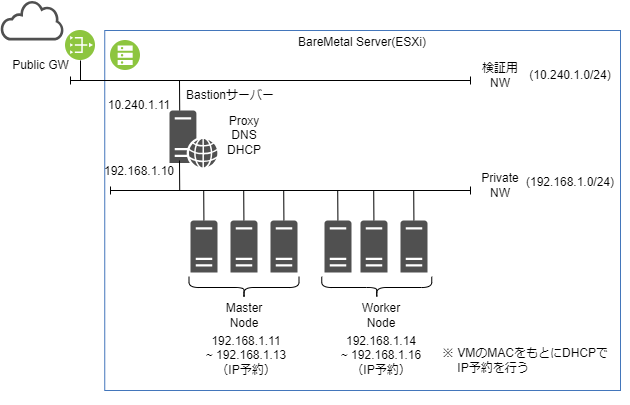
先の記事と同じくIBM CloudのVPCベアメタルサーバーサービスを利用しています。
構成の違いは、ESXi上にプライベートネットワークを構成する形になるため、DNS、DHCPの各機能をProxyの機能を持つBastionサーバー上に構成してる点となります。
構築検証
事前準備
ESXi上にVMを作成し、VMのNICのMACアドレスを記録します。このMACアドレスをBastionサーバー上のDNS、DHCP(dnsmasq)に登録し、IPを予約します。
port=53
domain-needed
bogus-priv
resolv-file=/etc/resolv.dnsmasq
no-poll
address=/apps.ocptest.com/192.168.1.10
no-dhcp-interface=ens192
expand-hosts
domain=ocptest.com
dhcp-range=192.168.1.11,192.168.1.20,255.255.255.0,12h
dhcp-host=00:0c:29:7c:4b:32,m1,192.168.1.11
dhcp-host=00:0c:29:83:40:80,m2,192.168.1.12
dhcp-host=00:0c:29:de:07:63,m3,192.168.1.13
dhcp-host=00:0c:29:33:02:aa,w1,192.168.1.14
dhcp-host=00:0c:29:40:05:dd,w2,192.168.1.15
dhcp-host=00:0c:29:c1:f5:03,w3,192.168.1.16
dhcp-option=option:dns-server,192.168.1.10
dhcp-leasefile=/var/lib/dnsmasq/dnsmasq.leases
log-dhcp
log-facility=/var/log/dnsmasq.log
またhostsファイルは以下のように設定します。
127.0.0.1   localhost localhost.localdomain localhost4 localhost4.localdomain4
::1         localhost localhost.localdomain localhost6 localhost6.localdomain6

#for OCP4
192.168.1.20 api
192.168.1.20 api-int
192.168.1.20 api.pxocpcluster.ocptest.com
192.168.1.20 api-int.pxocpcluster.ocptest.com

192.168.1.10 proxy2 proxy2.ocptest.com
192.168.1.11 m1 m1.ocptest.com
192.168.1.12 m2 m2.ocptest.com
192.168.1.13 m3 m3.ocptest.com
192.168.1.14 w1 w1.ocptest.com
192.168.1.15 w2 w2.ocptest.com
192.168.1.16 w3 w3.ocptest.com

192.168.1.21 oauth-openshift.apps.pxocpcluster.ocptest.com
192.168.1.21 console-openshift-console.apps.pxocpcluster.ocptest.com
構成ファイル準備
次にインストール用の構成ファイルです。
まずはinstall-config.yamlファイルです。こちらは先の記事とはProxy設定が入っている点が異なります。IP・ホスト名は変えてあります。
apiVersion: v1
baseDomain: ocptest.com
proxy:
  httpProxy: http://192.168.1.10:8080
  httpsProxy: http://192.168.1.10:8080
  noProxy: .ocptest.com,192.168.1.0/24,10.240.1.0/24
compute:
- architecture: amd64
  hyperthreading: Enabled
  name: worker
  replicas: 3
controlPlane:
  architecture: amd64
  hyperthreading: Enabled
  name: master
  replicas: 3
metadata:
  name: pxocpcluster
networking:
  clusterNetwork:
  - cidr: 10.128.0.0/14
    hostPrefix: 23
  machineNetwork:
  - cidr: 192.168.1.0/24
  networkType: OVNKubernetes
  serviceNetwork:
  - 172.30.0.0/16
platform:
  baremetal:
    apiVIPs:
    - 192.168.1.20
    ingressVIPs:
    - 192.168.1.21
pullSecret: '{"auths":{"cloud.openshift.com":{"auth":xxxxx}}}'
sshKey: 'ssh-ed25519 AAAAxxxxx user01@proxy.ocptest.com'
続いてagent-config.yamlファイルです。こちらは先の記事とIP・ホスト名以外は同じです。
apiVersion: v1alpha1
kind: AgentConfig
metadata:
  name: pxocpcluster
rendezvousIP: 192.168.1.11
hosts:
  - hostname: m1.ocptest.com
    role: master
    interfaces:
      - name: ens192
        macAddress: 00:0c:29:7c:4b:32
    rootDeviceHints:
      deviceName: /dev/sda
    networkConfig:
      interfaces:
        - name: ens192
          type: ethernet
          state: up
          mac-address: 00:0c:29:7c:4b:32
          ipv4:
            enabled: true
            address:
              - ip: 192.168.1.11
                prefix-length: 24
            dhcp: false
      dns-resolver:
        config:
          server:
            - 192.168.1.10
      routes:
        config:
          - destination: 0.0.0.0/0
            next-hop-address: 192.168.1.10
            next-hop-interface: ens192
            table-id: 254
  - hostname: m2.ocptest.com
    role: master
    interfaces:
      - name: ens192
        macAddress: 00:0c:29:83:40:80
    rootDeviceHints:
      deviceName: /dev/sda
    networkConfig:
      interfaces:
        - name: ens192
          type: ethernet
          state: up
          mac-address: 00:0c:29:83:40:80
          ipv4:
            enabled: true
            address:
              - ip: 192.168.1.12
                prefix-length: 24
            dhcp: false
      dns-resolver:
        config:
          server:
            - 192.168.1.10
      routes:
        config:
          - destination: 0.0.0.0/0
            next-hop-address: 192.168.1.10
            next-hop-interface: ens192
            table-id: 254
  - hostname: m3.ocptest.com
    role: master
    interfaces:
      - name: ens192
        macAddress: 00:0c:29:de:07:63
    rootDeviceHints:
      deviceName: /dev/sda
    networkConfig:
      interfaces:
        - name: ens192
          type: ethernet
          state: up
          mac-address: 00:0c:29:de:07:63
          ipv4:
            enabled: true
            address:
              - ip: 192.168.1.13
                prefix-length: 24
            dhcp: false
      dns-resolver:
        config:
          server:
            - 192.168.1.10
      routes:
        config:
          - destination: 0.0.0.0/0
            next-hop-address: 192.168.1.10
            next-hop-interface: ens192
            table-id: 254
  - hostname: w1.ocptest.com
    role: worker
    interfaces:
      - name: ens192
        macAddress: 00:0c:29:33:02:aa
    rootDeviceHints:
      deviceName: /dev/sda
    networkConfig:
      interfaces:
        - name: ens192
          type: ethernet
          state: up
          mac-address: 00:0c:29:33:02:aa
          ipv4:
            enabled: true
            address:
              - ip: 192.168.1.14
                prefix-length: 24
            dhcp: false
      dns-resolver:
        config:
          server:
            - 192.168.1.10
      routes:
        config:
          - destination: 0.0.0.0/0
            next-hop-address: 192.168.1.10
            next-hop-interface: ens192
            table-id: 254
  - hostname: w2.ocptest.com
    role: worker
    interfaces:
      - name: ens192
        macAddress: 00:0c:29:40:05:dd
    rootDeviceHints:
      deviceName: /dev/sda
    networkConfig:
      interfaces:
        - name: ens192
          type: ethernet
          state: up
          mac-address: 00:0c:29:40:05:dd
          ipv4:
            enabled: true
            address:
              - ip: 192.168.1.15
                prefix-length: 24
            dhcp: false
      dns-resolver:
        config:
          server:
            - 192.168.1.10
      routes:
        config:
          - destination: 0.0.0.0/0
            next-hop-address: 192.168.1.10
            next-hop-interface: ens192
            table-id: 254
  - hostname: w3.ocptest.com
    role: worker
    interfaces:
      - name: ens192
        macAddress: 00:0c:29:c1:f5:03
    rootDeviceHints:
      deviceName: /dev/sda
    networkConfig:
      interfaces:
        - name: ens192
          type: ethernet
          state: up
          mac-address: 00:0c:29:c1:f5:03
          ipv4:
            enabled: true
            address:
              - ip: 192.168.1.16
                prefix-length: 24
            dhcp: false
      dns-resolver:
        config:
          server:
            - 192.168.1.10
      routes:
        config:
          - destination: 0.0.0.0/0
            next-hop-address: 192.168.1.10
            next-hop-interface: ens192
            table-id: 254
導入
導入方法も同じなので、元記事を参照ください。
インストール完了をCLIで確認
参考のため、Proxy設定情報だけ記載します。
$ oc get proxy cluster -o yaml
apiVersion: config.openshift.io/v1
kind: Proxy
metadata:
  creationTimestamp: "2023-09-15T03:30:13Z"
  generation: 1
  name: cluster
  resourceVersion: "549"
  uid: 9f51417b-d83e-45ee-b94c-44c56b8fe059
spec:
  httpProxy: http://192.168.1.10:8080
  httpsProxy: http://192.168.1.10:8080
  noProxy: .ocptest.com,192.168.1.0/24,10.240.1.0/24,.pxocpcluster.ocptest.com,10.128.0.0/14,172.30.0.0/16,192.168.1.0/24
  trustedCA:
    name: ""
status:
  httpProxy: http://192.168.1.10:8080
  httpsProxy: http://192.168.1.10:8080
  noProxy: .cluster.local,.ocptest.com,.pxocpcluster.ocptest.com,.svc,10.128.0.0/14,10.240.1.0/24,127.0.0.1,172.30.0.0/16,192.168.1.0/24,api-int.pxocpcluster.ocptest.com,localhost
まとめ
エージェントベース方式におけるProxy構成でのインストールも簡単に実施することができました。
次は、インターネット非接続環境版も余裕があれば検証してみたい。
