はじめに
AWSでのセキュリティは責任共有モデルで示しているように、OSより上位レイヤーの設定についてはお客様の責任となります。そのOSより上位のセキュリティ対策としてTrend Micro社のDeep Securityがいいらしい。
ということで、早速試してみました。
以下Deep Securityの構築ステップを記載します。Windows版のインストールガイドはWeb上探せば出てくるのですが、Linux版はあまり情報ないため、Linux版のインストールステップを記載します。
なおデータベースはAWS環境ということでRDSを採用しております。
ちなみに、Trend Micro社はAWS上でDeep Security as a ServiceとしてDeep Securityのサービスを提供していますが、今回はEC2インスタンスを立てそこにDeep Security Managerを導入する構成を組みました。
構成
構成はこんな感じ。
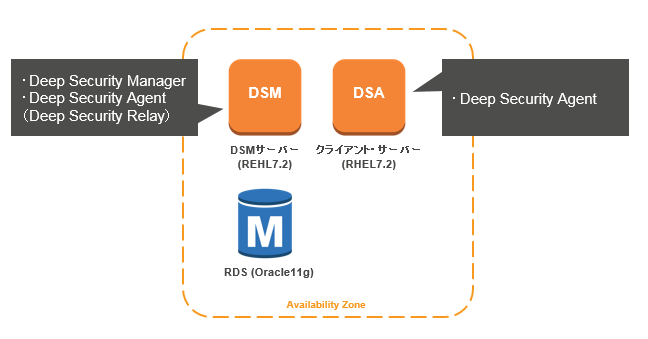
EC2インタンス上にDSMサーバーとしてDeep Security Manager(移行DSM)とDeep Security Agent(移行DSA)を導入しRelayを有効化。クライアントサーバーにはDSAのみ導入。データベースにはOracleのRDSを使用。
DSMバージョン:Deep Security Manager 9.6 SP1 Patch1 Update4
作ってみた
1. 前提はこちら参照
2. インストーラーダウンロード
DSM:こちらのサイトのDeep Security Managerをクリックし、Linux版(Manager-Linux-9.6.xxxx.x64.sh)をダウンロードします。
DSA:上記サイトのLinux 版 Deep Security Agent / Relayをクリックし、対象OS用のインストーラー(RHELならAgent-RedHat_EL7-9.6.x-xxxx.x86_64.zip)をダウンロードします。
3. 応答ファイル(dsm.properties)準備
今回はOSはREHL7.2を使用したため、インストールはCLIで実施します。応答ファイルは自分で作成します。
RDSを使用する場合はDB接続先として下記情報を記載します。(DBのHostnameにRDSを指定するだけです)
DatabaseScreen.DatabaseType=Oracle
DatabaseScreen.Hostname=xxxxxx.ap-northeast-1.rds.amazonaws.com
DatabaseScreen.DatabaseName=<db_name>
DatabaseScreen.Transport=TCPV
DatabaseScreen.Username=<db_user_name>
DatabaseScreen.Password=<db_user_password>
Relay有効化のため、RelayScreen.Install=Trueの1行もお忘れなく(※)
最低限の構成を導入するため、使用した応答ファイル(dsm.properties)はこちらです。
CredentialsScreen.Administrator.Username=<user_name>
CredentialsScreen.Administrator.Password=<password>
DatabaseScreen.DatabaseType=Oracle
DatabaseScreen.Hostname=xxxxxx.ap-northeast-1.rds.amazonaws.com
DatabaseScreen.DatabaseName=<db_name>
DatabaseScreen.Transport=TCP
DatabaseScreen.Username=<db_user_name>
DatabaseScreen.Password=<db_user_password>
RelayScreen.Install=True
(※)Relay有効化できずにハマったはなしはこちら
4. DSMのインストール実行
インストーラーを配置したディレクトリで下記実行するだけです。
[root@DSM DSM]# ./Manager-Linux-9.6.4072.x64.sh -q -conasole -varfile ./dsm.properties
Unpacking JRE ...
Starting Installer ...
The physical memory on this machine is less than what is recommended for a production environment. Unless you are installing Deep Security Manager
for demonstration or evaluation purposes only, it is strongly recommended that you cancel this installation and install on a more powerful machine.
See the system requirements in the Installation Guide for more information.
Stopping Trend Micro Deep Security Manager Service...
Checking for previous versions of Trend Micro Deep Security Manager...
Upgrade Verification Screen settings accepted...
The installation directory has been set to /opt/dsm.
Database Screen settings accepted...
License Screen settings accepted...
Address And Ports Screen settings accepted...
Credentials Screen settings accepted...
Security Update Screen settings accepted...
Software Update Screen settings accepted...
Smart Protection Network Screen settings accepted...
All settings accepted, ready to execute...
Extracting files ...
Setting Up...
Connecting to the Database...
Creating the Database Schema...
Creating dsmadmin Account...
Recording Settings...
Creating Temporary Directory...
Installing Reports...
Installing Modules and Plug-ins...
Creating Help System...
Validating and Applying Activation Codes...
Configure Localizable Settings...
Setting Default Password Policy...
Creating Scheduled Tasks...
Creating Asset Importance Entries...
Creating Auditor Role...
Optimizing...
Importing Software Packages...
Configuring Relay For Install...
Importing Performance Profiles...
Recording Installation...
Clearing Sessions...
Creating Properties File...
Creating Shortcut...
Configuring SSL...
Configuring Service...
Configuring Java Security...
Configuring Java Logging...
Cleaning Up...
Starting Deep Security Manager...
u Finishing installation ...
[root@DSM DSM]# echo $?
0
あっさり完了。
5. DSAインストール
ダウンロードしたzipを解凍し、RPMをインストールします。
[root@DSM DSM]# rpm -qoivh Agent-Core-RedHat_EL7-9.6.2-7599.x86_64.rpm
Preparing...

:

Starting ds_agent (via systemctl):  [  OK  ]
[root@DSM DSM]# echo $?
0
こちらもあっさり完了。
以上で、DSM、DSAのインストールが完了です。
あとはブラウザでコンソールにアクセスし、諸々設定し完了ですが、それはまた別の機会に。
その他
DSM、DSAのサービス名は次の通りです。これらのサービスが自動起動していればインストールは成功です。
DSM:dsm_s.service
DSA:ds_agent.service