さて、前回は、terraformを使ってクレデンシャル情報をどうやって扱うか。変数をどう扱うか。という部分にフォーカスして、terraformの基本を学びました。
今回は、実際にterraformを使ってAWS上のインフラ構築をしてみようと思います。
まずは簡単にEC②インスタンスを立ち上げる所からやってみます。
対象のリソースを設定する
前回は、クレデンシャル情報をoutputするだけのtfファイルを簡単に作ってみました。
あれだけでは、まだ変数をoutputしただけです。
当然ですが、実際にAWS上のインフラを触るにはリソースを弄る必要が出てきます。
これまで、変数をvariablesブロック、出力をoutputブロックに記載しました。
リソースを扱うには、resourceブロックに記載する必要があります。
その時の記載ルールは下記のようになります。
resource "{リソースの種類}" "{リソース名}" {}
このリソースの種類や、中に記載する項目などは全てdocumentに記載があります。
例えば、EC2インスタンスを立ち上げるのに必要なresourceの記載はこちらに書いてあります。
さっそくEC2インスタンスを立ち上げるリソースを定義してみる
resource "aws_instance" "web" {
  ami           = "ami-4af5022c"
  instance_type = "t2.micro"

  tags {
    Name = "HelloWorld"
  }
全体的にはこんな感じになります。
variable "aws_access_key" {}
variable "aws_secret_key" {}
variable "region" {
    default = "ap-northeast-1"
}

provider "aws" {
    access_key = "${var.aws_access_key}"
    secret_key = "${var.aws_secret_key}"
    region = "${var.region}"
}

resource "aws_instance" "web" {
  # Amazon Linux AMI
  ami           = "ami-4af5022c"
  instance_type = "t2.micro"

  tags {
    Name = "HelloWorld"
  }
}
まずはplanしてみる
$ terraform plan

Refreshing Terraform state in-memory prior to plan...
The refreshed state will be used to calculate this plan, but will not be
persisted to local or remote state storage.

The Terraform execution plan has been generated and is shown below.
Resources are shown in alphabetical order for quick scanning. Green resources
will be created (or destroyed and then created if an existing resource
exists), yellow resources are being changed in-place, and red resources
will be destroyed. Cyan entries are data sources to be read.

Note: You didn't specify an "-out" parameter to save this plan, so when
"apply" is called, Terraform can't guarantee this is what will execute.

+ aws_instance.web
    ami:                          "ami-4af5022c"
    associate_public_ip_address:  "<computed>"
    availability_zone:            "<computed>"
    ebs_block_device.#:           "<computed>"
    ephemeral_block_device.#:     "<computed>"
    instance_state:               "<computed>"
    instance_type:                "t2.micro"
    ipv6_addresses.#:             "<computed>"
    key_name:                     "<computed>"
    network_interface.#:          "<computed>"
    network_interface_id:         "<computed>"
    placement_group:              "<computed>"
    primary_network_interface_id: "<computed>"
    private_dns:                  "<computed>"
    private_ip:                   "<computed>"
    public_dns:                   "<computed>"
    public_ip:                    "<computed>"
    root_block_device.#:          "<computed>"
    security_groups.#:            "<computed>"
    source_dest_check:            "true"
    subnet_id:                    "<computed>"
    tags.%:                       "1"
    tags.Name:                    "HelloWorld"
    tenancy:                      "<computed>"
    vpc_security_group_ids.#:     "<computed>"


Plan: 1 to add, 0 to change, 0 to destroy.
このように、terraform planをすると、定義したフィアルが実行されたときに実際何が起きるのかを教えてくれます。
今回の場合であれば、指定したamiとインスタンスタイプ、タグを持ったec2インスタンスが立ち上がる事が確認出来ます。
実際にapplyで適用してみる
$ terraform apply
aws_instance.web: Creating...
  ami:                          "" => "ami-4af5022c"
  associate_public_ip_address:  "" => "<computed>"
  availability_zone:            "" => "<computed>"
  ebs_block_device.#:           "" => "<computed>"
  ephemeral_block_device.#:     "" => "<computed>"
  instance_state:               "" => "<computed>"
  instance_type:                "" => "t2.micro"
  ipv6_addresses.#:             "" => "<computed>"
  key_name:                     "" => "<computed>"
  network_interface.#:          "" => "<computed>"
  network_interface_id:         "" => "<computed>"
  placement_group:              "" => "<computed>"
  primary_network_interface_id: "" => "<computed>"
  private_dns:                  "" => "<computed>"
  private_ip:                   "" => "<computed>"
  public_dns:                   "" => "<computed>"
  public_ip:                    "" => "<computed>"
  root_block_device.#:          "" => "<computed>"
  security_groups.#:            "" => "<computed>"
  source_dest_check:            "" => "true"
  subnet_id:                    "" => "<computed>"
  tags.%:                       "" => "1"
  tags.Name:                    "" => "HelloWorld"
  tenancy:                      "" => "<computed>"
  vpc_security_group_ids.#:     "" => "<computed>"
aws_instance.web: Still creating... (10s elapsed)
aws_instance.web: Still creating... (20s elapsed)
aws_instance.web: Creation complete (ID: i-0725d4159001ac68e)

Apply complete! Resources: 1 added, 0 changed, 0 destroyed.

The state of your infrastructure has been saved to the path
below. This state is required to modify and destroy your
infrastructure, so keep it safe. To inspect the complete state
use the `terraform show` command.

State path:
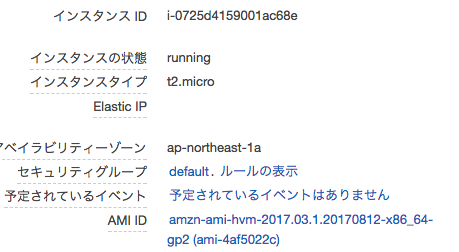
出来上がったみたいですので、実際にコンソール上で確認してみます。
良い感じですね。
生成したインスタンスを削除してみる
terraform destroyを使うと、定義したリソースを削除することが可能です。
実際に、今立ち上げたEC2インスタンスを早速削除してみようと思います。
$ terraform plan -destroy
Refreshing Terraform state in-memory prior to plan...
The refreshed state will be used to calculate this plan, but will not be
persisted to local or remote state storage.

aws_instance.web: Refreshing state... (ID: i-0725d4159001ac68e)
The Terraform execution plan has been generated and is shown below.
Resources are shown in alphabetical order for quick scanning. Green resources
will be created (or destroyed and then created if an existing resource
exists), yellow resources are being changed in-place, and red resources
will be destroyed. Cyan entries are data sources to be read.

Note: You didn't specify an "-out" parameter to save this plan, so when
"apply" is called, Terraform can't guarantee this is what will execute.

- aws_instance.web


Plan: 0 to add, 0 to change, 1 to destroy.
planコマンド実行時に、-destroyオプションを付けると何が削除されるか教えてくれます。
今回は、先程のaws_instance(id: i-0725d4159001ac68e)が削除されるのがわかります。
$ terraform destroy
Do you really want to destroy?
  Terraform will delete all your managed infrastructure.
  There is no undo. Only 'yes' will be accepted to confirm.

  Enter a value: yes

aws_instance.web: Refreshing state... (ID: i-0725d4159001ac68e)
aws_instance.web: Destroying... (ID: i-0725d4159001ac68e)
aws_instance.web: Still destroying... (ID: i-0725d4159001ac68e, 10s elapsed)
aws_instance.web: Still destroying... (ID: i-0725d4159001ac68e, 20s elapsed)
aws_instance.web: Still destroying... (ID: i-0725d4159001ac68e, 30s elapsed)
aws_instance.web: Still destroying... (ID: i-0725d4159001ac68e, 40s elapsed)
aws_instance.web: Still destroying... (ID: i-0725d4159001ac68e, 50s elapsed)
aws_instance.web: Destruction complete

Destroy complete! Resources: 1 destroyed.
destroyする場合は、「本当にいいの?」って聞かれるので、良い場合は「yes」と入力してEnterでOKです。
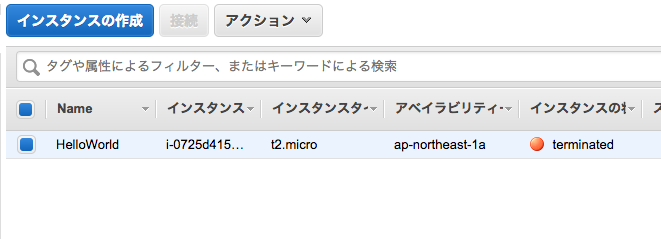
ちゃんとterminatedになってますね。
まとめ
- resourceブロックに何を記載するか、ドキュメントを見ながら追ってみた
- 実際にEC2インスタンスを立ち上げてみた
- また、
destroyを使って一度立ち上げたリソースを削除するところまでやってみた
次回予告
明日は、より実践的に、ただEC2インスタンスを立ち上げるのではなくて、
VPCを作り、その中にEC2インスタンスを立ち上げる。等をやっていこうと思います。


