この記事は、2021年の M5Stack のアドベントカレンダー の 3日目の記事です。
ふりかえり
2021年を振り返ってみました。在宅勤務を昨年末から開始していて、自宅にひきこもっていました。それでも、GitHubリポジトリを調べてみると2021年1月1日からコミットしていたようです。しかし、2021年1月1日に何をしていたのか思い出せません。
そんな中、2月か3月頃、一人で在宅勤務をしていた14時ぐらいにふと思いついて、M5 ATOM Liteを使ったニトリLED時計改造マイプロジェクトを始めました。それから派生したマイプロジェクトを引き続き取り組んでいます。
ことしもM5 ATOM LiteとM5 StickC Plusと遊んだとても充実した楽しい一年でした。
巨人の肩に立つ
わたしのGitHubリポジトリを調べると、今年作成したリポジトリは9個ぐらいでした。そのほとんどが、巨人たちが作ったライブラリの肩に立って作ったちょっとしたマイサンプルとマイプロジェクトです。
- riraosan/ESP32_Display_Weather
- riraosan/ESP32_WiFiTelnetConsole
- riraosan/ESPTelnet_Sample
- riraosan/ESP_8_BIT_composite_Sample
- riraosan/ESP32PushDown
- riraosan/ESP32_BT-A2DP_Receiver
- riraosan/ESP32_LEDMatrix_Clock
- riraosan/ESP32ClockDetectingMovement
- riraosan/ESP32_ntp_clock
個人的にはESP_8_BIT_compositeライブラリを見つけられてよかったと感じています。昔懐かしいGIFアニメをメルカリで買った3000円液晶テレビ(NTSC)で再生できて、かなり楽しめました。
その他、ライブラリをたくさんForkさせていただきました。さらに、クラスライブラリ作成方法の色々なパターンをライブラリより学ばさせていただきました。マイプロジェクト推進の援助と勇気をいただきました。
ライブラリ作者のみなさん、ありがとう👍
これらのマイサンプル、マイプロジェクトで使ってみた、おすすめしたいarduino-esp32 Libraryをご紹介したと思います。
おすすめしたい arduino-esp32 Library
Hieromon/AutoConnect
https://github.com/Hieromon/AutoConnect.git
Overview
わたしは昨年末ぐらいまで、WiFiManagerを使っていました。しかし、どうも、いまいち使いにくい。さらに、動作が不安定でした。(今となってはATOM LiteのCH552FW不具合によるWiFi問題の影響があったかもしれませんが。)なにか、他におもしろいWiFiマネージャーライブラリがないかと探していたところ、AutoConnectに出会いました。
@Hieromonさん、ありがとう👍
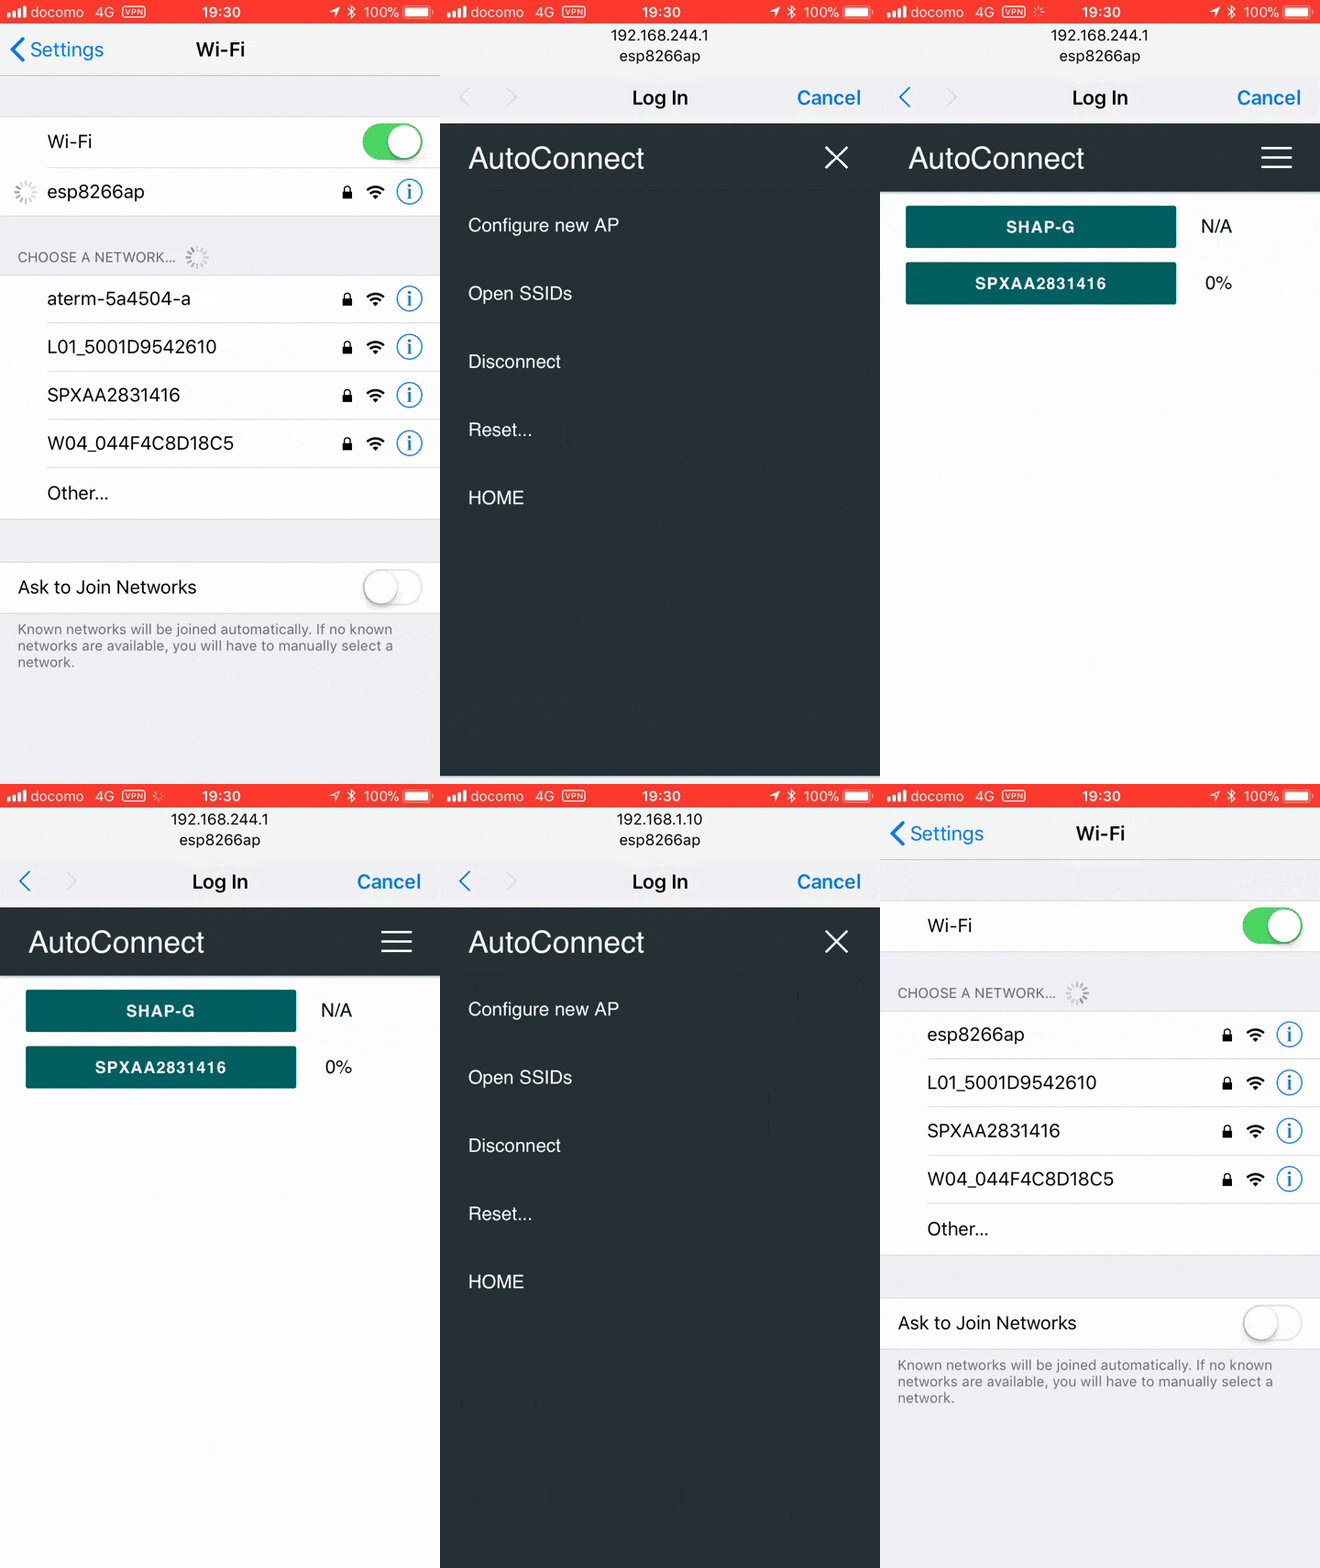
こちらのライブラリの特徴は、WebGUIよりAPのSSIDを選択してパスワードを入力することができ、安定してAPに接続できる点だと思います。もちろん、SSIDやパスワードをソースコード中に記述して接続することも可能です。(オススメできませんが。)
また、firmware.binをWeb画面よりアップロードしてWiFi無線経由でFWの書き換えもできます(OTA)。
さらに、ソースコード中にHTMLページのコードを埋め込んでユーザー独自のWebGUIを追加可能です。わたしは使ったことがありません。機会があれば調べて使ってみたいと思います。
このライブラリは機能がてんこ盛りです。これからも活用方法を考えてみたいと思います👍
こちらに公式ページへのリンクを貼っておきますので、オススメしておきます。
Roger-random/ESP_8_BIT_composite
https://github.com/Roger-random/ESP_8_BIT_composite.git
Overview
ESP_8_BITのコンポジットビデオ生成コードを抽出し、スタンドアローンのArduinoライブラリとしてパッケージ化したもので、誰でもカラーのコンポジットビデオ信号を出力するArduinoスケッチを書くことができます。NTSCとPALの両方に対応しています。
@Roger-randomさん、ありがとう👍
このライブラリは古くて新しいと思いました。ESP32でわざわざNTSC信号(アナログ信号)を作り出して(I2Sドライバ転用)、コンポジット入力(黄色いRCAコネクタ)よりアナログTV(ブラウン管)やデジタルTVへGIF画像やフォントを表示できます。
Adafruit GFX LibraryとAnimatedGif Libraryを組み合わせて作られているので、それらのライブラリから派生した他のライブラリも利用できると思います。
解像度は480i(256 pixels wide and 240 pixels tall.)で、色数は256色(8Bit)です。見た感じ、粗い表示にはなります。NTSC規格なのでTVによって発色が異なります。しかし、昔のアナログTV(ブラウン管TV、アナログ液晶TV)を再利用できます。アイデア次第で簡単に大画面表示機器を作成できるのではないでしょうか。👍
注意
PlatformIOでこのライブラリをビルドする場合、必ずreleaseモードでビルドしてください。
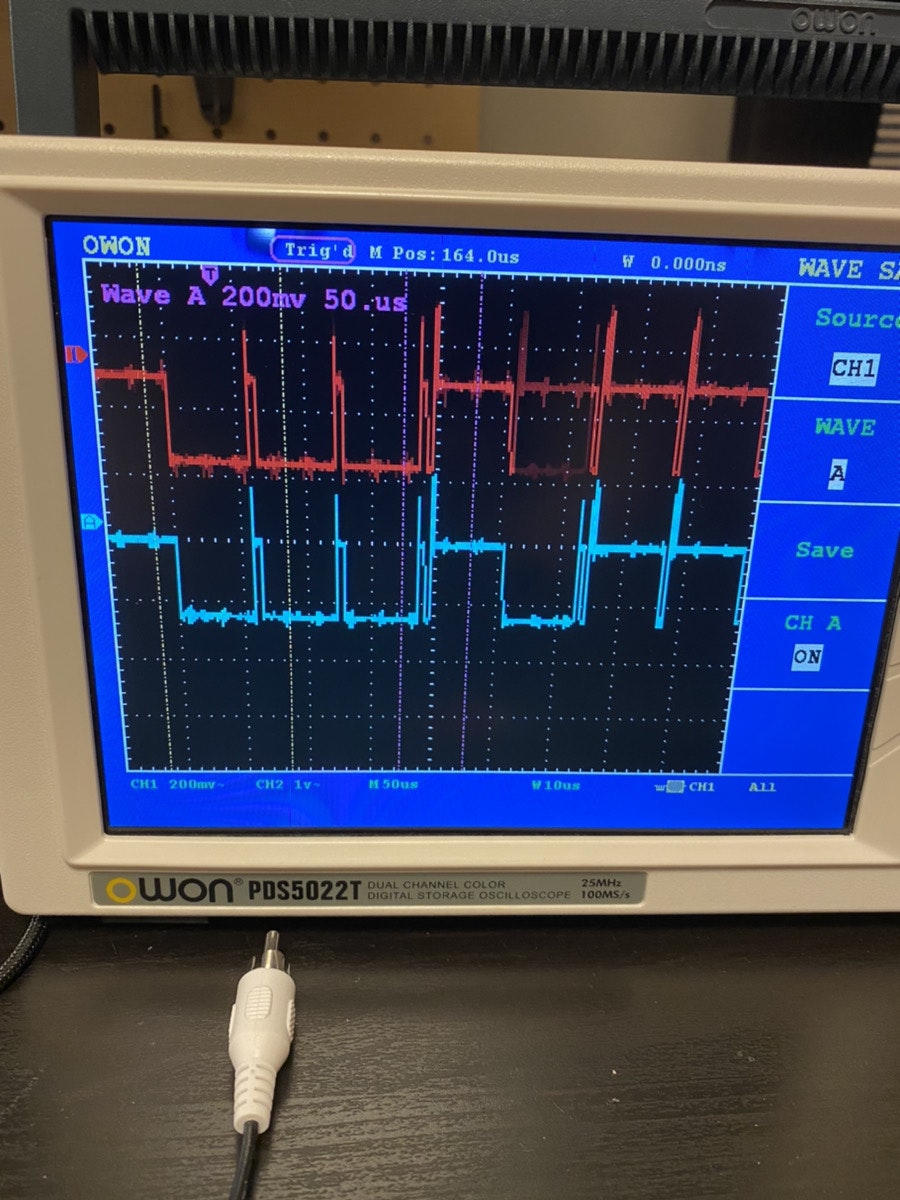
debugモードでビルドすると、垂直同期信号が不安定となり出力画像が細かい縦揺れを起こします。(Arduino IDEでビルドすると自動的にreleaseモードでビルドするようです。)

(写真)NTSC信号(垂直同期信号)のキャプチャ画像
(赤色)正常な信号(水色)不正な信号。
ランダムに垂直同期信号の電圧レベルが低下する事象がdebugビルドで発生しました。releaseビルドを行うと不正な信号出力が発生しなくなりました。だいぶ悩まされたが、最終的にオシロスコープで事実を確認することで解決しました。オシロスコープを買っておいてよかったです。![]()
[My Sample](https://github.com/riraosan/ESP_8_BIT_composite_Sample)と動作の様子(ATOM Liteで動作確認しました。)
# include <Arduino.h>
# include <Wire.h>
# include <SPI.h>
# include <AnimatedGIF.h>
# include <ESP_8_BIT_GFX.h>
# include "non_4b_gif.h"
# include <IRremoteESP8266.h>
# include <IRsend.h>

const uint16_t kIrLed = 12;  // ESP8266 GPIO pin to use. Recommended: 4 (D2).

IRsend irsend(kIrLed);  // Set the GPIO to be used to sending the message.

// Create an instance of the graphics library
ESP_8_BIT_GFX videoOut(true /* = NTSC */, 16 /* = RGB565 colors will be downsampled to 8-bit RGB332 */);
AnimatedGIF gif;

// Vertical margin to compensate for aspect ratio
constexpr int margin = 10;

constexpr int _gif_offset_x  = (256 - 180) / 2 - 10;
constexpr int _text_offset_y = 112;
constexpr int _text_offset_x = _gif_offset_x - 10;

// Draw a line of image to ESP_8_BIT_GFX frame buffer
void GIFDraw(GIFDRAW *pDraw) {
    uint8_t *s;
    uint16_t *d, *usPalette, usTemp[320];
    int x, y;

    usPalette = pDraw->pPalette;
    y         = pDraw->iY + pDraw->y;  // current line

    s = pDraw->pPixels;
    if (pDraw->ucDisposalMethod == 2)  // restore to background color
    {
        for (x = 0; x < pDraw->iWidth; x++) {
            if (s[x] == pDraw->ucTransparent)
                s[x] = pDraw->ucBackground;
        }
        pDraw->ucHasTransparency = 0;
    }
    // Apply the new pixels to the main image
    if (pDraw->ucHasTransparency)  // if transparency used
    {
        uint8_t *pEnd, c, ucTransparent = pDraw->ucTransparent;
        int x, iCount;
        pEnd   = s + pDraw->iWidth;
        x      = 0;
        iCount = 0;  // count non-transparent pixels
        while (x < pDraw->iWidth) {
            c = ucTransparent - 1;
            d = usTemp;
            while (c != ucTransparent && s < pEnd) {
                c = *s++;
                if (c == ucTransparent)  // done, stop
                {
                    s--;  // back up to treat it like transparent
                } else    // opaque
                {
                    *d++ = usPalette[c];
                    iCount++;
                }
            }            // while looking for opaque pixels
            if (iCount)  // any opaque pixels?
            {
                for (int xOffset = 0; xOffset < iCount; xOffset++) {
                    videoOut.drawPixel(pDraw->iX + x + xOffset, margin + y, usTemp[xOffset]);
                }
                x += iCount;
                iCount = 0;
            }
            // no, look for a run of transparent pixels
            c = ucTransparent;
            while (c == ucTransparent && s < pEnd) {
                c = *s++;
                if (c == ucTransparent)
                    iCount++;
                else
                    s--;
            }
            if (iCount) {
                x += iCount;  // skip these
                iCount = 0;
            }
        }
    } else {
        s = pDraw->pPixels;
        // Translate the 8-bit pixels through the RGB565 palette (already byte reversed)
        for (x = 0; x < pDraw->iWidth; x++) {
            videoOut.drawPixel(_gif_offset_x + x, margin + y, usPalette[*s++]);
        }
    }
} /* GIFDraw() */

void setup() {
    irsend.begin();
    delay(1000);
    irsend.sendPanasonic(0x555A, 0xF148688B);
    delay(10);
    irsend.sendPanasonic(0x555A, 0xF148688B);
    delay(2000);

    videoOut.begin();
    videoOut.copyAfterSwap = true;  // gif library depends on data from previous buffer
    videoOut.fillScreen(0);
    videoOut.waitForFrame();

    gif.begin(LITTLE_ENDIAN_PIXELS);
}

void loop() {
    if (gif.open((uint8_t *)non_4b_gif, 2252208, GIFDraw)) {
        while (gif.playFrame(true, NULL)) {
            videoOut.setTextSize(1);
            videoOut.setTextColor(0xf800, 0x0000);
            videoOut.printEfont("          By using             ", _text_offset_x - 12, _text_offset_y + 16 * 2);
            videoOut.setTextColor(0xFFFF, 0x03e0);
            videoOut.printEfont("ESP_8_BIT_composite Library    ", _text_offset_x - 12, _text_offset_y + 16 * 3);
            videoOut.setTextColor(0xFFFF, 0x001f);
            videoOut.printEfont("AnimatedGIF Library            ", _text_offset_x - 12, _text_offset_y + 16 * 4);
            videoOut.setTextColor(0xFFFF, 0xf800);
            videoOut.printEfont("EfontWrapper Library           ", _text_offset_x - 12, _text_offset_y + 16 * 5);

            videoOut.waitForFrame();
        }
        videoOut.waitForFrame();
        gif.close();
    }
}
私はWeather Stationの表示器として利用しています。
ESP_8_BIT_compositeをオススメします。![]()
pschatzmann/ESP32-A2DP
https://github.com/pschatzmann/ESP32-A2DP.git
Overview
ESP32はBluetooth A2DP APIを提供しており、スマートフォンなどからサウンドデータを受信し、コールバック・メソッドを介して利用可能にします。出力はSBCフォーマットからデコードされたPCMデータストリームです。
I2Sはデジタルオーディオ機器同士の接続に使用されるシリアルバスインターフェース規格です。電子機器内の集積回路間でPCMオーディオデータを通信するために使用されます。
つまり、Bluetoothからの入力をI2Sの出力に与えればいいわけです。EspressifによるこのサンプルはGitHubにあります。
残念ながら、このサンプルは私を満足させるものではなかったので、ArduinoソフトウェアIDEから非常に簡単に使用できるシンプルなArduinoライブラリに変換することにしました。
@pschatzmannさん、ありがとう👍
実は以前、私はEspressifのESP-IDFライブラリからa2dp_sinkサンプルを使って、Bluetoothスピーカーを作成しました。SBC(Sub Band Codec)なので音の遅延はありますが、そこそこいい音を出してくれています。今も自宅で運用しています。
しかし、@pschatzmannさんが言うように、私も「このサンプルは私を満足させるものでなっかったので」、このサンプルをArduinoライブラリに出来ないか思案していました。
その前に、だれか同じことをやっているかもしれない。そこでGitHubを調べてみると、@pschatzmannさんがすでに作って公開されていました。再発明の再発明をしなくてよかったw
巨人の肩に立って簡単なサンプルを作成してみました。
[My Sample](https://github.com/riraosan/ESP32_BT-A2DP_Receiver)
# include <Application.h>

static Application app;

void setup() {
    app.setup();
}

void loop() {
    app.handle();
}
# include <Arduino.h>
# include <BluetoothA2DPSink.h>
# include <esp32-hal-log.h>

class Application {
   public:
    Application() {}

    ~Application() {}

    static void avrc_metadata_callback(uint8_t id, const uint8_t* text) {
        log_i("==> AVRC metadata rsp");

        switch (id) {
            case 0x01:
                log_i("==> 曲名:%s", text);
                break;
            case 0x02:
                log_i("==> アーティスト:%s", text);
                break;
            case 0x04:
                log_i("==> アルバム名:%s", text);
                break;
            case 0x20:
                log_i("==> ジャンル:%s", text);
                break;
            default:
                log_i("==> Unknown:%s", text);
                break;
        }
    }

    static void on_data_receive_callback(void) {
        static int count;
        if (++count % 100 == 0) {
            digitalWrite(_BLUE_LED_PORT, HIGH);
        } else {
            digitalWrite(_BLUE_LED_PORT, LOW);
        }
    }
# ifdef TEST
    BluetoothA2DPSink* getA2DPSink(void) {
        return &_a2dp_sink;
    }
# endif
    void setup(void) {
        pinMode(_BLUE_LED_PORT, OUTPUT);
        pinMode(_GREEN_LED_PORT, OUTPUT);

        i2s_pin_config_t pin_config = {
            .bck_io_num   = 26,
            .ws_io_num    = 22,
            .data_out_num = 25,
            .data_in_num  = I2S_PIN_NO_CHANGE  //Use in i2s_pin_config_t for pins which should not be changed
        };

        //Settings for ES9038Q2M VR1.07 DAC Board(eBay item number:263908779821)
        i2s_config_t i2s_config = {
            .mode                 = (i2s_mode_t)(I2S_MODE_MASTER | I2S_MODE_TX),
            .sample_rate          = 44100,                       // corrected by info from bluetooth
            .bits_per_sample      = (i2s_bits_per_sample_t)16,   // set_bits_per_sample()
            .channel_format       = I2S_CHANNEL_FMT_RIGHT_LEFT,  // 2-channels
            .communication_format = I2S_COMM_FORMAT_I2S,         // I2S communication format I2S
            .intr_alloc_flags     = ESP_INTR_FLAG_LEVEL1,        // default interrupt priority
            .dma_buf_count        = 8,                           // default
            .dma_buf_len          = 64,                          // default
            .use_apll             = false,                       // I2S using APLL as main I2S clock, enable it to get accurate clock
            .tx_desc_auto_clear   = true                         // I2S auto clear tx descriptor if there is underflow condition
        };

        _a2dp_sink.set_pin_config(pin_config);
        _a2dp_sink.set_i2s_config(i2s_config);
        _a2dp_sink.set_bits_per_sample(I2S_BITS_PER_SAMPLE_32BIT);  //for I2S : PCM 44.1K-384K 32BIT
        _a2dp_sink.set_on_data_received(on_data_receive_callback);
        _a2dp_sink.set_avrc_metadata_callback(avrc_metadata_callback);

        _a2dp_sink.start("Riraosan Player", true);
    }

    void handle(void) {
        if (_a2dp_sink.isConnected()) {
            digitalWrite(_GREEN_LED_PORT, HIGH);
        } else {
            digitalWrite(_GREEN_LED_PORT, LOW);
        }

        switch (_a2dp_sink.get_audio_state()) {
            case ESP_A2D_AUDIO_STATE_STARTED:
                break;
            case ESP_A2D_AUDIO_STATE_STOPPED:
            case ESP_A2D_AUDIO_STATE_REMOTE_SUSPEND:
                digitalWrite(_BLUE_LED_PORT, LOW);
                break;
            default:
                break;
        }
    }

   private:
    BluetoothA2DPSink _a2dp_sink;
    constexpr static int _BLUE_LED_PORT  = 33;
    constexpr static int _GREEN_LED_PORT = 32;
};
動作風景
デジタル・アナログコンバーター「ES9038Q2M VR1.07 DAC Board」を使いました。オペアンプはMUSES8920を使用しています。
このボードは「IIS / DSD: PCM44.1K-384K 32BIT」というインプットをサポートしていたので、わたしが次のコードをライブラリに独自に追加しました。
_a2dp_sink.set_bits_per_sample(I2S_BITS_PER_SAMPLE_32BIT); //for I2S : PCM 44.1K-384K 32BIT
Pull Requestはマージされませんでしたが、@pschatzmannさんがわたしのリクエストを彼のライブラリに反映してくれました。感謝👍
ESP32-A2DPをオススメします。![]()
techno/arduino-HD-0158-RG0019A
https://github.com/techno/arduino-HD-0158-RG0019A.git
Overview
Arduino library for the KOHA HD-0158-RG0019A (32x16 dot matrix LED panel) built on top of Adafruit GFX Library.
デジットなどで販売中の、ドットマトリクス LED パネル向けのライブラリです。赤と緑の2色の LED をコントロールできます。
シフトレジスタ方式で、ケーブルで複数パネルを連結するだけで、横に表示領域を拡張することができます。 このライブラリでは、3枚までの動作確認をしていますが、更に接続することも可能です。
@technoさん、ありがとう。👍
こちらの画像が、デジットで手に入れたLEDマトリクスです。ピンク色のプチプチの中にデジットの店員さんがまとめたデータシートとサンプルプログラムも添付されていました。(現在、デジットの実店鋪は共立電子さんのビル3Fに移転しました。)

自分でもLEDマトリクスライブラリを作成しました。しかし、こちらのライブラリのほうがとてもシンプルな作りで頭がスッキリした感じになりました。さらに、Adafruit GFX Library描画ライブラリに対応しているということで、こちらのライブラリに乗り換えさせてもらいました。ご覧のようにパネルを2枚連結させて使用しています。
Adafruit GFX Libraryを使ってフォントの描画をしています。GFXライブラリのAPIを使って線、矩形、円等も描画することも可能です。
同じくAdafruit GFX Libraryを使っているefontライブラが使えます。efontライブラリをラップしたefontWrapperを@tanakamasayukiさんにマージししてもらいました。よろしければどうぞ。
@tanakamasayukiさん、ありがとう。👍
[My Sample](https://github.com/riraosan/ESP32_LEDMatrix_Sample)
/*
The MIT License (MIT)
Copyright (c) 2020-2021 riraosan.github.io
Permission is hereby granted, free of charge, to any person obtaining a copy
of this software and associated documentation files (the "Software"), to deal
in the Software without restriction, including without limitation the rights
to use, copy, modify, merge, publish, distribute, sublicense, and/or sell
copies of the Software, and to permit persons to whom the Software is
furnished to do so, subject to the following conditions:
The above copyright notice and this permission notice shall be included in all
copies or substantial portions of the Software.
THE SOFTWARE IS PROVIDED "AS IS", WITHOUT WARRANTY OF ANY KIND, EXPRESS OR
IMPLIED, INCLUDING BUT NOT LIMITED TO THE WARRANTIES OF MERCHANTABILITY,
FITNESS FOR A PARTICULAR PURPOSE AND NONINFRINGEMENT. IN NO EVENT SHALL THE
AUTHORS OR COPYRIGHT HOLDERS BE LIABLE FOR ANY CLAIM, DAMAGES OR OTHER
LIABILITY, WHETHER IN AN ACTION OF CONTRACT, TORT OR OTHERWISE, ARISING FROM,
OUT OF OR IN CONNECTION WITH THE SOFTWARE OR THE USE OR OTHER DEALINGS IN THE
SOFTWARE.
*/
# define TS_ENABLE_SSL // Don't forget it for ThingSpeak.h!!
# include <esp32-hal-log.h>
# define USE_EFONT
# include <HD_0158_RG0019A.h>
# include <AutoConnect.h>
# include <ESPUI.h>
# include <ThingSpeak.h>
# include <Ticker.h>
# include <WebServer.h>
# include <WiFi.h>
# include <WiFiClientSecure.h>
# include <ESPmDNS.h>
# include <timezone.h>
# include <secrets.h>
# define HOSTNAME "esp32_clock"
# define HTTP_PORT 80
# define MSG_CONNECTED "WiFi Started."
# define CLOCK_EN_S 6 //Start AM 6:00
# define CLOCK_EN_E 23 //End PM11:00
Ticker clocker;
Ticker connectBlinker;
Ticker clockChecker;
Ticker sensorChecker;
StaticJsonDocument<384> doc;
// HD_0158_RG0019A library doesn't use manual RAM control.
// Set SE and ABB low.
# define PANEL_PIN_A3 23
# define PANEL_PIN_A2 21
# define PANEL_PIN_A1 25
# define PANEL_PIN_A0 26
# define PANEL_PIN_DG 19
# define PANEL_PIN_CLK 18
# define PANEL_PIN_WE 17
# define PANEL_PIN_DR 16
# define PANEL_PIN_ALE 22
# define PORT_SE_IN 13
# define PORT_AB_IN 27
# define PORT_LAMP 5
HD_0158_RG0019A matrix(
2,
PANEL_PIN_A3, PANEL_PIN_A2, PANEL_PIN_A1, PANEL_PIN_A0,
PANEL_PIN_DG, PANEL_PIN_CLK, PANEL_PIN_WE, PANEL_PIN_DR, PANEL_PIN_ALE);
uint16_t timeLabelId;
uint16_t temperatureLabelId;
uint16_t humidityLabelId;
uint16_t pressurLabelId;
WebServer Server;
AutoConnect Portal(Server);
AutoConnectConfig Config; // Enable autoReconnect supported on v0.9.4
AutoConnectAux Timezone;
unsigned long myChannelNumber = SECRET_CH_ID;
const char *myWriteAPIKey = SECRET_WRITE_APIKEY;
const char *certificate = SECRET_TS_ROOT_CA;
//message ID
enum class MESSAGE {
MSG_COMMAND_NOTHING,
MSG_COMMAND_GET_SENSOR_DATA,
MSG_COMMAND_PRINT_TEMPERATURE_VALUE,
MSG_COMMAND_PRINT_PRESSURE_VALUE,
MSG_COMMAND_PRINT_HUMIDITY_VALUE,
MSG_COMMAND_START_CLOCK,
MSG_COMMAND_STOP_CLOCK,
MSG_COMMAND_BLE_INIT,
MSG_COMMAND_BLE_DO_CONNECT,
MSG_COMMAND_BLE_CONNECTED,
MSG_COMMAND_BLE_DISCONNECTED,
MSG_COMMAND_BLE_NOT_FOUND,
};
MESSAGE message = MESSAGE::MSG_COMMAND_NOTHING;
void setAllPortOutput() {
pinMode(PORT_SE_IN, OUTPUT);
pinMode(PORT_AB_IN, OUTPUT);
pinMode(PORT_LAMP, OUTPUT);
}
void setAllPortLow() {
digitalWrite(PORT_SE_IN, LOW);
digitalWrite(PORT_AB_IN, LOW);
digitalWrite(PORT_LAMP, LOW);
}
void rootPage(void) {
String content =
"<html>"
"<head>"
"<meta name=\"viewport\" content=\"width=device-width, initial-scale=1\">"
"<script type=\"text/javascript\">"
"setTimeout(\"location.reload()\", 1000);"
"</script>"
"</head>"
"<body>"
"<h2 align=\"center\" style=\"color:blue;margin:20px;\">Hello, world</h2>"
"<h3 align=\"center\" style=\"color:gray;margin:10px;\">{{DateTime}}</h3>"
"<p style=\"text-align:center;\">Reload the page to update the time.</p>"
"<p></p><p style=\"padding-top:15px;text-align:center\">" AUTOCONNECT_LINK(COG_24) "</p>"
"</body>"
"</html>";
static const char *wd[7] = {"Sun", "Mon", "Tue", "Wed", "Thr", "Fri", "Sat"};
struct tm *tm;
time_t t;
char dateTime[26];
t = time(NULL);
tm = localtime(&t);
sprintf(dateTime, "%04d/%02d/%02d(%s) %02d:%02d:%02d.",
tm->tm_year + 1900, tm->tm_mon + 1, tm->tm_mday,
wd[tm->tm_wday],
tm->tm_hour, tm->tm_min, tm->tm_sec);
content.replace("{{DateTime}}", String(dateTime));
Server.send(200, "text/html", content);
}
void startPage(void) {
// Retrieve the value of AutoConnectElement with arg function of WebServer class.
// Values are accessible with the element name.
String tz = Server.arg("timezone");
for (uint8_t n = 0; n < sizeof(TZ) / sizeof(Timezone_t); n++) {
String tzName = String(TZ[n].zone);
if (tz.equalsIgnoreCase(tzName)) {
configTime(TZ[n].tzoff * 3600, 0, TZ[n].ntpServer);
log_d("Time zone: %s", tz.c_str());
log_d("ntp server: %s", String(TZ[n].ntpServer).c_str());
break;
}
}
// The /start page just constitutes timezone,
// it redirects to the root page without the content response.
Server.sendHeader("Location", String("http://") + Server.client().localIP().toString() + String("/"));
Server.send(302, "text/plain", "");
Server.client().flush();
Server.client().stop();
}
void otaPage(void) {
String content = R"(
<!DOCTYPE html>
<html>
<head>
<meta charset="UTF-8" name="viewport" content="width=device-width, initial-scale=1">
</head>
<body>
Place the root page with the sketch application. 
__AC_LINK__
</body>
</html>
)";
content.replace("__AC_LINK__", String(AUTOCONNECT_LINK(COG_16)));
Server.send(200, "text/html", content);
}
String makeCreateTime() {
time_t t = time(NULL);
struct tm *tm = localtime(&t);
char buffer[128] = {0};
sprintf(buffer, "%04d-%02d-%02dT%02d:%02d:%02d+0900",
tm->tm_year + 1900,
tm->tm_mon + 1,
tm->tm_mday,
tm->tm_hour,
tm->tm_min,
tm->tm_sec);
log_i("[time] %s", String(buffer).c_str());
return String(buffer);
}
void printTimeLEDMatrix(void) {
static int flag = 0;
flag = ~flag;
char tmp_str[10] = {0};
time_t t = time(NULL);
struct tm *tm = localtime(&t);
if (flag == 0) {
sprintf(tmp_str, "%02d:%02d:%02d", tm->tm_hour, tm->tm_min, tm->tm_sec);
} else {
sprintf(tmp_str, "%02d:%02d:%02d", tm->tm_hour, tm->tm_min, tm->tm_sec);
}
matrix.startWrite();
matrix.setCursor(0, -1);
matrix.setTextColor(DOT_GREEN, DOT_BLACK);
matrix.printEfont(tmp_str);
matrix.endWrite();
}
void connecting() {
static int num = 0;
num = ~num;
matrix.startWrite();
matrix.fillScreen(DOT_BLACK);
matrix.setCursor(0, 0);
matrix.setTextColor(DOT_GREEN, DOT_BLACK);
if (num) {
matrix.printEfont("init");
matrix.setTextColor(DOT_ORANGE, DOT_BLACK);
matrix.printEfont(".");
} else {
matrix.printEfont("init");
}
matrix.endWrite();
}
void initMatrix(void) {
setAllPortOutput();
setAllPortLow();
matrix.begin();
# ifdef DEBUG
delay(1000);
matrix.fillScreen(DOT_GREEN);
delay(1000);
matrix.fillScreen(DOT_RED);
delay(1000);
# endif
matrix.fillScreen(DOT_BLACK);
matrix.setTextWrap(false);
matrix.setTextSize(1); // x1
matrix.setCursor(0, 0);
matrix.setRotation(0);
}
bool check_clock_enable(uint8_t start_hour, uint8_t end_hour) {
time_t t = time(NULL);
struct tm *tm = localtime(&t);
log_i("HH:MM:SS = %02d:%02d:%02d", tm->tm_hour, tm->tm_min, tm->tm_sec);
if (start_hour <= tm->tm_hour && tm->tm_hour < end_hour) {
return true;
} else {
return false;
}
}
void checkSensor() {
message = MESSAGE::MSG_COMMAND_GET_SENSOR_DATA;
}
void stopClock() {
clocker.detach();
}
void startClock() {
clocker.attach_ms(250, printTimeLEDMatrix);
}
void check_clock() {
if (check_clock_enable(CLOCK_EN_S, CLOCK_EN_E)) {
message = MESSAGE::MSG_COMMAND_START_CLOCK;
} else {
stopClock();
matrix.fillScreen(DOT_BLACK);
digitalWrite(PORT_LAMP, LOW);
}
}
bool WaitSeconds(int second) {
time_t t = time(NULL);
struct tm *tm = localtime(&t);
if (tm->tm_sec == second) {
return false;
}
return true;
}
void initClock() {
//Get NTP Time
configTzTime("JST-9", "ntp.nict.jp", "ntp.jst.mfeed.ad.jp");
delay(2000);
while (WaitSeconds(0)) {
delay(100);
yield();
}
check_clock();
clockChecker.attach(60, check_clock);
while (WaitSeconds(30)) {
delay(100);
yield();
}
}
void selectHour(Control *sender, int value) {
log_d("Select: ID: %d, Value: %d", sender->id, sender->value);
}
void selectMinuit(Control *sender, int value) {
log_d("Select: ID: %d, Value: %d", sender->id, sender->value);
}
void initESPUI() {
ESPUI.setVerbosity(Verbosity::Quiet);
uint16_t hour = ESPUI.addControl(ControlType::Select, "Hour", "", ControlColor::Alizarin, Control::noParent, &selectHour);
ESPUI.addControl(ControlType::Option, "6 am", "6", ControlColor::Alizarin, hour);
ESPUI.addControl(ControlType::Option, "7 am", "7", ControlColor::Alizarin, hour);
ESPUI.addControl(ControlType::Option, "8 am", "8", ControlColor::Alizarin, hour);
uint16_t minuit = ESPUI.addControl(ControlType::Select, "Minuit", "", ControlColor::Alizarin, Control::noParent, &selectMinuit);
ESPUI.addControl(ControlType::Option, "0", "0", ControlColor::Alizarin, minuit);
ESPUI.addControl(ControlType::Option, "10", "10", ControlColor::Alizarin, minuit);
ESPUI.addControl(ControlType::Option, "20", "20", ControlColor::Alizarin, minuit);
ESPUI.addControl(ControlType::Option, "30", "30", ControlColor::Alizarin, minuit);
ESPUI.addControl(ControlType::Option, "40", "40", ControlColor::Alizarin, minuit);
ESPUI.addControl(ControlType::Option, "50", "50", ControlColor::Alizarin, minuit);
ESPUI.begin("LAMP Alarm Clock Setting");
}
void initAutoConnect(void) {
Serial.begin(115200);
// Enable saved past credential by autoReconnect option,
// even once it is disconnected.
Config.autoReconnect = true;
Config.ota = AC_OTA_BUILTIN;
Portal.config(Config);
// Load aux. page
Timezone.load(AUX_TIMEZONE);
// Retrieve the select element that holds the time zone code and
// register the zone mnemonic in advance.
AutoConnectSelect &tz = Timezone["timezone"].as<AutoConnectSelect>();
for (uint8_t n = 0; n < sizeof(TZ) / sizeof(Timezone_t); n++) {
tz.add(String(TZ[n].zone));
}
Portal.join({Timezone}); // Register aux. page
// Behavior a root path of ESP8266WebServer.
Server.on("/", rootPage);
Server.on("/start", startPage); // Set NTP server trigger handler
Server.on("/ota", otaPage);
// Establish a connection with an autoReconnect option.
if (Portal.begin()) {
log_i("WiFi connected: %s", WiFi.localIP().toString().c_str());
if (MDNS.begin(HOSTNAME)) {
MDNS.addService("http", "tcp", HTTP_PORT);
log_i("HTTP Server ready! Open http://%s.local/ in your browser\n", HOSTNAME);
} else
log_e("Error setting up MDNS responder");
}
}
void setup() {
initMatrix();
connectBlinker.attach_ms(500, connecting);
initAutoConnect();
initClock();
//initESPUI();
connectBlinker.detach();
}
void loop() {
Portal.handleClient();
switch (message) {
case MESSAGE::MSG_COMMAND_GET_SENSOR_DATA:
message = MESSAGE::MSG_COMMAND_NOTHING;
break;
case MESSAGE::MSG_COMMAND_START_CLOCK:
digitalWrite(PORT_LAMP, HIGH);
startClock();
message = MESSAGE::MSG_COMMAND_NOTHING;
break;
case MESSAGE::MSG_COMMAND_STOP_CLOCK:
stopClock();
message = MESSAGE::MSG_COMMAND_PRINT_TEMPERATURE_VALUE;
break;
case MESSAGE::MSG_COMMAND_NOTHING:
default:; //nothing
}
yield();
}

arduino-HD-0158-RG0019Aをオススメします。![]()
tanakamasayuki/efont
https://github.com/tanakamasayuki/efont.git

Overview
efont Unicode Fontに含まれるf16.bdf、b16.bdfを使用した1文字32バイトの16ピクセルフォントデータです。全角文字はf16.bdf、U+00FFまでの文字は半角文字で、b16.bdfを使用します。
@tanakamasayukiさん、ありがとう👍
こちらのライブラリはM5 StickC PlusとM5 ATOM Lite/ATOM Matrixで動作を確認しました。
このフォントライブラリは16ピクセルののBDFフォーマットのフォントデータです。
M5StickC PlusのTFT液晶に表示されているように、efontライブラリは次の言語のフォントを含んでいます。このフォントをESP_8_BIT_composite_Sampleで使わせてもらいました。
| Target | Option | Characters | Font size |
|---|---|---|---|
| ALL | efontEnableAll.h | 21,727 | 738,718 |
| Ascii(半角英数字) | efontEnableAscii.h | 191 | 6,494 |
| CJK Kanji(CJK統合漢字) | efontEnableCJK.h | 19,379 | 658,886 |
| Simplified Chinese(簡体字) | efontEnableCn.h | 18,077 | 614,618 |
| Japanese(日本語) | efontEnableJa.h | 10,835 | 368,390 |
| Mini Japanese(日本語) | efontEnableJaMini.h | 4,107 | 139,638 |
| Korean(韓国語) | efontEnableKr.h | 8,319 | 282,846 |
| Traditional Chinese(繁体字) | efontEnableTw.h | 13,555 | 460,870 |
Sample
# include <M5StickC.h>
# include "efontEnableAll.h"
//#include "efontEnableAscii.h"
//#include "efontEnableCJK.h"
//#include "efontEnableJa.h"
# include "efont.h"
# include "efontM5StickC.h"

void setup() {
  M5.begin();
  M5.Lcd.setRotation(0);
  M5.Lcd.setCursor(0, 0);

  printEfont("Hello", 0, 16*0);
  printEfont("こんにちは", 0, 16*1);
  printEfont("你好", 0, 16*2);
  printEfont("안녕하세요", 0, 16*3);
  printEfont("Доброе утро", 0, 16*4);
  printEfont("Päivää", 0, 16*6);
  printEfont("Здравствуйте", 0, 16*7);
}

void loop() {
}
インスタの動画の前半、efontを使ってひらがなを表示しています。(後半のGIF画像はAnimatedGifライブラリを使って表示しています。)
efont Unicode BDF Font Dataをオススメします。![]()
これから
今年の11月、この記事を書いている最中に、らびやんさん作のLovyanGFXライブラリを見つけました。どうやら、M5 Stack界隈では有名なパネル表示ライブラリのようです。M5 Stack Core2などのでかいほうのM5Stackは使ったことがなかったので知りませんでした。勉強になりました。
Facebookコミュニティー「M5Stack User Group Japan」のみなさん、ご支援ありがとう👍
どうやら、来年の方向性が決まった様です。
まず、LovyanGFXをESP_8_BIT_compositeにマージしてみたいと思います。AnalogPanelとでもしましょうか。それと平行して、WeatherStationプロジェクトを推進したいと思います。
それと同時に、M5 Stack社の出すおもしろデバイスを使ったマイプロジェクトを通じて、巨人に勇気をもらいながら、楽しみながら、あらゆる共同体へ貢献していきたいと思います。
「幸福とは貢献感である」(アルフレッド・アドラー)👍
(了)

