これは WCDI Advent Calendar 2018 8日目の記事です。
前日の記事 WEBサーバで障害が発生した際に確認すべき事
翌日の記事 一生「お前は誰だッ!」って言ってろ - はてなブログ様のリソースを無駄に消費してごめんなさい
はじめに
Vue.jsに浮気した時代もあったけど、やっぱりReactが可愛いから戻ってきた。
かわいいかわいい後輩に教える教材をネットで探していたのだが、必要な教材が必要なときに見つかることばかりではなく、今回はかわいくてしょうがない後輩のために自分で作ることにした。
間違いがあったらコメントや編集リクエストをお願いしたい。
Reactのチュートリアルには公式の Tutorial: Intro to Reactや、それ以外にも様々な人が有用な記事を投稿している。
しかし、人の数だけコーディングスタイルがあるため初心者にはどの書き方が正しいのか悩むと思う。
解決策としては、いろんな人のいろんなサンプルを試してみて自分がしっくり来たものを試してみたらいい。
この記事もそのサンプルの一つとして利用してもらえたら幸いである。
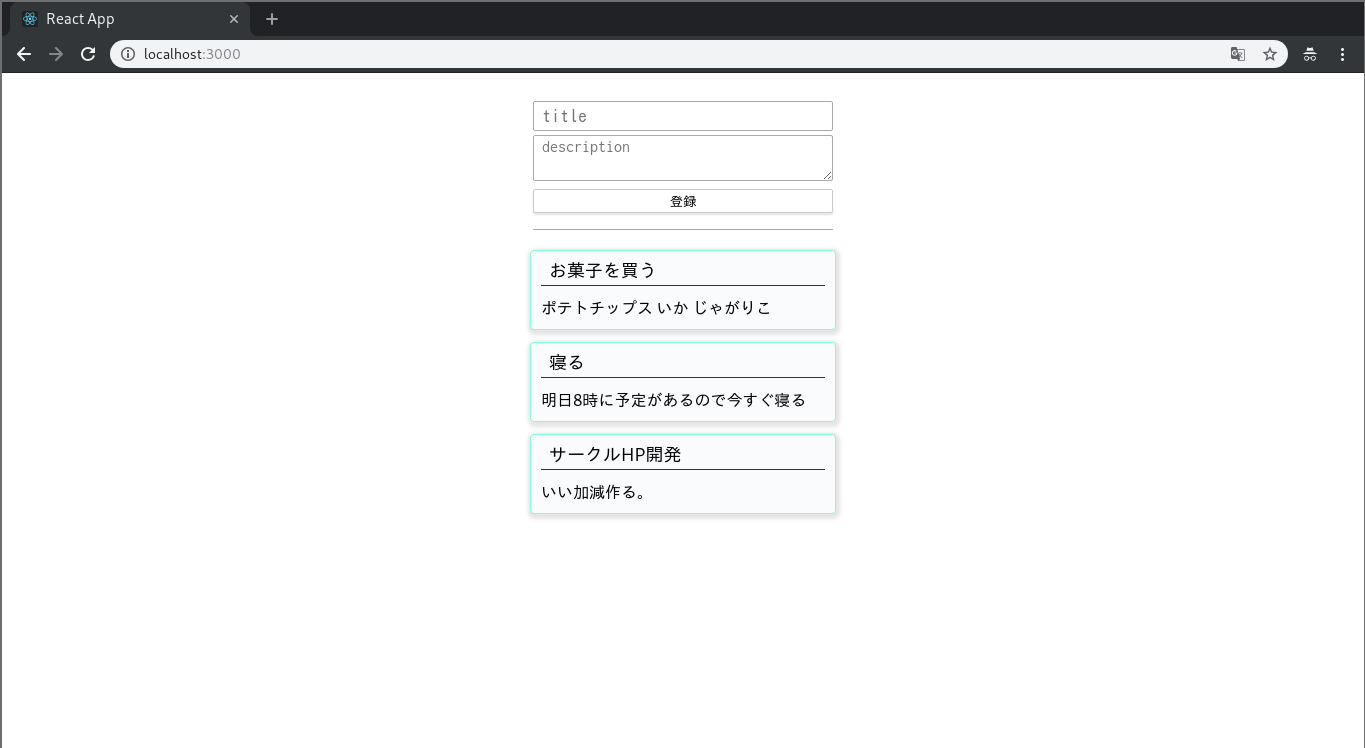
今回のToDoリストの完成形
タイトルと説明だけ追加するシンプルなToDoリスト
1. 雛形の作成
最近のフロントエンドの開発ではなんでもかんでもビルドをするけど、初心者にはなかなかハードルが高いものである。
今回使用するcreate-react-appは、煩わしいbuildの設定やデバッグ用のサーバなどを1コマンドですべて用意してくれる初心者への味方である。
create-react-app を使って作成
README.mdを確認すると3通りの作成方法がサポートされていることがわかる。
npx
npx create-react-app my-app(npx comes with npm 5.2+ and higher, see instructions for older npm versions)
npm
npm init react-app my-appnpm init is available in npm 6+
Yarn
yarn create react-app my-appyarn create is available in Yarn 0.25+
どれを使っても同じものが生成されるので、自分の環境にあるものを使用しよう。
特にインタラクティブはなく作成できる。
下記は yarn で実行した例
$ yarn create react-app react-todo-list
yarn create v1.12.3
[1/4] Resolving packages...
[2/4] Fetching packages...
[3/4] Linking dependencies...
[4/4] Building fresh packages...
success Installed "create-react-app@2.1.1" with binaries:
      - create-react-app
[################################################################] 64/64
Creating a new React app in /home/rioc/project/github.com/NozomiSugiyama/react-todo-list.

Installing packages. This might take a couple of minutes.
Installing react, react-dom, and react-scripts...

yarn add v1.12.3
[1/4] Resolving packages...
[2/4] Fetching packages...
info fsevents@1.2.4: The platform "linux" is incompatible with this module.
info "fsevents@1.2.4" is an optional dependency and failed compatibility check. Excluding it from installation.
[3/4] Linking dependencies...
[4/4] Building fresh packages...
success Saved lockfile.
success Saved 6 new dependencies.
info Direct dependencies
├─ react-dom@16.6.3
├─ react-scripts@2.1.1
└─ react@16.6.3
info All dependencies
├─ babel-preset-react-app@6.1.0
├─ react-dev-utils@6.1.1
├─ react-dom@16.6.3
├─ react-error-overlay@5.1.0
├─ react-scripts@2.1.1
└─ react@16.6.3
Done in 15.38s.

Initialized a git repository.

Success! Created react-todo-list at /home/rioc/project/github.com/NozomiSugiyama/react-todo-list
Inside that directory, you can run several commands:

  yarn start
    Starts the development server.

  yarn build
    Bundles the app into static files for production.

  yarn test
    Starts the test runner.

  yarn eject
    Removes this tool and copies build dependencies, configuration files
    and scripts into the app directory. If you do this, you can’t go back!

We suggest that you begin by typing:

  cd react-todo-list
  yarn start

Happy hacking!
Done in 17.82s.
上記のような結果が表示されれば成功している。
コマンド
yarn.lock が用意されていることから、パッケージマネージャは npm でなく yarn が使用されていることがわかる。
create-react-app の実行結果を見ると4つのコマンドが用意されていることがわかる。
- yarn start
- 開発用サーバが起動する。
- ホットリロードによって、ソースコードの変更すると自動的にブラウザに反映される。
- yarn build
- ソースコードをビルドし、
buildディレクトリにはきだす。 - アプリを公開する場合、
buildディレクトリをWebサーバのDocumentルートにそのまま配置することで配信が可能 -
package.jsonのbrowserslistを変更することによって、対応するブラウザを指定可能
- ソースコードをビルドし、
- yarn test
- testを実行する。
- yarn eject
- https://ohbarye.hatenablog.jp/entry/2016/11/20/141135 ←この方の記事をどうぞ
- https://qiita.com/naohikowatanabe/items/71a8bf477216ef56a5b7 ←この方の記事もどうぞ
- webpack buildのカスタマイズが必要になった場合とかに使用する
これらのコマンドは、 react-todo-list/package.json の"scripts" 内にて定義されている。
{
  "name": "react-todo-list",
  "version": "0.1.0",
  "private": true,
  "dependencies": {
    "react": "^16.6.3",
    "react-dom": "^16.6.3",
    "react-scripts": "2.1.1"
  },
  "scripts": {
    "start": "react-scripts start",
    "build": "react-scripts build",
    "test": "react-scripts test",
    "eject": "react-scripts eject"
  },
  "eslintConfig": {
    "extends": "react-app"
  },
  "browserslist": [
    ">0.2%",
    "not dead",
    "not ie <= 11",
    "not op_mini all"
  ]
}
上記からわかるように実際には react-scripts というコマンドを実行している。
これらのコマンドは react-todo-list/node_modules/react-scripts/scripts 下にソースコードが存在しているので、気になったら確認してみると良い。
2. デバッグ用サーバの起動
すこし話はそれたが、先に進もう。
まず作成されたディレクトリ下に移動し、サーバを起動してみる。
$ cd react-todo-list
$ yarn start
Compiled successfully!

You can now view react-todo-list in the browser.

  Local:            http://localhost:3000/
  On Your Network:  http://xxx.xxx.xxx.xxx:3000/

Note that the development build is not optimized.
To create a production build, use yarn build.
$ yarn start では webpack-dev-serverが使用されており、前述の通りホットリロードに対応している。
ブラウザが自動に立ち上がり現在のソースがbuildされ表示がされる。(もし表示されなかった場合は $yarn start 実行時の出力のURLにアクセスすれば良い。)
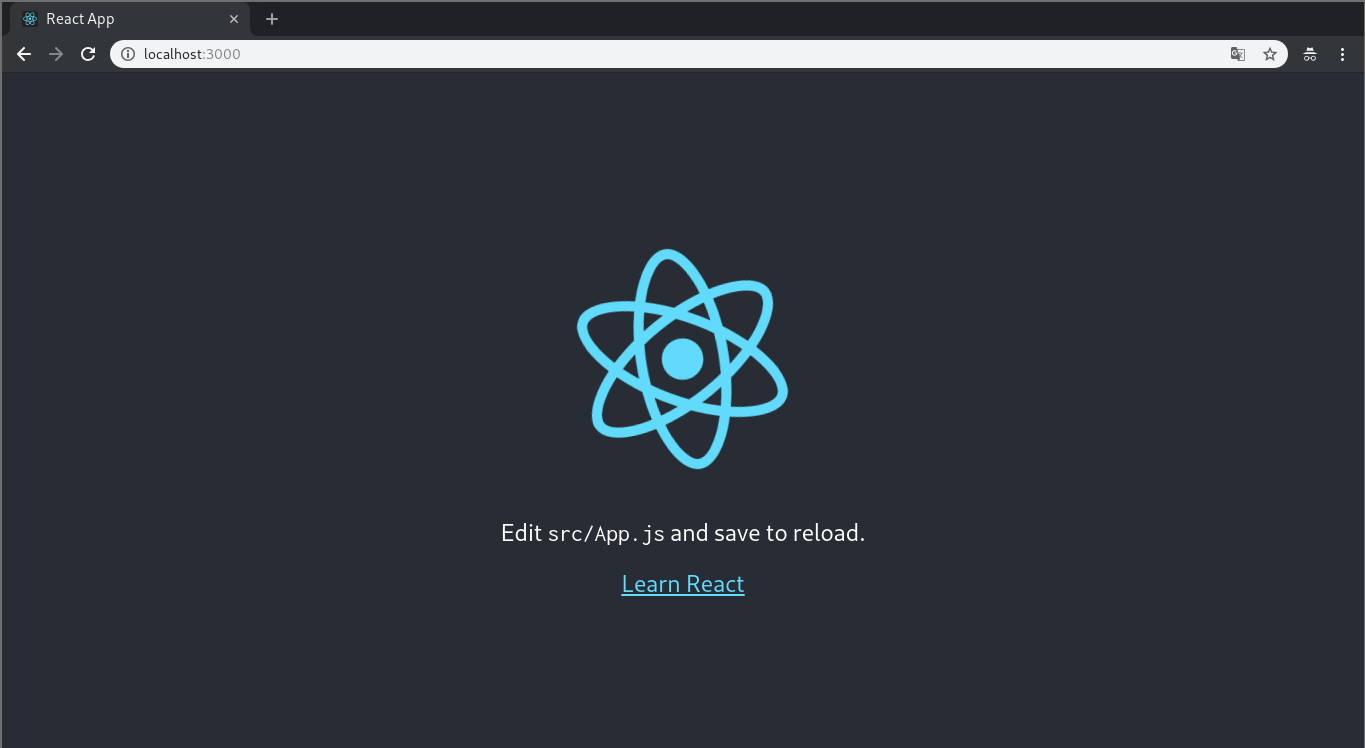
ロゴがぐるぐる回っているのを確認できたら勝者である。
3. 現状のソースの確認
これからコードリーディング、コーディングに移るがエディタの指定はないので好きなものを使ってかまわない。
特にこだわりがなければ、
-
VSCodeで爆速コーディング環境を構築する(主にReactJS向け設定)
この方の記事を参考にセットアップすれば、開発しやすいだろう。
とりあえず、今回のProject treeはこちら
見にくいのは我慢してもらいたい。
react-todo-list
├── README.md
├── node_modules
├── package.json
├── .gitignore
├── public ← buildする必要のないコンテンツを配置する(画像など)
│   ├── favicon.ico ← ブラウザのタグに表示されるIcon
│   ├── index.html ← メインのHTMLファイル
│   └── manifest.json <- ウェブアプリマニフェスト
└── src ← buildが必要なソースコードを配置する
    ├── App.css ← Appコンポーネント用のCSSファイル
    ├── App.js ← Appコンポーネントの定義ファイル
    ├── App.test.js ← Appコンポーネントのテストファイル(`$ yarn test` にて使用される)
    ├── index.css ← HTML全体に適用するCSSファイル
    ├── index.js ← ビルド時のエントリーポイント、ReactコンポーネントをHTMLへの適用やservice workerの登録を行っている。
    ├── logo.svg ← ぐるぐる回っているロゴ
    └── serviceWorker.js ← service workerで動作させるソースコードファイル(今回は扱わない)
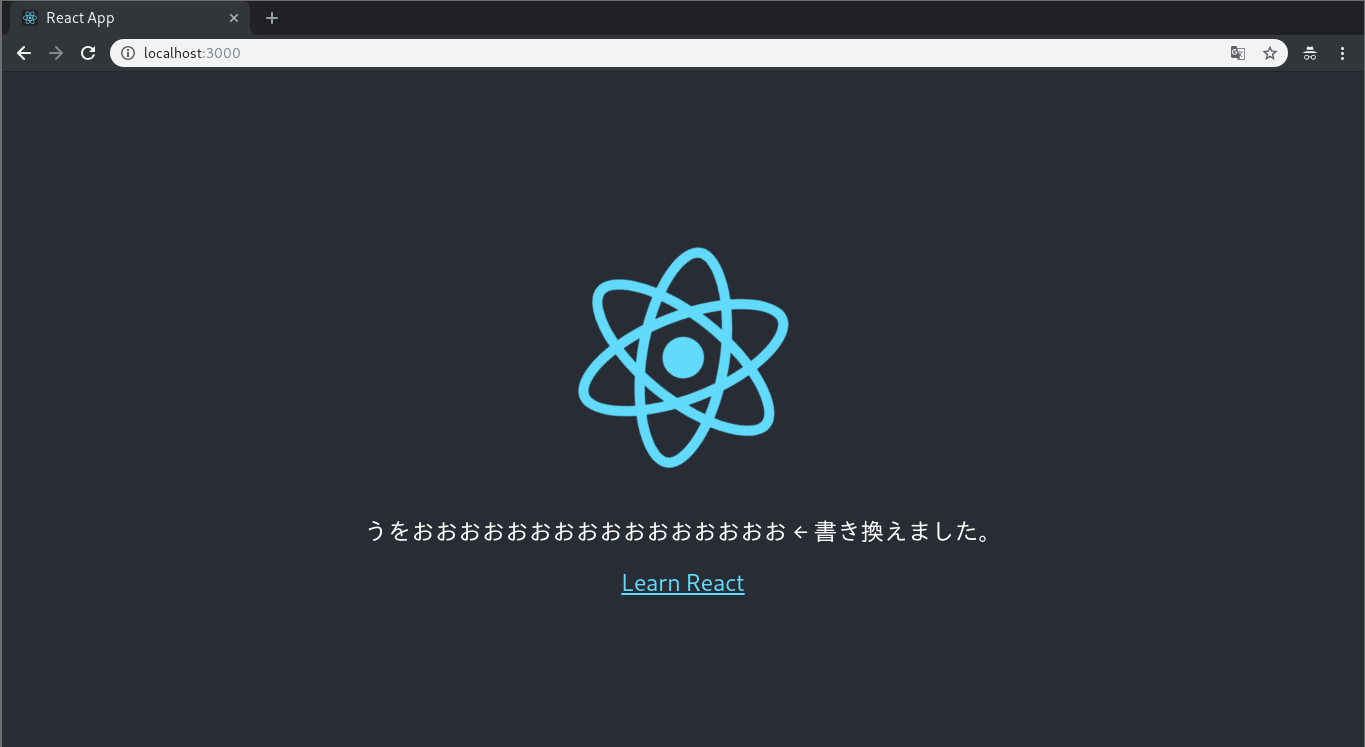
現在のソースを実際に書き換えてみよう。
- 変更前
なんか Edit src/App.js and save to reload と言ってるので、実際に書き換えてみよう。
import React, { Component } from 'react';
import logo from './logo.svg';
import './App.css';

class App extends Component {
  render() {
    return (
      <div className="App">
        <header className="App-header">
          <img src={logo} className="App-logo" alt="logo" />
          <p>
            うをおおおおおおおおおおおおおおおお ← 書き換えました。
          </p>
          <a
            className="App-link"
            href="https://reactjs.org"
            target="_blank"
            rel="noopener noreferrer"
          >
            Learn React
          </a>
        </header>
      </div>
    );
  }
}

export default App;
- 変更後
ソースコードを保存すると、自動的にブラウザでの表示が変わったかと思う。
ここまでついてこれてた人は、やっとToDoリストの作成が許される。
4. ToDoListItemコンポーネントの作成
Reactといえばやはりコンポーネント、やっとコンポーネントが自分の手でつくれるのだ。
コンポーネント?
なんだそれしらねーよ
ってひとは、これらの記事を参考にしてきてほしい。
5分で理解する React.js
React.js コンポーネント入門(props/state)
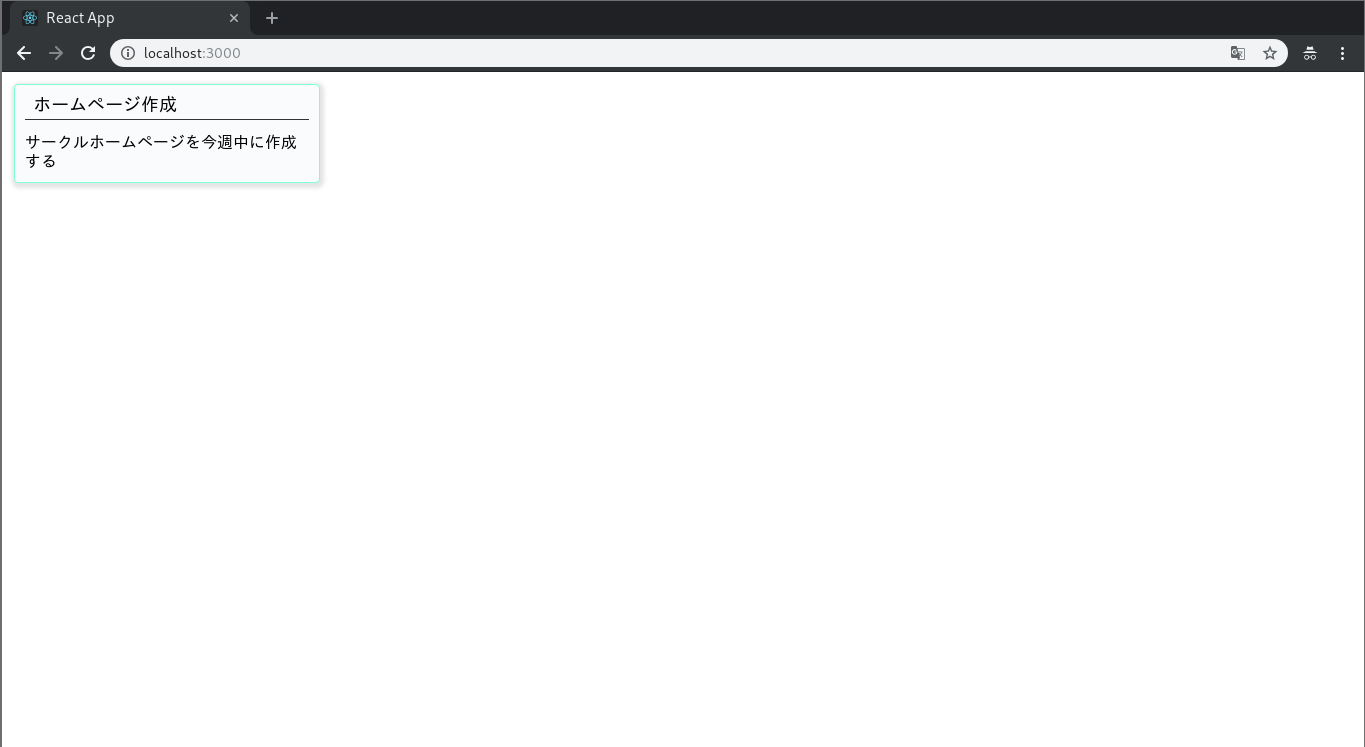
ToDoとして登録されたコンテンツ(タイトルと説明)を表示するコンポーネントである。
props(引数)として title と description を受け取り表示させる。
src ディレクトリ下に2つファイルを作成する。
- src/ToDoListItem.js
import React, { Component } from 'react';
import './ToDoListItem.css';

class ToDoListItem extends Component {
  render() {
    const {
      title,
      description
    } = this.props;

    return (
      <div className="ToDoListItem">
        <div className="ToDoListItem-title">{title}</div>
        <div className="ToDoListItem-description">{description}</div>
      </div>
    );
  }
}

export default ToDoListItem;
- src/ToDoListItem.css
.ToDoListItem {
  border: 1px solid aquamarine;
  margin: 12px;
  border-radius: 4px;
  width: 300px;
  background-color: #fafbfd;
  box-shadow: 1px 2px 5px 3px rgba(0,0,0,.1);
  padding: 4px 2px;
}

.ToDoListItem-title {
  font-size: 18px;
  margin: 0 8px 4px;
  border-bottom: 1px solid #333;
  text-align: left;
  padding: 4px 8px;
}

.ToDoListItem-description {
  word-wrap: break-word;
  padding: 8px;
}
ToDoListItemコンポーネントは状態を持たず、propsに渡された引数によって表示内容が変わるだけの単純なコンポーネントだ。
cssファイルに記述されている内容の説明は今回省く。
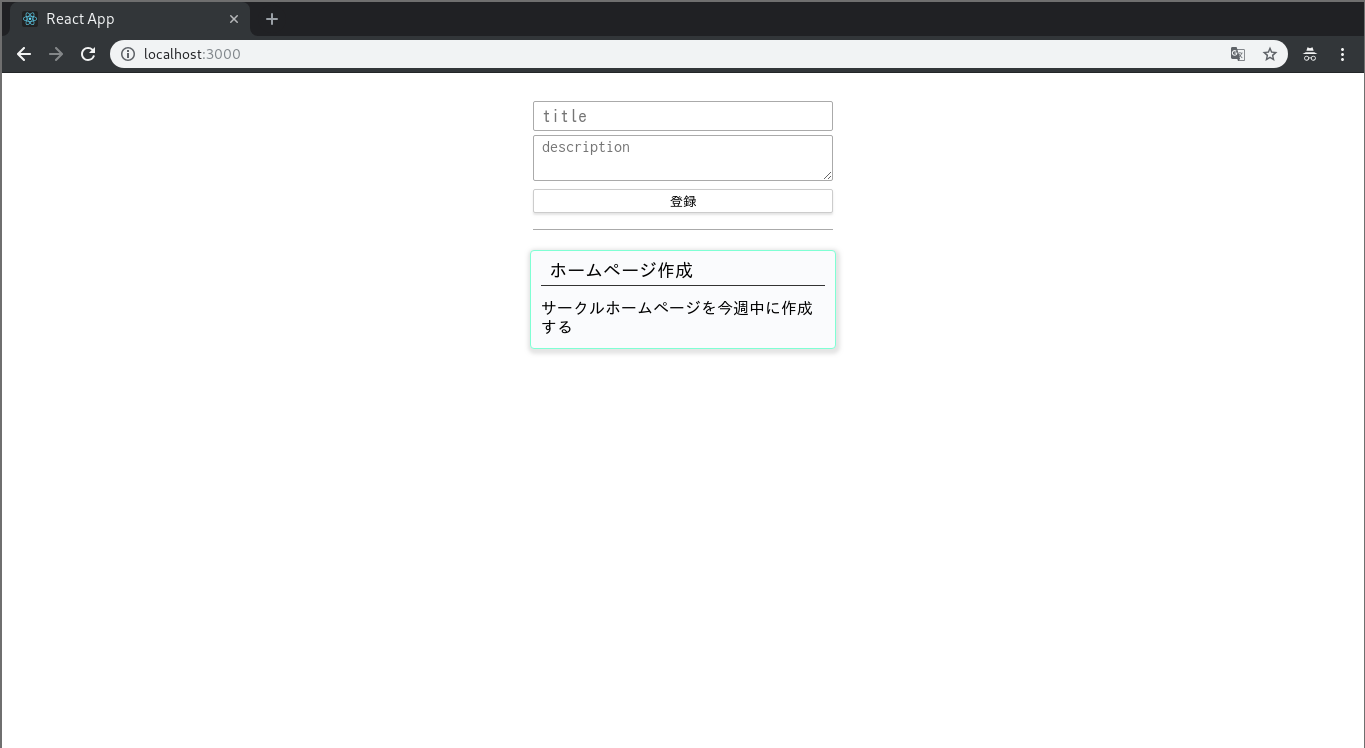
今回作成したコンポーネントが実際に動くか、 App.js を書き換えて確かめて見よう。
import React, { Component } from 'react';
import './App.css';
import ToDoListItem from "./ToDoListItem.js"

class App extends Component {
  render() {
    return (
      <div className="App">
        <div>
          <ToDoListItem
            title="ホームページ作成"
            description="サークルホームページを今週中に作成する"
          />
        </div>
      </div>
    );
  }
}

export default App;
このように表示されてることが確認できると思う。
5. ToDo入力フォームを作成
App.js を変更してformを追加する。
- src/App.js
import React, { Component } from 'react';
import './App.css';
import ToDoListItem from "./ToDoListItem.js"

class App extends Component {
  render() {
    return (
      <div className="App">
        <form
          className="App-form"
        >
          <div>
            <input
              id="title"
              placeholder="title"
            />
            <textarea
              id="description"
              placeholder="description"
            />
          </div>
          <div>
            <button
              type="submit"
            >
             登録
            </button>
          </div>
        </form>
        <div>
          <ToDoListItem
            title="ホームページ作成"
            description="サークルホームページを今週中に作成する"
          />
        </div>
      </div>
    );
  }
}

export default App;
同時にスタイルも変更する。
- src/App.css
.App {
  width: 800px;
  margin: 20px auto;
  display: flex;
  flex-direction: column;
  justify-content: center;
  align-items: center;
}

.App-form {
  display: flex;
  flex-direction: column;
  width: 300px;
  margin: 8px 4px;
  padding-bottom: 16px;
  border-bottom: 1px solid #aaa;
}

.App-form > :nth-child(1) {
  display: flex;
  flex-direction: column;
}

.App-form > :nth-child(1) > * {
  outline: none;
  border: 1px solid #aaa;
  transition: all .3s;
  border-radius: 2px;
}

.App-form > :nth-child(1) > *:focus {
  box-shadow: 0 0 7px #1abc9c;
  border: 1px solid #1abc9c;
}

.App-form > :nth-child(1) > :first-child {
  font-size: 18px;
  height: 24px;
  padding: 2px 8px;
}

.App-form > :nth-child(1) > :last-child {
  margin-top: 4px;
  font-size: 16px;
  height: 40px;
  padding: 2px 8px;
}

.App-form > :nth-child(2) {
  display: flex;
  flex-direction: column;
  justify-content: flex-end;
}

.App-form button {
  border: 1px solid #ccc;
  background: white;
  padding: 4px 8px;
  border-radius: 2px;
  margin-top: 8px;
  cursor: pointer;
  box-shadow: 0px 2px 2px 0px rgba(0,0,0,.1);
}

.App-form button:hover {
  box-shadow: 0px 2px 2px 2px rgba(0,0,0,.1);
}
完成形のデザインにだいぶ近づいた。
現状はまだハリボテで、実際にToDoの追加はできない。
6. ボタンを押してToDoを追加
formのonSubmit属性を利用して、ToDoの追加機能を実装する。
- src/App.js
import React, { Component } from 'react';
import './App.css';
import ToDoListItem from "./ToDoListItem.js"

class App extends Component {

  // ToDoListをstateに定義、初期値は []
  state = {
    todoList: []
  }

  render() {
    return (
      <div className="App">
        <form
          className="App-form"
          onSubmit={e => {
            // formのデフォルトのイベントをキャンセル
            e.preventDefault();

            // idがtitleのElementを取得
            const titleElement = e.target.elements["title"]
            // idがdescriptionのElementを取得
            const descriptionElement = e.target.elements["description"];

            // todoList stateに追加
            this.setState(
              {
                todoList: this.state.todoList.concat({
                  title: titleElement.value,
                  description: descriptionElement.value
                })
              },
              // stateの変更後に入力した値を空にする
              () => {
                titleElement.value = "";
                descriptionElement.value = "";
              }
            )
          }}
        >
          <div>
            <input
              id="title"
              placeholder="title"
            />
            <textarea
              id="description"
              placeholder="description"
            />
          </div>
          <div>
            <button
              type="submit"
            >
              登録
            </button>
          </div>
        </form>
        <div>
        {/* todoList配列の要素数分ToDoListItemコンポーネントを展開 */}
          {this.state.todoList.map(todo => (
            <ToDoListItem
              key={todo.title}
              title={todo.title}
              description={todo.description}
            />
          ))}
        </div>
      </div>
    );
  }
}

export default App;
実際にタイトルと説明を入力し、登録ボタンを押すと追加されることが確認できる。
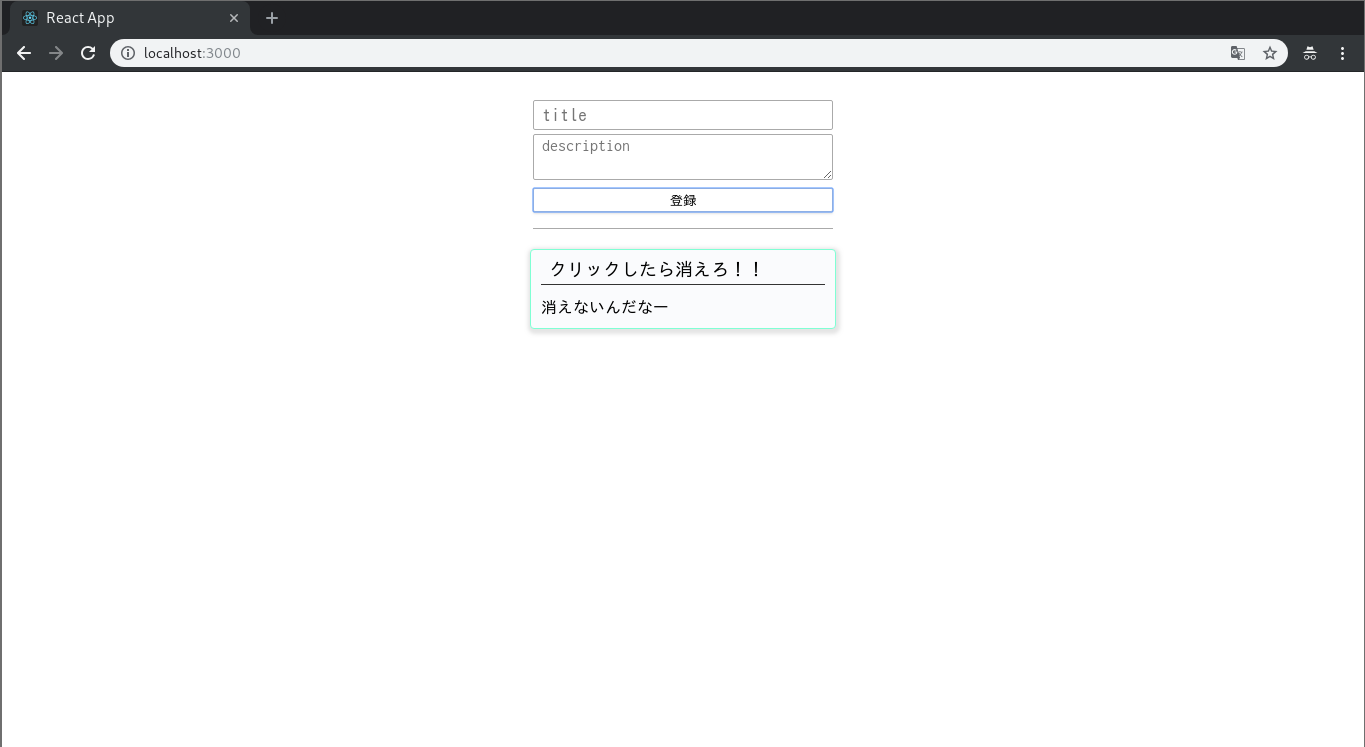
7. ToDoListItemを押してToDoを削除
「Item押したら消えるってどういうことや」とかは言わないでほしい。。。
また App.js を編集する。
ToDoListItemコンポーネントのonClickイベントを追加する。
- src/App.js
import React, { Component } from 'react';
import './App.css';
import ToDoListItem from "./ToDoListItem.js"

class App extends Component {

  // ToDoListをstateに定義、初期値は []
  state = {
    todoList: []
  }

  render() {
    return (
      <div className="App">
        <form
          className="App-form"
          onSubmit={e => {
            // formのデフォルトのイベントをキャンセル
            e.preventDefault();

            // idがtitleのElementを取得
            const titleElement = e.target.elements["title"]
            // idがdescriptionのElementを取得
            const descriptionElement = e.target.elements["description"];

            // todoList stateに追加
            this.setState(
              {
                todoList: this.state.todoList.concat({
                  title: titleElement.value,
                  description: descriptionElement.value
                })
              },
              // stateの変更後に入力した値を空にする
              () => {
                titleElement.value = "";
                descriptionElement.value = "";
              }
            )
          }}
        >
          <div>
            <input
              id="title"
              placeholder="title"
            />
            <textarea
              id="description"
              placeholder="description"
            />
          </div>
          <div>
            <button
              type="submit"
            >
              登録
            </button>
          </div>
        </form>
        <div>
        {/* todoList配列の要素数分ToDoListItemコンポーネントを展開 */}
          {this.state.todoList.map(todo => (
            <ToDoListItem
              key={todo.title}
              title={todo.title}
              description={todo.description}
              // クリックされたItemをtodoList stateから削除
              onClick={() => {
                this.setState({
                  todoList: this.state.todoList.filter(x => x !== todo)
                })
              }}
            />
          ))}
        </div>
      </div>
    );
  }
}

export default App;
デバッグした人には申し訳ない。
この段階ではまだ動作しない。
App.js のToDoListItemコンポーネントに追加した onClick 属性も、title や description 同様ToDoListItemコンポーネントのpropsに渡される。
現状、ToDoListItemコンポーネントには title と description の引数以外のハンドリングを行っていないために、 onClick が動かなかったのだ。
JavaScriptの分割代入を利用して対処する。
- src/ToDoListItem.js
import React, { Component } from 'react';
import './ToDoListItem.css';

class ToDoListItem extends Component {
  render() {
    const {
      title,
      description,
      ...props
    } = this.props;

    return (
      <div className="ToDoListItem" {...props}>
        <div className="ToDoListItem-title">{title}</div>
        <div className="ToDoListItem-description">{description}</div>
      </div>
    );
  }
}

export default ToDoListItem;
これでonClick属性はToDoListItemのdivタグに反映され、ボタンを押すとToDoが消えるようになった。
8. ToDoListの永続化
ここまでで、ある程度ToDoListの形にはなった。
しかし、現状の段階だとページ更新のたびにToDoListが初期化されてしまう。
そこで、localStorageを使用して永続化を行う。
- src/App.js
import React, { Component } from 'react';
import './App.css';
import ToDoListItem from "./ToDoListItem.js"

class App extends Component {

  // ToDoListをstateに定義、初期値はlocalStorageから取得または []
  state = {
    todoList: JSON.parse(localStorage.getItem("todoList")) || []
  }

  // todoList itemの追加
  addTodo = (item, callBack) => {
    // todoList stateに追加
    this.setState(
      {
        todoList: this.state.todoList.concat(item)
      },
      () => {
        // localStorageにtodoList stateを保存
        localStorage.setItem("todoList", JSON.stringify(this.state.todoList))
        // callBack関数が引数に渡されていた場合に実行
        callBack && callBack()
      }
    )
  }

  // todoListからitemを削除
  removeTodo = (item, callBack) => {
    this.setState(
      {
        todoList: this.state.todoList.filter(x => x !== item)
      },
      () => {
        // localStorageにtodoList stateを保存
        localStorage.setItem("todoList", JSON.stringify(this.state.todoList))
        // callBack関数が引数に渡されていた場合に実行
        callBack && callBack()
      }
    )
  }

  render() {
    return (
      <div className="App">
        <form
          className="App-form"
          onSubmit={e => {
            // formのデフォルトのイベントをキャンセル
            e.preventDefault();

            // idがtitleのElementを取得
            const titleElement = e.target.elements["title"]
            // idがdescriptionのElementを取得
            const descriptionElement = e.target.elements["description"];

            this.addTodo(
              {
                title: titleElement.value,
                description: descriptionElement.value
              },
              () => {
                // stateの変更後に入力した値を空にする
                titleElement.value = "";
                descriptionElement.value = "";
              }
            )
          }}
        >
          <div>
            <input
              id="title"
              placeholder="title"
            />
            <textarea
              id="description"
              placeholder="description"
            />
          </div>
          <div>
            <button
              type="submit"
            >
              登録
            </button>
          </div>
        </form>
        <div>
        {/* todoList配列の要素数分ToDoListItemコンポーネントを展開 */}
          {this.state.todoList.map(todo => (
            <ToDoListItem
              key={todo.title}
              title={todo.title}
              description={todo.description}
              // クリックされたItemをtodoList stateから削除
              onClick={() => this.removeTodo(todo)}
            />
          ))}
        </div>
      </div>
    );
  }
}

export default App;
stateの初期値登録時に、localStorageにtodoListと名付けたitemが存在する場合、localStorageから取得するように変更。
また、addTodoメソッドとremoveTodoメソッドを追加し、setStateと同時にlocalStorageに反映されるように変更した。
ちなみに、localStorageのvalueには文字列しか登録できないため、JSONを使用している。
これによって、ブラウザ更新を行っても登録したToDoListは消えることなく、永続化することができた。
最後に
いかがだっただろうか。
ReactはJSXを使用しているため、プログラミング初心者や他の言語から参加した人にとってはなれるまで時間がかかると思う。
しかし、慣れてくると開発効率がとても高くなりフロントエンドの開発が楽しくなってくる。
今回の記事が、少しでもReactでフロントエンドエンドを開発したいと思っている人に役立ったのなら幸いである。