はじめに
本記事では、先日の記事に続き「Composeを用いたAndroidアプリの基礎」というコース内でCompose象限というお題に挑戦して得られた知識を共有したいと思います。
お題について
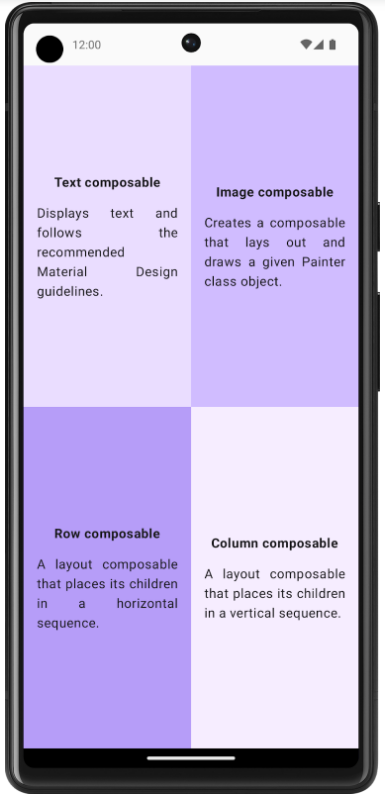
Jetpack Composeを用いて、↓画像のような画面を作るのがお題です。
お題に関するUI仕様は次のようなものでした。
画面全体のUI仕様は、次のとおりです。
・画面全体を同じ大きさに4分割します。それぞれにComposeカードがあり、Composable関数についての情報が表示されます。
各象限の仕様は次のとおりです。
- 象限全体(上下左右)を、パディング
16dpに設定します。- すべてのコンテンツを各象限の垂直方向と水平方向に中央揃えで配置します。
- 最初の
Textコンポーザブルを、太字に書式設定し、下パディング16dpに設定します。- 2つ目の
Textコンポーザブルを、フォントサイズDefaultに設定します。
実装したコード(解答確認前)
実装手順
・まず細かいパディングなどを整える前に、コンテンツの配置を整えることを考えました。
・画面は、1行に2つのコンテンツが並んでいるのが、2列あるためRow内にColumnを2つ挿入するといった流れで実装しました。
package com.example.composequadrant

import android.os.Bundle
import androidx.activity.ComponentActivity
import androidx.activity.compose.setContent
import androidx.activity.enableEdgeToEdge
import androidx.compose.foundation.layout.Column
import androidx.compose.foundation.layout.Row
import androidx.compose.foundation.layout.fillMaxSize
import androidx.compose.material3.MaterialTheme
import androidx.compose.material3.Surface
import androidx.compose.material3.Text
import androidx.compose.runtime.Composable
import androidx.compose.ui.Modifier
import androidx.compose.ui.tooling.preview.Preview
import com.example.composequadrant.ui.theme.ComposeQuadrantTheme

class MainActivity : ComponentActivity() {
    override fun onCreate(savedInstanceState: Bundle?) {
        super.onCreate(savedInstanceState)
        enableEdgeToEdge()
        setContent {
            ComposeQuadrantTheme {
                Surface(
                    modifier = Modifier.fillMaxSize(),
                    color = MaterialTheme.colorScheme.background
                ) {
//
                }
            }
        }
    }
}

@Composable
fun QuadrantCard() {
    Row {
        Column {
            Text(
                text = "Text Composable"
            )
            Text(
                text = "Displays text and follows the recommended Material Design guidelines."
            )
        }
        Column {
            Text(
                text = "Image composable"
            )
            Text(
                text = "Creates a composable that lays out and draws a given Painter class object."
            )
        }
    }
    Row {
        Column {
            Text(
                text = "Row composable"
            )
            Text(
                text = "A layout composable that places its children in a horizontal sequence."
            )
        }
    }
    Row {
        Column {
            Text(
                text = "Column composable"
            )
            Text(
                text = "A layout composable that places its children in a vertical sequence."
            )
        }
    }
}
しかし、プレビューしてみると・・・要素が重なってしまっています。

その原因がわからず、以下の解答を見て理解することにしました。
解答コード
package com.example.composequadrant

import android.os.Bundle
import androidx.activity.ComponentActivity
import androidx.activity.compose.setContent
import androidx.compose.foundation.background
import androidx.compose.foundation.layout.Arrangement
import androidx.compose.foundation.layout.Column
import androidx.compose.foundation.layout.Row
import androidx.compose.foundation.layout.fillMaxSize
import androidx.compose.foundation.layout.fillMaxWidth
import androidx.compose.foundation.layout.padding
import androidx.compose.material3.MaterialTheme
import androidx.compose.material3.Surface
import androidx.compose.material3.Text
import androidx.compose.runtime.Composable
import androidx.compose.ui.Alignment
import androidx.compose.ui.Modifier
import androidx.compose.ui.graphics.Color
import androidx.compose.ui.res.stringResource
import androidx.compose.ui.text.font.FontWeight
import androidx.compose.ui.text.style.TextAlign
import androidx.compose.ui.tooling.preview.Preview
import androidx.compose.ui.unit.dp
import com.example.composequadrant.ui.theme.ComposeQuadrantTheme

class MainActivity : ComponentActivity() {
    override fun onCreate(savedInstanceState: Bundle?) {
        super.onCreate(savedInstanceState)
        setContent {
            ComposeQuadrantTheme {
                // A surface container using the 'background' color from the theme
                Surface(
                    modifier = Modifier.fillMaxSize(),
                    color = MaterialTheme.colorScheme.background
                ) {
                    ComposeQuadrantApp()
                }
            }
        }
    }
}

@Composable
fun ComposeQuadrantApp() {
    Column(Modifier.fillMaxWidth()) {
        Row(Modifier.weight(1f)) {
            ComposableInfoCard(
                title = stringResource(R.string.first_title),
                description = stringResource(R.string.first_description),
                backgroundColor = Color(0xFFEADDFF),
                modifier = Modifier.weight(1f)
            )
            ComposableInfoCard(
                title = stringResource(R.string.second_title),
                description = stringResource(R.string.second_description),
                backgroundColor = Color(0xFFD0BCFF),
                modifier = Modifier.weight(1f)
            )
        }
        Row(Modifier.weight(1f)) {
            ComposableInfoCard(
                title = stringResource(R.string.third_title),
                description = stringResource(R.string.third_description),
                backgroundColor = Color(0xFFB69DF8),
                modifier = Modifier.weight(1f)
            )
            ComposableInfoCard(
                title = stringResource(R.string.fourth_title),
                description = stringResource(R.string.fourth_description),
                backgroundColor = Color(0xFFF6EDFF),
                modifier = Modifier.weight(1f)
            )
        }
    }
}

@Composable
private fun ComposableInfoCard(
    title: String,
    description: String,
    backgroundColor: Color,
    modifier: Modifier = Modifier
) {
    Column(
        modifier = modifier
            .fillMaxSize()
            .background(backgroundColor)
            .padding(16.dp),
        verticalArrangement = Arrangement.Center,
        horizontalAlignment = Alignment.CenterHorizontally
    ) {
        Text(
            text = title,
            modifier = Modifier.padding(bottom = 16.dp),
            fontWeight = FontWeight.Bold
        )
        Text(
            text = description,
            textAlign = TextAlign.Justify
        )
    }
}

@Preview(showBackground = true)
@Composable
fun ComposeQuadrantAppPreview() {
    ComposeQuadrantTheme {
        ComposeQuadrantApp()
    }
}
解答コードから得られたこと(ポイント)
ComposableInfoCard()という1つの象限UIを描画する関数を定義し、親コンポーズであるComposeQuadrantApp()という関数内で、コンテンツを縦に配置するレイアウト要素Column内に、コンテンツを横に配置するレイアウト要素Rowを2つ定義し、それぞれComposableInfoCard(modifier = Modifier.weight(1f))を呼び出すことで画面を設計している。
Modifier.weight()について
公式には以下のような説明文があります。
Size the element's width proportional to its weight relative to other weighted sibling elements in the Row.
訳すと、「要素の幅サイズがRow内の他の重み付けられた兄弟要素に対する相対的な重みに比例する」という意味になります。
今回で言うと、以下のように、ComposeInfoCard(modifier = Modifier.weight(1f))とComposeInfoCard(modifier = Modifier.weight(1f))とあるように、1つの象限ともう1つの象限の重みが1:1になるように振る舞うことを知れました。
Row(Modifier.weight(1f) {
    ComposableInfoCard(
        title = string(R.string.first_title),
        description = stringResource(R.string.first_description)
        backgroundColor = Color(0xFFEADDFF),
        modifier = Modifier.weight(1f)
    )
    ComposableInfoCard(
                title = stringResource(R.string.second_title),
                description = stringResource(R.string.second_description),
                backgroundColor = Color(0xFFD0BCFF),
                modifier = Modifier.weight(1f)
    )
}


