はじめに
久しぶりの投稿です。Android開発に興味があり、「Composeを用いたAndroidアプリの基礎」」を用いて学習しています。本記事では、このコース内にあるCompose記事といったお題に挑戦したことで得られた知識を共有したいと思います。
お題について
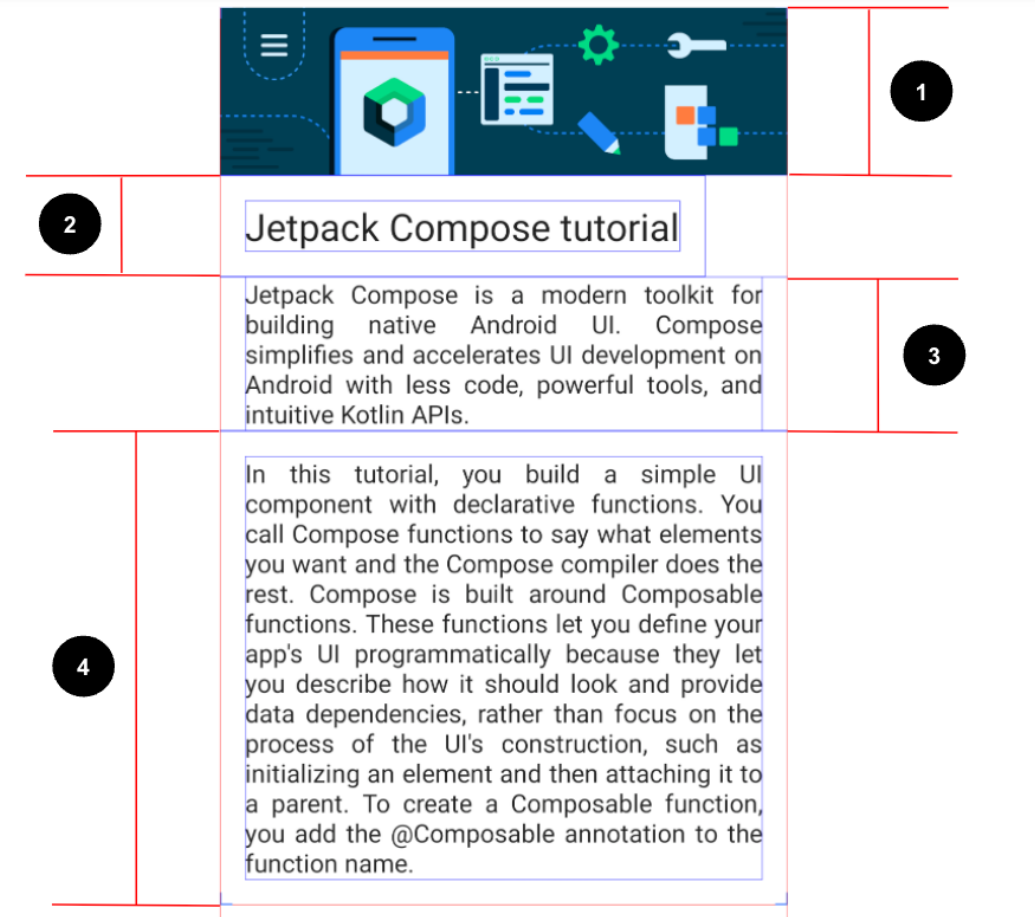
Jetpack Composeの基本を用いて、↓画像のようにデザインされた画面を作るのがお題です。
お題に関するUI仕様は次のようなものです。
- 画像を幅いっぱいになるように設定します。
- 最初の
Textコンポーザブルを、フォントサイズ24sp、パディング(上下左右)16dpに設定します。- 2つ目の
Textコンポーザブルを、デフォルトのフォントサイズ、パディング(左右)16dp、テキスト配置Justifyに設定します。- 3つ目の
Textコンポーザブルを、デフォルトのフォントサイズ、パディング(上下左右)16dp、テキスト配置Justifyに設定します。
完成コード(解答確認前)
package com.example.composearticle

import android.os.Bundle
import androidx.activity.ComponentActivity
import androidx.activity.compose.setContent
import androidx.activity.enableEdgeToEdge
import androidx.compose.foundation.Image
import androidx.compose.foundation.layout.Column
import androidx.compose.foundation.layout.fillMaxSize
import androidx.compose.foundation.layout.padding
import androidx.compose.material3.MaterialTheme
import androidx.compose.material3.Surface
import androidx.compose.material3.Text
import androidx.compose.runtime.Composable
import androidx.compose.ui.Modifier
import androidx.compose.ui.layout.ContentScale
import androidx.compose.ui.res.painterResource
import androidx.compose.ui.res.stringResource
import androidx.compose.ui.text.style.TextAlign
import androidx.compose.ui.tooling.preview.Preview
import androidx.compose.ui.unit.dp
import androidx.compose.ui.unit.sp
import com.example.composearticle.ui.theme.ComposeArticleTheme

class MainActivity : ComponentActivity() {
    override fun onCreate(savedInstanceState: Bundle?) {
        super.onCreate(savedInstanceState)
        enableEdgeToEdge()
        setContent {
            ComposeArticleTheme {
                Surface(
                    modifier = Modifier.fillMaxSize(),
                    color = MaterialTheme.colorScheme.background
                ) {
                    Column {
                        ArticleImage()
                        ArticleText(
                            text1 = stringResource(R.string.jetpack_compose_tutorial_text1),
                            text2 = stringResource(R.string.jetpack_compose_tutorial_text2),
                            text3 = stringResource(R.string.jetpack_compose_tutorial_text3)
                        )
                    }
                }
            }
        }
    }
}

@Composable
fun ArticleImage() {
    val image = painterResource(R.drawable.bg_compose_background)
    Image(
        painter = image,
        contentDescription = null,
        contentScale = ContentScale.FillWidth
    )
}

@Composable
fun ArticleText(text1: String, text2: String, text3: String) {
    Text(
        text = text1,
        fontSize = 24.sp,
        modifier = Modifier
            .padding(16.dp)

    )
    Text(
        text = text2,
        modifier = Modifier
            .padding(
                start = 16.dp,
                end = 16.dp
            ),
        textAlign = TextAlign.Justify
    )
    Text(
        text = text3,
        modifier = Modifier
            .padding(16.dp),
        textAlign = TextAlign.Justify
    )
}

@Preview(showBackground = true)
@Composable
fun ArticleImagePreview() {
    ComposeArticleTheme {
        Column {
            ArticleImage()
            ArticleText(
                text1 = stringResource(R.string.jetpack_compose_tutorial_text1),
                text2 = stringResource(R.string.jetpack_compose_tutorial_text2),
                text3 = stringResource(R.string.jetpack_compose_tutorial_text3)
            )
        }
    }
}
実装手順
・画面が上から画像とテキスト3つで構成されている → 「画像表示関数」ArticleImage()と「テキスト表示関数」ArticleText()を用意し、それぞれの責務を担当するといった流れで実装しました。
実装するうえで得られたこと(ポイント)
・画像を表示するにはImageコンポーザブル、テキストを表示するにはTextコンポーザブルという関数を使う。
・画像や文字列などのリソースは、そのまま利用(ハードコーディング)するのではなく、別のファイルに格納して再利用性をあげる。
・Composeの基本的なレイアウト要素であるColumnコンポーザブルで内部に配置された子要素を垂直に配置する。
・コンポーザブルを装飾・拡張するために、修飾子であるModifierを用いる。
解答コード
package com.example.composearticle

import android.os.Bundle
import androidx.activity.ComponentActivity
import androidx.activity.compose.setContent
import androidx.activity.enableEdgeToEdge
import androidx.compose.foundation.Image
import androidx.compose.foundation.layout.Column
import androidx.compose.foundation.layout.fillMaxSize
import androidx.compose.foundation.layout.padding
import androidx.compose.material3.MaterialTheme
import androidx.compose.material3.Surface
import androidx.compose.material3.Text
import androidx.compose.runtime.Composable
import androidx.compose.ui.Modifier
import androidx.compose.ui.graphics.painter.Painter
import androidx.compose.ui.res.painterResource
import androidx.compose.ui.res.stringResource
import androidx.compose.ui.text.style.TextAlign
import androidx.compose.ui.tooling.preview.Preview
import androidx.compose.ui.unit.dp
import androidx.compose.ui.unit.sp
import com.example.composearticle.ui.theme.ComposeArticleTheme

class MainActivity : ComponentActivity() {
    override fun onCreate(savedInstanceState: Bundle?) {
        super.onCreate(savedInstanceState)
        enableEdgeToEdge()
        setContent {
            ComposeArticleTheme {
                Surface(
                    modifier = Modifier.fillMaxSize(),
                    color = MaterialTheme.colorScheme.background
                ) {
                    ComposableArticleApp()
                }
            }
        }
    }
}

@Composable
fun ComposableArticleApp() {
    ArticleCard(
        title = stringResource(R.string.title_jetpack_compose_tutorial),
        shortDescription = stringResource(R.string.compose_short_desc),
        longDescription = stringResource(R.string.compose_long_desc),
        imagePainter = painterResource(R.drawable.bg_compose_background),
    )
}

@Composable
private fun ArticleCard(
    title: String,
    shortDescription: String,
    longDescription: String,
    imagePainter: Painter,
    modifier: Modifier = Modifier,
) {
    Column(modifier = modifier) {
        Image(
            painter = imagePainter, contentDescription = null,
        )
        Text(
            text = title,
            fontSize = 24.sp,
            modifier = Modifier.padding(16.dp)
        )
        Text(
            text = shortDescription,
            modifier = Modifier.padding(start = 16.dp, end = 16.dp),
            textAlign = TextAlign.Justify
        )
        Text(
            text = longDescription,
            modifier = Modifier.padding(16.dp),
            textAlign = TextAlign.Justify
        )
    }
}

@Preview(showBackground = true)
@Composable
fun ArticleImagePreview() {
    ComposeArticleTheme {
        ComposableArticleApp()
    }
}
解答コードから得られること(ポイント)
画像を表示する関数とテキストを表示する関数を1つの関数ArticleCard()に定義している。
ComposableArticleApp()という内部でArticleCard関数を呼び出している。
MainActiviy内に、UI構造を直接記述すると、UI構造の詳細に依存し、肥大化してしまったり(可読性の低下)、新しいUIを作成するたびに、重複したコードが発生してしまったり(再利用性の低下)、UI構築の責務を持つことになり、コードが複雑化しやすくエラーが発生しやすくなってしまう(保守性の低下)ことを学びました。

