公式のgithubにプッシュ通知のサンプルコードがありますが、daily updateとpush notificationが並列で説明されているため、今回はpush notificationの機能に絞った実装方法を紹介してみます。
また、サンプルコードの情報が少し古く、また日本語環境での実装で多少手を加える必要があるので、その部分に関しても記載したいと思います。
サンプルコード:https://github.com/actions-on-google/dialogflow-updates-nodejs
Actions on Googleでプロジェクトの作成
まずはActions on Googleのコンソールに開発アカウントでログインして、今回プッシュ通知を実装するプロジェクトを作成します。
コンソールにログインしたら、「Add/import project」をクリックします。
 !
!
任意のプロジェクト名を入力します。今回は「pushNotificationTest」というプロジェクト名にして進めていきます。また、日本語環境でAoGを使用したいので「default language」をJapanese、「country or region」をJapanに設定します。入力が終わったら「CREATE PROJECT」をクリックします。

プロジェクトのテンプレートがいろいろと用意されていますが、今回は既存テンプレートは使わないので「SKIP」をクリックして先に進みます。

プロジェクトが作成され、プロジェクトの各種設定する画面に遷移します。まずはこのプロジェクトのAoGアプリ呼び出し名を設定するために「Decide how your Actions is invoked」をクリックします。

Display nameの欄にAoGの呼び出し名を記入して「SAVE」をクリックします。今回は「プッシュプッシュ通知」という呼び出し名で進めます。
※他で使われている名前は「SAVE」をクリックしたあと、「他で既に使われています...」的なエラーメッセージが出るので、その場合は他の呼び出し名にする必要があります。

続いて、このAoGで使用するActionsを設定するために画面左のメニュー「Actions」をクリックします。

「ADD YOUR FIRST ACTION」をクリックしてActionの作成に入ります。

ここでも各種テンプレート選択できますが、まっさらな状態のActionを制作したいので「Custom intent」を選択肢「BUILD」をクリックして進めます。

ここで、Actions on GoogleのコンソールからDialogflowのコンソールに遷移します。ここからはDialogflowでの設定に移るので一旦Actions on Googleの設定はそのままにしておきます。
DialogflowでAoGのActionの作成する
日本語で使用したいので、「DEFAULT LANGUAGE」で「japanese -ja」を選択して、「DEFAULT TIMEZONE」も「Asia/Tokyo」を選択して「CREATE」をクリックします。

これで、雛形となるActions on GoogleとDialogflowの設定が完了しました。プッシュ通知を行うまでに、まだまだ他にもActions on Googleで各種設定したりDialogflowでインテントを制作および設定したり、webhookと呼ばれる実際のプログラムロジックを処理するサーバーなどを用意する必要がありますが、それぞれ今から説明していきます。
Actions APIの設定
AoGでプッシュ通知を行う場合、Google APIsのActions APIを使用してユーザーにプッシュ通知を行います。実際には後述するfirebase cloud functions内で、このapiを使用するので、まずはActions APIの設定を済ませておきます。
Google APIsのコンソールにアクセスします。
https://console.developers.google.com/
※もしログインがまだであれば、今回のAoGのプロジェクトの開発アカウントでログインしてください。
プロジェクトの選択
ウィンドウ上部の「Google APIs」の横にあるセレクターをクリックし、今回制作したプロジェクト名を選択してください。今回の説明通り作っていれば「pushNotificationTest」という名前を選択することになります。

プロジェクトが選択がきちんと出来ていれば「Google APIs」のロゴの横に「pushNotificationTest」と表示されているはずです。
APIとサービスの有効化
次に、このプロジェクトでActions APIを有効にするために「APIとサービスの有効化」をクリックしてください。

様々なAPIがありますが検索ウィンドウに「Actions API」と入力することで、Actions APIの設定を行うページに遷移するカードが表示されるので「Actions API」をクリックしてください。

Actions APIのページが表示されるので「有効にする」をクリックします。これでこのプロジェクトでActions APIを有効化することができました。

同意画面の設定
Google APIを使用するにあたり、もう少し設定をする必要があり、まずは認証の同意画面の設定を行います。
左のメニューから「認証情報」をクリックし、タブメニューの「認証情報」を選択して「同意画面の設定」をクリックします。

OAuth同意画面タブに移りるので、「メールアドレス」のプルダウンに今回使用している開発アカウントのメールアドレスが表示されるので、それを選択してください。
その他にも設定する項目がありますが任意のものなので適宜設定してください。
記入が終わったら画面下部の「保存」をクリックして設定を完了します。

サービスアカウントキーの生成
次に、Actions APIを実際にapiを通じてやり取りするために、ここで生成した秘密鍵を使用して通信を行う必要があるので、その手順を説明します。
左のメニューから「認証情報」をクリックし、タブメニューの「認証情報」を選択して「認証情報を作成」のプルダウンから「サービス アカウント キー」を選択します。

「サービスアカウント」のプルダウンから「新しいサービスアカウント」を選択します。

「サービス アカウント」にわかりやすい任意の名前を記入してください。今回は「pushnotificationtest-aog」とつけてみました。次に「役割」で「Project」の「オーナー」を選択します。キーのタイプでJSONにチェックを入れて「作成」をクリックしてサービスアカウントキーを生成します。

ダウンロードが始まり、「秘密鍵がパソコンに保存されました」と表示されます。
このサービスアカウントキーのjsonファイルは、後に実装するfirebase cloud functions内で使用するので保管しておいてください。
※このファイルはパブリックに公開しないよう注意してください。

これでActions APIの設定は完了です。
ここまでで、Actions on Googleの雛形の設定、Dialogflowの雛形の設定、Actions APIの設定が完了しました。ここからはプッシュ通知を行うプログラムロジックを実装していくfirabase cloud functionsの説明に入ります。
firebase cloud functionsの設定
今回webhookのロジック部分をfirebase cloud functionsを利用して実装していきます。
まずは、firebase consoleに開発者アカウントでログインしてください。
https://console.firebase.google.com/
AoGで作成されたプロジェクトが表示されているので、該当のプロジェクトをクリックします。

左メニューの「functions」をクリックしてみると、functionは空の状態です。
これからローカルでfunctionの中身をnode.jsで記述し、firebase-toolsを使用してデプロイを行うことで、firebase cloud functionsにロジックを実装することができます。

firebase-toolsのインストール
firebase cloud functionsのロジックを開発するにあたり、今回はnode.jsを使用します。
※事前にローカルの開発マシンにnode.jsのv8以上をインストールしておいてください。(node.jsのインストールについては割愛させていただきます。)
まずはnpmを利用してfirebase-toolsをグローバルにインストールします。
$ npm install -g firebase-tools
firebase-toolsをインストールすることによって、firebaseコマンドを利用することができるようになります。
firebaseコマンドを利用して、今回作成したfirebaseプロジェクトのfunctionsにコードをデプロイしていきます。
コマンドラインからfirebaseにログイン
まずはターミナルを開き、コマンドラインから開発アカウントでfirebaseにログインします。
$ firebase login
? Allow Firebase to collect anonymous CLI usage and error reporting information?
 (Y/n)
YをクリックするとブラウザにFirebase CLIで使用するアカウントが聞かれるので、今回のプロジェクトに紐付いたアカウントを選択して「許可」する。✔ Success! Logged in as <アカウント>が出ればOK
firebaseのプロジェクトを確認
$ firebase list
これでアカウントに紐付いたプロジェクトが一覧できる、今回でいうとpushNotificationTestが表示されていれば、正しいfirebaseのアカウントでログインできている。
※ここでプロジェクトが表示されない場合は、別アカウントでfirebaseにログインしている可能性があるので、その際はfirebase logoutして再度firebase loginをして正しいアカウントでログインし直す。
プロジェクトディレクトリの作成
firebase cloud functionsにデプロイするコードを記述していくプロジェクトディレクトリをローカルに作成します。
※プロジェクトディレクトリの名前は任意。説明ではpushNotificationTestというディレクトリ名で進めます。
$ mkdir pushNotificationTest
$ cd pushNotificationTest
firebaseの初期化
プロジェクトディレクトリを制作したので、firebase initコマンドで、firebaseの初期化をまずは行います。ここでアカウントに紐付いたfirebaseの各種設定ファイルなどを生成し、該当のfirebaseプロジェクトに適切なデプロイを行うことができるようになります。
firebase initコマンドを実行し、Functionsまでカーソルを移動して「スペースキー」を押して有効にして「Enter」。
$ firebase init
? Which Firebase CLI features do you want to setup for this folder? Press Space
to select features, then Enter to confirm your choices.
 ◯ Database: Deploy Firebase Realtime Database Rules
 ◯ Firestore: Deploy rules and create indexes for Firestore
❯◉ Functions: Configure and deploy Cloud Functions
 ◯ Hosting: Configure and deploy Firebase Hosting sites
 ◯ Storage: Deploy Cloud Storage security rules
該当のプロジェクトまでカーソルを移動して「Enter」。
? Select a default Firebase project for this directory:
  [don't setup a default project]
❯ pushNotificationTest (***********)
  [create a new project]
今回はJavaScriptを選択(TypeScriptで書きたい方はTypeScript)
? What language would you like to use to write Cloud Functions? (Use arrow keys)

❯ JavaScript
  TypeScript
ESLintを使用するかどうかを聞かれるので、こちらはお好みで選択してください。
? Do you want to use ESLint to catch probable bugs and enforce style? (y/N)
npm installをこの時点で実行するか?と聞かれます。あとでnpmのモジュールを追加しますが、まずはYを選べば良いと思います。
functionsディレクトリ下にnode_modulesが作成され、生成されたpackage.jsonを参照して、該当のモジュールのインストールが開始されます。
? Do you want to install dependencies with npm now? (Y/n)
✔ Firebase initialization complete!と出れば完了。
これでfirebaseの初期化は終了です。
次にwebhookのロジックの起点となるfunctions/index.jsにAoGのwebhookに必要となるコーディングを行っていきます。
firebase functionsにデプロイ
firebase functionsにまだデプロイしていないため、DialogflowのFullfillmentのWebhookアドレスが決まっていないので、最小限のコードを記述してfirebase deployを行います。
actions-on-googleのnode_modulesをインストール
まずはAoGやDialogflowの通信用に用意されたactions-on-googleのnode.js SDKをインストールします。
firebase initで制作されたfunctionsディレクトリに移動してactions-on-googleをインストール
$ cd functions
$ npm install --save actions-on-google
firebase functionsのnodeをv8にするための設定
現時点ではデフォルトのfirebaseの実行環境がnode.jsのv6系ですが、今後のこともふまえてv8系で実行できるように設定しておきます。
functions/package.jsonに"engines": {"node": "8"}のコードを追記指定することで、firebase functionsのnode.js実行環境をv8で実行するように設定できます。
{
  "name": "functions",
  "description": "Cloud Functions for Firebase",
  "engines": {
    "node": "8"
  },
  "scripts": {
    "serve": "firebase serve --only functions",
    "shell": "firebase functions:shell",
    "start": "npm run shell",
    "deploy": "firebase deploy --only functions",
    "logs": "firebase functions:log"
  },
  "dependencies": {
    "actions-on-google": "^2.3.0",
    "firebase-admin": "~6.0.0",
    "firebase-functions": "^2.0.3"
  },
  "private": true
}
index.jsを記述とデプロイ
まずはfirebase cloud functionsのURLを発行し、Dialogflowのwebhookに設定するためにDefault Welcome Intentのみに対応した最小限のコードを記載してデプロイしてみます。
'use strict';

const {
    dialogflow
} = require('actions-on-google');
const functions = require('firebase-functions');

const app = dialogflow({ debug: true });

app.intent('Default Welcome Intent', (conv) => {
    conv.close('プッシュプッシュ通知')
});

exports.pushNotificationTestFullfillment = functions.https.onRequest(app);
firebase functionsのURLをコンソールから確認
デプロイするとfirebase consoleのFunctionsで「トリガー」のURLが記載されているので、そのURLをコピーします。

DialogflowでFullfillmentにwebhookを設定
DialogflowのコンソールのFullfillmentからWebhookのENABLEDトグルをオンにして、先程コピーしたURLをURLの欄にペーストし、画面下部までスクロールして「SAVE」ボタンを押す。

該当intentでwebhookを使用する設定
Default Welcome Intentでfirebase cloud functionsでロジックを処理できるようにFullfillmentの項目でWebhookを使うように設定します。

Default Welcome Intentの画面下部までスクロールしてFullfillmentのEnable webhook call for this intentのトグルをオンにして「SAVE」をクリック

シュミレータでのチェック
先程デプロイした「プッシュプッシュ通知」と帰ってきていればOK

firebase firestoreの設定
今回のサンプルコードではfirestoreのデータを参照してティップスを出しているので、まずはfirestoreにデータを格納していきます。
直にfirebaseコンソールからfirestoreにデータを手作業で入れても問題ないですが、サンプルコードでは初期のデータをfirestoreに格納できるコードが記載されているので、そちらを利用してデータを入れ込んでいきます。
firestoreにデータを格納
サンプルソースを参考にfirestoreにデータを格納するfunctionを記述
// 省略

const admin = require('firebase-admin');

/** Collections and fields names in Firestore */
const FirestoreNames = {
    CATEGORY: 'category',
    CREATED_AT: 'created_at',
    INTENT: 'intent',
    TIP: 'tip',
    TIPS: 'tips',
    URL: 'url',
    USERS: 'users',
    USER_ID: 'userId',
};

admin.initializeApp();
const db = admin.firestore();
db.settings({ timestampsInSnapshots: true }); // dateの扱いが変更されたようでエラーを回避するためこの行を追加(これを記載していないとfirebase functionsのログコンソールでエラーが出て、正常に動作しない可能性がある)

// 省略

// Use this function to restore the content of the tips database.
exports.restoreTipsDB = functions.https.onRequest((request, response) => {
    db.collection(FirestoreNames.TIPS)
        .get()
        .then((querySnapshot) => {
            if (querySnapshot.size > 0) {
                let batch = db.batch();
                querySnapshot.forEach((doc) => {
                    batch.delete(doc.ref);
                });
                batch.commit()
                    .then(addTips);
            }
        })
        .catch((error) => {
            throw new Error(`Firestore query error: ${error}`);
        });
    addTips();

    /**
     * Add tips
     */
    function addTips() {
        const tips = require('./tipsDB.json');
        let batch = db.batch();
        let tipsRef = db.collection(FirestoreNames.TIPS);
        tips.forEach((tip) => {
            let tipRef = tipsRef.doc();
            batch.set(tipRef, tip);
        });
        batch.commit()
            .then(() => {
                response.send(`Tips DB succesfully restored`);
            })
            .catch((error) => {
                throw new Error(`Error restoring tips DB: ${error}`);
            });
    }
});
firestoreに格納するデータテンプレートをtipsDB.jsonとしてindex.jsと同階層に作成します。
こちらがfirestoreに入れ込むデータのテンプレートファイルになります。今回はサンプルコードに書かれているものをそのまま使用していますが、tipの文言などが英語のままになっているのでお好みで日本語に書き直すなどしてみるとよりわかりやすいかもしれません。
[{
    "category": "tools",
    "url": "https:\/\/www.youtube.com\/watch?v=sjpbu4y6F_M&list=PLOU2XLYxmsILvfJcIASBDbgfxloFz_XsU&index=5",
    "tip": "If you don't know how to code, you can use templates to build an App! Learn more about it in our Build an App for the Google Assistant with Templates and No Code video.",
    "created_at": "2017-12-25T08:00:00.000Z"
},
{
    "category": "voice user interface",
    "url": "https:\/\/developers.google.com\/actions\/assistant\/best-practices",
    "created_at": "2017-12-21T08:00:00.000Z",
    "tip": "Remember that your users may need your app to repeat itself at any time, so keep track of your last prompt and be prepared to repeat it."
},
{
    "category": "tools",
    "url": "https:\/\/github.com\/actions-on-google\/actions-on-google-nodejs",
    "tip": "The Actions On Google client library for Dialogflow and Actions SDK is a nodejs module that helps you build your fulfillment whether you're using Dialogflow or the Actions SDK. ",
    "created_at": "2017-12-19T08:00:00.000Z"
},
{
    "category": "voice user interface",
    "url": "https:\/\/developers.google.com\/actions\/reference\/ssml",
    "tip": "Use SSML, or speech synthesis markup language, to improve the quality of your app with features like custom audio and granular speech synthesis controls.",
    "created_at": "2017-12-17T08:00:00.000Z"
},
{
    "category": "voice user interface",
    "url": "https:\/\/www.youtube.com\/watch?v=cHEahGHseGc&list=PLOU2XLYxmsILvfJcIASBDbgfxloFz_XsU&t=1s&index=4",
    "tip": "When designing a voice user interface, you should avoid simply converting a graphical user interface to a voice user interface. Learn more tips about designing VUI watching our \"How to better design VUI for the Google Assistant\" video.",
    "created_at": "2017-12-13T08:00:00.000Z"
},
{
    "category": "dialogflow",
    "url": "https:\/\/developers.google.com\/actions\/dialogflow\/define-actions#define_additional_actions",
    "tip": "If using Dialogflow, you can specify additional actions for your app as additional triggering intents in the Assistant Integrations page. The user says phrases of those triggering intents will also be used for app discovery.",
    "created_at": "2017-12-11T08:00:00.000Z"
},
{
    "category": "development",
    "url": "https:\/\/developers.google.com\/actions\/reference\/rest\/Shared.Types\/AppRequest#Conversation",
    "tip": "Use the data property of our client library interface to persist data within a dialog. It uses the conversation Token field of the conversation API request and response. ",
    "created_at": "2017-12-09T08:00:00.000Z"
},
{
    "category": "development",
    "url": "https:\/\/www.youtube.com\/watch?v=GKP4AS4L_K8&list=PLOU2XLYxmsILvfJcIASBDbgfxloFz_XsU&t=1s&index=3",
    "tip": "The most common cause for app rejection during review is incomplete store listing data. Learn more tips about passing the review in our How to Publish an App for the Google Assistant that Will Pass Review video.",
    "created_at": "2017-12-08T08:00:00.000Z"
},
{
    "category": "development",
    "url": "https:\/\/developers.google.com\/actions\/assistant\/best-practices",
    "tip": "Use the last Seen property of the incoming request to determine return users, and greet them differently than new users.",
    "created_at": "2017-12-07T08:00:00.000Z"
},
{
    "category": "dialogflow",
    "url": "https:\/\/developers.google.com\/actions\/assistant\/best-practices",
    "tip": "If using Dialogflow, provide at least 10-12 examples of User Says phrases for your intents.",
    "created_at": "2017-12-06T08:00:00.000Z"
},
{
    "category": "development",
    "url": "https:\/\/developers.googleblog.com\/2017\/11\/actions-on-google-best-practices-video.html",
    "tip": "You can learn all the best practices for Actions on Google watching videos from the Actions On Google Best Practices Video Series.",
    "created_at": "2017-12-05T08:00:00.000Z"
},
{
    "category": "development",
    "url": "https:\/\/developers.google.com\/actions\/discovery\/implicit#writing_useful_action_invocation_phrases",
    "tip": "When defining action phrases, try to make sure they have a verb and an object to improve the chances for discovery.",
    "created_at": "2017-12-04T08:00:00.000Z"
},
{
    "category": "voice user interface",
    "url": "https:\/\/developers.google.com\/actions\/assistant\/best-practices",
    "tip": "Be prepared to help whenever your user asks for it, and when they do, give them some foothold into the conversation.",
    "created_at": "2017-12-03T08:00:00.000Z"
},
{
    "category": "voice user interface",
    "url": "https:\/\/developers.google.com\/actions\/assistant\/best-practices",
    "tip": "If a user provides some unrecognized input, first try a simple rapid reprompt like \"What was that?\" to keep the conversation moving quickly. As they continue to provide unrecognized input, expand the reprompting to be more clear until finally ending the conversation after 3 failures.",
    "created_at": "2017-12-01T08:00:00.000Z"
},
{
    "category": "tools",
    "url": "https:\/\/developers.google.com\/actions\/tools\/sound-library\/",
    "tip": "Use our sound library to insert custom audio through SSML. This makes your voice experience far more engaging!",
    "created_at": "2017-12-02T08:00:00.000Z"
}]
firestoreにデータ格納する準備が整ったので、修正したものをfirebaseにデプロイします。
$ firebase deploy --only functions
deploying functions以下が表示されて新しく追加したrestoreTipDBファンクションが登録されたのがわかります。
Function URL (restoreTipsDB): https://us-central1-<project_id>.cloudfunctions.net/restoreTipsDB
firebase コンソールでfirestoreの設定
firestoreのデータ格納のコードは準備できましたが、まだfirestoreの設定が済んでいないのでfirebase consoleからfirestoreの初期設定を行っていきます。
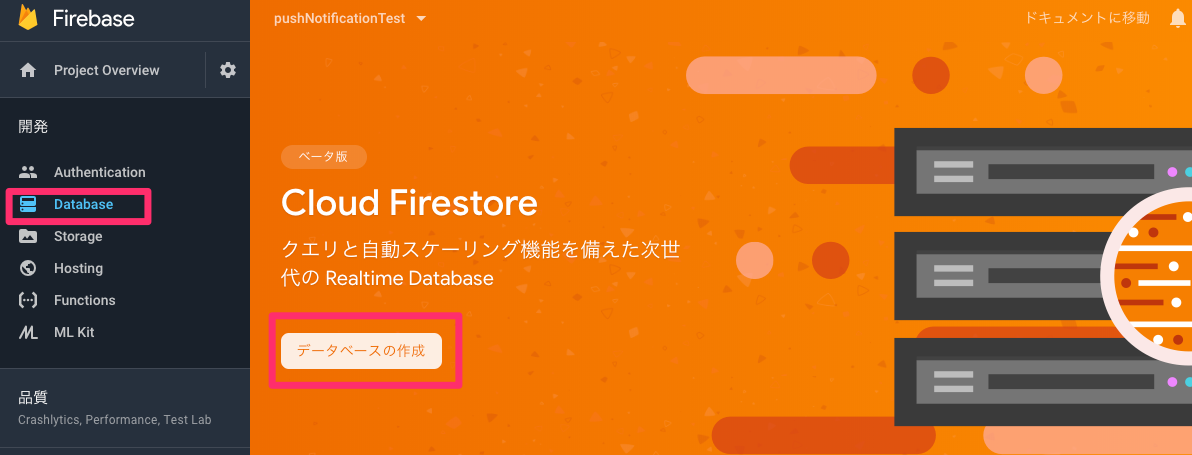
firebaseコンソールを開いて、左のメニューからdatabaseを選択し、Cloud Firestore「データベースを作成」をクリックします。
firestoreのアクセス権限の設定
firestoreのアクセス権限は、今回テスト目的なので、テストモードで開始を選択して「有効にする」をクリックします。
※本番ではきちんとセキュリティー設定をすることを強くおすすめします。

firestoreの設定ができているかを実際にDatabaseを選択して確認してみます。

firestoreに初期データを格納
最初はデータが空の状態なので、先程デプロイしたrestoreTipDBにアクセスしてDBにデータを格納してみます。
先程デプロイ時に表示されたFunction URL (restoreTipsDB)のhttps://us-central1-<project_id>.cloudfunctions.net/restoreTipsDBURLを、ブラウザを開いてアスセスすることで、restoreTipDBを実行し、firestoreにデータを作成することができます。
無事制作できるとブラウザにTips DB succesfully restoredと表示されます。
firesotreにデータが格納されたかを確認
firebaseコンソールのDatabaseを開くと、先程空だったものにデータが作成できたことを確認できます。

これで、firestoreの設定および初期データの格納ができました。次は実際にfirestoreのデータを取得してAoGに表示するコードを実装していきます。
firestoreからデータを取得してみる
index.jsのDefault Welcome Intentにアクセスした時にfirestoreに格納されたデータを取得・出力するコードを追記および修正します。
index.jsの修正
※サンプルコードを参考に実装
// 省略

const {
    dialogflow,
    Suggestions
} = require('actions-on-google');

// 省略

/** App strings */
const RANDOM_CATEGORY = 'ランダム';
const RECENT_TIP = '最新情報';

// 省略

app.intent('Default Welcome Intent', (conv) => {
    // get available categories to show in the welcome message and in the
    // suggestion chips.
    return db.collection(FirestoreNames.TIPS)
        .get()
        .then((querySnapshot) => {
            // create an array that contains only the unique values of categories
            const uniqueCategories = querySnapshot.docs.map((currentValue) => {
                    return currentValue.get(FirestoreNames.CATEGORY);
                })
                .filter((element, index, array) => {
                    return array.indexOf(element) === index;
                });
            uniqueCategories.unshift(RECENT_TIP);
            const welcomeMessage = `グーグル ティップスへようこそ。 ` +
                `アクションズ オン グーグルのティップスを選択することができます。` +
                `最新に追加されたティップスか、以下の項目のカテゴリーから選択できます。` +
                `${uniqueCategories.join(', ')}。` +
                `もしくはランダムにティップスを提供します。`;
            const screenOutput =
                conv.surface.capabilities.has('actions.capability.SCREEN_OUTPUT');
            if (!screenOutput) {
                return conv.ask(welcomeMessage);
            }
            uniqueCategories.push(RANDOM_CATEGORY);
            conv.ask(welcomeMessage);
            conv.ask(new Suggestions(uniqueCategories));
        });
})
修正したコードをデプロイ
最新情報やランダムの入力に対しての受けのIntentはまだ作成していないですが、Default Welcome Intentにアクセスした時にfirestoreからデータを取得して表示させる部分をデプロイして確かめてみます。
$ firebase deploy --only functions
シミュレータでの確認
AoGのコンソールからシミュレーターを起動して動作しているか確認してみます。

無事、firestoreに格納したデータが表示されていればOKです。
ユーザーの「最新情報」の発話に答えるインテントを作成
最新情報のユーザー発話に対応したインテントを作成します。
Dialogflowでインテントを作成
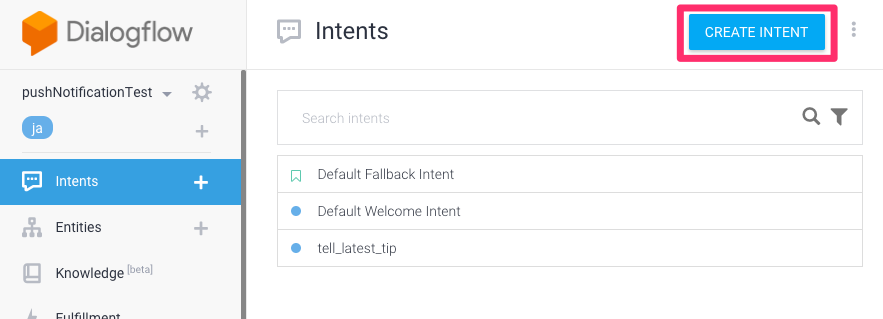
Dialogflowコンソール画面からIntentsのCREATE INTENTをクリックします。

サンプルコードに習ってtell_latest_tipという名前のインテントにします。Training phrasesに「最新情報」を追加して「最新情報」というユーザー発話をフックできるようにしておきます。画面をスクロールダウンしてFullfillmentのEnable webhook call for this intentのトグルをオンにして「SAVE」をクリックします。

firebase functionsのindex.jsにtell_latest_tipを受け付けるインテント処理を実装
Dialogflow側でインテントを設定したので、今度はwebhookのロジック側でそのインテントを受け付けた時の処理を行うコードをindex.jsに実装していきます。
// 省略

const {
    dialogflow,
    Suggestions,
    BasicCard,
    Button
} = require('actions-on-google');

// 省略

app.intent('tell_latest_tip', (conv) => {
    return db.collection(FirestoreNames.TIPS)
        .orderBy(FirestoreNames.CREATED_AT, 'desc')
        .limit(1)
        .get()
        .then((querySnapshot) => {
            const tip = querySnapshot.docs[0];
            const screenOutput =
                conv.surface.capabilities.has('actions.capability.SCREEN_OUTPUT');
            if (!screenOutput) {
                return conv.close(tip.get(FirestoreNames.TIP));
            }
            conv.ask(tip.get(FirestoreNames.TIP));
            conv.ask(new BasicCard({
                text: tip.get(FirestoreNames.TIP),
                buttons: new Button({
                    title: 'Learn More!',
                    url: tip.get(FirestoreNames.URL),
                }),
            }));
        });
});
修正コードをデプロイ
修正したコードをデプロイします。
$ firebase deploy --only functions
シミュレータでの確認
AoGのシミュレーターを起動してfirestoreから取得した最新情報が表示されていることが確認できます。

長かったですが、これでプッシュ通知を行うコード実装の準備が整いました。次に実際にプッシュ通知の実装について記述していきます。
プッシュ通知の実装
ここからが本題のプッシュ通知を送る部分の説明になります。
手順としては
- UpdatePermissionを受け付けるインテントを作成して、ユーザーに通知を受けるかどうかを有効にするかを聞きます。この時、同時にプッシュ通知時に起動するインテントを設定します(※今回は最新情報を出す
tell_latest_tipになります)。 - 事前に
tell_latest_tipインテントが呼び出されるようにDialogflowコンソールおよびActions on GoogleコンソールでUser engagementの設定を行います。 - ユーザーが通知を受け取ることに「はい」つまり承認した時に受け付けるインテントの設定・実装します。この時userIDを取得し、それをfirestoreに格納しておくことで通知すべきuserIDがわかるようにします。※後述する
conv.arguments.get('UPSATES_USER_ID')は一度しか取得できないので、もしfirestoreにuserIDに保存の失敗した場合は、別途userIDを取得し直すコード・及びロジックを書かないといけないので要注意) - firestoreに新しいデータが作られた時に、プッシュ通知を送る機能を先に説明したgoogleapiのActions APIを使って実装します。
1.UpdatePermissionを受け付けるインテントの作成とindex.jsの追加修正
Dialogflowでインテントの作成
Dialogflowのコンソールの左メニューIntentsを選択し、「CREATE INTENT」をクリックします。
インテント名をサンプロコードにならってsetup_pushとし、「新しいティップスを通知して」とユーザーが発話した時に呼ばれるように設定します。画面をスクロールダウンしてFullfillmentのEnable webhook call for this intentのトグルをオンにして「SAVE」をクリックします。

index.jsのコード修正・追加
Dialogflowのsetup_pushのインテントを受け付けるためのコードをindex.jsに追加修正します。
ユーザーが「新しいティップスを通知して」と発話すると、setup_pushインテントが呼ばれ、index.jsのsetup_pushインテント処理ないでUpdatePermission()を呼ぶようにしています。
※UpdatePermission()を呼ぶことでAoGのEventのactions_intent_PERMISSIONが呼ばれます。後述しますが、このactions_intent_PERMISSIONEventを受けるインテントを設定していない状態ではエラーになるので要注意です。
// 省略

const {
    dialogflow,
    BasicCard,
    Button,
    Suggestions,
    UpdatePermission
} = require('actions-on-google');

// 省略

/** App strings */
const TELL_LATEST_TIP_INTENT = 'tell_latest_tip';

// 省略

// Start opt-in flow for push notifications
app.intent('setup_push', (conv) => {
    conv.ask(new UpdatePermission({ intent: TELL_LATEST_TIP_INTENT }));
});
2.プッシュ通知時に呼び出されるインテントの設定
プッシュ通知を届けた時に呼び出すインテントの設定を行います。AoGコンソールでインテントにユーザーに通知を受ける許可を受られる設定を行います。
Dialogflowのintegrationを設定
DialogflowのintegrationからGoogle Assistantの「INTEGRATION SETTINGS」をクリックします。

AoGで呼び出しインテントをActionsに追加
インテント設定のUser engagementの設定をすできるようにするためにDiscoveryのImplicit invocationに通知時に呼び出されるインテントを選択します。今回の場合はtell_latest_tipになります。
※Implicit invocationは暗黙的呼び出しの設定でもあるので、少々気になりますが、現状のUIではこうすることでしかインテントのUser engagementを設定できないのでここで設定しています。

「TEST」をクリックして、Actions on Googleでの設定に移ります。

Actions on GoogleのコンソールでActionsの設定
Actions on Googleのコンソールの左メニュー「Actions」を選択すると、先程Dialogflowで設定したインテント(今回の場合tell_latest_tip)が表示されているのでクリックします。

User engagementの設定
画面をスクロールダウンしてUser engagementの項目のWould you like to send push notifications? If yse, user permission will be neededのトグルをオンにします。
Content titleにユーザーにパーミッションを求める時の文言を設定しておきます。

3.UpdatePermissionを受けつけるインテントの作成とindex.jsの追加修正
「1.UpdatePermissionを受け付けるインテントの作成...」で作成したUpdatePermissionを呼び出した時に、Eventのactions_intent_RERMISSIONが発生するので、それを受け取るためのインテントを作成します。
Dialogflowのコンソールの左メニューのintentsを選択し「CREATE INTENT」をクリックします。

インテント名を設定し(ここではサンプルコードにならってfinish_push_setupとしています)、Eventsにactions_intent_PERMISSIONと記入します。
画面をスクロールダウンしてFullfillmentのEnable webhook call for this intentのトグルをオンにして「SAVE」をクリックします。

index.jsのコードを追加修正
ユーザーに許可を求める返事の「はい」「いいえ」をconv.arguments.get('PERMISSION')で取得することができます。
「はい」のときはconv.arguments.get('UPDATES_USER_ID')からユーザーIDを取得して、firestoreにプッシュ通知で起動するインテント名とユーザーIDを格納します。
「いいえ」のときは、ユーザーに通知しない旨を伝えて、そのままセッションを切断しています。
※注意事項 conv.arguments.get('UPDATES_USER_ID')はconv.arguments.get('PERMISSION')trueの初回時のみ取得できるようで、二回目以降はundefinedを返してしまうのでfirestoreなどに格納ミスを行うと、ユーザーIDが取得できなくなってしまうので、別途匿名ユーザーのIDの取得する方法などで取得し直すコードおよびロジックを組む必要があります。←ここハマるところです。
// 省略

// Save intent and user id if user gave consent.
app.intent('finish_push_setup', (conv, params) => {
    if (conv.arguments.get('PERMISSION')) {
    	 //以下のcov.arguments.get('UPDATES_USER_ID')はPERMISSIONを承認した最初にしか取れないので、firestoreに保存失敗したときは匿名ユーザーIDの取得方法などで実装する必要がある
        const userID = conv.arguments.get('UPDATES_USER_ID');

        return db.collection(FirestoreNames.USERS)
            .add({
                [FirestoreNames.INTENT]: TELL_LATEST_TIP_INTENT,
                [FirestoreNames.USER_ID]: userID,
            })
            .then((docRef) => {
                conv.close(`通知を開始します。`);
            });
    } else {
        conv.close(`通知はしません。`);
    }
});

// 省略
index.jsをデプロイ
では修正したコードをデプロイします。
$ firebase deploy --only functions
シミュレーターで実行して確認

firestoreに保存されているかを確認

これでプッシュ通知を受け付けるAoG、Dialogflow、firebase cloud functions(index.js)、firestoreの準備が完了しました。
あとは、実際にActions APIを通じてプッシュ通知を送るトリガーを実装することでプッシュ通知を受け取ることができます。
では最後にサンプルコードにならってプッシュ通知を送る部分を実装していきます。
4. firestoreに新しいデータが作られた時に、プッシュ通知を送る機能をgoogleapiのActions APIを使って実装
firestore内のtipsデータに新しくドキュメントが追加されたことを検知するファンクションを用意して、そこからgoogleapiを使用しActions API経由でユーザーにプッシュ通知を送ります。
新しいファンクションで使用するgoogleapiとrequestをnpmでインストール
$ npm install --save googleapis
$ npm install --save request
前述した、Actions APIで生成したサービスアカウントの秘密鍵jsonファイルをわかりやすいようにservice-account-actionsapi.jsonなどにリネームしてindex.jsと同階層に移動しておきます。
index.jsの編集
注意事項: サンプルコードのままだと、エラーで動かないので以下の二点に注意する必要があります。
-
const google = require('googleapis')とサンプルコードでは記載されているが、googleapisの仕様変更により記法が変わったのでconst {google} = require('googleapis')とする -
notification.target = {}内にlocale: 'js'の追記をする
exports.createTip = functions.firestore
    .document(`${FirestoreNames.TIPS}/{tipId}`)
    .onCreate((snap, context) => {
        const request = require('request');
        const {google} = require('googleapis');
        const serviceAccount = require('./service-account-actionsapi.json');
        const jwtClient = new google.auth.JWT(
            serviceAccount.client_email, null, serviceAccount.private_key, ['https://www.googleapis.com/auth/actions.fulfillment.conversation'],
            null
        );
        let notification = {
            userNotification: {
                title: '最新のティップスが追加されました!',
            },
            target: {},
        };
        jwtClient.authorize((err, tokens) => {
            if (err) {
                throw new Error(`Auth error: ${err}`);
            }
            return db.collection(FirestoreNames.USERS)
                .where(FirestoreNames.INTENT, '==', TELL_LATEST_TIP_INTENT)
                .get()
                .then((querySnapshot) => {
                    querySnapshot.forEach((user) => {
                        notification.target = {
                            userId: user.get(FirestoreNames.USER_ID),
                            intent: user.get(FirestoreNames.INTENT),
                            locale: 'ja',
                        };
                        request.post('https://actions.googleapis.com/v2/conversations:send', {
                            'auth': {
                                'bearer': tokens.access_token,
                            },
                            'json': true,
                            'body': { 'customPushMessage': notification, 'isInSandbox': true },
                        }, (err, httpResponse, body) => {
                            if (err) {
                                throw new Error(`API request error: ${err}`);
                            }
                            console.log(`${httpResponse.statusCode}: ` +
                                `${httpResponse.statusMessage}`);
                            console.log(JSON.stringify(body));
                        });
                    });
                })
                .catch((error) => {
                    throw new Error(`Firestore query error: ${error}`);
                });
        });
        return 0;
    });
index.jsをデプロイ
では修正したコードをデプロイします。
$ firebase deploy --only functions
プッシュ通知の送信
実際はプログラムによってfirestoreに新しいデータを生成すると思いますが、今回はfirestoreのwebコンソールに直接データを作成して、プッシュ通知が届けてみます。
tipsの「ドキュメント追加」をクリックします。

必要なフィールドと値を記入して「保存」を押します。

多少のタイムラグが有るときが結構ありますが、プロジェクトを制作したアカウントでモバイルのGoogle Assistantにログインしていれば、Google Assistantに通知が届きます。
要検証
- プッシュ通知を削除する方法が不明(※1)
- プッシュ通知をユーザー全員に送る仕様になっているので、出し分けロジックをどうするか?
- プッシュ通知をユーザー全員にfor文でわまして送信しているので、数千人規模になった時googleapiの料金・及びパフォーマンスがどうなるか?
※1:公式リファレンスのUser EngagementのManage updatesの項目や、Google Actions: Stop sending updates from “app_name” issueで英語での解説があるがstop sending updates from <action_name>を日本語でどういうか?が不明