はじめに
先日からFlutterを始めた初心者です。
BottomNavigationBarを色々触ってみてるうちに詰まった部分についての備忘録としてメモします。
この記事で分かること
この記事では主に
- BottomNavigationBarの実装方法
- Iconの増やし方
- Icon一覧サイト
をまとめています。
BottomNavigationBarを実装しよう
まずはBottomNavigationBar classのサイトにある以下のコードをmain.dartにコピペしてください。(ここでは最初にあるコメントアウト部分を消去しています)
import 'package:flutter/material.dart';

void main() => runApp(const MyApp());

/// This is the main application widget.
class MyApp extends StatelessWidget {
  const MyApp({Key? key}) : super(key: key);

  static const String _title = 'Flutter Code Sample';

  @override
  Widget build(BuildContext context) {
    return const MaterialApp(
      title: _title,
      home: MyStatefulWidget(),
    );
  }
}

/// This is the stateful widget that the main application instantiates.
class MyStatefulWidget extends StatefulWidget {
  const MyStatefulWidget({Key? key}) : super(key: key);

  @override
  State<MyStatefulWidget> createState() => _MyStatefulWidgetState();
}

/// This is the private State class that goes with MyStatefulWidget.
class _MyStatefulWidgetState extends State<MyStatefulWidget> {
  int _selectedIndex = 0;
  static const TextStyle optionStyle =
      TextStyle(fontSize: 30, fontWeight: FontWeight.bold);
  static const List<Widget> _widgetOptions = <Widget>[
    Text(
      'Index 0: Home',
      style: optionStyle,
    ),
    Text(
      'Index 1: Business',
      style: optionStyle,
    ),
    Text(
      'Index 2: School',
      style: optionStyle,
    ),
  ];

  void _onItemTapped(int index) {
    setState(() {
      _selectedIndex = index;
    });
  }

  @override
  Widget build(BuildContext context) {
    return Scaffold(
      appBar: AppBar(
        title: const Text('BottomNavigationBar Sample'),
      ),
      body: Center(
        child: _widgetOptions.elementAt(_selectedIndex),
      ),
      bottomNavigationBar: BottomNavigationBar(
        items: const <BottomNavigationBarItem>[
          BottomNavigationBarItem(
            icon: Icon(Icons.home),
            label: 'Home',
          ),
          BottomNavigationBarItem(
            icon: Icon(Icons.business),
            label: 'Business',
          ),
          BottomNavigationBarItem(
            icon: Icon(Icons.school),
            label: 'School',
          ),
        ],
        currentIndex: _selectedIndex,
        selectedItemColor: Colors.amber[800],
        onTap: _onItemTapped,
      ),
    );
  }
}
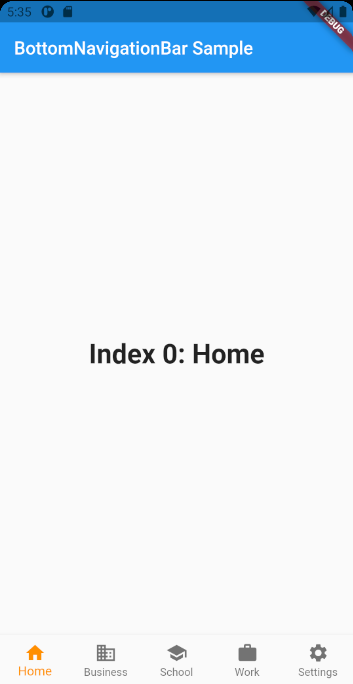
そして実行すると、このようにBottomNavigationBarが現れます。

これをもとに、下にあるIconの数を増やしてみましょう。
Iconの数を4つ以上に増やす
とりあえずIconを増やしてみる
先ほどのコードを見ていじってみましょう。変更するのは以下の2点のみです。
- BottomNavigationBarItemを追加
- Textを追加
ここでは先ほどのコードで最後のIconであったschoolを2つ増やして全部で5つのアイコンにしてみます。コードは以下です。
import 'package:flutter/material.dart';

void main() => runApp(const MyApp());

/// This is the main application widget.
class MyApp extends StatelessWidget {
  const MyApp({Key? key}) : super(key: key);

  static const String _title = 'Flutter Code Sample';

  @override
  Widget build(BuildContext context) {
    return const MaterialApp(
      title: _title,
      home: MyStatefulWidget(),
    );
  }
}

/// This is the stateful widget that the main application instantiates.
class MyStatefulWidget extends StatefulWidget {
  const MyStatefulWidget({Key? key}) : super(key: key);

  @override
  State<MyStatefulWidget> createState() => _MyStatefulWidgetState();
}

/// This is the private State class that goes with MyStatefulWidget.
class _MyStatefulWidgetState extends State<MyStatefulWidget> {
  int _selectedIndex = 0;
  static const TextStyle optionStyle =
  TextStyle(fontSize: 30, fontWeight: FontWeight.bold);
  static const List<Widget> _widgetOptions = <Widget>[
    Text(
      'Index 0: Home',
      style: optionStyle,
    ),
    Text(
      'Index 1: Business',
      style: optionStyle,
    ),
    Text(
      'Index 2: School',
      style: optionStyle,
    ),
    Text(
      'Index 2: School',
      style: optionStyle,
    ),
    Text(
      'Index 2: School',
      style: optionStyle,
    ),
  ];

  void _onItemTapped(int index) {
    setState(() {
      _selectedIndex = index;
    });
  }

  @override
  Widget build(BuildContext context) {
    return Scaffold(
      appBar: AppBar(
        title: const Text('BottomNavigationBar Sample'),
      ),
      body: Center(
        child: _widgetOptions.elementAt(_selectedIndex),
      ),
      bottomNavigationBar: BottomNavigationBar(
        items: const <BottomNavigationBarItem>[
          BottomNavigationBarItem(
            icon: Icon(Icons.home),
            label: 'Home',
          ),
          BottomNavigationBarItem(
            icon: Icon(Icons.business),
            label: 'Business',
          ),
          BottomNavigationBarItem(
            icon: Icon(Icons.school),
            label: 'School',
          ),
          BottomNavigationBarItem(
            icon: Icon(Icons.school),
            label: 'School',
          ),
          BottomNavigationBarItem(
            icon: Icon(Icons.school),
            label: 'School',
          ),
        ],
        currentIndex: _selectedIndex,
        selectedItemColor: Colors.amber[800],
        onTap: _onItemTapped,
      ),
    );
  }
}
実行してみる
さて、これでIconが増えているはずです。実行してみましょう。
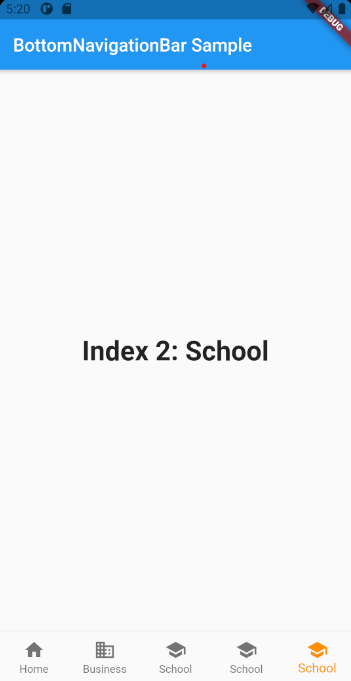
……??あれ???
Home以外のIconが無くなった?!
試しに他の部分を押してみるとちゃんとほかのIconを選択できました。Iconはちゃんと5つ存在しているようです。
ですが、このままだと実際のアプリには使いにくいので、さらに改善していきましょう。
全てのIconを表示したままにする
こちらのサイトを参考にしました。
結果、以下の一文をbottomNavigationBar: BottomNavigationBarの下に入れるだけで解決出来ることが分かりました。
type: BottomNavigationBarType.fixed,
見えました!!!これで一安心ですね
せっかくなのでIconを変更してみる
これらのサイトで使いたいIconを選びましょう。
ここではWorkとSettingsに変更してみます。IconとLabel、Textを変更すると以下のコードになります。
import 'package:flutter/material.dart';

void main() => runApp(const MyApp());

/// This is the main application widget.
class MyApp extends StatelessWidget {
  const MyApp({Key? key}) : super(key: key);

  static const String _title = 'Flutter Code Sample';

  @override
  Widget build(BuildContext context) {
    return const MaterialApp(
      title: _title,
      home: MyStatefulWidget(),
    );
  }
}

/// This is the stateful widget that the main application instantiates.
class MyStatefulWidget extends StatefulWidget {
  const MyStatefulWidget({Key? key}) : super(key: key);

  @override
  State<MyStatefulWidget> createState() => _MyStatefulWidgetState();
}

/// This is the private State class that goes with MyStatefulWidget.
class _MyStatefulWidgetState extends State<MyStatefulWidget> {
  int _selectedIndex = 0;
  static const TextStyle optionStyle =
  TextStyle(fontSize: 30, fontWeight: FontWeight.bold);
  static const List<Widget> _widgetOptions = <Widget>[
    Text(
      'Index 0: Home',
      style: optionStyle,
    ),
    Text(
      'Index 1: Business',
      style: optionStyle,
    ),
    Text(
      'Index 2: School',
      style: optionStyle,
    ),
    Text(
      'Index 3: Work',
      style: optionStyle,
    ),
    Text(
      'Index 4: Settings',
      style: optionStyle,
    ),
  ];

  void _onItemTapped(int index) {
    setState(() {
      _selectedIndex = index;
    });
  }

  @override
  Widget build(BuildContext context) {
    return Scaffold(
      appBar: AppBar(
        title: const Text('BottomNavigationBar Sample'),
      ),
      body: Center(
        child: _widgetOptions.elementAt(_selectedIndex),
      ),
      bottomNavigationBar: BottomNavigationBar(
        type: BottomNavigationBarType.fixed,
        items: const <BottomNavigationBarItem>[
          BottomNavigationBarItem(
            icon: Icon(Icons.home),
            label: 'Home',
          ),
          BottomNavigationBarItem(
            icon: Icon(Icons.business),
            label: 'Business',
          ),
          BottomNavigationBarItem(
            icon: Icon(Icons.school),
            label: 'School',
          ),
          BottomNavigationBarItem(
            icon: Icon(Icons.work),
            label: 'Work',
          ),
          BottomNavigationBarItem(
            icon: Icon(Icons.settings),
            label: 'Settings',
          ),
        ],
        currentIndex: _selectedIndex,
        selectedItemColor: Colors.amber[800],
        onTap: _onItemTapped,
      ),
    );
  }
}
これで完成形が出来ました。
このようにすればIconを自由自在に増やすことが出来ます。
おまけ
他にもいじってみて分かったことを軽く紹介します。気になる方は実際にやってみてください。
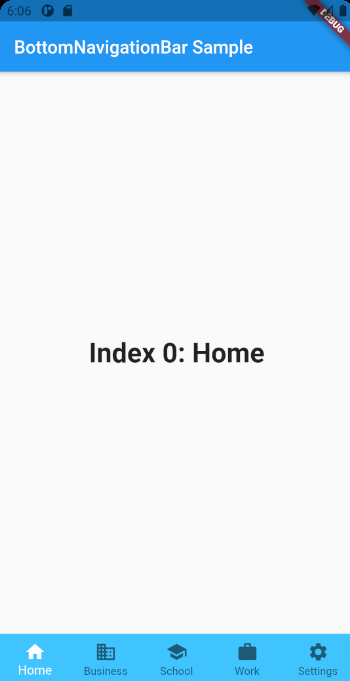
BottomNavigationBarに色をつける
bottomNavigationBar: BottomNavigationBarの下に以下のコードを加えましょう。
lightBlueAccentの部分を変更することで色を変更できます。
backgroundColor: Colors.lightBlueAccent,
Icon選択時の色を変更する
selectedItemColorの部分を変える。ここでは白に設定してみました。
selectedItemColor: Colors.white,
カラーコードを使う
Flutterラボのサイトを参考にしました。
以下のコードを一番下に追加しましょう。
class HexColor extends Color {
 static int _getColorFromHex(String hexColor) {
   hexColor = hexColor.toUpperCase().replaceAll('#', '');
   if (hexColor.length == 6) {
     hexColor = 'FF' + hexColor;
   }
   return int.parse(hexColor, radix: 16);
 }

 HexColor(final String hexColor) : super(_getColorFromHex(hexColor));
}
その後、HexColorでカラーコードを指定することができます。
先ほどの白をカラーコードで表現したのが以下になります。
selectedItemColor: HexColor('FFFFFF'),
実行してみる
おわりに
色々いじってみましたがflutter楽しいですね~
他にもまだまだ様々なことが出来ると思うので、今後増やしていきたいと思います!
ここまで読んでいただきありがとうございました。何かありましたらコメントをお願いします。


