はじめに
Webサーバー(ここではApacheベースのIBM HTTP Server)とLiberty間をSSL化する方法がマニュアルに記載されつつも、少し手こずってしまったので備忘録のためStep-By-Stepでまとめておきます。なおここではサーバー証明書は自己署名証明書を使います。
公開されている最新情報をもとに検証しているつもりですが、誤植・より良い方法などございましたらご指摘ください。
前提環境
- RHEL 7.3
- WebSphere Liberty 17.0.0.2(以下Liberty)
- IBM HTTP Server 9.0.0.2 (以下IHS)
- WebSphere Plugins 9.0.0.2(以下Plugin)
- IBM JDK 8
構成
- クライアント => IBM HTTP Server(Plugin) => Liberty x2
- IHSがバックエンドの2台のLibertyにラウンドロビンで割り振る
- この構成(シンプル・クラスター)方法についてはこちらをご参照ください
- クライアントとIHS、IHSとLibertyの間の通信がSSL
- IHSがバックエンドの2台のLibertyにラウンドロビンで割り振る
方法
クライアント => IHS間のSSL構成
- CMS鍵ストアを作成し、デフォルト・トラステッドCA証明書を格納します。以下は例です。
<IHSROOT>/bin/gskcapicmd -keydb -create -db /opt/IBM/HTTPServer/key.kdb -pw password -stash
<IHSROOT>/bin/gskcmd -cert -populate -db /opt/IBM/HTTPServer/key.kdb -pw password
- サーバー証明書を入手します。ここでは自己署名証明書を作成します。以下は作成例です。
<IHSROOT>/bin/gskcapicmd -cert -create -db /opt/IBM/HTTPServer/key.kdb -pw password -dn "cn=www.example.com" -label default -size 2048 -expire 365
3. httpd.confでSSLを設定します。以下は設定例です。
# Example SSL configuration
LoadModule ibm_ssl_module modules/mod_ibm_ssl.so
Listen 443
<VirtualHost *:443>
 ServerName YourHostName
 SSLEnable
 SSLClientAuth None
 SSLServerCert default
 KeyFile /opt/IBM/WebSphere/HTTPServer/key.kdb
</VirtualHost>
SSLDisable
4. IHSを再起動してhttpd.confを読み込みます。
<IHSROOT>/bin/apachectl stop
<IHSROOT>/bin/apachectl start
5. https://IHSHostname にアクセスできることを確認します。
いわゆるオレオレ証明書なので警告が出ますが受け入れて続行します。

IHS => Liberty間のSSL構成
- 各LibertyでJKS鍵ファイルを作成します。サーバー構成ファイルに以下を追記して起動します。
<featureManager>
  <feature>ssl-1.0</feature>
</featureManager>
<keyStore id="defaultKeyStore"
      location="key1.jks"
      type="JKS" password="password" />
<LibertyROOT>/bin/server start server1
<keyStore id="defaultKeyStore"
      location="key2.jks"
      type="JKS" password="password" />
<LibertyROOT>/bin/server start server2
<serverName>/resources/security/ディレクトリに自動生成されたjksファイルがあることを確認します。以下は例です。
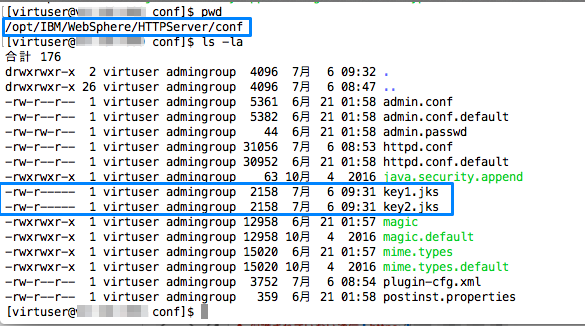
2. 上記のjksファイル2点をIHSの任意の場所にコピー
以下は例です。
3. gskcmdコマンドを使ってそれぞれのjksファイルをkdbファイルに変換
./gskcmd -keydb -convert -pw Liberty -db /opt/IBM/WebSphere/HTTPServer/conf/key1.jks -old_format jks -target /opt/IBM/WebSphere/HTTPServer/conf/plugin-key1.kdb -new_format cms -stash
./gskcmd -keydb -convert -pw Liberty -db /opt/IBM/WebSphere/HTTPServer/conf/key2.jks -old_format jks -target /opt/IBM/WebSphere/HTTPServer/conf/plugin-key2.kdb -new_format cms -stash
以下は例です。
4. 上記ファイルをプラグイン構成ファイル内でServerClusterエレメントを更新しIHSを再起動
以下は例です。
<ServerCluster CloneSeparatorChange="false" GetDWLMTable="false" IgnoreAffinityRequests="true" LoadBalance="Round Robin" Name="Cluster1" PostBufferSize="0" PostSizeLimit="-1" RemoveSpecialHeaders="true" RetryInterval="60" ServerIOTimeoutRetry="-1">
      <Server CloneID="abcd-efgh-1234-5678-90xx" ConnectTimeout="5" ExtendedHandshake="false" LoadBalanceWeight="20" MaxConnections="-1" Name="server1" ServerIOTimeout="900" WaitForContinue="false">
         <Transport Hostname="YourLibertyHostName1" Port="9080" Protocol="http"/>
         <Transport Hostname="YourLibertyHostName1" Port="9443" Protocol="https">
            <Property Name="keyring" Value="/opt/IBM/WebSphere/HTTPServer/conf/plugin-key1.kdb"/>
            <Property Name="stashfile" Value="/opt/IBM/WebSphere/HTTPServer/conf/plugin-key1.sth"/>
         </Transport>
      </Server>
<Server CloneID="1234-5678-90yy-abcd-efgh" ConnectTimeout="5" ExtendedHandshake="false" LoadBalanceWeight="20" MaxConnections="-1" Name="server2" ServerIOTimeout="900" WaitForContinue="false">
         <Transport Hostname="YourLibertyHostName2" Port="9080" Protocol="http"/>
         <Transport Hostname="YourLibertyHostName2" Port="9443" Protocol="https">
            <Property Name="keyring" Value="/opt/IBM/WebSphere/HTTPServer/conf/plugin-key2.kdb"/>
            <Property Name="stashfile" Value="/opt/IBM/WebSphere/HTTPServer/conf/plugin-key2.sth"/>
         </Transport>
      </Server>

</ServerCluster>
5. https://IHSHostname/App などLibertyにデプロイされているアプリにHTTPSでアクセスできることを確認します。
以下は例です。
まとめ
以上でIBM HTTP ServerとWebSphere Libertyのクラスター環境において、全コンポーネント間でSSL化する方法をまとめました。


