やりたいこと
- BottomNavigationをNavigationで作成
- 画面遷移をNavigationで作成
BottomNavigationをNavigationで作成
-
事前に以下のクラスを用意
-
MainActivity.kt
-
FirstFragment.kt
-
SecondFragment.kt
-
BottomNavigationのMenuリソース作成
BottomNavigationに表示するアイコンやタイトルを設定します。
<menu xmlns:android="http://schemas.android.com/apk/res/android"
    xmlns:tools="http://schemas.android.com/tools">

    <item
        android:id="@+id/fragment_first"
        android:icon="@drawable/ic_baseline_format_list_bulleted_24"
        android:title="first"
        tools:ignore="HardcodedText" />

    <item
        android:id="@+id/fragment_second"
        android:icon="@drawable/ic_baseline_event_note_24"
        android:title="second"
        tools:ignore="HardcodedText" />

</menu>
- MainActivityのレイアウトにBottomNavigationを追加
BottomNavigationView使用するためにbuild.gradleにマテリアルデザインを追加します。
dependencies {
    implementation 'com.google.android.material:material:1.1.0'
}
先ほど作成したMenuリソースを指定したBottomNavigationViewをMainActivityのレイアウトに追加します。
    <com.google.android.material.bottomnavigation.BottomNavigationView
        android:id="@+id/bottom_nav_view"
        android:layout_width="0dp"
        android:layout_height="wrap_content"
        android:background="?android:attr/windowBackground"
        app:layout_constraintBottom_toBottomOf="parent"
        app:layout_constraintLeft_toLeftOf="parent"
        app:layout_constraintRight_toRightOf="parent"
        app:menu="@menu/bottom_nav_menu" />
- Navigationリソース作成
Navigationを使用するためにbuild.gradleに以下を追加します。
dependencies {
    implementation 'androidx.navigation:navigation-fragment-ktx:2.2.2'
    implementation 'androidx.navigation:navigation-ui-ktx:2.2.2'
}
BottomNavigationから表示させるFragmentを追加します。
※idをbottom_nav_menu.xmlのitemに指定したidと同じ値にするのが注意点です!!
<navigation xmlns:android="http://schemas.android.com/apk/res/android"
    xmlns:app="http://schemas.android.com/apk/res-auto"
    xmlns:tools="http://schemas.android.com/tools"
    android:id="@+id/bottom_nav_graph"
    app:startDestination="@+id/fragment_first">

    <fragment
        android:id="@id/fragment_first"
        android:name="jp.co.monomemo.FirstFragment"
        android:label="first"
        tools:layout="@layout/fragment_first" >
    </fragment>

    <fragment
        android:id="@id/fragment_second"
        android:name="jp.co.monomemo.SecondFragment"
        android:label="second"
        tools:layout="@layout/fragment_second" >
    </fragment>

</navigation>
- MainActivityのレイアウトにfragment追加
ここで先ほど作成したNavigationリソースをActivityに紐付けます。
    <fragment
        android:id="@+id/nav_host_fragment"
        android:name="androidx.navigation.fragment.NavHostFragment"
        android:layout_width="match_parent"
        android:layout_height="match_parent"
        app:defaultNavHost="true"
        app:layout_constraintBottom_toTopOf="@id/bottom_nav_view"
        app:layout_constraintLeft_toLeftOf="parent"
        app:layout_constraintRight_toRightOf="parent"
        app:layout_constraintTop_toTopOf="parent"
        app:navGraph="@navigation/nav_graph" />
- MainActivityにBottomNavigationとNavigationを紐付ける処理を実装
これでBottomNavigationでFragmentの切り替えが完成!!
    override fun onCreate(savedInstanceState: Bundle?) {
        super.onCreate(savedInstanceState)
        setContentView(R.layout.activity_main)

        val navController = findNavController(R.id.nav_host_fragment)
        // タイトルなどの制御
        setupActionBarWithNavController(
            navController, AppBarConfiguration(
                setOf(
                    R.id.fragment_first,
                    R.id.fragment_second
                )
            )
        )
        // BottomNavigation の遷移を制御
        bottom_nav_view.setupWithNavController(navController)
    }
※ここでCannot inline bytecode built with JVM target 1.8 into bytecode that is being built with JVM target 1.6. Please specify proper '-jvm-target' optionが発生した場合は、build.gradleに以下を追加します。
android {
    kotlinOptions {
        jvmTarget = '1.8'
    }
}
画面遷移をNavigationで作成
-
画面遷移用の以下のFragmentを追加
-
ThirdFragment
-
FirstFragmentに遷移用のButtonを追加
    <Button
        android:id="@+id/to_third_fragment_button"
        android:layout_width="wrap_content"
        android:layout_height="wrap_content"
        android:layout_gravity="center"
        android:text="to third fragment" />
- navigationリソースに画面遷移のアクションを追加
nav_graph.xmlにThirdFragmentを追加

FirstFragmentからThirdFragmentへ矢印を引く
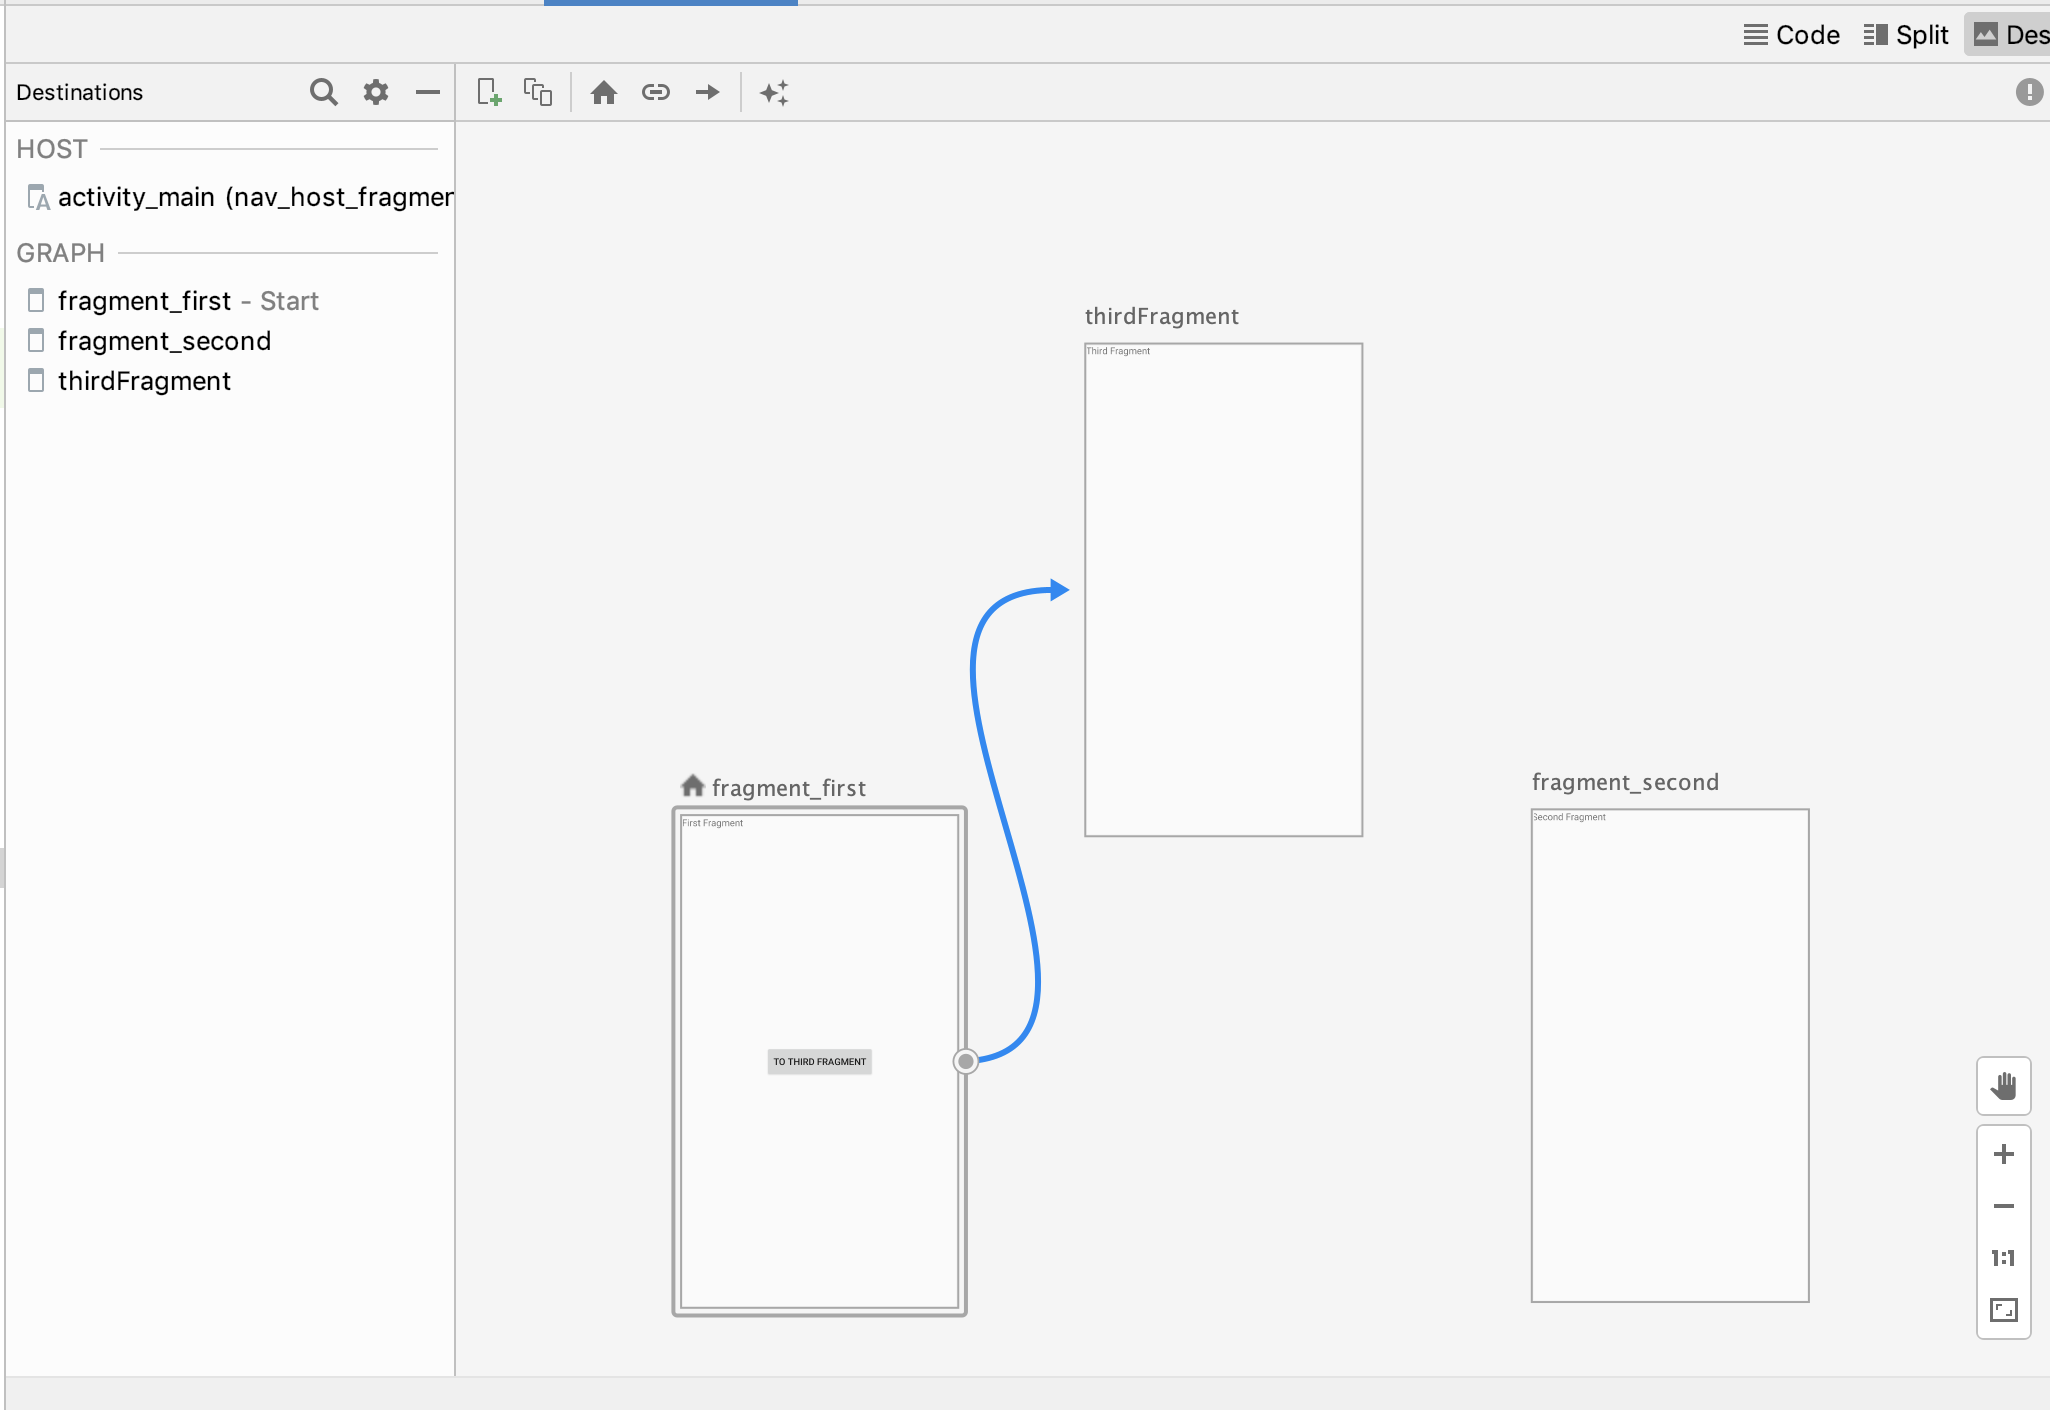
コードを確認すると、FirstFragmentからThirdFragmentへ遷移遷移するアクションが追加されている
(デフォルトのidはキャメルケースになるので手動で少し修正してます)
    <fragment
        android:id="@id/fragment_first"
        android:name="jp.co.myapplication.FirstFragment"
        android:label="first"
        tools:layout="@layout/fragment_first" >
        <action
            android:id="@+id/action_fragment_first_to_third_fragment"
            app:destination="@id/third_fragment" />
    </fragment>
- 最後に、FirstFragmentにボタンクリックイベントを追加
これでFragmentからFragmentへの画面遷移も完成!!
    override fun onViewCreated(view: View, savedInstanceState: Bundle?) {
        super.onViewCreated(view, savedInstanceState)

        to_third_fragment_button.setOnClickListener {
            // NavController取得
            val navController = findNavController()
            // ThirdFragmentへ画面遷移
            navController.navigate(R.id.action_fragment_first_to_third_fragment)
        }

    }
(kotlinはidでViewが取得できるのが個人的にとても便利!!)
まとめ
とても簡単にNavigationでの画面遷移が実装できました。
Argumentsを設定すれば遷移時に値も渡せるので今度追記します。