概要
学校の実験に音源の周波数変化を計測する装置が必要だったので勉強するついでにプロトタイプを作ってみました。その過程で得た知見を本記事に残します。前回はArduinoで簡易的なFFT解析を試しました。今回はピークの周波数を検出する方法について考えます。
開発環境
- Windows 11 Home 23H2
- Arduino IDE 2.3.0
- Arduino-Pico 3.8.1
- Arduino FFT 2.0.2
ピークを検出する方法
FFT解析で時間窓長を短くすると時間分解能は上がりますが、周波数分解能は下がってしまうため、単純に極大値を探すだけでは精度が著しく落ちてしまいます。そこで周波数分解能は少し犠牲になりますが、高い時間分解能でピークの周波数を正確に検出するため、放物線で近似し、補正を行います。
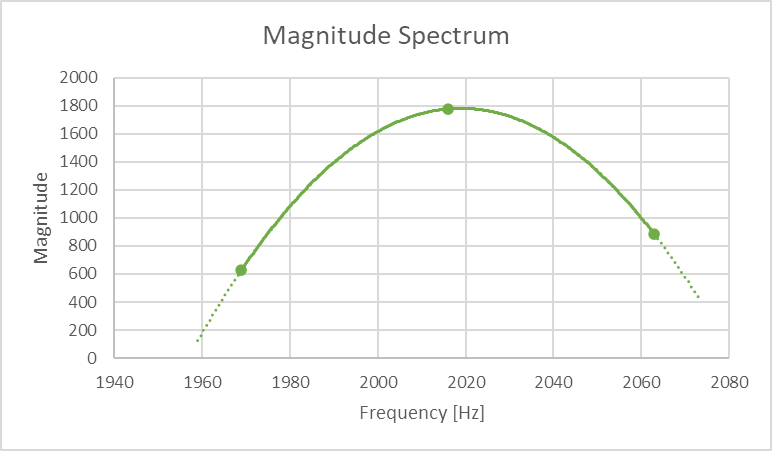
まずは微分係数が正から負に切り替わる点、つまり、極大値を探してピークの位置を仮に検出します。そして上図のような前後の隣接する3点を通る放物線を計算し、その頂点を最終的なピークの位置として検出します。計算式はこちらのページが参考になりました。単純に極大値を探す関数と放物線で近似する関数の両方がライブラリには用意されていますが、どちらも単数のピークしか検出できないので今回は複数のピークを検出できるように自前で関数を実装します。
プログラム
基本的には前回のプログラムを踏襲しています。計算量を減らすため、ピークの位置に影響しない正規化や窓関数の補正は省略しました。閾値を設定し、その値を超えるピークだけ検出します。
#include <ArduinoFFT.h>

#define MICROPHONE_PIN A2

const double threshold = 1000.0f; //magnitude
const double samplingFrequency = 48000.0f; //48kHz
const int samples = 1024; //this value must always be a power of 2
const int peaks = 2;

double real[samples] = {0};
double imaginary[samples] = {0};

ArduinoFFT<double> fft = ArduinoFFT<double>(real, imaginary, samples, samplingFrequency);


//return an estimation of the dominant frequency according to an interpolation through the parabola equation of the bigest peak found on the magnitude array
inline void findPeaks(double *data, int samples, double samplingFrequency, double *frequency, double *magnitude, int peaks) {
  int j = 0;
  for (int i = 0; i < (samples / 2); i++) {
    if (j > (peaks - 1)) {
      return;
    }

    if (data[i] > threshold) {
      int next = min((samples / 2 - 1), (i + 1));
      int previous = max(0, (i - 1));

      if (data[previous] < data[i] && data[i] > data[next]) { //local maximum magnitude
        double c = data[i];
        double a = (data[next] + data[previous]) / 2.0f - c;
        double b = (data[next] - data[previous]) / 2.0f;

        frequency[j] = (i - b / (2.0f * a)) * samplingFrequency / samples;
        magnitude[j] = c - pow(b, 2.0f) / (4.0f * a);
        j++;
      }
    }
  }
}

void setup() {
  Serial.begin(115200);
  delay(1000);

  pinMode(17, OUTPUT); //red
  pinMode(16, OUTPUT); //green
  pinMode(25, OUTPUT); //blue
  pinMode(MICROPHONE_PIN, INPUT);

  //turn off the onboard LED
  digitalWrite(17, HIGH); //red
  digitalWrite(16, HIGH); //green
  digitalWrite(25, HIGH); //blue

  analogReadResolution(12); //12 bits
  delay(1000);
}

void loop() {
  static const int samplingPeriod = floor(1000000.0f / samplingFrequency); //in microseconds

  for (int i = 0; i < samples; i++) {
    unsigned long time = micros();
    real[i] = analogRead(MICROPHONE_PIN);
    imaginary[i] = 0;

    while (micros() < (time + samplingPeriod)) {
      //do nothing
    }
  }

  fft.dcRemoval();
  fft.windowing(FFT_WIN_TYP_HAMMING, FFT_FORWARD);
  fft.compute(FFT_FORWARD);
  fft.complexToMagnitude(); //overwrite the first half of the integer data array

  // for (int i = 0; i < (samples / 2); i++) {
  //   if (i > 0) {
  //     Serial.print(",");
  //   }
  //   Serial.print(real[i]);
  // }
  // Serial.println();

  double frequency[peaks] = {0};
  double magnitude[peaks] = {0};
  findPeaks(real, samples, samplingFrequency, frequency, magnitude, peaks);

  for (int i = 0; i < peaks; i++) {
    if (i > 0) {
      Serial.print(",");
    }
    Serial.print(frequency[i]);
  }
  Serial.println();

  delay(1000);
}
検証
前回と同様、こちらのアプリで2kHzと3kHzの純音を同時に再生し、まずはFFT解析の結果を確認します。
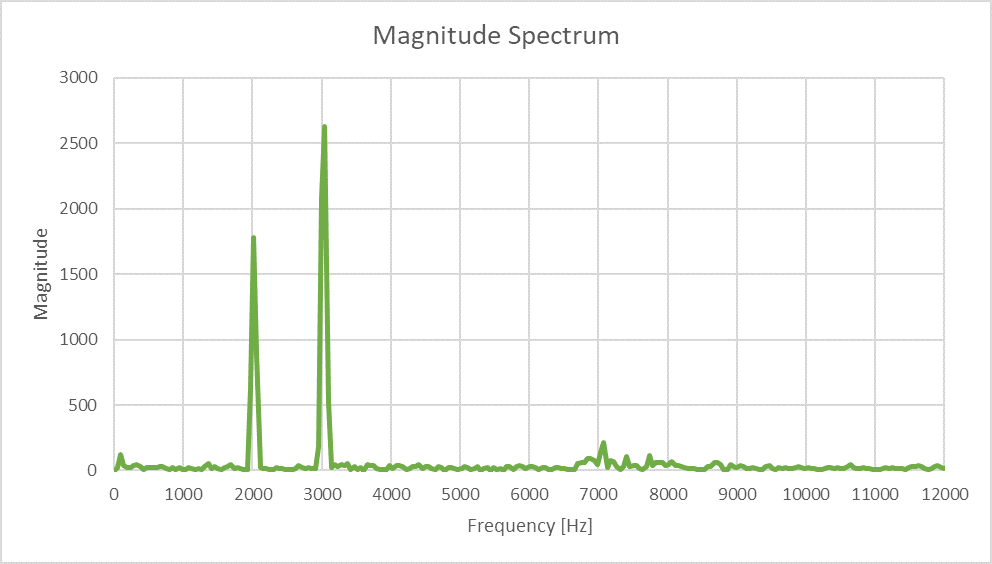
それぞれの純音に対応するピークを確認できます。その周波数は補正前で2.016kHzと3.047kHz、補正後で約2.019kHzと約3.033kHzとなりました。あまり確度は変わらないようですが、精度は向上したはずです。つまり、より細かい周波数変化を計測できるようになります。
総括
次回はPDMマイクも試してみる予定です。