はじめに
「標的型攻撃に対するJPCERT/CCのおすすめログ設定をElasticsearchで構築してみる(プロキシサーバ編)」ではJPCERT/CCによる「高度サイバー攻撃への対処におけるログの活用と分析方法」をもとに、以下の情報をElasticsearchへ出力するように設定してみました。
- URL
- HTTPリクエストメソッド
- タイムスタンプ
- 送信先サーバのFQDN
- 送信先サーバのIPアドレス
- 送信先サーバのポート番号
- 送信元クライアントのIPアドレス
- ユーザエージェント
- リファラ
- 送受信量
- 送信元クライアントのポート番号
※プロキシサーバとしてSquidを利用しています。
本記事ではこれらの情報出力をElastic Common Schema(ECS)へ対応させてみます。
- Elastic Common Schemaについて (Elastic社)
※本記事で作成するFilebeatモジュールやSquidの設定例はこちらへ置いておきました。
利用するソフトウェア
- OS: Ubuntu 18.04
- プロキシサーバ: Squid (3.5.27)
- DNSサーバ: Dnsmasq (2.79)
- Elasticsearch (7.3.2)
- Kibana (7.3.2)
- Filebeat (7.4.1)
- VMware Workstation Player等のVMソフトウェア
- Windows 10 (クライアントPC)
ネットワーク構成例
「標的型攻撃に対するJPCERT/CCのおすすめログ設定をElasticsearchで構築してみる(プロキシサーバ編)」から変更はありません。
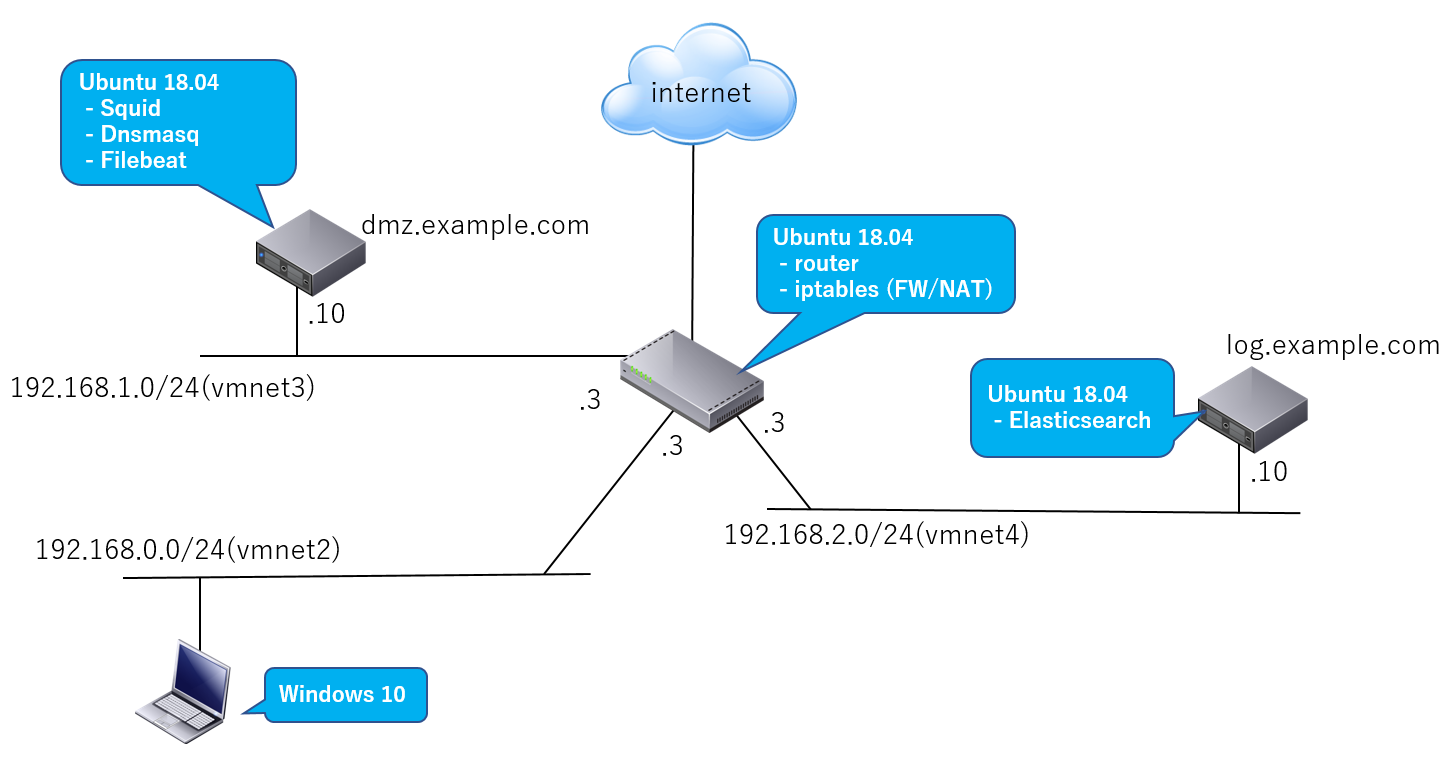
| 説明 | |
|---|---|
| Webアクセス | Windows 10上のWebブラウザはインターネットへdmz.example.comで動作するプロキシサーバ(Squid)経由でアクセス |
| ログ | dmz.example.com上で動作するプロキシサーバのログをFilebeatがElasticsearch(log.example.com)へ転送 |
プロキシサーバ(Squid)のログ設定とフォーマット追加
特に変更はありません。
Squidの設定ファイル**/etc/squid/squid.conf**に以下の設定を追加します。Squidログフォーマットの詳細仕様についてはこちらを参照。
logformat combined   %>a:%>p %[ui %[un "%rm %ru HTTP/%rv" %>Hs %>st %<st "%{Referer}>h" "%{User-Agent}>h" %Ss:%Sh [%ts%03tu] %<a:%<p %<A
access_log daemon:/var/log/squid/access.log combined
Squid用Filebeatモジュールの作成
「標的型攻撃に対するJPCERT/CCのおすすめログ設定をElasticsearchで構築してみる(プロキシサーバ編)」で作成したFilebeatモジュールをElastic Common Schema(ECS)へ対応させます。
Squid用モジュールのファイル構成
以下のような構成でモジュールのファイルを配置します(変更ありません)。
/usr/share/filebeat/
   `- module/
        `- squid/
             |- module.yml
             `- access/
                  |- manifest.yml
                  |- config/
                  |    `- access.yml
                  `- ingest/
                       `- default.json
squid/access/manifest.ymlの設定
変更はありません。
module_version: 1.0

var:
  - name: paths
    default:
      # Squidのログファイルパス(FilebeatへのInputソース)
      - /var/log/squid/access.log*

# Ingestノードのパイプライン設定ファイルパス
ingest_pipeline: ingest/default.json

# 入力ソースの設定ファイルパス
input: config/access.yml

# Ingestノードのプラグインの指定
requires.processors:
- name: user_agent
  # ユーザエージェント情報のパーシング
  plugin: ingest-user-agent
- name: geoip
  # 送信先サーバの地理情報の付加
  plugin: ingest-geoip
squid/access/config/access.ymlの設定
変更はありません。
type: log
paths:
{{ range $i, $path := .paths }}
 - {{$path}}
{{ end }}
exclude_files: [".gz$"]
squid/module.yml
変更はありません。
dashboards:
- id: Filebeat-Squid-Dashboard
squid/access/ingest/default.json
Ingestノードに注入するPipeline設定を記述します。利用するプロセッサは同じです。
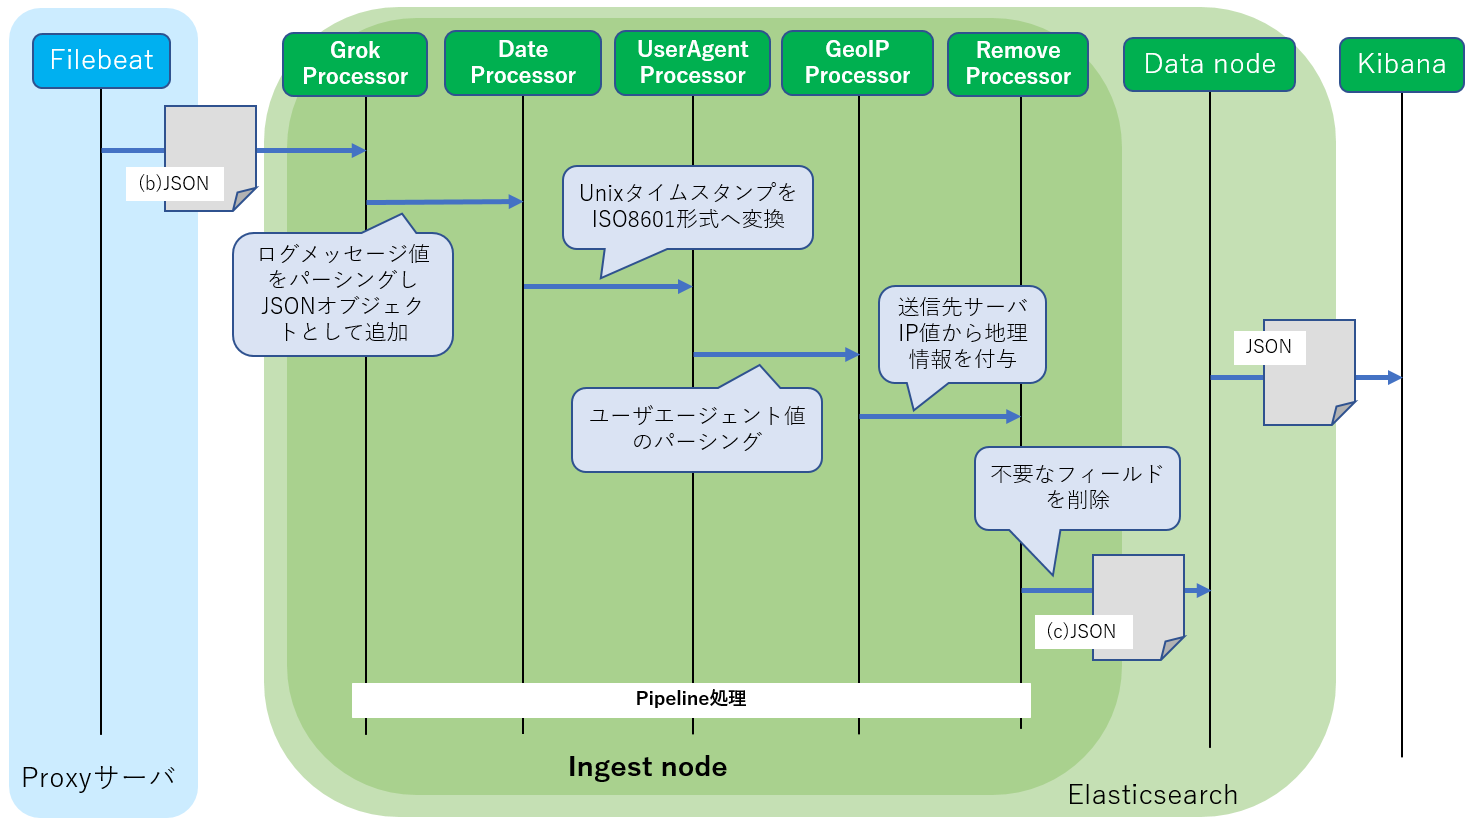
| 説明 | |
|---|---|
| Grokプロセッサ | ログメッセージのテキストデータをパーシングしてJSON形式へ変換するプロセッサ。 パース形式を正規表現を組み合わせたパターンで記述するだけでOKです |
| Dateプロセッサ | SquidログのUNIXタイムスタンプからISO8601形式タイムスタンプへ変換します |
| User Agentプロセッサ | Webブラウザが送信するユーザエージェント情報(ブラウザ情報)をパーシングします |
| GeoIPプロセッサ | 接続先サーバIPの地理情報を追加します |
| Removeプロセッサ | 不要な情報を削除。 Grokによってパーシングされた後で不要な情報をElasticsearchへ保存する前に削除します |
| Renameプロセッサ | 上図には含まれていませんが、ログ内のフィールド名を変更します。例えばECSの名前(空間)へ変換するためによく利用されます |
設定の全体は以下の通りとなります。それぞれのプロセッサ設定について説明していきます。
{
    "description": "Pipeline for parsing Squid access logs. Requires the geoip and user_agent plugins.",
    "processors": [
        {
            "grok": {
                "field": "message",
                "patterns": [
                    "%{IPORHOST:source.address}:%{NUMBER:source.port} %{DATA:user.id} %{DATA:user.name} \"%{WORD:http.request.method} %{DATA:url.original} HTTP/%{NUMBER:http.version}\" %{NUMBER:http.response.status_code:long} %{NUMBER:http.request.bytes:long} %{NUMBER:http.response.bytes:long} \"%{DATA:http.request.referrer}\" \"%{DATA:user_agent.original}\" %{DATA:squid.access.squid_status}:%{DATA:squid.access.squid_hier} \\[%{NUMBER:squid.access.unix_time}\\] %{IPORHOST:destination.ip}:%{NUMBER:destination.port} %{IPORHOST:destination.domain}",
                    "%{IPORHOST:source.address}:%{NUMBER:source.port} %{DATA:user.id} %{DATA:user.name} \"%{WORD:http.request.method} %{DATA:url.original} HTTP/%{NUMBER:http.version}\" %{NUMBER:http.response.status_code:long} %{NUMBER:http.request.bytes:long} %{NUMBER:http.response.bytes:long} \"%{DATA:http.request.referrer}\" \"%{DATA:user_agent.original}\" %{DATA:squid.access.squid_status}:%{DATA:squid.access.squid_hier} \\[%{NUMBER:squid.access.unix_time}\\] -:- -"
                ],
                "ignore_missing": true,
                "ignore_failure": true
            }
        },
        {
            "grok": {
                "field": "source.address",
                "ignore_missing": true,
                "ignore_failure": true,
                "patterns": [
                    "^(%{IP:source.ip}|%{HOSTNAME:source.domain})$"
                ]
            }
        },
        {
            "rename": {
                "field": "@timestamp",
                "target_field": "event.created",
                "ignore_failure": true
            }
        },
        {
            "date": {
                "field": "squid.access.unix_time",
                "target_field": "@timestamp",
                "formats": [
                    "UNIX_MS"
                 ],
                "ignore_failure": true
            }
        },
        {
            "user_agent": {
                "field": "user_agent.original",
                "ignore_failure": true
            }
        },
        {
            "geoip": {
                "field": "source.ip",
                "target_field": "source.geo",
                "ignore_missing": true
            }
        },
        {
            "geoip": {
                "database_file": "GeoLite2-ASN.mmdb",
                "field": "source.ip",
                "target_field": "source.as",
                "properties": [
                    "asn",
                    "organization_name"
                ],
                "ignore_missing": true
            }
        },
        {
            "rename": {
                "field": "source.as.asn",
                "target_field": "source.as.number",
                "ignore_missing": true
            }
        },
        {
            "rename": {
                "field": "source.as.organization_name",
                "target_field": "source.as.organization.name",
                "ignore_missing": true
            }
        },
        {
            "geoip": {
                "field": "destination.ip",
                "target_field": "destination.geo",
                "ignore_missing": true
            }
        },
        {
            "geoip": {
                "database_file": "GeoLite2-ASN.mmdb",
                "field": "destination.ip",
                "target_field": "destination.as",
                "properties": [
                    "asn",
                    "organization_name"
                ],
                "ignore_missing": true
            }
        },
        {
            "rename": {
                "field": "destination.as.asn",
                "target_field": "destination.as.number",
                "ignore_missing": true
            }
        },
        {
            "rename": {
                "field": "destination.as.organization_name",
                "target_field": "destination.as.organization.name",
                "ignore_missing": true
            }
        },
        {
            "remove": {
                "field": "message",
                "ignore_missing": true,
                "ignore_failure": true
            }
        }
    ],
    "on_failure": [
        {
            "set": {
                "field": "error.message",
                "value": "{{ _ingest.on_failure_message }}"
            }
        }
    ]
}
GrokプロセッサによるログメッセージのJSON変換
GrokプロセッサによりFilebeatから転送されたJSONドキュメント内のmessageフィールドをパーシングし各フィールドを生成します。
※Grokのしくみについては「標的型攻撃に対するJPCERT/CCのおすすめログ設定をElasticsearchで構築してみる(プロキシサーバ編)」を参照してください。
変換先のテンプレート定義
まずGrokプロセッサがインデクスへ格納するログ情報のJSON形式(テンプレート)を定義します。テンプレートはデフォルトでは**/etc/filebeat/fields.ymlに定義されています。このファイルをmy_fields.yml**としてコピーしSquidモジュール用の定義を追加します。
cd /etc/filebeat
cp fields.yml my_fields.yml
Elastic Common Schema (ECS)を利用
ECSの定義は既に上述のfields.ymlに含まれていますので特に追加は必要ありません。
本モジュールでは以下のようにECSを利用します。
| 説明 | |
|---|---|
| source | クライアント(例:Webブラウザ)の接続元情報が設定されます |
| destination | 接続先サーバー(例:インターネットのWebサーバ)の接続先情報が設定されます |
| user | プロキシ認証情報が設定されます |
| http | HTTPプロトコル情報が設定されます |
| user_agent | UserAgent情報が設定されます |
| url | URL情報が設定されます |
Squid用モジュールのテンプレート定義
ECSに含まれていないSquid特有の情報については別途定義を**/etc/filebeat/my_fields.yml**へ追加します。
- key: squid
  title: "Squid"
  description: >
    Squid Module
  short_config: true
  fields:
    - name: squid
      type: group
      description: >
        Squid fields.
      fields:
        - name: access
          type: group
          description: >
            Contains fields for the Squid HTTP Server access logs.
          fields:
            - name: squid_status
              type: keyword
              description: >
                Squid request status (TCP_MISS etc).
            - name: squid_hier
              type: keyword
              description: >
                Squid hierarchy status (DEFAULT_PARENT etc).
            - name: unix_time
              type: keyword
              description: >
                Timestamp by UNIX_MS.
Grokプロセッサの詳細
Grokプロセッサによるログメッセージのパーシング結果を変換するJSON形式を定義できました。次にプロセッサの設定を以下の通り行います。
{
  "description": "Pipeline for parsing Squid access logs. Requires the geoip and user_agent plugins.",
  "processors": [{
        {
            "grok": {
                "field": "message",
                "patterns": [
                    "%{IPORHOST:source.address}:%{NUMBER:source.port} %{DATA:user.id} %{DATA:user.name} \"%{WORD:http.request.method} %{DATA:url.original} HTTP/%{NUMBER:http.version}\" %{NUMBER:http.response.status_code:long} %{NUMBER:http.request.bytes:long} %{NUMBER:http.response.bytes:long} \"%{DATA:http.request.referrer}\" \"%{DATA:user_agent.original}\" %{DATA:squid.access.squid_status}:%{DATA:squid.access.squid_hier} \\[%{NUMBER:squid.access.unix_time}\\] %{IPORHOST:destination.ip}:%{NUMBER:destination.port} %{IPORHOST:destination.domain}",
                    "%{IPORHOST:source.address}:%{NUMBER:source.port} %{DATA:user.id} %{DATA:user.name} \"%{WORD:http.request.method} %{DATA:url.original} HTTP/%{NUMBER:http.version}\" %{NUMBER:http.response.status_code:long} %{NUMBER:http.request.bytes:long} %{NUMBER:http.response.bytes:long} \"%{DATA:http.request.referrer}\" \"%{DATA:user_agent.original}\" %{DATA:squid.access.squid_status}:%{DATA:squid.access.squid_hier} \\[%{NUMBER:squid.access.unix_time}\\] -:- -"
                ],
                "ignore_missing": true,
                "ignore_failure": true
            }
        },
        {
            "grok": {
                "field": "source.address",
                "ignore_missing": true,
                "ignore_failure": true,
                "patterns": [
                    "^(%{IP:source.ip}|%{HOSTNAME:source.domain})$"
                ]
            }
        },
......
  }]
}
Squidの元ログは以下のように記録されます。
192.168.0.134:50435 - - \"GET http://xxx.example.com HTTP/1.1\" 200 2991 918 \"http://xxx.example.com/xxx.js\" \"Mozilla/5.0 (Windows NT 10.0; Win64; x64) AppleWebKit/537.36 (KHTML, like Gecko) Chrome/73.0.3683.86 Safari/537.36\" TCP_MISS:HIER_DIRECT [xxxxxxxx35237] 10.0.0.3:80 xxx.example.com
例えばsource.addressやsource.ipには「192.168.0.134」が、destination.ipには「10.0.0.3」が代入されます。またurl.originalには「xxx.example.com/xxx.js」が入ります。
設定の詳細についてはこちらを参照。
DateプロセッサによるISO8601形式タイムスタンプの追加
Squidのログで記録されるUNIXタイムスタンプからISO8601形式タイムスタンプを生成し追加します。
{
  "description": "Pipeline for parsing Squid access logs. Requires the geoip and user_agent plugins.",
  "processors": [{
  ......
        {
            "date": {
                "field": "squid.access.unix_time",
                "target_field": "@timestamp",
                "formats": [
                    "UNIX_MS"
                 ],
                "ignore_failure": true
            }
        },
  ......
  }],
  ......
}
User Agentプロセッサによるブラウザ情報のパーシング
ユーザエージェント情報(user_agent.originalフィールド)をパーシングします。
{
  "description": "Pipeline for parsing Squid access logs. Requires the geoip and user_agent plugins.",
  "processors": [{
  ......
        {
            "user_agent": {
                "field": "user_agent.original",
                "ignore_failure": true
            }
        },
  ......
  }],
  ......
}
詳細についてはこちらを参照。
※以前はUser Agentプロセッサを利用するためにはElasticsearchへプラグインを別途追加する必要がありましたが、7.x.x系ではデフォルトで組み込まれています。
GeoIPプロセッサによる接続先サーバの地理情報の付加
接続元また接続先IPアドレスの地理情報を付加します。
{
  "description": "Pipeline for parsing Squid access logs. Requires the geoip and user_agent plugins.",
  "processors": [{
  ......
        {
            "geoip": {
                "field": "source.ip",
                "target_field": "source.geo",
                "ignore_missing": true
            }
        },
        {
            "geoip": {
                "database_file": "GeoLite2-ASN.mmdb",
                "field": "source.ip",
                "target_field": "source.as",
                "properties": [
                    "asn",
                    "organization_name"
                ],
                "ignore_missing": true
            }
        },
  ......
        {
            "geoip": {
                "field": "destination.ip",
                "target_field": "destination.geo",
                "ignore_missing": true
            }
        },
        {
            "geoip": {
                "database_file": "GeoLite2-ASN.mmdb",
                "field": "destination.ip",
                "target_field": "destination.as",
                "properties": [
                    "asn",
                    "organization_name"
                ],
                "ignore_missing": true
            }
        },
        {
  ......
  }],
  ......
}
詳細についてはこちらを参照。
※以前はGeoIPプロセッサを利用するためにはElasticsearchへプラグインを別途追加する必要がありましたが、7.x.x系ではデフォルトで組み込まれています。
Removeプロセッサによる不要な情報の削除
不要または冗長な情報を削除します。
パーシングしたmessageフィールドは不要のため削除します。
{
  "description": "Pipeline for parsing Squid access logs. Requires the geoip and user_agent plugins.",
  "processors": [{
  ......
  }, {
    "remove": {
      "field": "message",
      "ignore_missing": true,
      "ignore_failure": true
    }
  ......
  }],
  ......
}
※後述の「Kibanaでログを確認」ではこの設定はデバッグ用にはずしてあります。必要に応じて追加してください。
詳細についてはこちらを参照。
Filebeatモジュールの設定手順
Squid用のモジュールが完成しましたのでそれをdmz.example.comへデプロイします。
モジュールの設定ファイル作成
特に変更はありません。
/etc/filebeat/
   `- modules.d/
       `- squid.yml.disabled
- module: squid
  # Access logs
  access:
    enabled: true

    # Set custom paths for the log files. If left empty,
    # Filebeat will choose the paths depending on your OS.
    #var.paths:
モジュールのテンプレート設定を追加
/etc/filebeat/
   `- my_fields.yml
さきほど作成したmy_fields.ymlのパスをFilebeatの設定ファイル(/etc/filebeat/filebeat.yml)で変更します。以下のsetup.template.fieldsで説明します。
Filebeatの設定ファイルを修正
/etc/filebeat/
   `- filebeat.yml
| 説明 | |
|---|---|
| hosts: ["log.example.com:9200"] | Elasticsearchが動作するホストアドレスとポート番号を指定 |
| filebeat.overwrite_pipelines: true | Elasticsearchへの接続毎にIngestノードのパイプライン設定を注入(デバッグ用) |
| setup.template.enabled: true | テンプレート設定の注入を有効化 |
| setup.template.fields: "/etc/filebeat/my_fields.yml" | テンプレート設定ファイルの場所を変更 |
| setup.template.overwrite: true | 既存のテンプレート設定を更新 |
| setup.ilm.enabled: false | 本記事ではILMは無効にしておきます。そのためインデクスは日付単位で生成されます |
詳細は**/etc/filebeat/filebeat.reference.yml**を参照してください。
hosts: ["log.example.com:9200"]

# 運用時にはコメントアウト
filebeat.overwrite_pipelines: true

setup.template.enabled: true
setup.template.fields: "/etc/filebeat/my_fields.yml"
setup.template.overwrite: true
setup.ilm.enabled: false
設定を確認します。log.example.com:9200(Elasticsearch)への接続確認も行っておきましょう。
cd /etc/filebeat
/usr/share/filebeat/bin/filebeat test config
/usr/share/filebeat/bin/filebeat test output
Filebeatを再起動します。
systemctl restart filebeat.service
モジュールの有効化
以上の設定作業が終わったらSquid用のモジュールを有効化します。
filebeat modules enable squid
モジュールのテンプレート設定をElasticsearchへ注入
filebeat setup --index-management
モジュールのパイプライン設定をElasticsearchへ注入
filebeat setup --pipelines -modules squid
補足
テンプレートの参照
curl -XGET http://log.example.com:9200/_template/filebeat-*?pretty

テンプレートの削除
curl -XDELETE http://log.example.com:9200/_template/filebeat-*

パイプライン設定の参照
curl -XGET http://log.example.com:9200/_ingest/pipeline/filebeat-*?pretty

パイプライン設定の削除
curl -XDELETE http://log.example.com:9200/_ingest/pipeline/filebeat-*

registryファイルのクリア
rm /var/lib/filebeat/registry
Kibanaでログを確認
- Management/Create Index Patternにて filebeat-*を指定してインデクスパターンを生成
- Discoverにてパーシングされたログを確認できます。

{
  "_index": "filebeat-7.4.1-2019.10.24",
  "_type": "_doc",
  "_id": "X-Ly_xxxu7mxxxxxxxxxxxxxxxxx",
  "_version": 1,
  "_score": null,
  "_source": {
    "agent": {
      "hostname": "dmz_server",
      "id": "xxxxxxx-xxxx-xxxx-xxxx-xxxxxx",
      "type": "filebeat",
      "ephemeral_id": "xxxxxxx-xxxx-xxx-xxxx-xxxxxxxxxxxxxxxxx",
      "version": "7.4.1"
    },
    "log": {
      "file": {
        "path": "/var/log/squid/access.log"
      },
      "offset": 204461
    },
    "destination": {
      "geo": {
        "continent_name": "North America",
        "country_iso_code": "US",
        "location": {
          "lon": -97.822,
          "lat": 37.751
        }
      },
      "as": {
        "number": 15169,
        "organization": {
          "name": "Google LLC"
        }
      },
      "port": "443",
      "domain": "www.google.com",
      "ip": "172.217.161.36"
    },
    "source": {
      "address": "192.168.0.134",
      "port": "51325",
      "ip": "192.168.0.134"
    },
    "message": "192.168.0.134:51325 - - \"CONNECT www.google.com:443 HTTP/1.1\" 200 3541 66346 \"-\" \"Mozilla/5.0 (Windows NT 10.0; Win64; x64; rv:70.0) Gecko/20100101 Firefox/70.0\" TCP_TUNNEL:HIER_DIRECT [1571940395920] 172.217.161.36:443 www.google.com",
    "fileset": {
      "name": "access"
    },
    "url": {
      "original": "www.google.com:443"
    },
    "input": {
      "type": "log"
    },
    "@timestamp": "2019-10-24T18:06:35.920Z",
    "ecs": {
      "version": "1.1.0"
    },
    "service": {
      "type": "squid"
    },
    "host": {
      "hostname": "dmz_server",
      "os": {
        "kernel": "4.15.0-66-generic",
        "codename": "bionic",
        "name": "Ubuntu",
        "family": "debian",
        "version": "18.04.1 LTS (Bionic Beaver)",
        "platform": "ubuntu"
      },
      "containerized": false,
      "name": "dmz_server",
      "id": "xxxxxxxxxxxxxxxxxxxxxxx",
      "architecture": "x86_64"
    },
    "http": {
      "request": {
        "referrer": "-",
        "method": "CONNECT",
        "bytes": 3541
      },
      "response": {
        "status_code": 200,
        "bytes": 66346
      },
      "version": "1.1"
    },
    "squid": {
      "access": {
        "squid_hier": "HIER_DIRECT",
        "unix_time": "1571940395920",
        "squid_status": "TCP_TUNNEL"
      }
    },
    "event": {
      "created": "2019-10-24T18:06:37.572Z",
      "module": "squid",
      "dataset": "squid.access"
    },
    "user": {
      "name": "-",
      "id": "-"
    },
    "user_agent": {
      "original": "Mozilla/5.0 (Windows NT 10.0; Win64; x64; rv:70.0) Gecko/20100101 Firefox/70.0",
      "os": {
        "name": "Windows 10"
      },
      "name": "Firefox",
      "device": {
        "name": "Other"
      },
      "version": "70.0"
    }
  },
  "fields": {
    "suricata.eve.timestamp": [
      "2019-10-24T18:06:35.920Z"
    ],
    "@timestamp": [
      "2019-10-24T18:06:35.920Z"
    ],
    "event.created": [
      "2019-10-24T18:06:37.572Z"
    ]
  },
  "highlight": {
    "suricata.eve.http.url": [
      "@kibana-highlighted-field@www.google.com:443@/kibana-highlighted-field@"
    ],
    "url.original": [
      "@kibana-highlighted-field@www.google.com:443@/kibana-highlighted-field@"
    ]
  },
  "sort": [
    01234567890
  ]
}
まとめ
Filebeatで収集するSquidログをElastic Common Schema (ECS)へ対応させてみました。こうすることで例えばElastic SIEMで分析する際にもSquidのログを利用可能となります。