概要
- 最近ReactとReduxの組み合わせを耳にすることがあったので簡単なWebアプリを作ってみようと思いました
- 僕自身ReactもReduxも初心者のため、何もわからないところからstep by stepで動くものが完成するまでを書いてみようと思います
- 正確さよりもReactやReduxがどんな感じか理解しやすいように記述しようと思います
- 公式ではNodejsを使用していますが、ReactとReduxに焦点を絞るためにNodejsは使用しないで進めます
使用ライブラリ
使用するライブラリと投稿時点のバージョンです
※ReactでJSXを使用するためbabelが必要です
| library | version |
|---|---|
| react | 4.0.5 |
| redux | 16.13.1 |
| react-redux | 7.2.1 |
| babel | 7.11.6 |
1. 準備
ReactとReduxの役割
大雑把な役割は以下の通りです
- React: UIの操作
- Redux: データの管理
Reactだけでデータの管理もできるのですが、Reduxを併用することでデータの管理を楽にしようという思想(のはず)です
※詳細はこの後触れます
ということでReactだけでアプリは作れるので、
まずはReactだけでアプリを作ってみます。
そのあとReduxを使用してアプリをリファクタリングしていきます
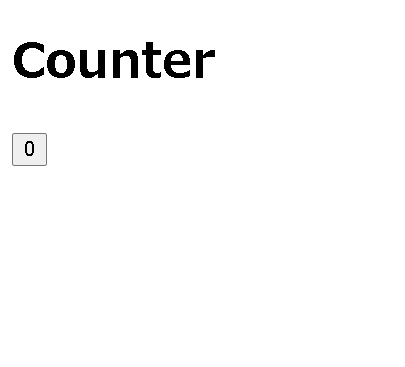
作成するアプリ
ボタンをクリックするとカウントアップしていくカウンターを作成してみます
ベースのHTML
以下のHTMLをベースに実装していきます
<!DOCTYPE html>
<html lang="ja">
<head>
    <meta charset="UTF-8">

    <script src="https://unpkg.com/redux@latest/dist/redux.min.js"></script>

    <script src="https://unpkg.com/react@latest/umd/react.development.js"></script>
    <script src="https://unpkg.com/react-dom@latest/umd/react-dom.development.js"></script>
    <!--<script src="https://unpkg.com/react@latest/umd/react.production.min.js"></script>-->
    <!--<script src="https://unpkg.com/react-dom@latest/umd/react-dom.production.min.js"></script>-->

    <script src="https://unpkg.com/react-redux@7.2.1/dist/react-redux.js"></script>

    <!--JSXのブラウザでの単独実行のために必要-->
    <script src="https://unpkg.com/babel-standalone@latest/babel.min.js"></script>

    <title>Counter</title>
</head>
<body>

<h1>Counter</h1>
<div id="app"></div>

<script type="text/babel">
    // 以降、コードはこの部分のみを編集していきます
</script>
</body>
</html>
- Reactのライブラリは
developmentとproductionの2つがあり、開発中はdevelopmentの方を使用するとエラーがより詳細に表示されるためやりやすいと思います - scriptを記述していくことで
<div id="app"></div>の部分にコンポーネントがレンダリングされます - scriptタグには
type="text/babel"が必要です(なぜかはこのあと)
2. Reactで実装してみる
2-1. Hello World
まずはReactを使用してHello Worldを表示してみます
ReactDOM.render(    // ①
    <span>Hello World</span>,  // ②
    document.getElementById('app')  // ③
)
ポイント
- レンダリングは
ReactDOM.renderを実行することで実施されます(①) - renderの第一引数でHTMLを指定します(②)
- ここがJSXとよばれる記法(?)で以下の2つが必要です
- babelを使用すること(他のライブラリでも可)
- scriptタグに
type="text/babelを指定すること
- renderの第二引数でレンダリング対象のElementを指定します(③)
- ここでは
id="app"が指定されたElementを指定しています
- ここでは
2-2. Reactのコンポーネントを使ってみる
ReactではUIの各要素をコンポーネントと呼ばれる単位で定義していきます。
先ほどのHello Worldを表示するHTMLをコンポーネントに定義しなおしてみます
<script type="text/babel">
class CounterApp extends React.Component { // ①
    render() { // ②
        return (
            <span>Hello World</span>
        )
    }
}

ReactDOM.render(
    <CounterApp/>,  // ③
    document.getElementById('app')
)
</script>
ポイント
- コンポーネントは
React.Componentを実装したクラスにより定義します(①) - コンポーネントには「引数なし」で「HTMLを返す」
renderメソッドを実装します(②) - 作成したコンポーネントはHTMLタグのように用いることができます(③)
-
renderで返却されたHTMLが埋め込まれるイメージです
-
2-3. 変数を埋め込んでみる
ここで完成形のUIとなるように修正を加えます。
同時にUIでボタンを押すごとに更新されるカウンタ情報について変数であつかってみます
<script type="text/babel">
class CounterApp extends React.Component {
    constructor(props) {  // ①
        super(props)      // ②
        this.state = {    // ③
            count: 0
        }
    }

    render() {
        return (
            <button>{this.state.count}</button>  // ④
        )
    }
}

ReactDOM.render(
    <CounterApp/>,
    document.getElementById('app')
)
</script>
ポイント
- 変数を扱うために
stateというフィールドを使用する(③) -
stateの初期化はpropsを引数に取るコンストラクタ内で定義する(①) - コンストラクタでは必ず
superでpropsを引き渡す(②) - 変数は
{}で囲ってあげることで展開される(④)
2-4. クリック時の動作を追加する
クリックしたときにボタンに表示されている数字が1ずつカウントアップするようにしてみます。
コンポーネントにカウントアップ用の関数countUpを追加し、buttonタグにonClickを追加します。
<script type="text/babel">
class CounterApp extends React.Component {
    constructor(props) {
        super(props)
        this.state = {
            count: 0
        }
        this.countUp = this.countUp.bind(this)  // ①
    }

    countUp() {
        let count = this.state.count + 1   // ②
        this.setState({                    // ③
            count
        })
    }

    render() {
        return (
            <button onClick={this.countUp}>{this.state.count}</button>  // ④
        )
    }
}

ReactDOM.render(
    <CounterApp/>,
    document.getElementById('app')
)
</script>
ポイント
-
stateの更新はthis.setStateにより行う(③) -
setStateの中でthis.stateは行わず、外で実施(②)-
setStateが非同期でstateを更新するためのようです(詳細まで理解できてません…) - どうしてもな場合は
this.setState(state => ({count: state.count + 1}))というような記述も可能です(が複雑なのでここでは扱いません)
-
- 独自の関数(
countUp)でthis.stateやthis.setStateを使用する場合はコンストラクタ内でbindしておく(①)- ここはあまりJavascriptに詳しくないのでおまじないだと思っています
- onClick時の動作を
onClick={関数名}というように指定します(④)- (関数も変数も同じように引き渡せるんですね)
ここまででいったん目標としていたWebアプリは完成しました!!!
ここからいろいろリファクタリングしていきます
2-5. コンポーネントの分離
ここはReduxを使用することを想定したリファクタリングになります
React×Reduxを使用するにあたって、コンポーネントは以下の2つに分類します。
-
Presentational Components※以後コンポーネント- UIに関わることに特化したコンポーネント
- propsによってデータ(count)や関数(countUp)を受け取る
- 基本的には関数で記述する(※このあと)
-
Container Components※以後コンテナ- 動作やデータを他のコンポーネントに提供するコンポーネント
ということで先ほどのCounterAppをコンテナとし、その中からUIに関することをCounterコンポーネントとして分離してみます
<script type="text/babel">
class Counter extends React.Component {
    render() {
        return (
            <button onClick={this.props.handleClick}>{this.props.count}</button>
        )
    }
}

class CounterApp extends React.Component {
    ...

    render() {
        return (
            <Counter handleClick={this.countUp} count={this.state.count} />
        )
    }
}
...
ポイント
- コンテナ
CounterAppはコンポーネントCounterに関数や変数を渡すためにHTMLでいう属性を使用します - コンポーネント
Counterでは関数や変数をpropsから受け取ります- propsはconstructorで登場したやつです
さらに、Counterを関数型に変更してみます
propsを引数にとり、HTMLを返す関数を定義することでクラスを定義せずともコンポーネントを記述可能です(先ほども記載した通りこちらが推奨です)
//class Counter extends React.Component {
//    render() {
//        return (
//            <button onClick={this.props.handleClick}>{this.props.count}</button>
//        )
//    }
//}
function Counter(props) {
    return <button onClick={props.handleClick}>{props.count}</button>
}
注意点としては、propsがクラスのフィールドからメソッドの引数に変わったため、thisが不要になります
またアロー関数を使うことでさらに記述を簡略化することができます
const Counter = ({handleClick, count}) => <button onClick={handleClick}>{count}</button>
いったんここまでで以下のようのscriptとなりました
<script type="text/babel">
const Counter = ({handleClick, count}) => <button onClick={handleClick}>{count}</button>

class CounterApp extends React.Component {
    constructor(props) {
        super(props)
        this.state = {
            count: 0
        }
        this.countUp = this.countUp.bind(this)
    }

    countUp() {
        let count = this.state.count + 1
        this.setState({
            count
        })
    }

    render() {
        return (
            <Counter handleClick={this.countUp} count={this.state.count} />  // ④
        )
    }
}

ReactDOM.render(
    <CounterApp/>,
    document.getElementById('app')
)
</script>
3. なぜRedux?
いったんReactのみで実装してみましたが、Reactのみで十分な実装ができているように思えます。
しかし、より複雑なUIを実装しようとすると課題が出てきます。
それはコンポーネントからコンポーネントを何層も呼ぶ場合で、
以下のような実装になりえます。
const Container1 = ({a}) => <Container2 b={a.b}/>
const Container2 = ({b}) => <Container3 b={b.c}/>
const Container3 = ({c}) => <Container4 b={c.d}/>
...
このようにpropsで子コンポーネントに変数を引き渡していくと
- どこでどんな値が引き渡されているのか追いにくい
- そもそも毎回propsで引き渡すのがめんどう
という課題がでてきます。
そこで、データを一元管理して、
データが必要な場合はその一元管理されたものから取得できるようにしたものがRedux(のはず)です。
なので冒頭でも述べた通り、Reduxはデータの管理に特化したものです。
4. Reduxの仕組み
Reduxでは以下の3つの要素を実装していきます
| 要素 | 説明 |
|---|---|
| action | UIからの情報をstoreに伝える役割 ※動作自体は定義しない action creatorによって生成 |
| reducer | actionを元にstateを変更する役割 ※正確には古いstateをもとに新しいstateを生成 |
| store | データ(state)を一元管理する役割 |
シーケンスで書くとこんな感じです
※あくまで大雑把な理解のためのものです
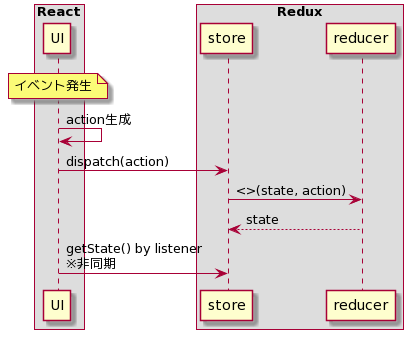
storeはreducerから自動で生成するため、actionとreducerを実装していきます
5. Reduxを組み込む
5-1. actionを実装
actionはUIでのイベントをpropertyに定義したシンプルなオブジェクトです。
typeが必須で関数を持ちません
typeはreducerでstateを更新する際にどのような処理を行うのか判断するために使用します。
今回は、typeに加えincrementalという増分を表すpropertyも定義してみます。
actionは任意引数の関数の返り値として定義します。
※この関数を総称してaction creatorと呼ぶそうです
const COUNT_UP = 'count up'

// action creator
function countUp(incremental) {
    return {
        type: COUNT_UP,
        incremental
    }
}
incremental = 1のとき{incremental}と記載すると{incremental: 1}と同等ということを今回知りました
actionはUIで起こったイベントに対して1対1で定義していきます
5-2. Reducerを実装
reducerは「古いstate」と「action」を受け取り、「新しいstate」を生成する役割を持ちます。
ドキュメントで繰り返し書かれていたので念押しですが、
「stateの更新ではなく、古いstateから新しいstateを生成する」必要があります。
stateの更新時にはObject.assignという関数を使用して、stateをコピーしてから操作します
// 空のプロパティにstateの内容をコピーする
Objct.assign({}, state)
// 空のプロパティにstateの内容をコピーした後にcountプロパティの値を1に更新する
Objct.assign({}, state, {count: 1})
reducerの実装はstateとactionを引数に、stateを返す関数を定義します。
const initialState = {
    count: 0
}

// reducer
function counterApp(state = initialState, action) {
    switch (action.type) {
        case COUNT_UP:
            return Object.assign({}, state, {
                count: state.count + action.incremental
            })
        default:
            return state
    }
}
ポイント
- 先ほどactionで説明した通り、actionには
typeプロパティが存在するため、typeによって処理を分岐させます。 - 定義していない
typeの場合には引数で受け取ったstateをそのまま返します -
counterApp(state = initialState)という書き方をしておくことでstateが未定義の場合にinitialStateで置き換えてくれます
今回は1つだけreducerを作成しましたが、複数のreducerを定義して親のreducerの子として使用することも可能です。
5-3. storeを生成
reducerを実装できたところでstoreを生成します。
先ほど実装したreducerを引数にRedux.createStoreを実行するだけです!
const store = Redux.createStore(counterApp)
1つ注意点をあげるとするとstoreはデータの一元管理を目的としているため、1つのアプリに対して1つのみ生成することが基本です。
storeの関数は以下の3つを把握しておけば基礎は大丈夫かと思います
| 関数 | サンプル | 説明 |
|---|---|---|
| getState | getState() | stateの取得 |
| dispatch | dispatch(actionCreator()) | actionの送信(stateの更新) |
| subscribe | subscribe(() => console.log('dispatched')) | listenerの登録 |
5-4. Reactアプリに組み込む!
Reduxの準備がこれで整ったので、Reactのみで実装したアプリに組み込んでいきます
まず、CounterAppのstateについてstoreから取得するようにします。
また、dispatchで更新されたstateを反映するためにlistenerを登録しておきます。
class CounterApp extends React.Component {
    constructor(props) {
        super(props)
        this.state = store.getState()
        store.subscribe(() => this.setState(store.getState()))
        this.countUp = this.countUp.bind(this)
    }
...
}
次にもともと定義してあったcountUp関数についてはstore.dispatchで置き換えます。
class CounterApp extends React.Component {
    constructor(props) {
        super(props)
        this.state = store.getState()
        store.subscribe(() => this.setState(store.getState()))
    }

    render() {
        return (
            <Counter handleClick={(incremental) => store.dispatch(countUp(incremental))} count={this.state.count} />
        )
    }
}
最後にCounterコンポーネントからincremental=1を渡すように修正してみます
const Counter = ({handleClick, count}) => <button onClick={() => handleClick(1)}>{count}</button>
ここまででscript全体はこのようになりました!
<script type="text/babel">

const COUNT_UP = 'count up'

// action creator
function countUp(incremental) {
    return {
        type: COUNT_UP,
        incremental
    }
}

const initialState = {
    count: 0
}

// reducer
function counterApp(state = initialState, action) {
    switch (action.type) {
        case COUNT_UP:
            return Object.assign({}, state, {
                count: state.count + action.incremental
            })
        default:
            return state
    }
}

// storeの生成
const store = Redux.createStore(counterApp)

const Counter = ({handleClick, count}) => <button onClick={() => handleClick(1)}>{count}</button>

class CounterApp extends React.Component {
    constructor(props) {
        super(props)
        this.state = store.getState()
        store.subscribe(() => this.setState(store.getState()))
    }

    render() {
        return (
            <Counter handleClick={(incremental => store.dispatch(countUp(incremental)))} count={this.state.count} />
        )
    }
}

ReactDOM.render(
    <CounterApp/>,
    document.getElementById('app')
)
</script>
5-5. react-reduxでコンテナ生成を自動化
react-reduxのconnectを使用するとCounterAppの実装を省略することができます。
また、実装内容もより合理的なものになるためconnectの利用が推奨されています。
ということで最後の最後にconnectを使用した形にCounterAppを書き換えていきます。
改めてCounterAppを確認すると
class CounterApp extends React.Component {
    constructor(props) {
        super(props)
        this.state = store.getState()
        store.subscribe(() => this.setState(store.getState()))
    }

    render() {
        return (
            <Counter handleClick={(incremental => store.dispatch(countUp(incremental)))} count={this.state.count} />
        )
    }
}
- コンポーネントは何か?
Counter
- stateをどのようにpropsに変換するか?
count={this.state.count}
- dispatchをどのように実行するか?
handleClick={(incremental => store.dispatch(countUp(incremental)))}
上記の3つが動的に変わる部分になりそうです。
そのため、connectを使用するにあたって、「stateをどうやってコンポーネントに伝えるか?」と「dispatchをどのように実行するか?」を関数として定義していきます。
それぞれ、mapStateToProps、mapDispatchToPropsという関数で実装していきます。
// stateをどうやってコンポーネントに伝えるか?
const mapStateToProps = state => ({
    count: state.count
})
// dispatchをどのように実行するか?
const mapDispatchToProps = dispatch => ({
    handleClick: incremental => store.dispatch(countUp(incremental))
})
そして、以下のようにconnectを実行すると自動でCounterAppが生成されます。
const CounterApp = ReactRedux.connect(mapStateToProps, mapDispatchToProps)(Counter)
最後にひさびさにレンダリングの部分を変更します
const Provider = ReactRedux.Provider;
ReactDOM.render(
    <Provider store={store}>
        <CounterApp/>
    </Provider>,
    document.getElementById('app')
)
ポイント
-
Providorの子要素としてCounterAppを記述する -
Providorにはstoreを引き渡す
これで完了!!!
6. 完成コード
ReactとReduxを使って最終的に以下のようなコードでカウンターが完成しました!!
<!DOCTYPE html>
<html lang="ja">
<head>
    <meta charset="UTF-8">

    <script src="https://unpkg.com/redux@latest/dist/redux.min.js"></script>

    <script src="https://unpkg.com/react@latest/umd/react.development.js"></script>
    <script src="https://unpkg.com/react-dom@latest/umd/react-dom.development.js"></script>
    <!--<script src="https://unpkg.com/react@latest/umd/react.production.min.js"></script>-->
    <!--<script src="https://unpkg.com/react-dom@latest/umd/react-dom.production.min.js"></script>-->

    <script src="https://unpkg.com/react-redux@7.2.1/dist/react-redux.js"></script>

    <!--JSXのブラウザでの単独実行のために必要-->
    <script src="https://unpkg.com/babel-standalone@latest/babel.min.js"></script>

    <title>Counter</title>
</head>
<body>

<h1>Counter</h1>
<div id="app"></div>

<script type="text/babel">

const COUNT_UP = 'count up'

// action creator
function countUp(incremental) {
    return {
        type: COUNT_UP,
        incremental
    }
}

const initialState = {
    count: 0
}

// reducer
function counterApp(state = initialState, action) {
    switch (action.type) {
        case COUNT_UP:
            return Object.assign({}, state, {
                count: state.count + action.incremental
            })
        default:
            return state
    }
}

// storeの生成
const store = Redux.createStore(counterApp)

const Counter = ({handleClick, count}) => <button onClick={() => handleClick(1)}>{count}</button>

// stateをどうやってコンポーネントに伝えるか?
const mapStateToProps = state => ({
    count: state.count
})
// dispatchをどのように実行するか?
const mapDispatchToProps = dispatch => ({
    handleClick: incremental => store.dispatch(countUp(incremental))
})

const CounterApp = ReactRedux.connect(mapStateToProps, mapDispatchToProps)(Counter)

const Provider = ReactRedux.Provider;

ReactDOM.render(
    <Provider store={store}>
        <CounterApp/>
    </Provider>,
    document.getElementById('app')
)
</script>
</body>
</html>
7. 次は
次はToDoListを作ってみたいなーと思っています。
むしろもともとはこの記事でToDoListを作る予定だったのですが、
- jsを外部ファイルに適切に分離していかないと見通しが悪そう
- 外部ファイルに分離するとJSX周りでうまく動かない
ということで断念しました。
webpackを使用してコードを自動生成すればできるような記事も見つけたのですが、
npmを使っていろいろした方がよさそうな印象を受けました。
なのでnpmを使って(ということはNodejsベースで?)ToDoListを作る記事も書けたらなと思います。