【はじめに】
本記事の内容は限られた用途にのみ有効です。
現行環境をなるべく触りたくない、納品物を最小限にしたい、客先でインストーラが使えないなどの場合におすすめです。
通常はインストーラからPythonをインストールした上で、venvなどを使って環境を分けることをおすすめします。
本手順での最大の欠点は、Pythonの標準的なGUI環境である「tkinter」モジュールをインストールできない点にあります。
このため「matplotlib」など「tkinter」を使うモジュールを利用するためには、少し工夫が必要になります。
なお、「matplotlib」については【補足】の項で解決方法を記載しています。
【内容】
利用中のWindows PCの環境を極力汚さずにPythonをインストールして、開発や動作確認を行えるようにします。
この方法で構築した環境は、そのままフォルダごと別の環境(客先など)に持っていくことも可能です。
組み込みPythonをセットアップするスクリプトを作成しました。
下記リポジトリの「setup_embed_python.ps1」を実行すると、
指定したバージョンの組み込みPython環境を作成することができます。
【手順】
0. 前準備
情報
最近のバージョンではVCランタイムが組み込まれているため本手順は不要になりました。
Windows上でPythonを実行するためには「Visual Studio 2015 の Visual C++ 再頒布可能パッケージ」が必要になります。
以下のURLからダウンロードして、インストールしてください。
Visual Studio 2015 の Visual C++ 再頒布可能パッケージ
この部分のみ環境の変更が必要になります。1
1. python.orgからバイナリファイルをダウンロードして解凍する
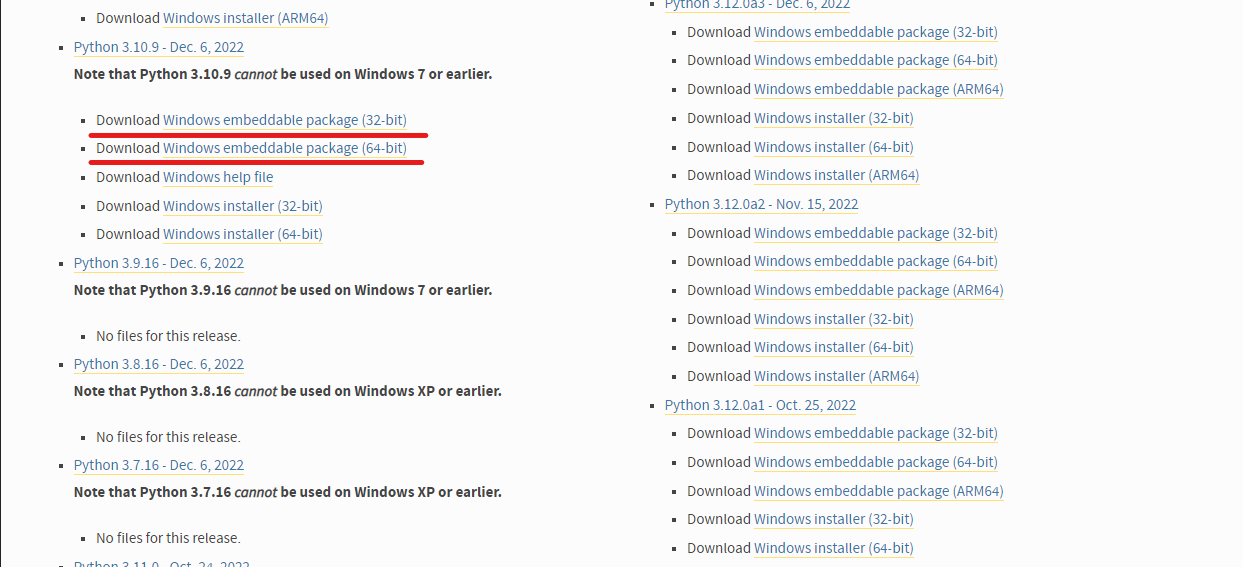
python.orgに接続して、[Downloads]からWindows用のバイナリ置き場位に移動します。
【Python Releases for Windows】

この中から「embeddable zip file」の記載のあるものを選択してダウンロードします。
開発バージョンに合わせてダウンロードしてください。
今回はPython 3.10.9の64bitを選択した例で記述します。
ダウンロードしたZIPファイルはPythonをインストールするフォルダに解凍してください。
本記事では「c:\python3109」にインストールすることを想定しています。
なお、Windows10の場合はPowerShellから以下のコマンドでダウンロードから解凍まで実行できます。
mkdir c:\python3109
cd c:\python3109
[System.Net.ServicePointManager]::SecurityProtocol = [System.Net.SecurityProtocolType]::Tls12;
wget "https://www.python.org/ftp/python/3.10.9/python-3.10.9-embed-amd64.zip" -O python.zip
Expand-Archive -Path python.zip -DestinationPath ./
rm python.zip
2. Pythonの設定変更
解凍したフォルダ内にpython310._pthというファイルがあるのでメモ帳で開いて、以下のように変更して保存します。(ファイル名はインストールしたバージョン番号に依存します)
notepad .\python310._pth
(変更前) #import site
↓
(変更後) import site
3. pipのインストール
pip2をインストールします。
以下のURLからファイルをダウンロードしてきて、Pythonのインストール先に保存します。
https://bootstrap.pypa.io/get-pip.py
その後、コマンドプロントから以下のコマンドを実行します。
cd c:\python3109
.\python .\get-pip.py
Windows10の場合はPowershellから以下のコマンドで、ダウンロードからインストールまで行えます。
cd c:\python3109
[System.Net.ServicePointManager]::SecurityProtocol = [System.Net.SecurityProtocolType]::Tls12;
wget "https://bootstrap.pypa.io/get-pip.py" -O get-pip.py
.\python .\get-pip.py
rm .\get-pip.py
pipコマンドはPythonをインストールしたフォルダ内の「Scripts」フォルダ内にインストールされます。
以上で、Pythonの最小限環境が整いました。
必要に応じて以下のフォルダにPATHを通すと捗ります。
(個人的にはpathを通さずにフルパスで運用しています)
- c:\python3109
- c:\python3109\Scripts\
【補足】
matplotlibのインストールとハマりどころ
matplotlibをインストールするには以下のコマンドを実行します。
c:\python3109\python -m pip install matplotlib
以上でインストールは完了しますが、plt.show()などでGUIの画面を表示が必要な場面でエラーになります。
これは「tkinter」というモジュールが存在しないためです。
「tkinter」はPythonのインストーラの中には含まれていますが、embeddable版には含まれていません。
なおかつ、単独でのインストール方法が解りませんでした。(← ご存じの方、教えて下さい)
そこで、別のGUI環境をインストールした上で、matplotlibのデフォルトのバックエンドを変更します。
まずは下記のコマンドで、tkinterと同様にPythonにGUIを提供する「wxPython」をインストールします。
サーバ用途などでグラフをファイルに出力するだけなど、特にGUIが必要ない場合は本インストールは不要です。
c:\python3109\python -m pip install wxpython
続いてmatplotlibの設定を変更します。
matplotlibの設定ファイルを把握するために、下記のコマンドを実行します。
c:\python3109\python -c "import matplotlib; print(matplotlib.matplotlib_fname())"
すると、以下のように表示されます。
c:\python3109\lib\site-packages\matplotlib\mpl-data\matplotlibrc
このファイルをメモ帳で開いて、以下のように変更します。
notepad c:\python3109\lib\site-packages\matplotlib\mpl-data\matplotlibrc
(変更前) ##backend: Agg
↓
(変更後) backend: WXAgg
GUIが不要でwxPythonをインストールしていない場合は以下のようにしてください。
(※コーディングでバックエンドを変更できるので、この設定自体はそもそも不要です)
(変更前) ##backend: Agg
↓
(変更後) backend: Agg
以上で、設定の変更は完了です。
動作確認
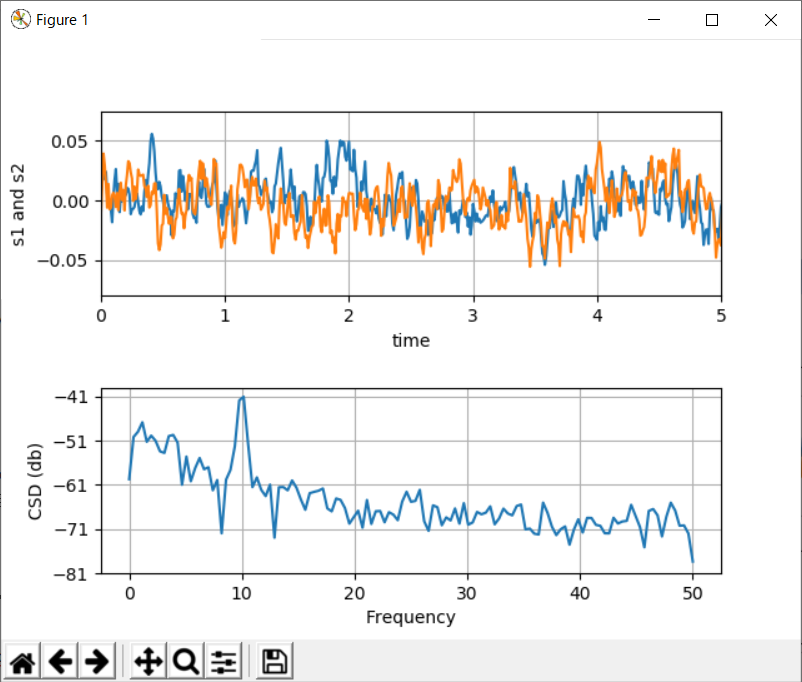
以下のコードをメモ帳などで保存して、pythonコマンドで実行してグラフが表示されるか確認してください。
【graph_test.py】
(公式のサンプル集より 【CSD Demo】)
import numpy as np
import matplotlib.pyplot as plt


fig, (ax1, ax2) = plt.subplots(2, 1)
# make a little extra space between the subplots
fig.subplots_adjust(hspace=0.5)

dt = 0.01
t = np.arange(0, 30, dt)

# Fixing random state for reproducibility
np.random.seed(19680801)


nse1 = np.random.randn(len(t))                 # white noise 1
nse2 = np.random.randn(len(t))                 # white noise 2
r = np.exp(-t / 0.05)

cnse1 = np.convolve(nse1, r, mode='same') * dt   # colored noise 1
cnse2 = np.convolve(nse2, r, mode='same') * dt   # colored noise 2

# two signals with a coherent part and a random part
s1 = 0.01 * np.sin(2 * np.pi * 10 * t) + cnse1
s2 = 0.01 * np.sin(2 * np.pi * 10 * t) + cnse2

ax1.plot(t, s1, t, s2)
ax1.set_xlim(0, 5)
ax1.set_xlabel('time')
ax1.set_ylabel('s1 and s2')
ax1.grid(True)

cxy, f = ax2.csd(s1, s2, 256, 1. / dt)
ax2.set_ylabel('CSD (db)')
plt.show()
【実行】
c:\python3109\python graph_test.py
【出力例】
【補足2】
カレントディレクトリのパスについて
Pythonは特に意識しなくてもカレントディレクトリに存在するPythonファイルをimportできるのですが、embeddable版ではパスが通らずアクセスできない状態になっています。
自分でコードを書く分にはそれほど問題になりませんが、TensorFlowなどをpipでインストールする際にエラーでコケる場合があります。
そこで、下記の方法でカレントディレクトリにパスを通すことで、問題を回避します。
【対応方法】
- Pythonをインストールしたフォルダ内に「current.pth」3というファイルを作成します。
- 作成した「current.pth」をメモ帳などで開いて
import sys; sys.path.append('')と記載して保存します。
【デバッグについて】
以前はデバッグには不向きでしたが、最近は問題なく行えそうです。
WindowsでPythonを開発する際にはVisual Studio Codeを使うと効率的にデバッグが可能ですが、embeddable版では大量のワーニングが流れて扱いにくいです。
解決方法がイマイチわかりませんので、開発に際してはインストール版を利用したほうが良いかもしれません。
