▼ はじめに
内部ネットワークにある社内向けのウェブサイトをhttpsで接続する方法は、いくつかあると思います。
・オレオレ証明書(自己署名証明書)を発行して、ブラウザの警告を常に無視するとか
・たとえばアクティブディレクトリなどをプライベート認証局(オレオレ認証局)として開設して、証明書を発行してもらうとか
・『イントラネットSSL』なるものを購入するとか
この記事では、
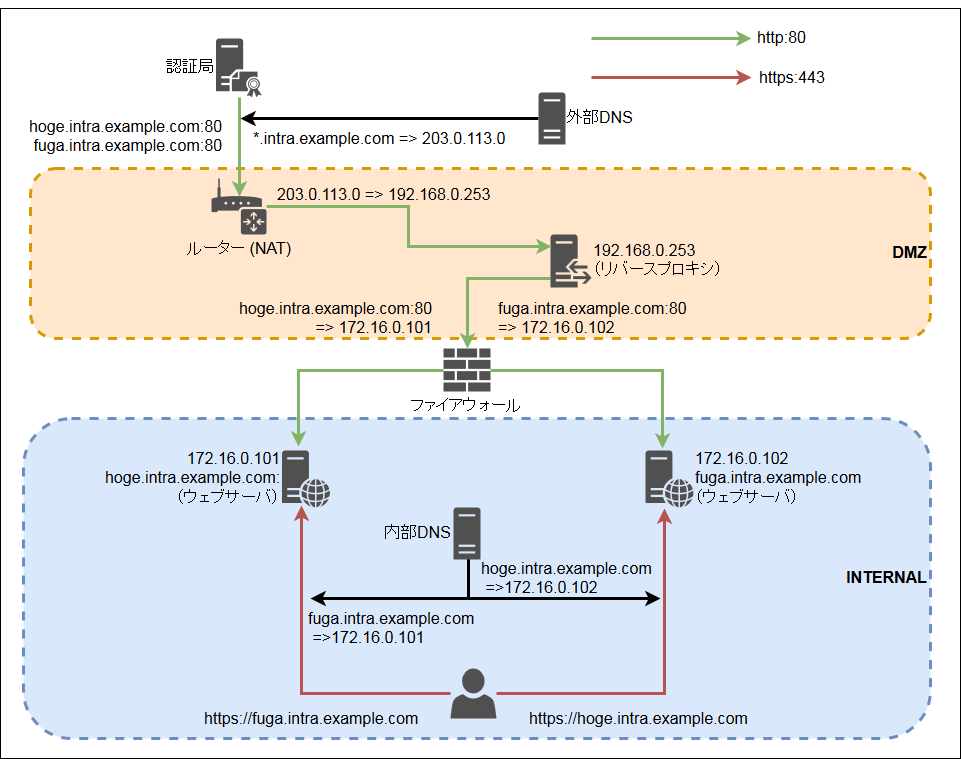
外部からイントラネットへの接続について、SSL認証の接続のみを許可する方法で実現してみます。
下記を参考にさせていただきました。
⇒ Let's Encryptにイントラサイトの証明書を発行してもらう
⇒ CentOS 7 + Apache 2.4 に Let’s Encrypt の証明書を導入する手順
▼ 構成図
▼ リバースプロキシ
● Apacheのインストール、設定
# yum install httpd
# systemctl enable httpd
# mv -i /etc/httpd/conf.d/autoindex.conf  /etc/httpd/conf.d/autoindex.conf.orig
# mv -i /etc/httpd/conf.d/welcome.conf  /etc/httpd/conf.d/welcome.conf.orig
# cp -p /etc/httpd/conf/httpd.conf /etc/httpd/conf/httpd.conf.orig
# vi /etc/httpd/conf.d/hoge.intra.conf
# vi /etc/httpd/conf.d/fuga.intra.conf
# vi /etc/httpd/conf.d/security.conf
<VirtualHost *:80>
  ServerName hoge.intra.example.com
  <Location /.well-known/>
    ProxyPreserveHost On
    ProxyPass http://172.16.0.101/.well-known/
    ProxyPassReverse http://172.16.0.101/.well-known/
  </Location>
</VirtualHost>
<VirtualHost *:80>
  ServerName fuga.intra.example.com
  <Location /.well-known/>
    ProxyPreserveHost On
    ProxyPass http://172.16.0.102/.well-known/
    ProxyPassReverse http://172.16.0.102/.well-known/
  </Location>
</VirtualHost>
/etc/httpd/conf.d/security.conf は下記とか参考にしてください
-
Apacheセキュリティ設定
- ( https://qiita.com/bezeklik/items/1c4145652661cf5b2271 )
● Firewallの設定
# firewall-cmd --add-service=http --permanent
# firewall-cmd --reload
● Apacheの起動
# apachectl configtest
# systemctl start httpd
▼ ウェブサーバ
● Apacheの設定
# cp -p /etc/httpd/conf/httpd.conf  /etc/httpd/conf/httpd.conf.orig
# sed -i -e 's/granted/denied/g' /etc/httpd/conf/httpd.conf
とりあえずすべての接続を拒否しておく
# vi /etc/httpd/conf.d/encrypt.conf
<VirtualHost *:80>
  ServerName hoge.intra.example.com
  DocumentRoot /var/www/lets_encrypt
  <Directory /var/www/lets_encrypt>
    Require all denied
  </Directory>
  <Directory /var/www/lets_encrypt/.well-known/>
    Require ip 192.168.0.253
  </Directory>
</VirtualHost>
/var/www/lets_encrypt/.well-known/ はリバースプロキシのみ許可。
/etc/httpd/conf.d/ssl.conf あたりにも Require ip を書いて許可しておく
● Firewallの設定
# firewall-cmd --add-service=http --permanent
# firewall-cmd --add-service=https --permanent
# firewall-cmd --reload
● certbotのインストール、設定
# yum install epel-release
# yum install certbot
# mkdir /var/www/lets_encrypt
# certbot certonly --webroot -w /var/www/lets_encrypt -d hoge.intra.example.com
# echo "0 5 * * * root certbot renew --quiet" > /etc/cron.d/certbot
● Apacheの再起動
# cp -p /etc/httpd/conf.d/ssl.conf /etc/httpd/conf.d/ssl.conf.orig
# sed -i -e 's|^SSLCertificateFile.*|SSLCertificateFile /etc/letsencrypt/live/hoge.intra.example.com/cert.pem|' /etc/httpd/conf.d/ssl.conf
# sed -i -e 's|^SSLCertificateKeyFile.*|SSLCertificateKeyFile /etc/letsencrypt/live/hoge.intra.example.com/privkey.pem|' /etc/httpd/conf.d/ssl.conf
# sed -i -e 's|^SSLCertificateChainFile.*|SSLCertificateChainFile /etc/letsencrypt/live/hoge.intra.example.com/chain.pem|' /etc/httpd/conf.d/ssl.conf
# apachectl configtest
# systemctl restart httpd
おわり!
