
ソース : ReduxでuseSelectorとuseDispatchを短いコードで覚える | React チュートリアル | off.tokyo
React Reduxは、既存のconnect()高次コンポーネントの代替としてHooksのセットを提供しています。
これらのHookは、connect()でコンポーネントをラップすることなく、Reduxストアへの接続やアクションのディスパッチを可能にします。
このガイドでは、React-Redux HooksであるuseSelectorとuseDispatchをアプリケーションに実装する方法を説明します。

カウンターとユーザーのログイン状態を表示する完成形があることを考えてみてください。
カウンターを記録するための状態と、ログインしたユーザーを記録するための状態の2つに分かれています。
それぞれの状態を処理するために、別々のファイルを用意します。
actions and reducersフォルダの作成
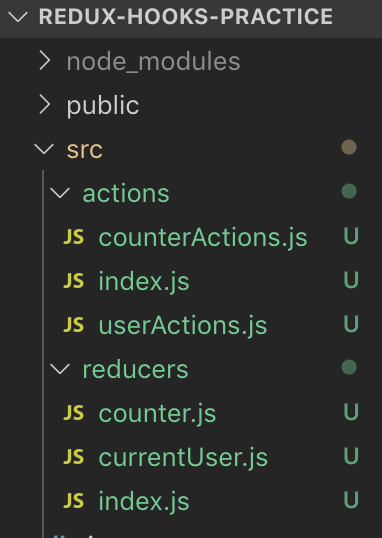
アクション
まずは counterActions.js でカウンターのアクションを定義してみましょう。
インクリメントとデクリメントという2つのメソッドが必要です。
この2つのメソッドは、オブジェクトとしてエクスポートします。
counterActions.js
const increment = () => {
    return {
        type: "INCREMENT"
    }
}
const decrement = () => {
return {
type: "DECREMENT"
}
}
export default {
increment,
decrement
}
同様に、userActions.jsで現在のユーザーに対するアクションを定義しましょう。
ここにもsetUserとlogOutという2つのメソッドがあり、オブジェクトとしてエクスポートされます。
userActions.js
const setUser = (userObj) => {
    return {
        type: "SET_USER",
        payload: userObj
    }
}
const logOut = () => {
return {
type: "LOG_OUT"
}
}
export default {
setUser,
logOut
}
これらの2つのファイルを1つの場所、つまりactionフォルダ内のindex.jsファイルにインポートします。
変数allActionsを作成し、インポートしたアクションを含むオブジェクトを設定します。
index.js
import counterActions from './counterActions'
import userActions from './userActions'
const allActions = {
counterActions,
userActions
}
export default allActions
レデューサ
アクションのファイル構造と同様に、reducersフォルダを作成して、ユーザー用とカウンター用のリデューサを格納します。
まずは、カウンターのリデューサであるcounter.jsから始めましょう。
レデューサ関数は、2つの引数、stateとactionを受け取りまして、stateは、必ずしもオブジェクトに設定する必要はありません。
今回の場合、stateのデフォルト値は整数に設定されています。
先に定義したように、アクションは2つのキー、タイプとオプションでペイロードを含むことができるオブジェクトを返します。
アクションのタイプに応じて、stateの値が変更されるわけですが、アプリが壊れないように、存在しないアクションタイプが呼び出された場合には、デフォルトケースが必要であることを覚えておいてください。
counter.js
const counter = (state = 1, action) => {
    switch(action.type){
        case "INCREMENT":
            return state + 1
        case "DECREMENT":
            return state - 1
        default:
            return state
    }
}
export default counter
カレントユーザーのリデューサであるcurrentUser.jsでは、キーuserとloggedInを含む空のオブジェクトがステートに設定されます。
counterとcurrentUserでは、返される値が異なることに注目してください。
counterリデューサは、初期値が整数であるため、整数を返します、current userのリデューサの場合は、常にオブジェクトが返されます。
currentUser.js
const currentUser = (state = {}, action) => {
    switch(action.type){
        case "SET_USER":
            return {
                ...state,
                user: action.payload,
                loggedIn: true
            }
        case "LOG_OUT":
            return {
                ...state,
                user: {},
                loggedIn: false
            }
        default:
            return state
    }
}
export default currentUser;
これらのレデューサーを1つにまとめる必要があります。
reducers/index.jsの下で、reducerのファイルとcombineReducersをインポートしましょう。
import {combineReducers} from 'redux'index.js
import currentUser from './currentUser'
import counter from './counter'
import {combineReducers} from 'redux'
const rootReducer = combineReducers({
currentUser,
counter
})
export default rootReducer
Combine reducersは,その名のとおり,別々のリデューサファイルを1つにまとめます。
引数は1つで、レデューサーファイルを格納したオブジェクトを受け取ります。
アクションとリデューサの設定が完了したので、アプリへのReduxの実装に移りましょう。
Reduxの実装
srcフォルダの下にあるindex.jsでは、以下のようにインポートします。
import {Provider} from 'react-redux';
import {createStore} from 'redux'
import rootReducer from './reducers'
ReduxのストアはcreateStoreというメソッドで作成されます。
このメソッドは2つの引数を取ります。
rootReducerはレデューサーを組み合わせたファイルで、Reduxのdevtools拡張機能です。
index.js
import {createStore} from 'redux'
import rootReducer from './reducers'
import {Provider} from 'react-redux'
const store = createStore(
rootReducer,
window.REDUX_DEVTOOLS_EXTENSION && window.REDUX_DEVTOOLS_EXTENSION()
)
ReactDOM.render(<Provider store={store}><App /></Provider>, document.getElementById('root'));
最後に、Appコンポーネントをreact-reduxのProviderコンポーネントでラップします。
Providerコンポーネントは1つのpropであるstoreを受け取り、
createStoreからのstoreに設定されます。
useSelector/useDispatchの実装
react-reduxから次のフック、useSelectorとuseDispatchをインポートします。
以前は、react-reduxからconnect()をインポートして、ステートをpropsにマッピングしたり、
ディスパッチをpropsにマッピングするために、コンポーネントをそれでラップする必要がありました。
useSelector
map state to props に相当するのが useSelector です。
useSelectorは、stateの必要な部分を返す関数の引数を受け取ります。
今回の例では、stateからcounterとcurrentUserというキーが定義されています。
これらは先ほどreducersを組み合わせる際に定義しました。
const counter = useSelector(state => state.counter)
// 1
const currentUser = useSelector(state => state.currentUser)
// {}
そのため、変数counterとcurrentUserには、それぞれのリデューサから定義された状態が設定されます。
useDispatch
map dispatchのpropsへの対応に相当するのが、useDispatchです。
useDispatchを起動して、変数dispatchに格納します。
dispatchはactionフォルダからインポートされたallActionsと連動します。
例えば、useEffectは次のようなアクション、allActions.userActions.setUser(user)でディスパッチを呼び出します。
ユーザーは次のように定義されます。
const user = {name: "Rei"}allActionsは、userActionsとcounterActionsをキーとしたオブジェクトです。
userActions.jsで定義されているsetUser関数の再確認をしましょう。
const setUser = (userObj) => {
   return {
      type: "SET_USER",
      payload: userObj
    }
}
setUserは、タイプとペイロードを持つオブジェクトを返します。
Dispatchはこのオブジェクトを受け取り、アクションタイプにマッチしたreducerを探します。
この例では、reducersフォルダ内のcurrentUser.jsがそれにあたります。
case "SET_USER":
   return {
   ...state,
   user: action.payload,
   loggedIn: true
}
App.js
import React, {useEffect} from 'react';
import {useSelector, useDispatch} from 'react-redux'
import './App.css';
import allActions from './actions'
const App = () => {
const counter = useSelector(state => state.counter)
const currentUser = useSelector(state => state.currentUser)
const dispatch = useDispatch()
const user = {name: "Rei"}
useEffect(() => {
dispatch(allActions.userActions.setUser(user))
}, [])
return (
<div className="App">
{
currentUser.loggedIn ?
<>
<h1>Hello, {currentUser.user.name}</h1>
<button onClick={() => dispatch(allActions.userActions.logOut())}>Logout</button>
</>
:
<>
<h1>Login</h1>
<button onClick={() => dispatch(allActions.userActions.setUser(user))}>Login as Rei</button>
</>
}
<h1>Counter: {counter}</h1>
<button onClick={() => dispatch(allActions.counterActions.increment())}>Increase Counter</button>
<button onClick={() => dispatch(allActions.counterActions.decrement())}>Decrease Counter</button>
</div>
);
}
export default App;
これで完成です。
React-ReduxのフックであるuseSelectorとuseDispatchがReact Appに実装されています。
connect()を使った場合と比べて、コードがすっきりと整理されています。
お読みいただきありがとうございました。
この記事は英語の記事を要点だけ絞って分かりやすく翻訳したものです、全文で詳しく英語で読みたい方は下記へどうぞ。