概要
BeautifulSoupでテーブルをパースしてpandas.DataFrame形式で取得。
できるだけ様々な状況に対応できるように...配慮してます。
サンプル
Wikipediaの東京都のページにちょうど良い複雑なテーブルがありました。
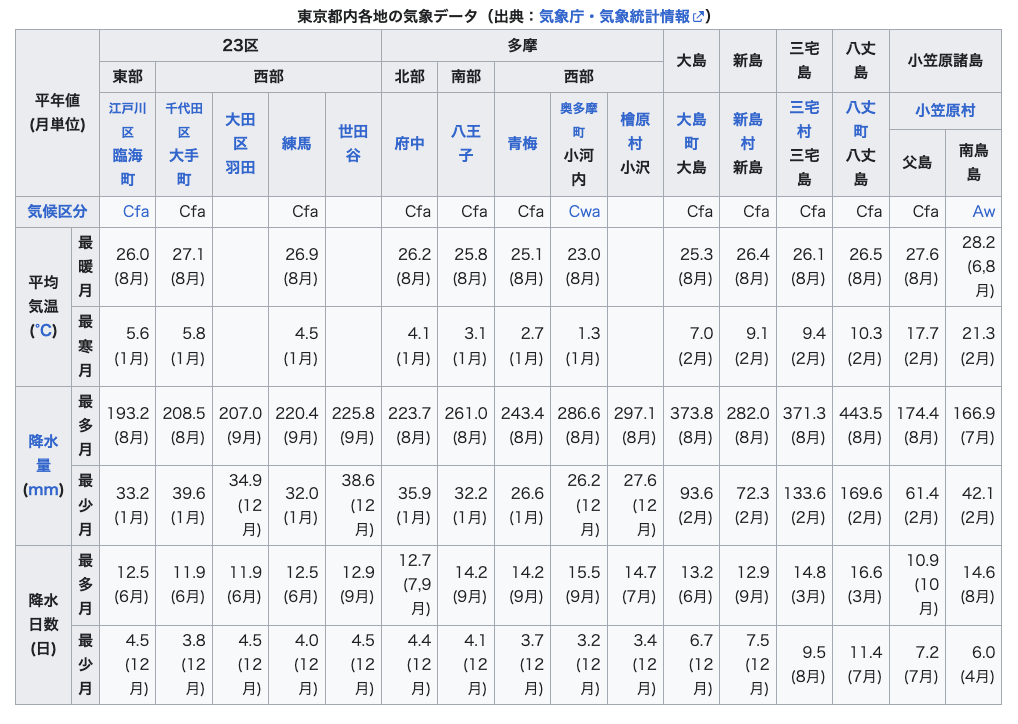
ページから該当のテーブルを探します。
from bs4 import BeautifulSoup
import wikipedia

wikipedia.set_lang("ja")

page = wikipedia.page("東京都", auto_suggest=False)
soup = BeautifulSoup(page.html(), 'html.parser')
tables = soup.findAll("table")

for i, value in enumerate(tables):
    if value.caption:
        print(i, value.caption.get_text(strip=True))
実行結果
9 東京都内各地の気象データ(出典:気象庁・気象統計情報)
20
tables[9]が該当テーブルです。
テーブルの取得
下記の関数で取得します。
import numpy as np
import pandas as pd

def parse_table(table, set_index=False, set_columns=False):
    tr_lst = table.findAll("tr") # trタグを全て取得

    # tableのサイズ(n,m)を取得し、np.arrayを作成
    m = sum([int(t.get("colspan", 1)) for t in tr_lst[0].findAll(("th", "td"))])
    n = 0
    while n < len(tr_lst):
        tr = tr_lst[n]
        rowspan = int(tr.find(("th", "td")).get("rowspan", 1))
        n += rowspan

    nptable = np.zeros([n,m], dtype=object)

    # 各セルの値を取得
    v = 0
    for tr in tr_lst:
        h = 0
        for t in tr.findAll(("th", "td")):
            # すでに値が格納されていればスキップ
            while nptable[v, h]:
                h += 1

            # colspan, rowsapnを考慮してテーブルに値を格納
            colspan = int(t.get("colspan", 1))
            rowspan = int(t.get("rowspan", 1))
            nptable[v:v+rowspan, h:h+colspan] = t.get_text(strip=True) or "-" # Nullは"-"に変換

            h += colspan
        v += 1

    # デフォルトではindex, columnsを設定せず終了
    if not (set_index or set_columns):
        return pd.DataFrame(nptable)

    # indexとcolumnsの階層を算出
    idx_layer, cols_layer = 0, 0
    for tr in tr_lst:
        if tr.find("td"):
            idx_layer = sum([int(tr.get("colspan", 1)) for t in tr.findAll("th")])
            break
        cols_layer += 1

    # 適宜indexとcolumnsを設定する
    if set_index and set_columns:
        idx = pd.MultiIndex.from_arrays(nptable[cols_layer:, 0:idx_layer].T)
        cols = pd.MultiIndex.from_arrays(nptable[0:cols_layer,idx_layer:])
        return pd.DataFrame(nptable[cols_layer:, idx_layer:], index=idx, columns=cols)

    if set_index:
        idx = pd.MultiIndex.from_arrays(nptable[:, 0:idx_layer].T)
        return pd.DataFrame(nptable[:, idx_layer:], index=idx)

    if set_columns:
        cols = pd.MultiIndex.from_arrays(nptable[0:cols_layer,:])
        return pd.DataFrame(nptable[cols_layer:, :], columns=cols)
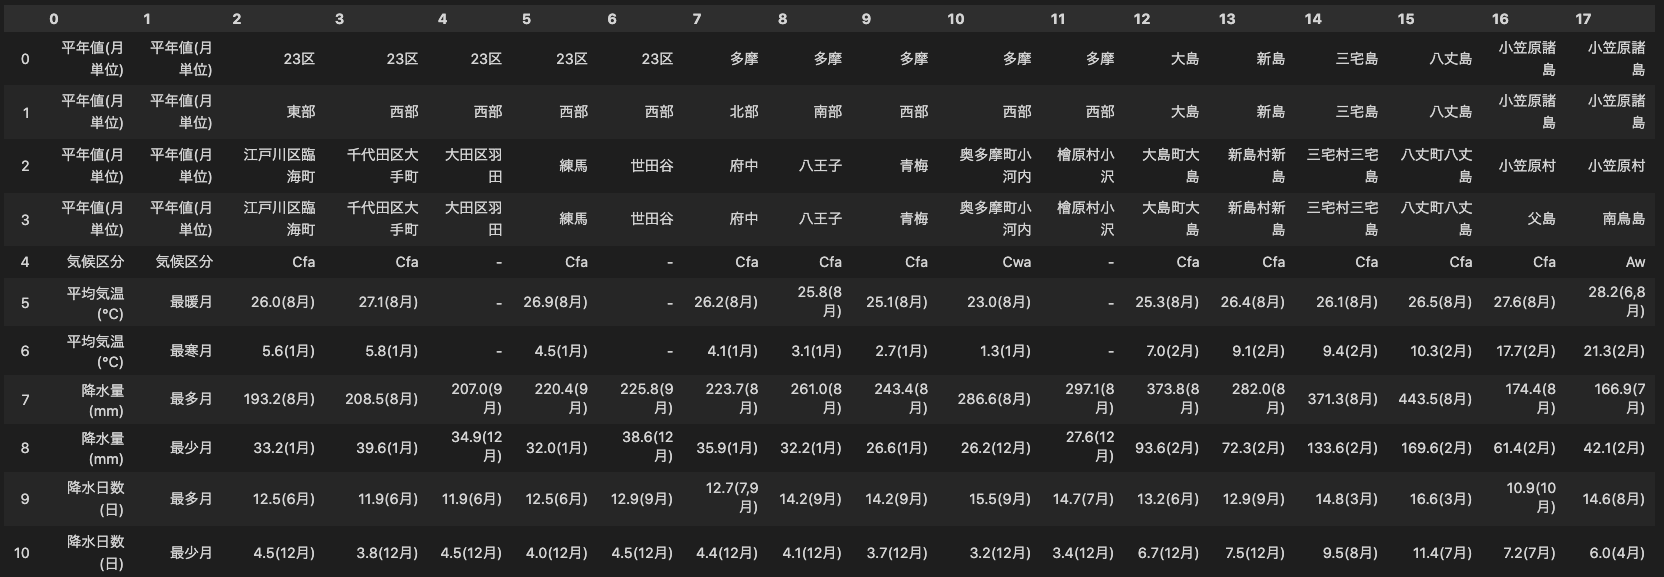
実行してみます。
parse_table(tables[9])
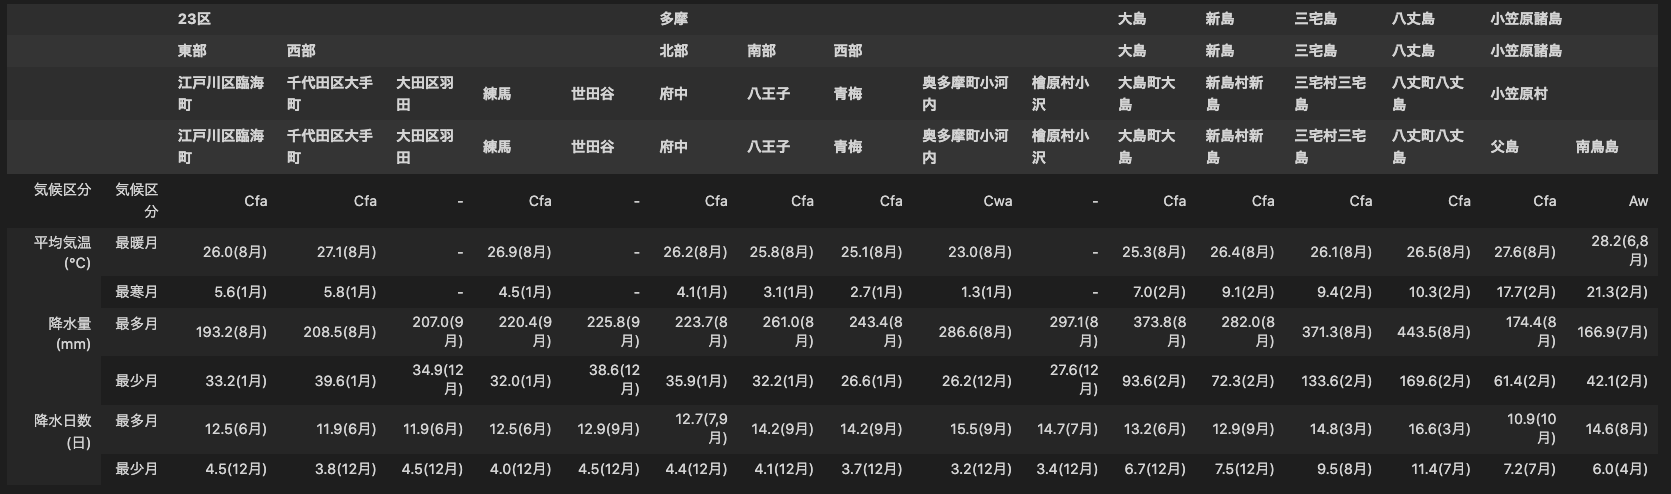
インデックスやカラムを設定すると次のようにmultiindex形式で返ってきます。
parse_table(tables[9], set_index=True, set_columns=True)
補足説明
処理について簡単に記します。適宜状況に応じて変更されたし。
1 テーブルサイズの取得
予めテーブルのサイズを事前に取得すると分かりが良いです。
trタグが各行を表し、その子要素としてth、tdタグが存在します。thはindex及びcolumnsに相当します。
まずtrタグをリストとして取得します。
tr_lst = table.findAll("tr") # trタグを全て取得
セル同士を結合する時には、行方向にはrowspan、列方向にはcolspanで結合するセルの数が指定されます。
次の箇所で1行目、すなわち1つ目のtrタグを取得してcolspanの値を足し合わせることで列数を計算します。t.get("colspan", 1)として、colspan属性が存在しなければ1とすれば辻褄が合います。
m = sum([int(t.get("colspan", 1)) for t in tr_lst[0].findAll(("th", "td"))])
行数もほぼ同様で、かくtrタグの一つ目のthもしくはtdタグのrowspanの値を足し合わせて計算しています。
n = 0
while n < len(tr_lst):
    tr = tr_lst[n]
    rowspan = int(tr.find(("th", "td")).get("rowspan", 1))
    n += rowspan
行数と列数が分かったので、テーブルの値を保持する値が全て0のnp.arrayを作成します。テーブルの値の形式は様々なのでdtype=objectとしています。
nptable = np.zeros([n,m], dtype=object)
2 indexとcolumnsの取得
ここではindexが左側に、columnsが上部にまとまって存在していることを仮定しています。
上述の例のように、indexとcolumnsは階層的にもできるので、それぞれの層数を取得します。後の処理最後にテーブルの左部と上部から層数分だけindexとcolumnsとして取り出します。
tdタグが一つも存在しない行はcolumnsであると判断できます。そのような行数をcols_layer += 1でカウントしていきます。
そしてindexの層の数はcolumns以外の行の中で最も
上述の例のように、indexやcolumnsが階層的になっている場合があります。
idx_layer, cols_layer = 0, 0 # indexとcolumnsの階層
for tr in tr_lst:
    if tr.find("td"):
        idx_layer = max(idx_layer, len(tr.findAll("th"))) # th要素の数の最大値をindexの階層とする
    else:
        cols_layer += 1 # td要素がない場合行数をcolumnsの階層とする
まとめ
これまでスクレイピングする中で出会った諸々のパターンに対応できるように書いてみました。