はじめに
AWSの最新情報はWhat’s New with AWS?やAWS News blogなどで日々提供されていますが、これらから必要な情報を探し出し、内容を理解するのは大変な作業です。
そこで、AWSが情報の収集、日本語での要約、受信Webhookに対応したコラボレーションツールへの投稿を行うソリューションWhat’s New Summary Notifierを公開しました。しかし、このコードはSlack有料プランのワークフローにあるWebhookを使う実装となっています。WebhookなのでフリープランのIncoming Webhooksで受信できるよう少し手を加えてみました。
さらに、得られた要約をXでシェアできるよう、シェアリンクも追加しました。
What's New Summary NotifierはSlackとTeamsの受信Webhookに対応する実装となっていますが、Webhook URLの登録とそのURLに対するリクエストボディを変更すれば他のツールにも応用できます。
デモ画面
以下のスクリーンショットは、RSSから以下の記事のURLを取得し翻訳・要約したものがSkackにポストされた例です。

Share on X のリンクは記事の要約を200文字以内にまとめたものをX(Twitter)でシェアするためのものです。"What’s New Summary Notifier"の実装にはそのようなものはなく、このソリューションを利用する際に自分の利便性のために実装しました。
参考情報
開発環境構築
作業環境のOSバージョン
$ cat /etc/os-release | grep PRETTY_NAME
PRETTY_NAME="Ubuntu 24.04 LTS"
npmコマンドがない場合はインストールします。
$ sudo apt install npm
$ npm --version
9.2.0
AWS CDKがない場合はインストールします。
$ sudo npm install -g aws-cdk
$ cdk --version
2.150.0 (build 3f93027)
Docker がない場合はインストールします。
$ docker --version
Docker version 27.1.2, build d01f264
構築手順
AWSの記事に手順が書かれているので、ここでは記事と手順が異なる箇所を中心に書きます。
構築にあたって、3-1. アーキテクチャの解説に書かれているAWSリソースを作成、操作可能な権限が必要です。
Slackの準備
チャンネルを作成
Webhookを受信するチャンネルを作成します。例えば、whats-new-aws-summaryといった名称でチャンネルを作成します。

Slack appの作成
slack apiを開き、新規アプリケーションを作成します。ここではFrom scratchを選択します。

Incoming Webhooksを開き、Activate Incoming WebhooksをOnにします。
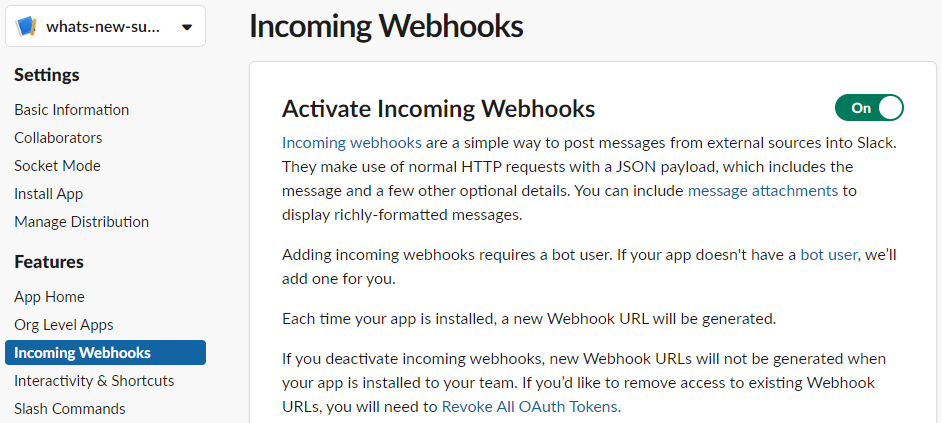
このスクリーンショットではすでにひとつWebhook URLが作成されています。Add New Webhook for Your Workspaceをクリックします。

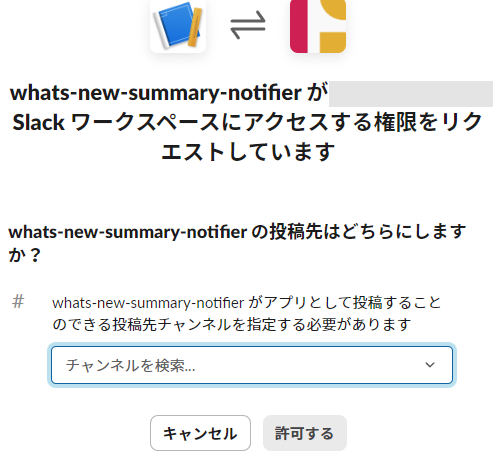
先ほど作成したWebhookの投稿先チャンネルを選択し、許可するをクリックします。
Webhook URLが作成されると、以下のようにチャンネル名とともにURLが一覧に表示されます。このURLをコピーします。
デプロイ
ここからは、AWS記事の手順と同じです。2-3. Webhook URL を AWS Systems Manager Parameter Store に格納 に従い、さきほどコピーしたWebhook URLをAWS Systems Manager Parameter Storeに登録します。
続いて、コードをGitリポジトリからクローンし、デプロイします。
Error: spawnSync docker ENOENT
デプロイの際に以下のエラーが発生した場合は、dockerがインストールされていないので、環境にあわせてdockerをインストールします。
$ cdk deploy
Error: spawnSync docker ENOENT
カスタマイズ
Incoming Webhooks対応
2-2-1. Slack の場合にあるように、ワークフローのWebhookで設定した変数にあわせたitemを作成しWebhook URLに送信しています。元コードはこのようになっています。
        else:  # Slack
            msg = item

        encoded_msg = json.dumps(msg).encode("utf-8")
Incoming Webhooksでは{"text":"Hello, World!"}のような形式でメッセージを送信する必要があるので、以下のように修正しました。これにより、ひとつのWebhookに情報を詰め込むことができました。
        else:  # Slack
            msg = create_slack_message(item)

        encoded_msg = json.dumps(msg).encode("utf-8")
def create_slack_message(item):
    # URL encode the RSS link separately

    message = {
        "text": f"{item['rss_time']}\n" \
                f"<{item['rss_link']}|{item['rss_title']}>\n" \
                f"{item['summary']}\n" \
                f"{item['detail']}"
    }

    return message
以下のようなメッセージを組み立ててWebhookに送信します。
| item名 | 内容 |
|---|---|
| item["rss_time"] | 記事投稿時間 |
| item["rss_link"] | 記事URL |
| item["rss_title"] | 記事タイトル |
| item["summary"] | item["detail"] をもとに要約した内容 |
| item["detail"] | プロンプトに基づいて思考した過程を箇条書きにした内容 |
lambda/notify-to-app/index.py全体の差分は以下のとおりです。
diff --git a/lambda/notify-to-app/index.py b/lambda/notify-to-app/index.py
index 1d31ded..05dbc0a 100644
--- a/lambda/notify-to-app/index.py
+++ b/lambda/notify-to-app/index.py
@@ -7,10 +7,12 @@ import os
 import time
 import traceback

+import urllib.parse
 import urllib.request

 from typing import Optional
 from botocore.config import Config
 from bs4 import BeautifulSoup
 from botocore.exceptions import ClientError
 import re
@@ -239,7 +241,7 @@ def push_notification(item_list):
             item["detail"] = item["detail"].replace("。\n", "。\r")
             msg = create_teams_message(item)
         else:  # Slack
-            msg = item
+            msg = create_slack_message(item)

         encoded_msg = json.dumps(msg).encode("utf-8")
         print("push_msg:{}".format(item))
@@ -277,6 +279,24 @@ def get_new_entries(blog_entries):
     return res_list


+def create_slack_message(item):
+
+    # URL encode the RSS link separately
+    encoded_rss_link = urllib.parse.quote(item["rss_link"])
+
+    message = {
+        "text": f"{item['rss_time']}\n" \
+                f"<{item['rss_link']}|{item['rss_title']}>\n" \
+                f"{item['summary']}\n" \
+                f"{item['detail']}\n"
+    }
+
+    return message
+
+
 def create_teams_message(item):
     message = {
         "type": "message",
Webhookを受信するとこのようなメッセージがチャンネルに投稿されます。
さまざまなAWSブログのRSSを追加する
4-2. What’s New with AWS? 以外の Web サイトから要約を作る にあるように、他のAWSブログやニュースのRSSを追加可能です。元のコードはこのように一つのRSSが設定されています。
        "notifiers": {
            "AwsWhatsNew": {
                "destination": "slack",
                "summarizerName": "AwsSolutionsArchitectJapanese",
                "webhookUrlParameterName": "/WhatsNew/URL",
                "rssUrl": {
                    "What’s new": "https://aws.amazon.com/about-aws/whats-new/recent/feed/"
                }
            }
        }
このように複数のRSSを設定することが可能です。これにより、日々追いかけたいブログの更新情報や要約を自動的に取得できます。
元の記事ではscheduleパラメータについて触れられていませんが、DEPLOY_ja.mdに「 (オプション): CRON 形式の RSS フィード取得間隔。本パラメータの指定がない場合は、毎時 00 分にフィードを取得します。」と書かれています。ここでは毎時20分にクロールするように設定しています。この値は、Amazon EventBridgeの設定に反映されます。
        "notifiers": {
            "AwsWhatsNew": {
                "destination": "slack",
                "summarizerName": "AwsSolutionsArchitectJapanese",
                "webhookUrlParameterName": "/WhatsNew/URL",
                "rssUrl": {
                    "What's new": "https://aws.amazon.com/about-aws/whats-new/recent/feed/",
                    "AWS News Blog": "https://aws.amazon.com/blogs/aws/feed",
                    "AWS News Security Blog": "https://aws.amazon.com/blogs/security/feed/",
                    "AWS News Machine Learning Blog": "https://aws.amazon.com/blogs/machine-learning/feed/",
                    "AWS Web Services Blog (JP)": "https://aws.amazon.com/jp/blogs/news/feed/",
                    "AWS Web Services Blog (JP) - Generative AI": "https://aws.amazon.com/jp/blogs/news/category/artificial-intelligence/generative-ai/feed/",
                    "AWS Web Services Blog - Generative AI": "https://aws.amazon.com/blogs/aws/category/artificial-intelligence/generative-ai/feed/",
                    "AWS Web Services Blog (JP) - Generative AI 2": "https://aws.amazon.com/jp/blogs/news/category/generative-ai-2/feed/"
                },
                "schedule": {
                    "minute": "20",
                    "hour": "*",
                    "day": "*",
                    "month": "*",
                    "year": "*"
                }
            }
        }
以下のサイトなどを参考に、RSSを設定しました。
AWSブログ以外のRSSを登録する
What’s New Summary Notifierが記事の内容を取得している部分の実装をみてみると、<main>タグ内のテキストを対象としていました。RSS URLの形式や<main>タグに記事本文があることから、記事配信にWordPressを利用しているようです。
            with urllib.request.urlopen(url) as response:
                html = response.read()
                if response.getcode() == 200:
                    soup = BeautifulSoup(html, "html.parser")
                    main = soup.find("main")

                    if main:
                        return main.text
そのため、WordPressを使っているブログであればRSS URLをcdn.jsonに追加するだけで記事を要約したものをSlackやTeamsに送信できると思います。もしくは<main>タグ内に記事本文があればWordPress以外のブログでも対応できそうです。
注意
クロールを行う際は、可否や方法についてサイトの利用規約などの確認が必要です。
先日、CloudflareがAIクローラーをブロックする設定を追加しました。
Cloudflare、ワンクリックでAIボット、AIクローラーをブロックする設定を追加
このように、機械的なクロールはブロックされることがあります。
技術的な視点だけでみると、Cloudflareを使っているサイトに対するアクセスはcloudscraperを使うことで成功します。get_blog_content()を以下のように実装すればよさそうです。
import cloudscraper
def get_blog_content(url):
    """Retrieve the content of a blog post

    Args:
        url (str): The URL of the blog post

    Returns:
        str: The content of the blog post, or None if it cannot be retrieved.
    """

    if not url.lower().startswith(("http://", "https://")):
        print(f"Invalid URL: {url}")
        return None

    # create a cloudscraper instance
    scraper = cloudscraper.create_scraper()

    # dummy User-Agent
    headers = {
        "User-Agent": "Mozilla/5.0 (Windows NT 10.0; Win64; x64) AppleWebKit/537.36 (KHTML, like Gecko) Chrome/121.0.0.0 Safari/537.36"
    }

    try:
        response = scraper.get(url, headers=headers, timeout=5)
        response.raise_for_status()

        soup = BeautifulSoup(response.text, "html.parser")
        main = soup.find("main")

        return main.text if main else None

    except Exception as e:
        print(f"Error accessing {url}: {e}")
        return None
元コードとの差分は以下のとおりです。
diff --git a/lambda/notify-to-app/index.py b/lambda/notify-to-app/index.py
index 1d31ded..4d05d60 100644
--- a/lambda/notify-to-app/index.py
+++ b/lambda/notify-to-app/index.py
@@ -7,10 +7,12 @@ import os
 import time
 import traceback

+import urllib.parse
 import urllib.request

 from typing import Optional
 from botocore.config import Config
+import cloudscraper
 from bs4 import BeautifulSoup
 from botocore.exceptions import ClientError
 import re
@@ -33,29 +35,33 @@ def get_blog_content(url):
         str: The content of the blog post, or None if it cannot be retrieved.
     """

+    if not url.lower().startswith(("http://", "https://")):
+        print(f"Invalid URL: {url}")
+        return None
+
+    # create a cloudscraper instance
+    scraper = cloudscraper.create_scraper()
+
+    # dummy User-Agent
+    headers = {
+        "User-Agent": "Mozilla/5.0 (Windows NT 10.0; Win64; x64) AppleWebKit/537.36 (KHTML, like Gecko) Chrome/121.0.0.0 Safari/537.36"
+    }
+
     try:
-        if url.lower().startswith(("http://", "https://")):
-            # Use the `with` statement to ensure the response is properly closed
-            with urllib.request.urlopen(url) as response:
-                html = response.read()
-                if response.getcode() == 200:
-                    soup = BeautifulSoup(html, "html.parser")
-                    main = soup.find("main")
-
-                    if main:
-                        return main.text
-                    else:
-                        return None
+        response = scraper.get(url, headers=headers, timeout=5)
+        response.raise_for_status()

-        else:
-            print(f"Error accessing {url}, status code {response.getcode()}")
-            return None
+        soup = BeautifulSoup(response.text, "html.parser")
+        main = soup.find("main")
+
+        return main.text if main else None

-    except urllib.error.URLError as e:
-        print(f"Error accessing {url}: {e.reason}")
+    except Exception as e:
+        print(f"Error accessing {url}: {e}")
         return None
X (Twitter) シェア用リンクを追加する
翻訳・要約された文章をX (Twitter)でシェアできるよう、Share on Xリンクを追加します。リンクを追加した画面はいかのとおりです。文末にリンクを追加しました。

Share on Xリンクをクリックすると以下のように投稿画面が開きます。

ポストの内容は以下のとおりです。
- 記事を100文字程度に要約した文章
- 自動生成したハッシュタグを2,3個
- 記事のURL
- ロボットのアイコンと吹き出しを模した記号、"(生成AIによる要約ポスト)"という注意書き
summarize_blog()のprompt_dataを以下のように変更しました。<instruction>タグ内に上記の要件を満たすX (Twitter)用ポストを作成する指示と、それを<twitter>タグに入れる指示を追加しました。
    prompt_data = f"""
<input>{blog_body}</input>
<persona>You are a professional {persona}. </persona>
<instruction>
Describe a new update in <input></input> tags in bullet points to describe "What is the new feature?", and "Who is this update good for". The description shall be output in <thinking></thinking> tags, and each thinking sentence must start with the bullet point "- " and end with "\n".
Make the final summary as per <summaryRule></summaryRule> tags. Try to shorten output for easy reading. You are not allowed to utilize any information except in the input. output format shall be in accordance with <outputFormat></outputFormat> tags.
Summarize the description and 1 or 2 hashtags for posting to X (Twitter) within 100 characters and the description shall be output in <twitter></twitter> tag.
</instruction>
<outputLanguage>In {language}.</outputLanguage>
<summaryRule>The final summary must consists of 2 or 3 sentences. The output format is defined in <outputFormat></outputFormat> tags.</summaryRule>
<outputFormat><thinking>(bullet points of the input)</thinking><summary>(final summary)</summary><twitter>(summary to post X(Twitter))</twitter></outputFormat>
Follow the instructions.
"""
同じくsummarize_blog()で、さきほどの<twitter>タグを抽出しreturnで返すようにしました。
    try:
        response = boto3_bedrock.invoke_model(
            body=body, modelId=MODEL_ID, accept=accept, contentType=contentType
        )
        response_body = json.loads(response.get("body").read().decode())
        outputText = beginning_word + response_body.get("content")[0]["text"]
        print(outputText)
        # extract contant inside <summary> tag
        summary = re.findall(r"<summary>([\s\S]*?)</summary>", outputText)[0]
        detail = re.findall(r"<thinking>([\s\S]*?)</thinking>", outputText)[0]
        twitter = re.findall(r"<twitter>([\s\S]*?)</twitter>", outputText)[0]
    except ClientError as error:
        if error.response["Error"]["Code"] == "AccessDeniedException":
            print(
                f"\x1b[41m{error.response['Error']['Message']}\
            \nTo troubeshoot this issue please refer to the following resources.\ \nhttps://docs.aws.amazon.com/IAM/latest/UserGuide/troubleshoot_access-denied.html\
            \nhttps://docs.aws.amazon.com/bedrock/latest/userguide/security-iam.html\x1b[0m\n"
            )
        else:
            raise error

    return summary, detail, twitter
push_notification()でsummarize_blog()の戻り値を受け取り、itemに追加します。最後にcreate_slack_message()に渡します。
       summary, detail, twitter = summarize_blog(content, language=summarizer["outputLanguage"], persona=summarizer["persona"])

        # Add the summary text to notified message
        item["summary"] = summary
        item["detail"] = detail
        item["twitter"] = twitter

        if destination == "teams":
            item["detail"] = item["detail"].replace("。\n", "。\r")
            msg = create_teams_message(item)
        else:  # Slack
            item["twitter"] = item["twitter"].replace("\n", "")
            msg = create_slack_message(item)
新しく追加したcreate_slack_message()でSlackにポストするWebhookのリクエストボディを組み立てます。
Share on Xリンクはここに登場します。他のシェア用リンクを追加することもできると思います。
import urllib.parse
def create_slack_message(item):
    # URL encode the twitter text
    encoded_twitter_text = urllib.parse.quote("🤖 < " + item["twitter"] + " (生成AIによる要約ポスト)")

    # URL encode the RSS link separately
    encoded_rss_link = urllib.parse.quote(item["rss_link"])

    message = {
        "text": f"{item['rss_time']}\n" \
                f"<{item['rss_link']}|{item['rss_title']}>\n" \
                f"{item['summary']}\n" \
                f"{item['detail']}\n" \
                f"<https://x.com/intent/tweet?url={encoded_rss_link}&text={encoded_twitter_text}|Share on X>"
    }

    return message
まとめ
What’s New Summary Notifierを利用してWhat’s New with AWS? やAWS News blogの内容を要約したものを、フリープランのSlackで受信することができました。
AWSは様々なニュースやブログを配信しているで、それらのRSSをcdk.jsonに設定することで日々の情報収集が捗ります。Webhookで受信できるので、他のコラボレーションツールとの相性も良さそうです。
また、X(Twitter)などソーシャルメディアでシェアしやすいようシェアリンクを設けたことで、情報共有も容易となりました。プロンプトを工夫するなどして、よく使うツールにあわせてフォーマットを整えてシェアするなど使い道がひろがりそうです。