今回の記事は、AWS amplifyの機能の一つであるAuthenticationについての記事です。
Nuxt.jsとAmazon Cognitoによるアプリケーションにユーザーのサインアップ、サインインなどの機能を追加し、実際にログイン画面を実装していきたいと思います。
環境
・Pug を使用
・コーディング規約は Nuxt.js に則って StandardJS
・Visual Studio Code
※amplify initによりプロジェクトが初期化されている前提のもと話を進めていきます。
Cognitoの準備
Cognitoを使用するためにAWSサービス機能のauthを追加しましょう
$ amplify add auth

$ amplify push
ライブラリの追加
Amplifyライブラリのインストールをします
$ npm install aws-amplify --save
ログイン画面の実装
Amplifyライブラリを使えるようにする
まずはAmplifyをVueで使うための設定をします。pluginsフォルダにamplify.jsを作り以下のようにします
import Vue from 'vue'
import * as AmplifyModules from 'aws-amplify'
import { AmplifyPlugin } from 'aws-amplify-vue'
import awsconfig from '@/aws-exports'
Amplify.configure(awsconfig)

Vue.use(AmplifyPlugin, AmplifyModules)
middlewareでのログイン判定
ユーザーからのログインが確認できない場合の制御を書きます
middlewareのフォルダ内にauth.jsを作り、以下のようにします。
import { Auth } from 'aws-amplify'

export default async ({ redirect }) => {
  const userInfo = await Auth.currentUserInfo()

  if (!userInfo) {
    redirect('/signin')
  }
}
currentUserInfoメソッドはAuthからユーザー情報を取ってくるメソッドです。従ってログインのリクエストをユーザが送った際に、userInfoの中にユーザー情報が入っていないとサインインのページ(/signin)にリダイレクトされるようになっています
ログイン機能
pagesフォルダ内にsignin.vueを作り以下のようにします
<template lang="pug">
    amplify-sign-out(
      v-if="isLoggedIn"
    )
    amplify-authenticator(
      v-else
      :authConfig="authConfig"
    )
</template>

<script>
export default {
  data () {
    return {
      isLoggedIn: false,
      authConfig: {
        usernameAttributes: 'My user name',
        signUpConfig: {
          header: 'My Customized Sign Up!',
          hideAllDefaults: true,
          defaultCountryCode: '1',
          signUpFields: [
            {
              label: 'My user name',
              key: 'username',
              required: true,
              displayOrder: 1,
              type: 'string'
            },
            {
              label: 'Password',
              key: 'password',
              required: true,
              displayOrder: 2,
              type: 'password'
            },
            {
              label: 'Phone Number',
              key: 'phone_number',
              required: true,
              displayOrder: 3,
              type: 'string'
            }
          ]
        }
      }
    }
  },
  async mounted () {
    const currentUserInfo = await this.$Amplify.Auth.currentUserInfo()
    this.isLoggedIn = Boolean(currentUserInfo)

    }
  }
}
</script>
authenticatorのコンポーネント
Amplifyライブラリにはユーザーログイン機能に関連するコンポーネントを用意してくれています
今回使うのはamplify-authenticatorとamplify-signoutの2つです
amplify-authenticator
このコンポーネントはサインアップ/サインインのフォームを用意してくれます。ユーザーがサインアップのフォームに登録情報を打ち込めば、Cognitoのユーザープールでユーザー情報を管理してくれます
サインイン画面

サインアップ画面(サインイン画面のCreate accountを押すと表示が切り替わる)
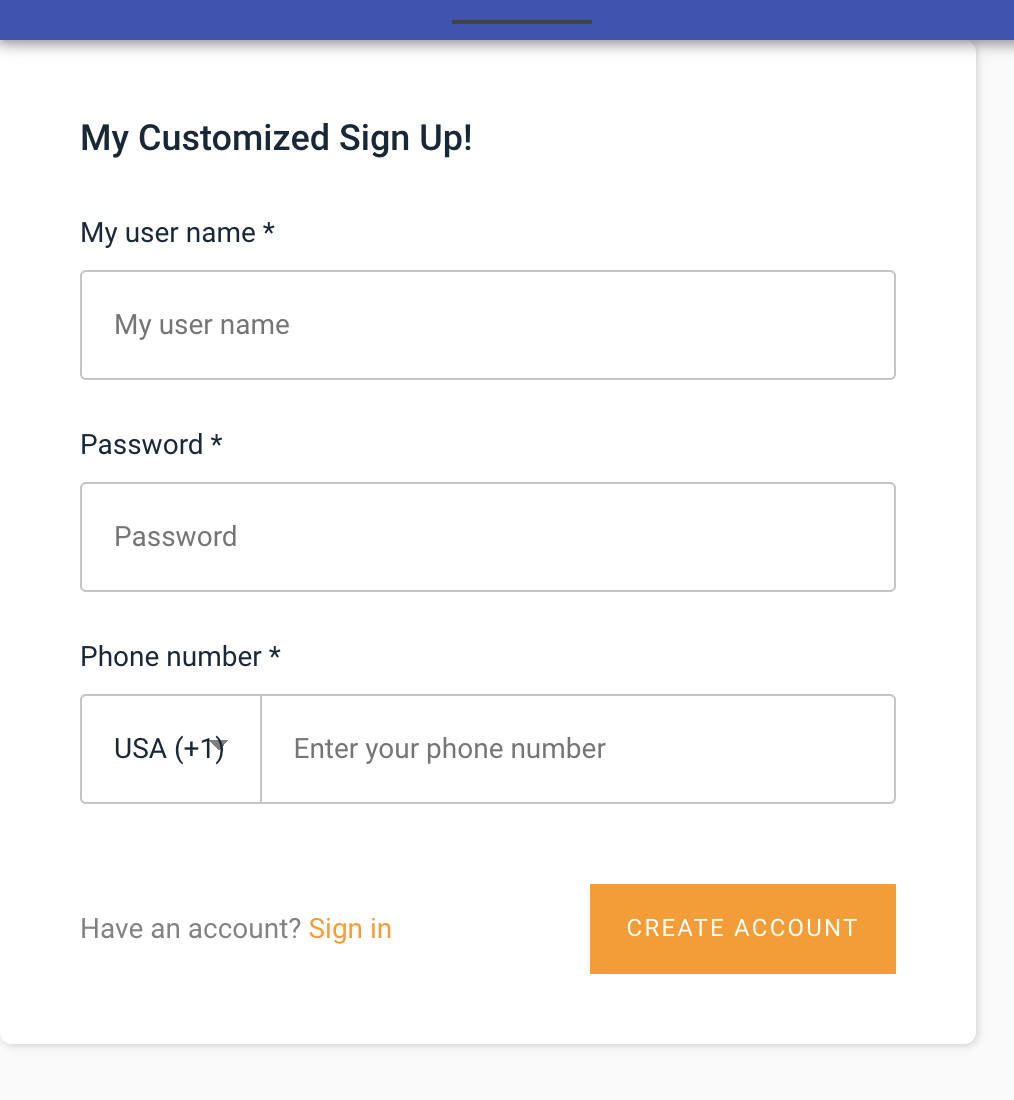
サインアップの中身は簡単にカスタマイズすることができます。それはdataの中にあるsignUpConfigで編集します
  signUpConfig: {

          header: 'My Customized Sign Up!',
          hideAllDefaults: true,
          defaultCountryCode: '1',
          signUpFields: [
            {
              label: 'My user name',
              key: 'username',
              required: true,
              displayOrder: 1,
              type: 'string'
            },
            {
              label: 'Password',
              key: 'password',
              required: true,
              displayOrder: 2,
              type: 'password'
            },
            {
              label: 'Phone Number',
              key: 'phone_number',
              required: true,
              displayOrder: 3,
              type: 'string'
            }
          ]
        }
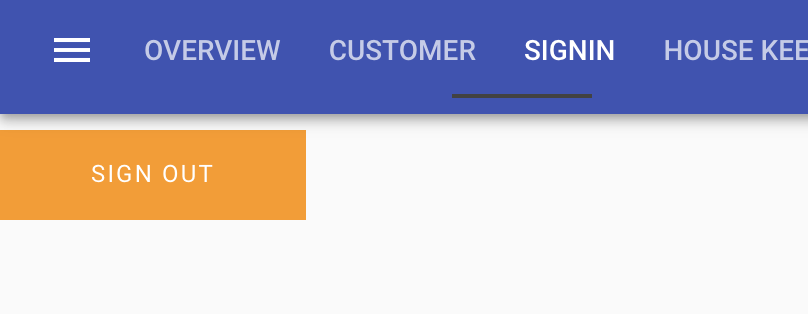
amplify-sign-out
サインアウトのボタンを表示してくれます。ボタンを押すとログイン画面に戻ります
プログラムの流れ
手順を追って説明していきます。
1 サインイン後
async/awaitを使い$Amplify.Authに対し、currentuserInfo()メソッドにより、ユーザー情報を取得したのを確認したら、定数currentuserInfoに代入される
const currentUserInfo = await this.$Amplify.Auth.currentUserInfo()
2 Boolean値の切り替え
ユーザー情報が取得できている場合、サインアップとサインアウトの切り替えに用いるisLoggedInのBoolean値を変更する
this.isLoggedIn = Boolean(currentUserInfo)
3 画面切り替え
v-ifによる条件分岐でサインアップorアウト画面の切り替えを行う
amplify-sign-out(
      v-if="isLoggedIn"
    )
    amplify-authenticator(
      v-else
      :authConfig="authConfig"
    )
以上がAmlifyライブラリを使ったログイン機能の一連の流れです!
ちなみにサインアップされたユーザー情報はCognitoに以下のように管理されます
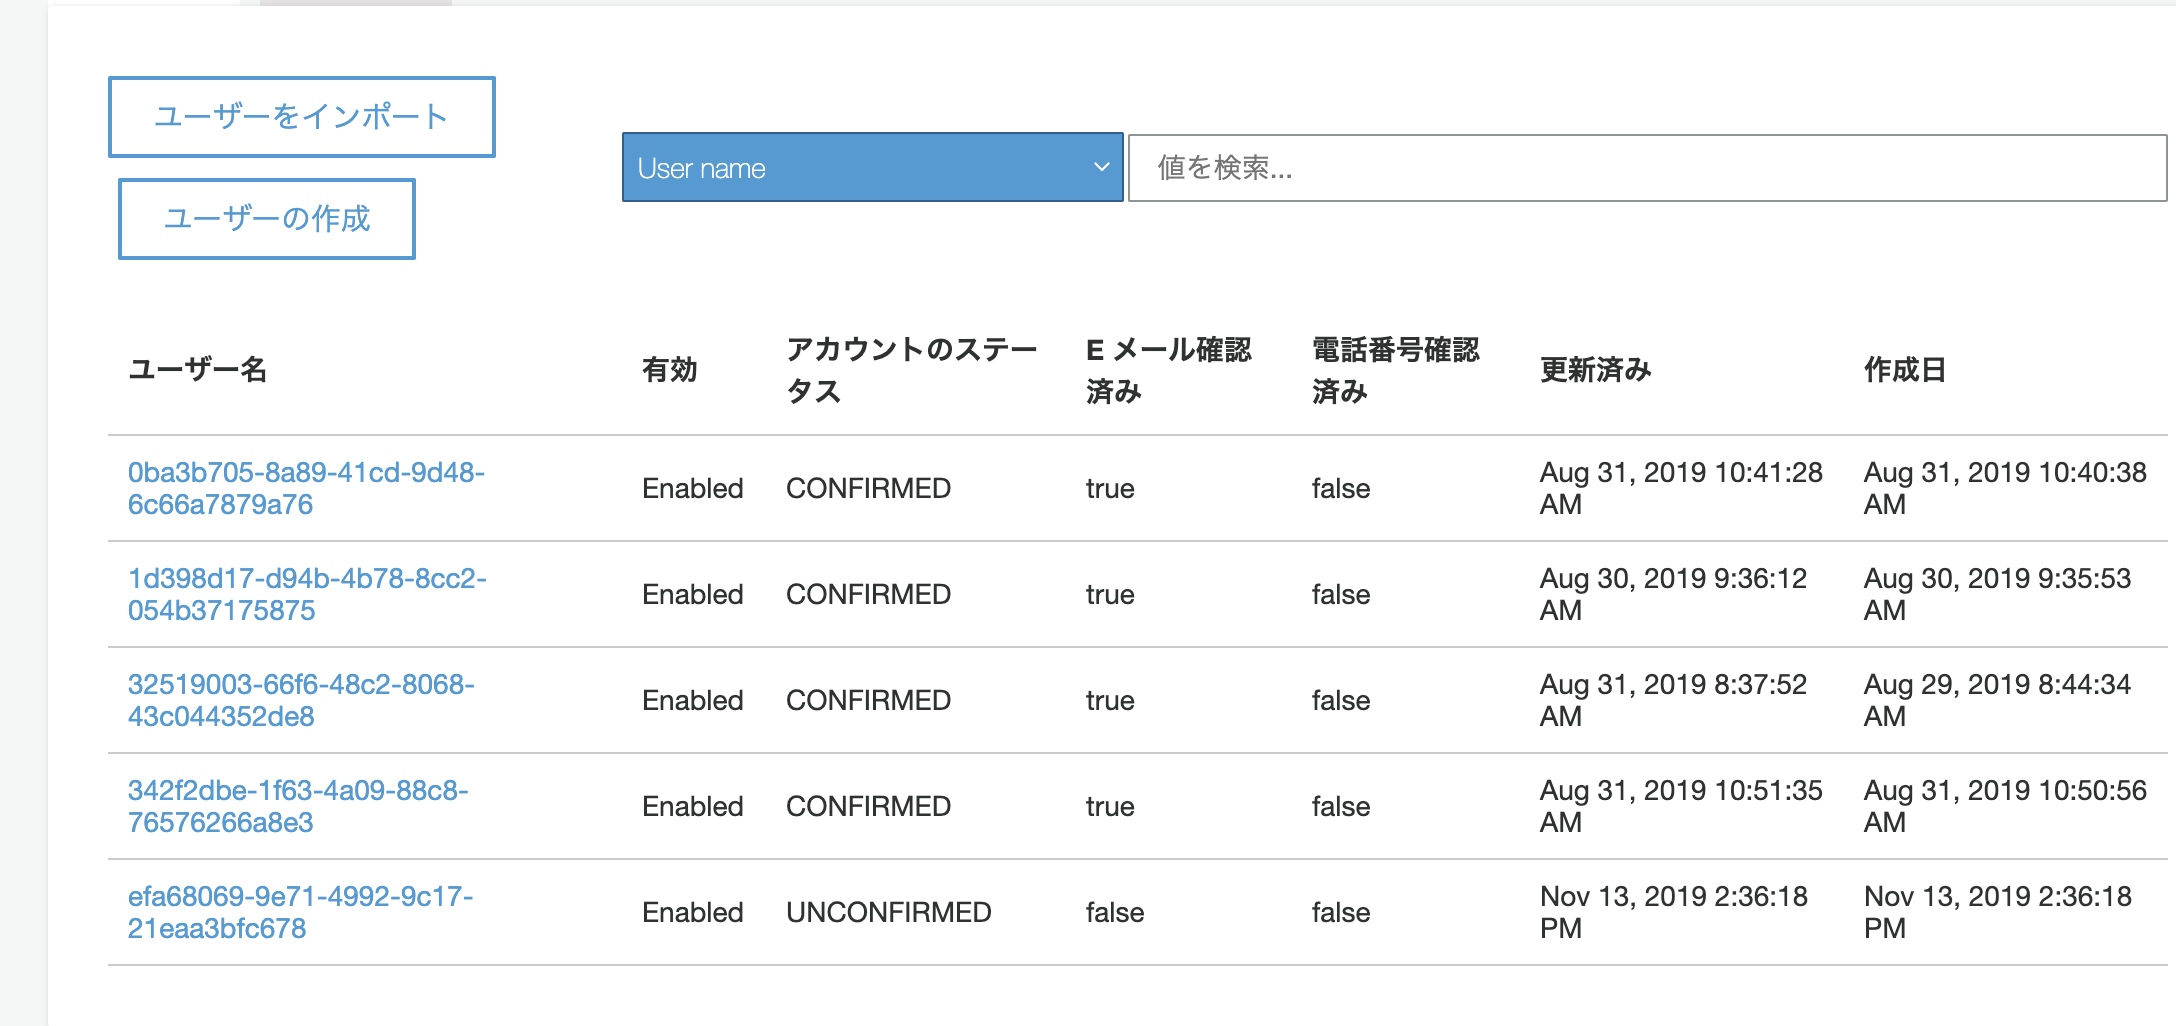
DBを使わずコンポーネント一つで登録、管理してくれるのはとても便利ですし、技術の進歩を実感しますね!
今後も最新技術について記事を書いていこうと思います!