はじめに
AWS AmplifyとIonic(Angular)を組み合わせて簡単に認証画面を作成します。
2021/10/20 タイトル修正
AWS Apmlifyとは
AWSのサービスと連携したWebアプリ・モバイルアプリを構築するためのサービスです。
Ionic Frameworkとは
Ionic Frameworkは、Webテクノロジー(HTML、CSS、JavaScript)を使って、高性能かつ高品質なモバイルとデスクトップアプリケーションをつくるためのオープンソースのUIフレームワークです。
Ionic Frameworkは、フロントエンドにおけるUXと、アプリケーションにおけるUIインタラクション(操作性、インタラクション、ジェスチャー、アニメーション)に特化しています。学びやすく、Angularをはじめとしたライブラリ・フレームワークと一緒に使うことができます。また、フレームワークなしで簡単なJavaScriptのコードだけでIonic Frameworkを利用することもできます。
環境
$ node -v
v14.15.4
$ npm -v
7.5.2
$ ionic -v
6.12.4
$ amplify -v
4.41.2
設定関連
Ionicプロジェクトの作成
# ionicのセットアップ開始
$ ionic start

# フレームワークの選択(Angular)
? Framework: Angular

# プロジェクト名を入力
? Project name: AuthTest

# テンプレートなし
? Starter template: blank

# スマートフォンをターゲットにするか?
? Integrate your new app with Capacitor to target native iOS and Android? No

# Ionicアカウントを作るか?
? Create free Ionic account? No
AWS Amplifyの設定
# 続きフォルダ移動
$ cd AuthTest
# AWS Amplifyの設定
$ amplify configure
Initializing new Amplify CLI version...
Done initializing new version.
Scanning for plugins...
Plugin scan successful
Follow these steps to set up access to your AWS account:
Sign in to your AWS administrator account:
https://console.aws.amazon.com/
Press Enter to continue
# AWSアカウントに管理者権限でサインインし、Enter
# リージョンの選択
Specify the AWS Region
? region: us-east-1
# 作成するIAM user名を入力
Specify the username of the new IAM user:
? user name: amplify-auth-test
Complete the user creation using the AWS console
https://console.aws.amazon.com/iam/home?region=us-east-1#/xxxxxxxxxxxxxxxxxxxxxxxxxxxxxx
Press Enter to continue
# IAM userを作成する(※1)
Enter the access key of the newly created user:
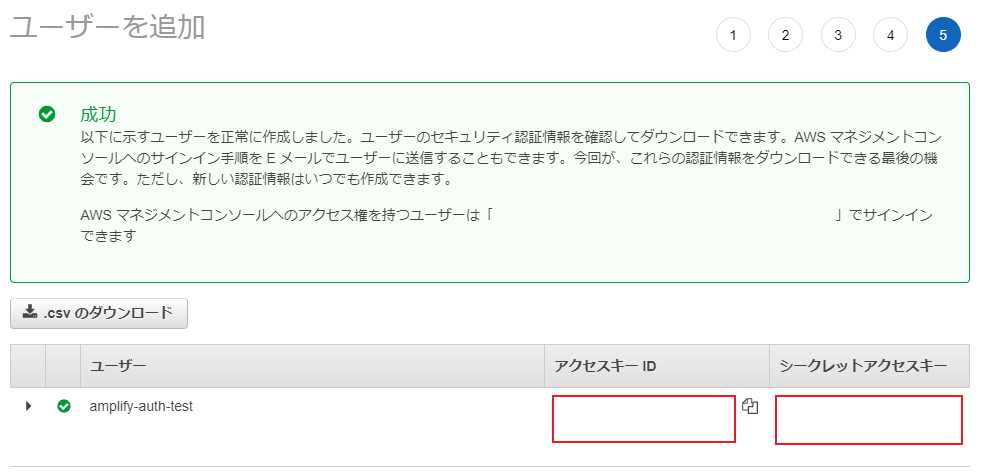
# 作成したIAM userのaccessKeyId(アクセスキー ID)を入力
? accessKeyId: ********************
# 作成したIAM userのsecretAccessKey(シークレットアクセスキー)を入力
? secretAccessKey: ****************************************
This would update/create the AWS Profile in your local machine
# Profile名を入力する
? Profile Name: AuthTest
Successfully set up the new user.
IAM userを作成する(※1)
-
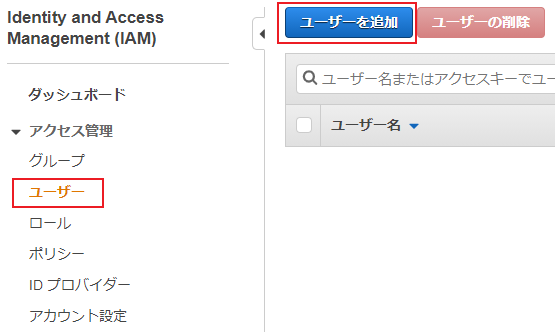
IAM Management Consoleに移動する。
-
左側のツリーからユーザーを選択する。
-
ユーザーを追加を選択する。
-
ユーザー名を入力する。
-
AWSアクセスの種類を選択:プログラムによるアクセスを選択する。
-
次のステップ:アクセス権限を選択する。
-
既存のポリシーを直接アタッチを選択する。
-
次のステップ:タグを選択する。
-
次のステップ:確認を選択する。
-
ユーザーの作成を選択する。
-
ユーザーが追加され、アクセスキーIDとシークレットアクセスキーが作成されました。
AWS Amplify 初期化
$ amplify init

Note: It is recommended to run this command from the root of your app directory
? Enter a name for the project AuthTest
? Enter a name for the environment dev
? Choose your default editor: Visual Studio Code
? Choose the type of app that you\'re building javascript
Please tell us about your project
? What javascript framework are you using ionic
? Source Directory Path:  src
? Distribution Directory Path: www
? Build Command:  npm.cmd run-script build
? Start Command: ionic serve
Using default provider  awscloudformation

For more information on AWS Profiles, see:
https://docs.aws.amazon.com/cli/latest/userguide/cli-configure-profiles.html

# プロファイルを使用するか。
? Do you want to use an AWS profile? Yes

# AWS Amplifyの設定で作成したプロファイルを使う
? Please choose the profile you want to use AuthTest
認証機能の追加
$ amplify add auth

Using service: Cognito, provided by: awscloudformation

 The current configured provider is Amazon Cognito.

 # 認証とセキュリティ設定(デフォルト)
 Do you want to use the default authentication and security configuration? Default configuration
 Warning: you will not be able to edit these selections.

 # サインインの方法(Email)
 How do you want users to be able to sign in? Email
 Do you want to configure advanced settings? No, I am done.
Successfully added auth resource xxxxxxxxxxxxxxxxxxxxxxx locally

Some next steps:
"amplify push" will build all your local backend resources and provision it in the cloud
"amplify publish" will build all your local backend and frontend resources (if you have hosting category added) and provision it in the cloud

$ amplify push

√ Successfully pulled backend environment dev from the cloud.

Current Environment: dev

| Category | Resource name    | Operation | Provider plugin   |
| -------- | ---------------- | --------- | ----------------- |
| Auth     | xxxxxxxxxxxxxxxx | Create    | xxxxxxxxxxxxxxxxx |
? Are you sure you want to continue? Yes
amplifyライブラリの追加
# amplifyライブラリの追加
$ npm install aws-amplify @aws-amplify/ui-angular
Angularの設定変更
Angular 6以降なので、src/polyfills.tsに以下を追加する。
(window as any).global = window;

(window as any).process = {
  env: { DEBUG: undefined },
};
src/tsconfig.app.jsonのcompilerOptionsに「 "types" : ["node"]」を追加する。
{
  "compileOnSave": false,
  "compilerOptions": {
    "baseUrl": "./",
    "outDir": "./dist/out-tsc",
    "sourceMap": true,
    "declaration": false,
    "downlevelIteration": true,
    "experimentalDecorators": true,
    "moduleResolution": "node",
    "importHelpers": true,
    "target": "es2015",
    "types": ["node"],
    "module": "es2020",
    "lib": ["es2018", "dom"]
  },
  "angularCompilerOptions": {
    "enableI18nLegacyMessageIdFormat": false,
    "strictInjectionParameters": true,
    "strictInputAccessModifiers": true,
    "strictTemplates": true
  }
}
認証関連の実装
app.module.tsの修正
import { NgModule } from '@angular/core';
import { BrowserModule } from '@angular/platform-browser';
import { RouteReuseStrategy } from '@angular/router';

import { IonicModule, IonicRouteStrategy } from '@ionic/angular';

import { AppComponent } from './app.component';
import { AppRoutingModule } from './app-routing.module';

/* Add Amplify imports */
import {AmplifyUIAngularModule} from "@aws-amplify/ui-angular";
import Amplify from "aws-amplify";
import awsconfig from "../aws-exports";

/* Configure Amplify resources */
Amplify.configure(awsconfig);

@NgModule({
  declarations: [AppComponent],
  entryComponents: [],
  imports: [BrowserModule, IonicModule.forRoot(), AppRoutingModule, AmplifyUIAngularModule/* Add Amplify module */],
  providers: [{ provide: RouteReuseStrategy, useClass: IonicRouteStrategy }],
  bootstrap: [AppComponent],
})
export class AppModule {}
home.page.tsの修正
import { Component, ChangeDetectorRef } from '@angular/core';
import {
  onAuthUIStateChange,
  CognitoUserInterface,
  AuthState,
  FormFieldTypes,
} from '@aws-amplify/ui-components';

@Component({
  selector: 'app-home',
  templateUrl: 'home.page.html',
  styleUrls: ['home.page.scss'],
})
export class HomePage {
  title = 'amplify-angular-auth';
  user: CognitoUserInterface | undefined;
  authState: AuthState;

  /** サインアップフィールド定義 */
  signUpformFields: FormFieldTypes = [
    { type: 'username' },
    { type: 'password' },
    { type: 'email' },
  ];

  constructor(private ref: ChangeDetectorRef) {}

  ngOnInit() {
    onAuthUIStateChange((authState, authData) => {
      this.authState = authState;
      this.user = authData as CognitoUserInterface;
      this.ref.detectChanges();
    });
  }

  ngOnDestroy() {
    return onAuthUIStateChange;
  }
}
home.page.htmlの修正
<ion-content [fullscreen]="true">
  <div id="container">
    <amplify-authenticator *ngIf="authState !== 'signedin'">
      <amplify-sign-in slot="sign-in">
      </amplify-sign-in>
      <amplify-sign-up slot="sign-up" [formFields]="signUpformFields">
      </amplify-sign-up>
    </amplify-authenticator>

    <div *ngIf="authState === 'signedin' && user" class="App">
      <amplify-sign-out></amplify-sign-out>
      <div>Hello, {{user.username}}</div>
    </div>
  </div>
</ion-content>
認証画面を確認
デバッグ実行
# デバッグ開始
$ ionic serve
自動的にブラウザが立ち上がります。
Chrome環境で確認しています。
アカウント作成
-
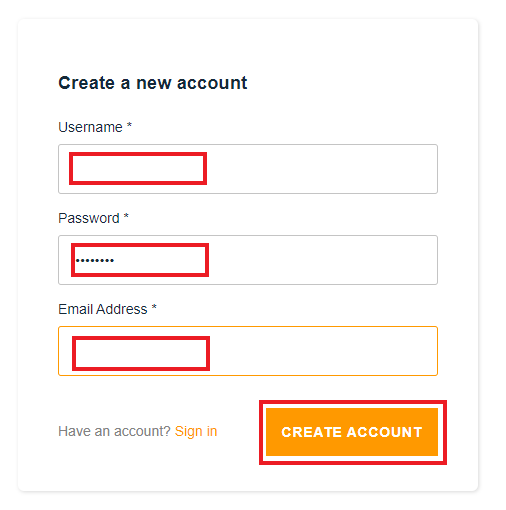
Create accountを選択する。

-
Username(Email Address)、Password、Email Addressを入力する。
-
CREATE ACCOUNTを選択する。
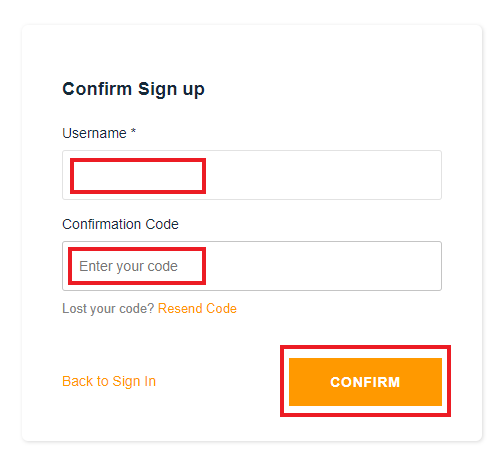
-
Confirmation Codeに入力したEmail Addressに届いた認証コードを入力する。
-
CONFIRMを選択する。
-
アカウントが作成され、サインイン状態となります。

終わりに
AWS Amplifyを利用することでとても簡単に作ることができました。
AWS Amplifyが無かったころは、認証画面を作成するのに数日かかっていたことを考えると、手軽さに驚きます。
参考
https://aws.amazon.com/jp/amplify/
https://ionicframework.com/jp/docs/intro
https://docs.amplify.aws/start/getting-started/installation/q/integration/ionic
https://docs.amplify.aws/lib/auth/getting-started/q/platform/js
https://docs.amplify.aws/ui/auth/authenticator/q/framework/angular
次回
認証画面のカスタマイズについて、書きたいと思います。