本記事を読んでできること
raspberryPi上に、Dockerを使ってGrowiを構築することができるようになる。
Growiとは
環境
- Raspbery Pi4 4GB
- Raspbian 64bit
手順
1.更新とアップグレードを実施します
sudo apt-get update && sudo apt-get upgrade
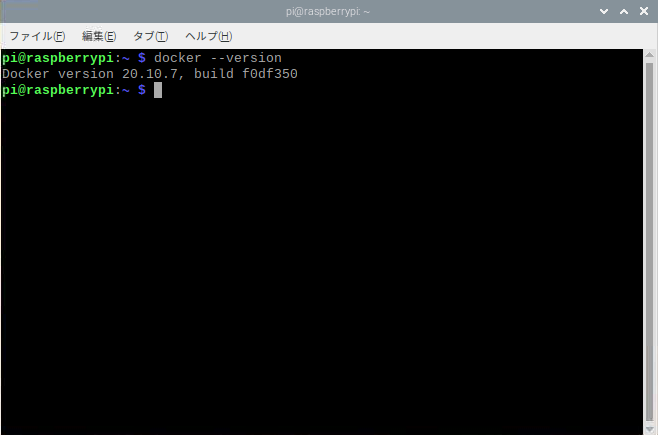
2.Dockerをインストールする
curl -sSL https://get.docker.com | sh
※下記のコマンドを実行して、結果を確認する
docker --version
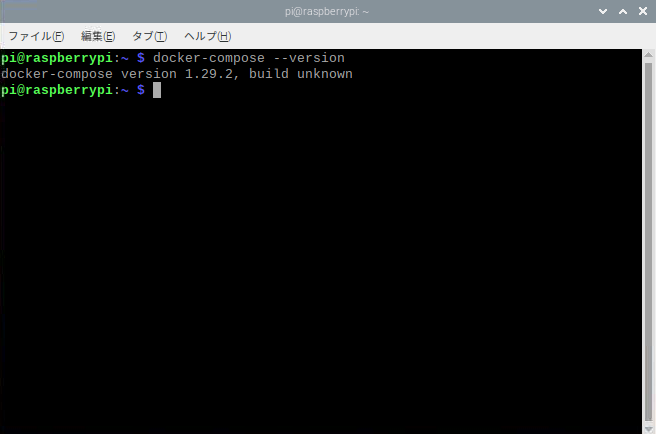
3.Docker-Composeをインストールする
sudo apt-get install libffi-dev libssl-dev
sudo pip3 install docker-compose
※下記のコマンドを実行して、結果を確認する
docker-compose --version
4.Raspberry Pi用にForkされたコンテナを取得する
git clone https://github.com/temple1026/growi-docker-compose-pi.git growi
5.growiフォルダー内のyamlを自身の環境に合わせて修正する
cd growi
nano docker-compose.yaml
※修正ポイントは、存在するパスを参照するように修正しているだけです。
※下記を参考に修正を実施する
version: '3'
services:
  growi:
    build:
      context: .
      dockerfile: ./Dockerfile
    image: growi-pi:4.0.7 # Please change if you need
    container_name: growi
    ports:
      - 3000:3000    # 修正ポイント
      # - 3000:3000 # my setting
    links:
      - mongo:mongo
      - elasticsearch:elasticsearch
    depends_on:
      - mongo
      - elasticsearch
    environment:
      - MONGO_URI=mongodb://mongo:27017/growi
      - ELASTICSEARCH_URI=http://elasticsearch:9200/growi
      # - PASSWORD_SEED=password
      # - FILE_UPLOAD=mongodb   # activate this line if you use MongoDB GridFS rather than AWS
      # - FILE_UPLOAD=local     # activate this line if you use local storage of server rather than AWS
      # - MATHJAX=1             # activate this line if you want to use MathJax
      # - PLANTUML_URI=http://  # activate this line and specify if you use your own PlantUML server rather than public plantuml.com
      # - HACKMD_URI=http://    # activate this line and specify HackMD server URI which can be accessed from GROWI client browsers
      # - HACKMD_URI_FOR_SERVER=http://hackmd:3000  # activate this line and specify HackMD server URI which can be accessed from this server container
      # - FORCE_WIKI_MODE='public'    # activate this line to force wiki public mode
      # - FORCE_WIKI_MODE='private'   # activate this line to force wiki private mode

    command: "dockerize
               -wait tcp://mongo:27017
               -wait tcp://elasticsearch:9200
               -timeout 120s
               npm run server:prod" # Changed 60s to 120s.
    # command: npm run server:prod
    restart: unless-stopped
    volumes:
      - /home/pi/Desktop/growi/growi/data # 修正ポイント
    tty: true

  mongo:
    image: arm64v8/mongo:3.6
    container_name: mongo
    restart: unless-stopped
    volumes:
      - /home/pi/Desktop/growi/growi/mongoConfigDB  # 修正ポイント
      - /home/pi/Desktop/growi/growi/mongoDB        # 修正ポイント

  elasticsearch:
    # image: webhippie/elasticsearch:6.4
    build:
      context: ./elasticsearch
      dockerfile: ./Dockerfile
    image: elasticsearch:6.6.1
    container_name: es
    command: sh bin/elasticsearch
    environment:
      - bootstrap.memory_lock=true
      - "ES_JAVA_OPTS=-Xms256m -Xmx256m"  # increase amount if you have enough memory
    ulimits:
      memlock:
        soft: -1
        hard: -1
    restart: unless-stopped
    ports:
      - 9200:9200
      - 9300:9300
    volumes:
      - /home/pi/Desktop/growi/growi/ESData  # 修正ポイント
      - ./elasticsearch/config:/usr/share/elasticsearch/config
    tty: true
6.コンテナを立ち上げる
sudo docker-compose up -b --build
7.raspberryPiのIPアドレスを確認する
ifconfig
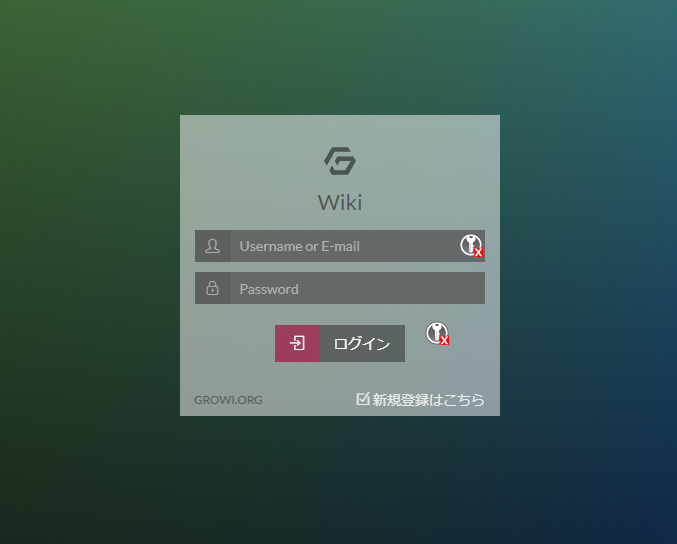
8.Growiにアクセスする
(raspberryPiのIPアドレス):3000
参考にしたサイト
ラズパイ4でUbuntuを入れてGrowiを構築しました
https://xuelei.hatenadiary.com/entry/2020/07/09/193319