はじめに
前回の記事に引き続き、Ktorのチュートリアル(Getting Started)を日本語訳しつつ進めていきます。
動作環境(再掲)
OS: MacOS Ventura
CPU: Apple M1 Pro
IDE: IntelliJ IDEA Community
Kotlin: 2.1.3
HTTP APIの作成(Creating HTTP APIs)
今回のチュートリアルでは、モバイル、ウェブ、デスクトップ、B2Bサービスなどのアプリケーションのバックエンドとして機能するHTTP APIを作成します。
ルートがどのように定義され構造化されるか、シリアライゼーションプラグインがどのように面倒な作業を簡略化するか、そしてどのようにアプリケーションの一部を手動と自動の両方でテストできるかについて見ていきます。
このチュートリアルでは、シンプルな JSON APIを構築して、架空のビジネスの顧客に関する情報、および処理したい注文を照会できるようにします。
システム内のすべての顧客と注文を一覧表示する機能を作成し、顧客と注文の情報を取得し、新しいエントリを追加したり古いエントリを削除したりする機能を提供します。
Ktorプロジェクトの新規作成(Creating a new Ktor project)
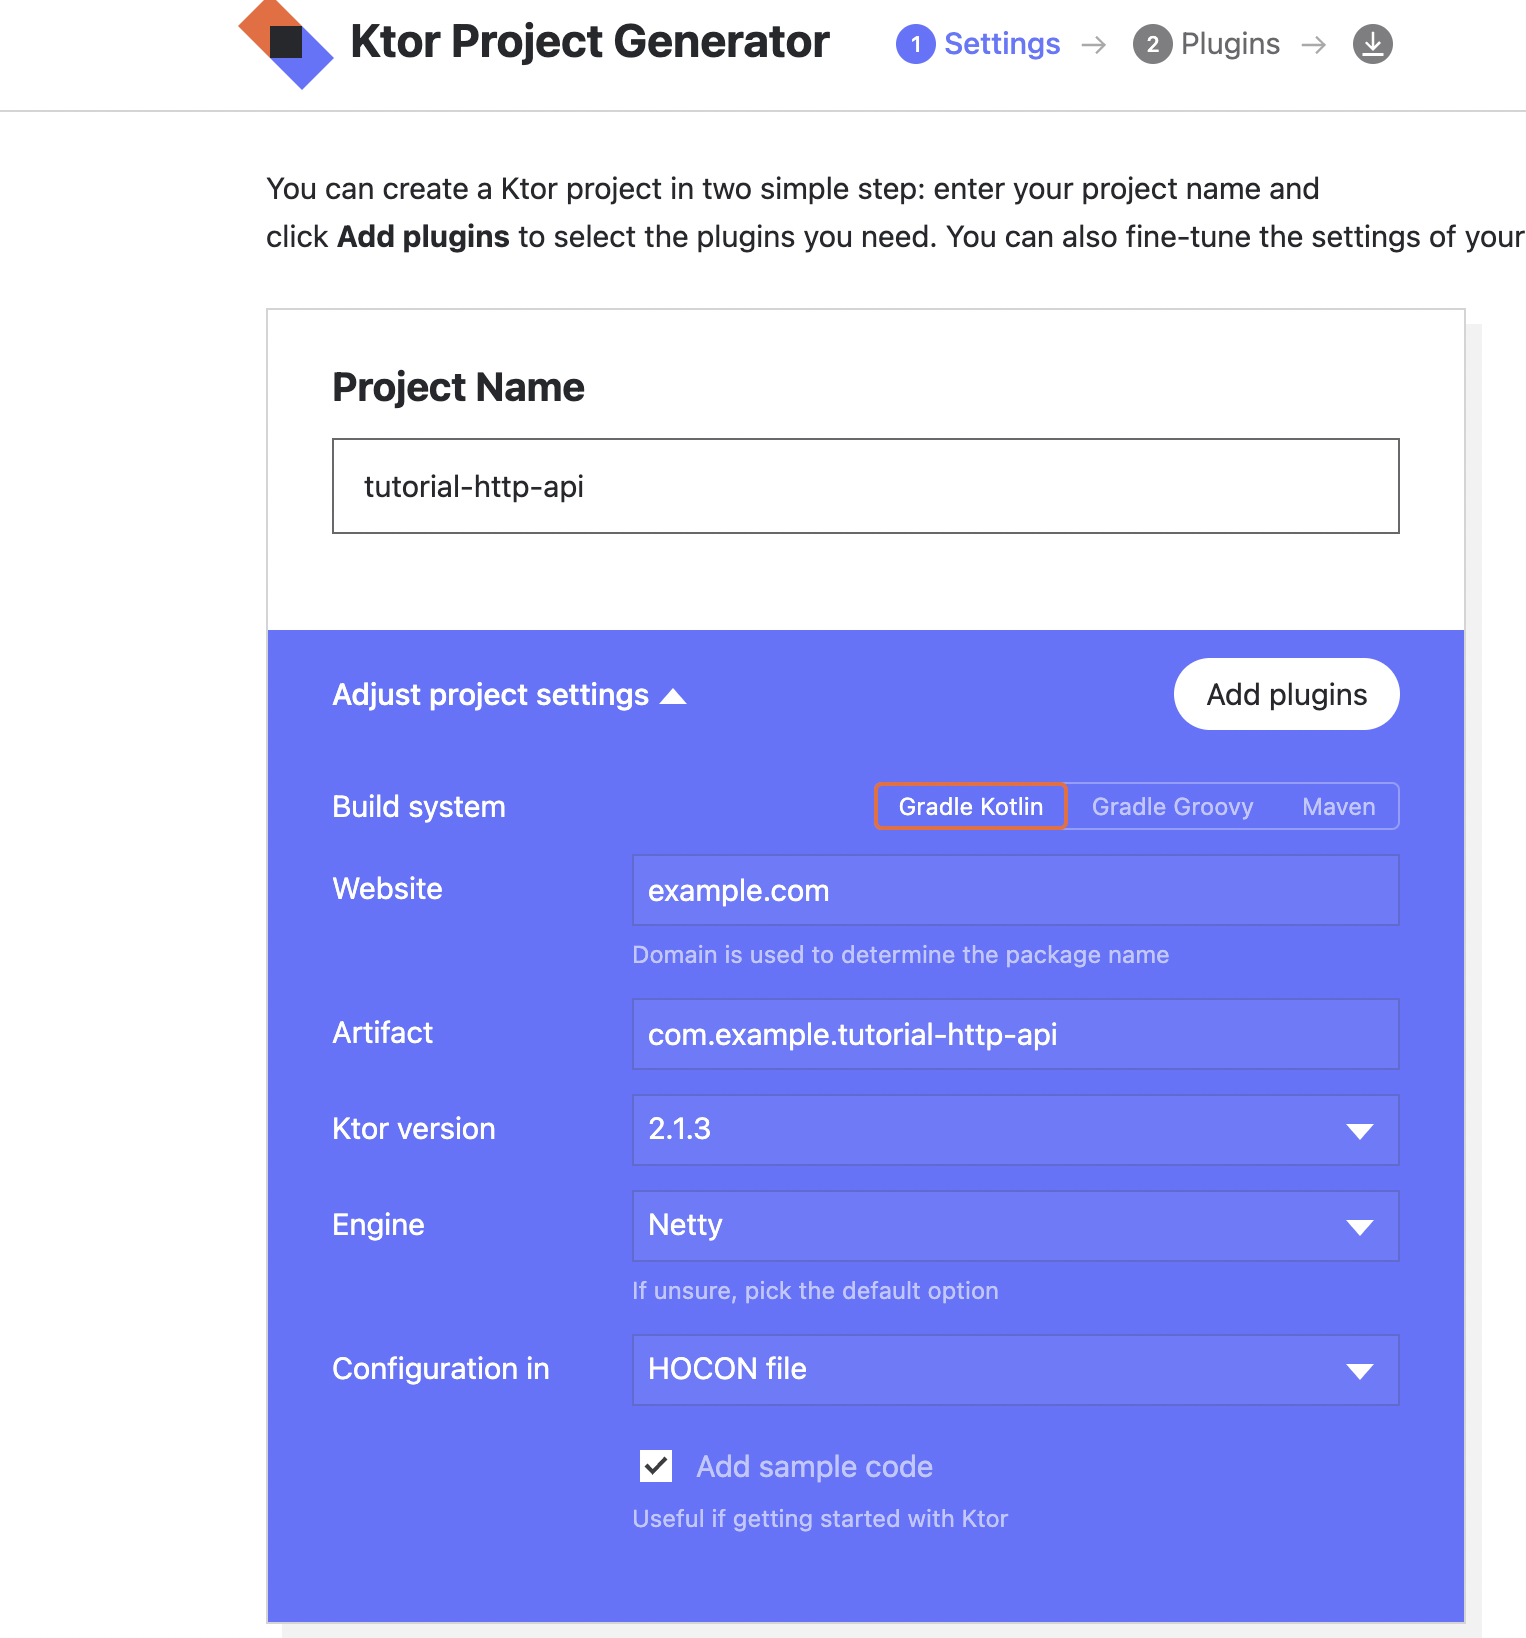
例によって、無課金のためWebベースのプロジェクトジェネレーターを使用してプロジェクトを作成します。
今回は、以下の設定で作成していきます。
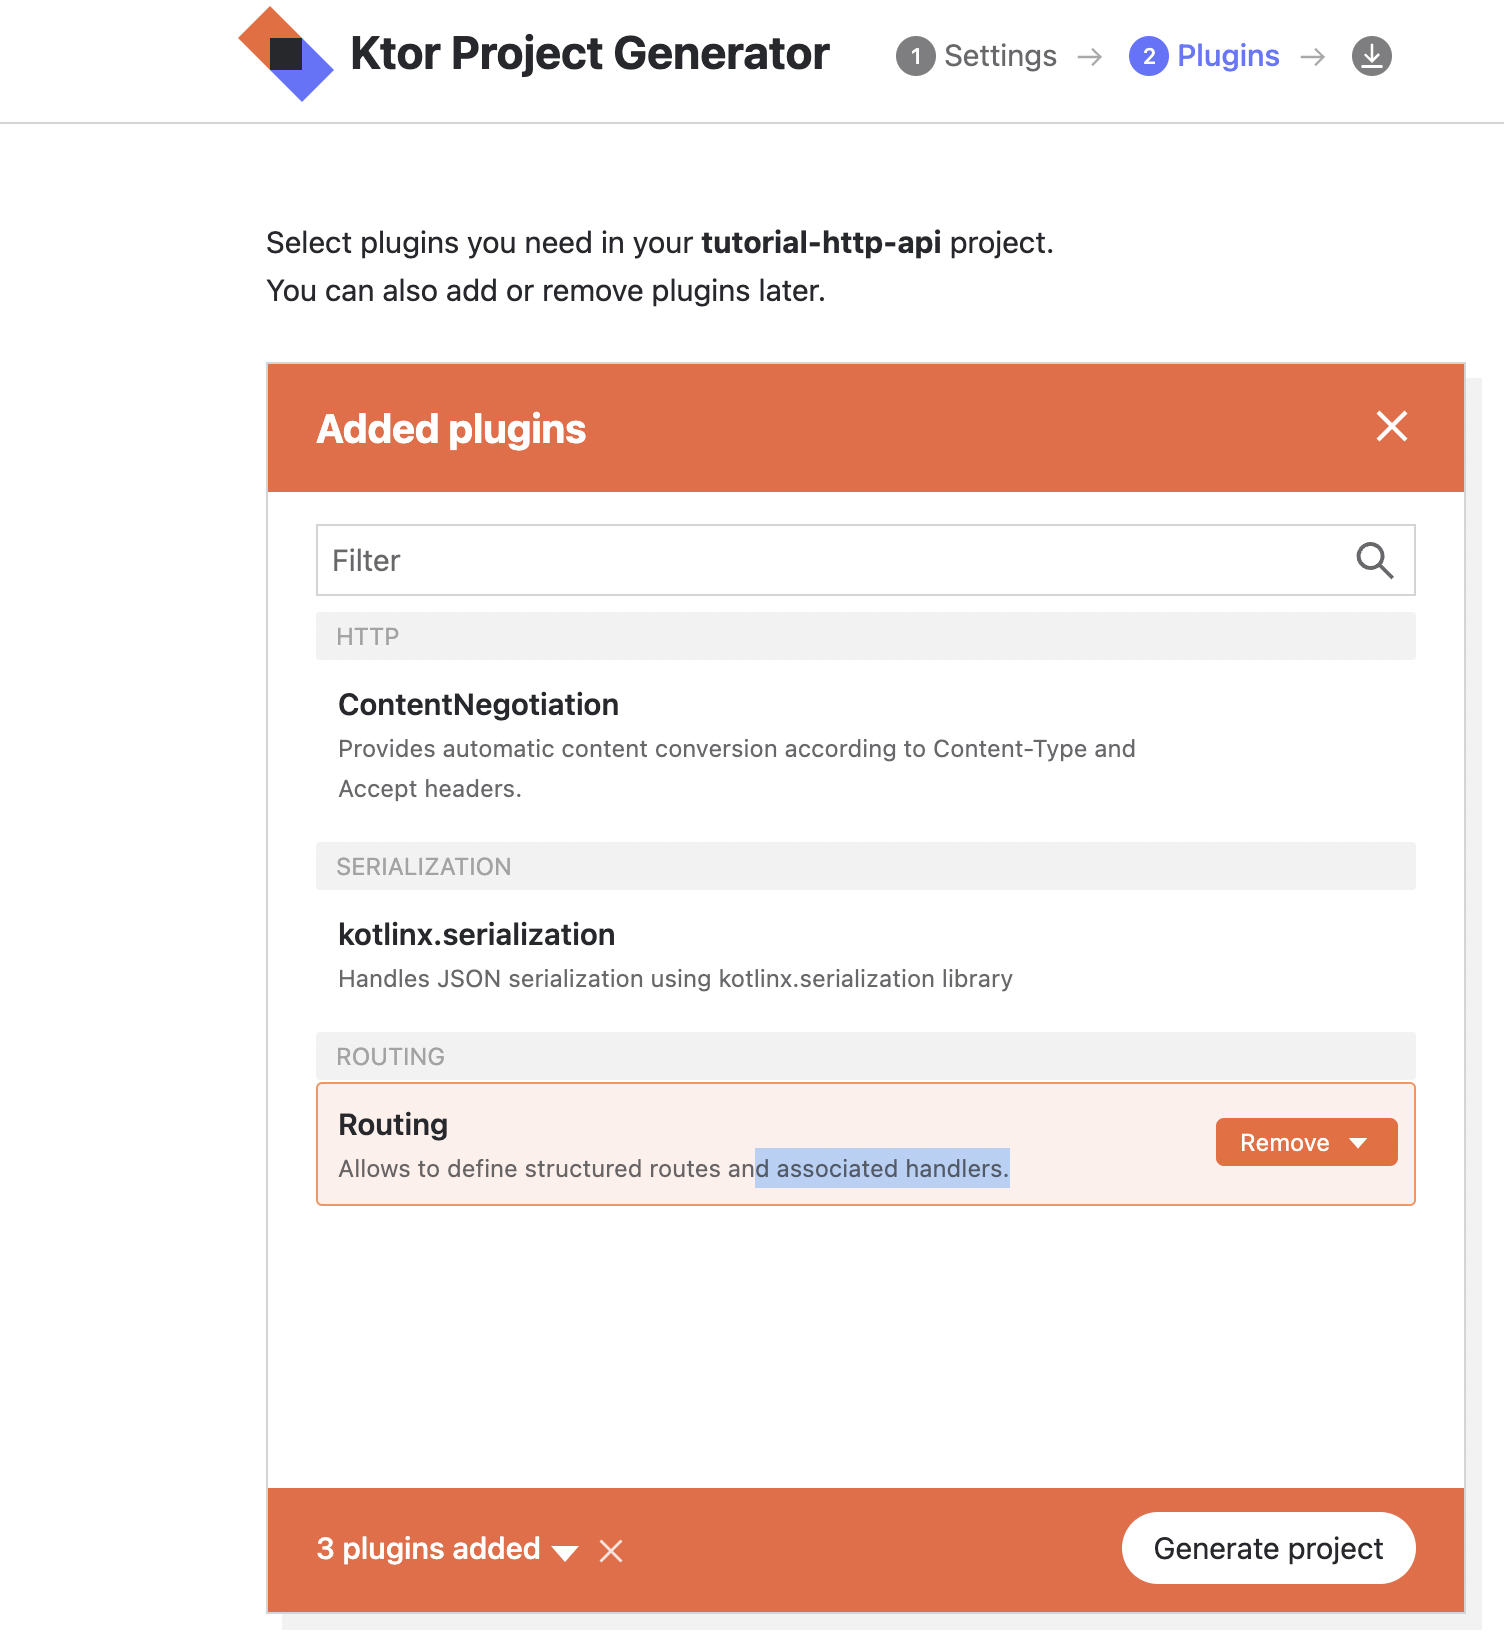
プラグインは、ContentNegotiation kotlinx.seralization Routingを使用します。
プロジェクトを調べる(Examine the project)
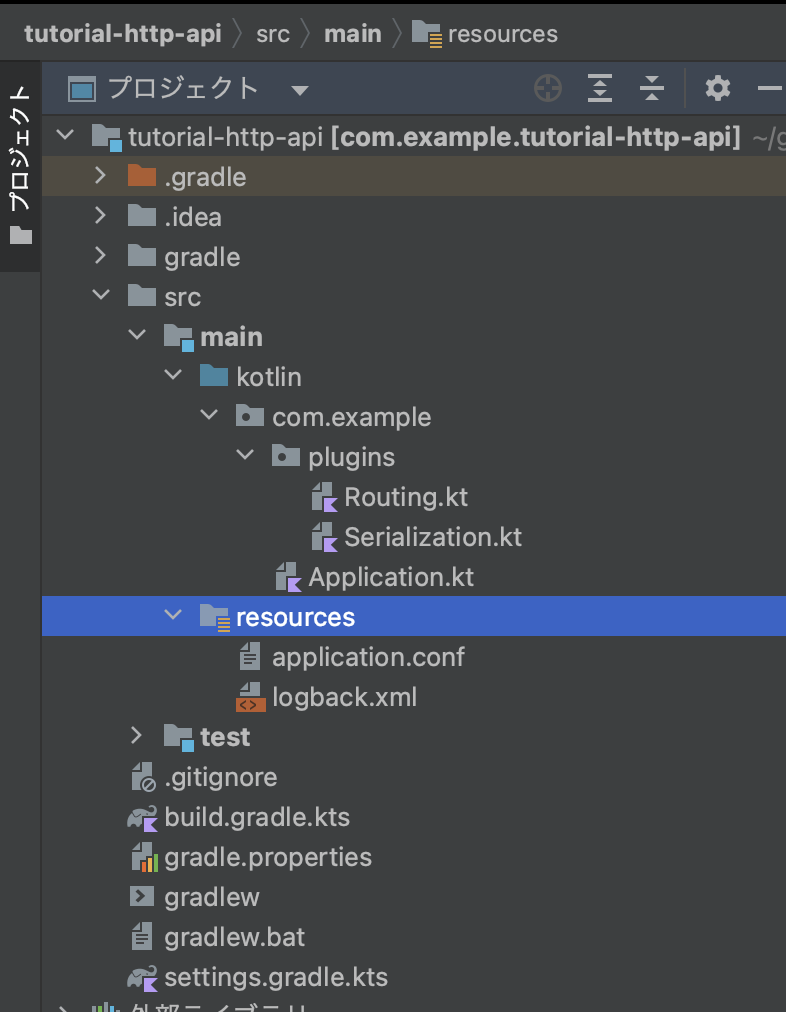
上記でジェネレートしたプロジェクトを開くと以下のようなディレクトリ構成になっています。

各ファイルの解説
- build.gradle.ktsファイル: Ktorサーバーとプラグインに必要な依存関係が含まれている
- main/resourcesフォルダ: 設定ファイルが含まれている
- main/kotlinフォルダ: 生成されたソースコードが格納されている
依存関係
build.gradle.ktsに依存関係が記載されています。
dependencies {
    implementation("io.ktor:ktor-server-content-negotiation-jvm:$ktor_version")
    implementation("io.ktor:ktor-server-core-jvm:$ktor_version")
    implementation("io.ktor:ktor-serialization-kotlinx-json-jvm:$ktor_version")
    implementation("io.ktor:ktor-server-netty-jvm:$ktor_version")
    implementation("ch.qos.logback:logback-classic:$logback_version")
    testImplementation("io.ktor:ktor-server-tests-jvm:$ktor_version")
    testImplementation("org.jetbrains.kotlin:kotlin-test-junit:$kotlin_version")
}
-
ktor-server-core: Ktor のコアコンポーネント -
ktor-server-netty: Nettyエンジン(非同期通信を行うアプリケーションを開発するためのフレームワーク)を追加し、サーバ機能を使用できるようにします -
ktor-server-content-negotiationktor-serialization-kotlinx-json: JSONシリアライザ -
logback-classic: ログフォーマッター -
ktor-server-test-hostkotlin-test-junit: テストツール
設定(application.conf と logback.xml)
application.conf は、HOCONフォーマットの設定ファイルです。
Ktorではこのファイルを使ってリッスンするポートを決定したり、アプリケーションのエントリポイントを定義しています。
logback.xmlはログ構造を定義しています。
顧客ルート(Customer routes)
顧客に関する処理を実装していきます。
まず顧客に関連するデータを定義するモデルを作成する必要があります。
また、顧客を追加、リスト、および削除できるようにするための一連のエンドポイントを作成する必要があります。
顧客モデルを作成する
今回のケースでは、顧客は、ID、姓、名、およびメールアドレスの情報を持っている必要があります。
Kotlinではデータクラスを使用して、これを簡単にモデル化します。
-
modelsという新しいパッケージをcom.exampleの中に作成します。 - modelsパッケージ内に
Customer.ktを作成し、以下のコードを追加します。
package com.example.models

import kotlinx.serialization.Serializable

@Serializable
data class Customer(val id: String, val firstName: String, val lastName: String, val email: String)
※ APIレスポンスをJSONにシリアライズするため、kotlinx.serializationの@Serializableアノテーションを使用しています
顧客ストレージを作成する
実装のアプリケーションではDBを使いますが、このチュートリアルでは、イン・メモリ・ストレージを使用します。
Customer.ktファイルのデータ・クラス宣言のすぐ後に、次の行を追加します。
val customerStorage = mutableListOf<Customer>()
これでCustomerクラスが定義され、顧客オブジェクトのストレージができたので、次はエンドポイントを作成してAPIで公開します。
顧客に関するルーティングを定義する
/customerエンドポイントへのGET、POST、DELETEリクエストに応答するようにします。
-
com.exampleにroutesというパッケージを作成する -
routesに以下のようなCustomerRoutes.ktというファイルを作成する。
package com.example.routes

import io.ktor.server.routing.*

fun Route.customerRouting() {
    route("/customer") {
        get {

        }
        get("{id?}") {

        }
        post {

        }
        delete("{id?}") {

        }
    }
}
顧客一覧
call.respond関数を使ってcustomerStorageリストを返します。
この関数は、KotlinオブジェクトをJSONへシリアライズします。
package com.example.routes

import com.example.models.*
import io.ktor.http.*
import io.ktor.server.application.*
import io.ktor.server.request.*
import io.ktor.server.response.*
import io.ktor.server.routing.*

fun Route.customerRouting() {
    route("/customer") {
        get {
            if (customerStorage.isNotEmpty()) {
                call.respond(customerStorage)
            } else {
                call.respondText("No customers found", status = HttpStatusCode.OK)
            }
        }
    }
}
特定の顧客情報
以下のような実装になります。
{id?}を使うことで、任意のIDに対して検索をかけます。
get("{id?}") {
    val id = call.parameters["id"] ?: return@get call.respondText(
        "Missing id",
        status = HttpStatusCode.BadRequest
    )
    val customer =
        customerStorage.find { it.id == id } ?: return@get call.respondText(
            "No customer with id $id",
            status = HttpStatusCode.NotFound
        )
    call.respond(customer)
}
顧客作成
post {
    val customer = call.receive<Customer>()
    customerStorage.add(customer)
    call.respondText("Customer stored correctly", status = HttpStatusCode.Created)
}
顧客削除
delete("{id?}") {
    val id = call.parameters["id"] ?: return@delete call.respond(HttpStatusCode.BadRequest)
    if (customerStorage.removeIf { it.id == id }) {
        call.respondText("Customer removed correctly", status = HttpStatusCode.Accepted)
    } else {
        call.respondText("Not Found", status = HttpStatusCode.NotFound)
    }
}
顧客に関するルーティングを登録する
plugins/Routing.ktを以下のように修正するとルーティング登録されます。
package com.example.plugins

import com.example.routes.*
import io.ktor.server.application.*
import io.ktor.server.routing.*

fun Application.configureRouting() {
    routing {
        customerRouting()
    }
}
注文ルート(Order routes)
次に注文に関する処理を実装していきます。
まず注文に関連するデータを定義するモデルを作成する必要があります。
また、注文を追加、リスト、および削除できるようにするための一連のエンドポイントを作成する必要があります。
注文モデルを作成する
modelsパッケージにOrder.ktを新規作成します。
package com.example.models

import kotlinx.serialization.Serializable

@Serializable
data class Order(val number: String, val contents: List<OrderItem>)

@Serializable
data class OrderItem(val item: String, val amount: Int, val price: Double)
注文モデルは、顧客モデルより少し複雑で以下の二つのデータクラスからなっていますね。
- 何を何個いくらで買ったかという情報をもつ
OrderItemデータクラス - 注文番号と
OrderItemのリストからなるOrderデータクラス
注文に関するルーティングを定義する
注文の一覧と特定の注文情報
package com.example.routes

import com.example.models.*
import io.ktor.server.application.*
import io.ktor.http.*
import io.ktor.server.response.*
import io.ktor.server.routing.*

fun Route.listOrdersRoute() {
    get("/order") {
        if (orderStorage.isNotEmpty()) {
            call.respond(orderStorage)
        }
    }
}

fun Route.getOrderRoute() {
    get("/order/{id?}") {
        val id = call.parameters["id"] ?: return@get call.respondText("Bad Request", status = HttpStatusCode.BadRequest)
        val order = orderStorage.find { it.number == id } ?: return@get call.respondText(
            "Not Found",
            status = HttpStatusCode.NotFound
        )
        call.respond(order)
    }
}
合計を表示する
fun Route.totalizeOrderRoute() {
    get("/order/{id?}/total") {
        val id = call.parameters["id"] ?: return@get call.respondText("Bad Request", status = HttpStatusCode.BadRequest)
        val order = orderStorage.find { it.number == id } ?: return@get call.respondText(
            "Not Found",
            status = HttpStatusCode.NotFound
        )
        val total = order.contents.sumOf { it.price * it.amount }
        call.respond(total)
    }
}
注文に関するルーティングを登録する
最後に顧客モデルの時と同様にplugins/Routing.ktにルーティングを登録して完了です!
package com.example.plugins

import com.example.routes.*
import io.ktor.server.application.*
import io.ktor.server.routing.*

fun Application.configureRouting() {
    routing {
        customerRouting()
        listOrdersRoute()
        getOrderRoute()
        totalizeOrderRoute()
    }
}
まとめ
今回は、Ktorを用いてAPIサーバを作成しました。
Ktorには、ルーティグやシリアライズといった便利プラグインが多くて開発しやすいですね。
一方で、そういったプラグインの使い方の学習コストも高いと思われるので、よく使うプラグインのまとめなんかもおいおい作っていきたいと思います。

