はじめに
CompositionalLayoutとは2019年にWWDCで発表されたUICollectionViewのレイアウト手法です。個人的にこのレイアウト手法が登場してからすごく楽にUICollectionViewのレイアウトを組めています!!(Webでいうとfloatからflexboxに変わるくらい)
しかし、学習する際に調べたところハンズオン形式で学べる記事というものがなかなか見つからなかったので、今回はCompositionalLayoutを使ってiOSにデフォルトでインストールされているリマインダー風のレイアウトを作っていきたいと思います!!また、初心者さん向けの話し方で説明していますのでご了承ください。
CompositionalLayoutについての詳細はこちらの記事が参考になるかと思います。
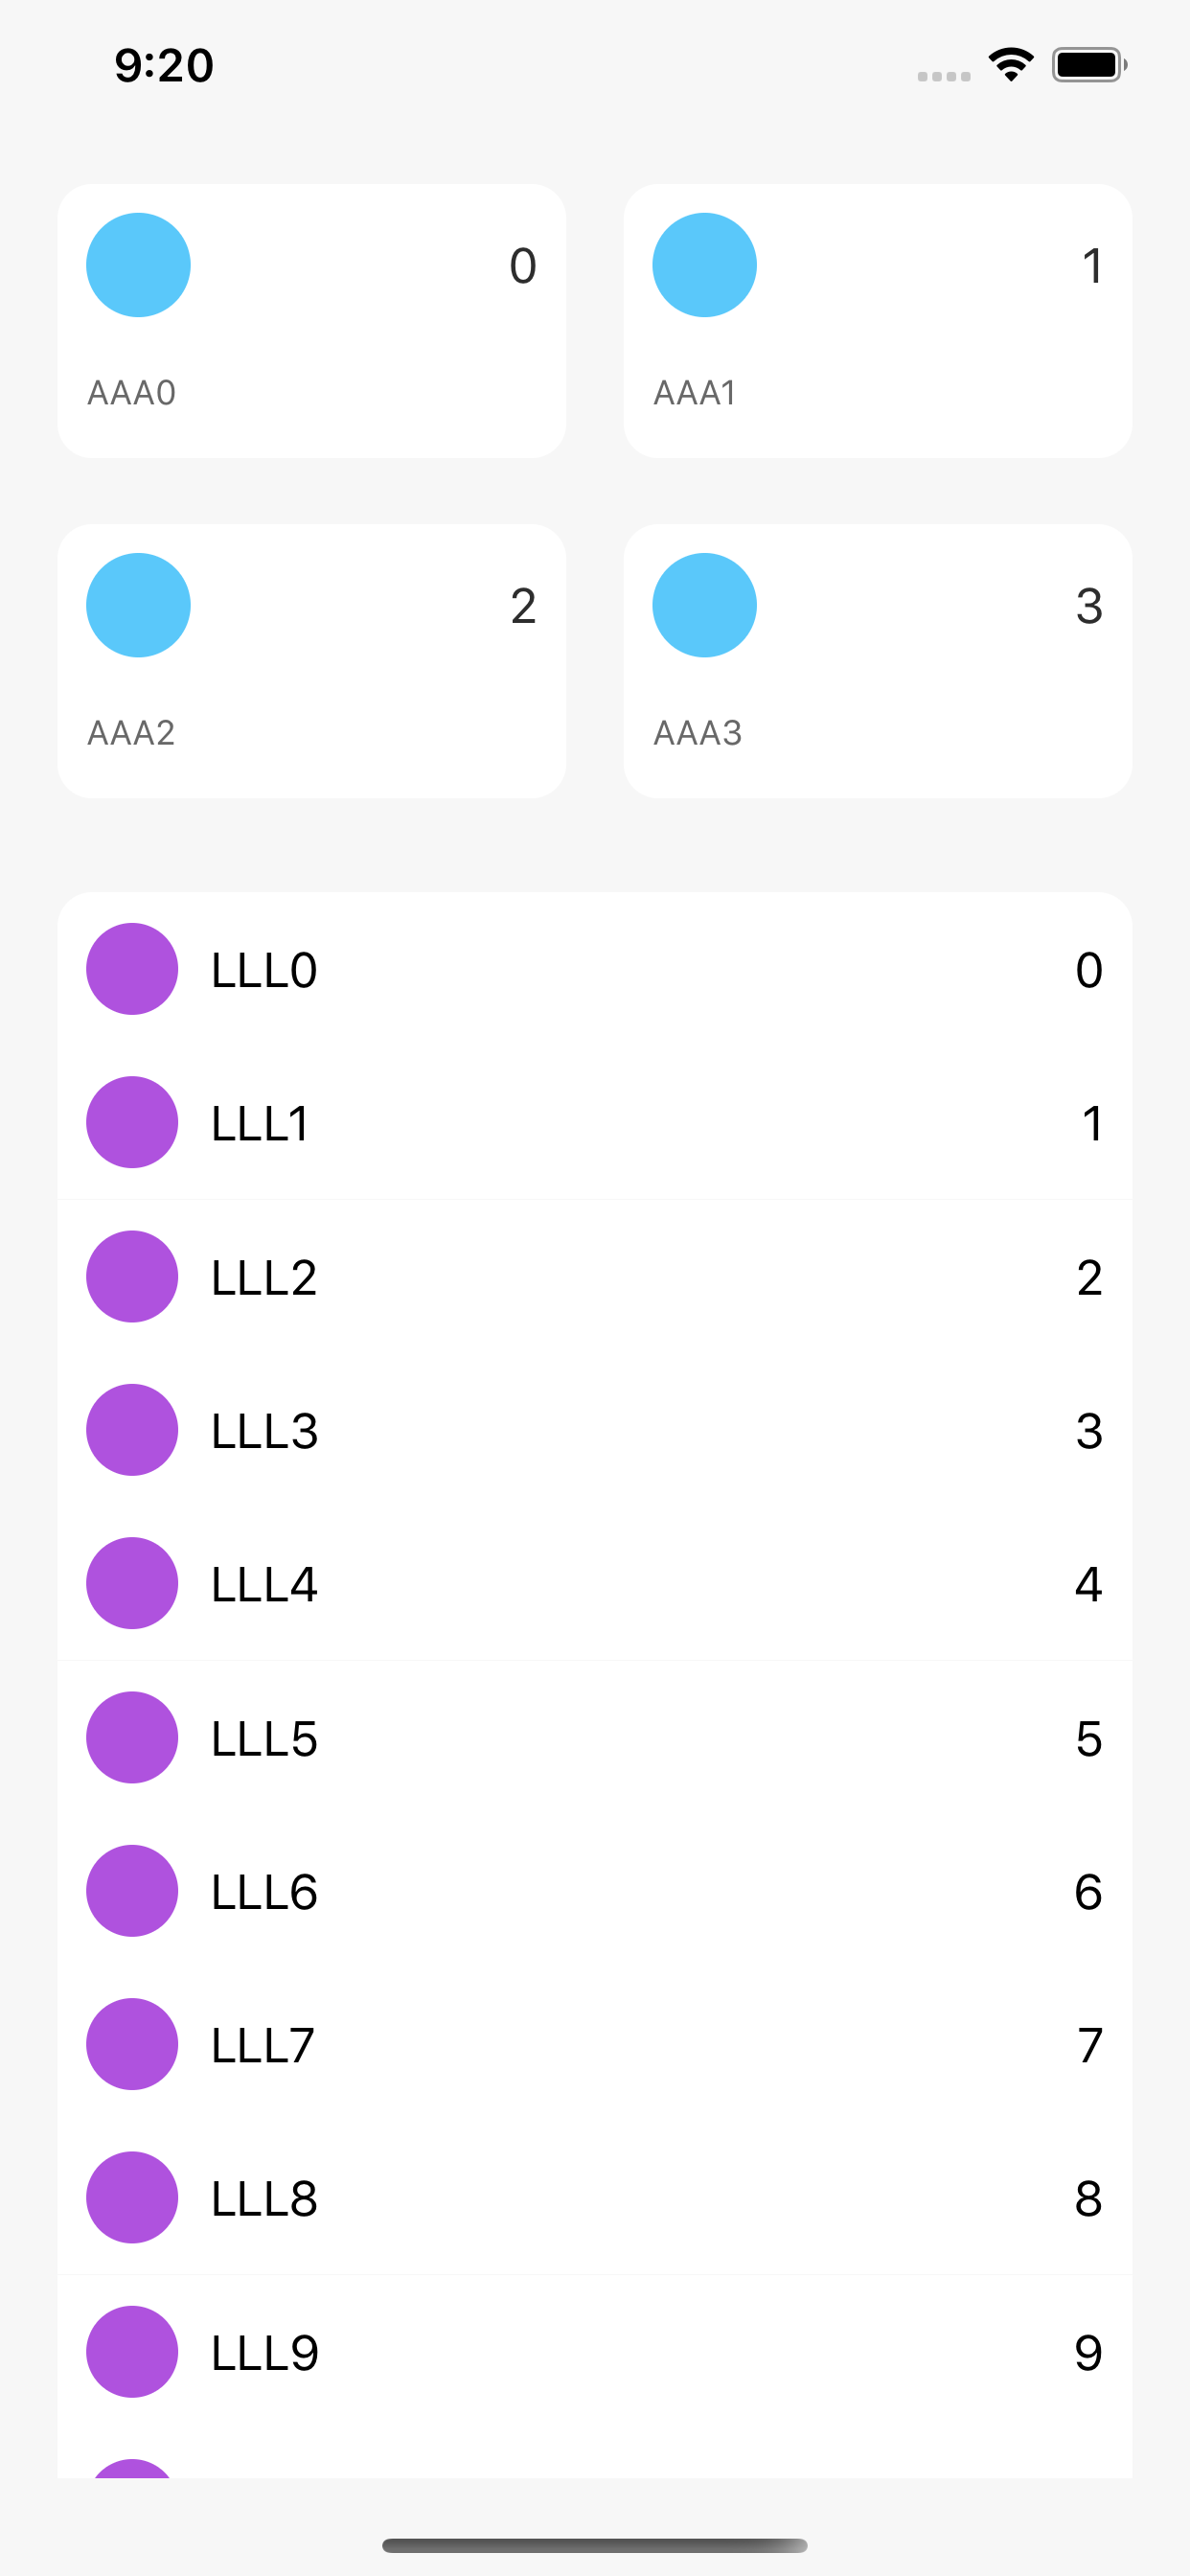
目標物
少し雑ですがこのようなレイアウトを組んでいきたいと思います!!
Main.storyboard
ViewControllerにUICollectionViewを1つ貼るだけなので説明は省きます!
Cellを作る
まず最初にCellを作っていきます!!
also xibにチェックを入れて、StandardListCollectionViewCell.swift
とMyListCollectionViewCell.swiftを作成します。
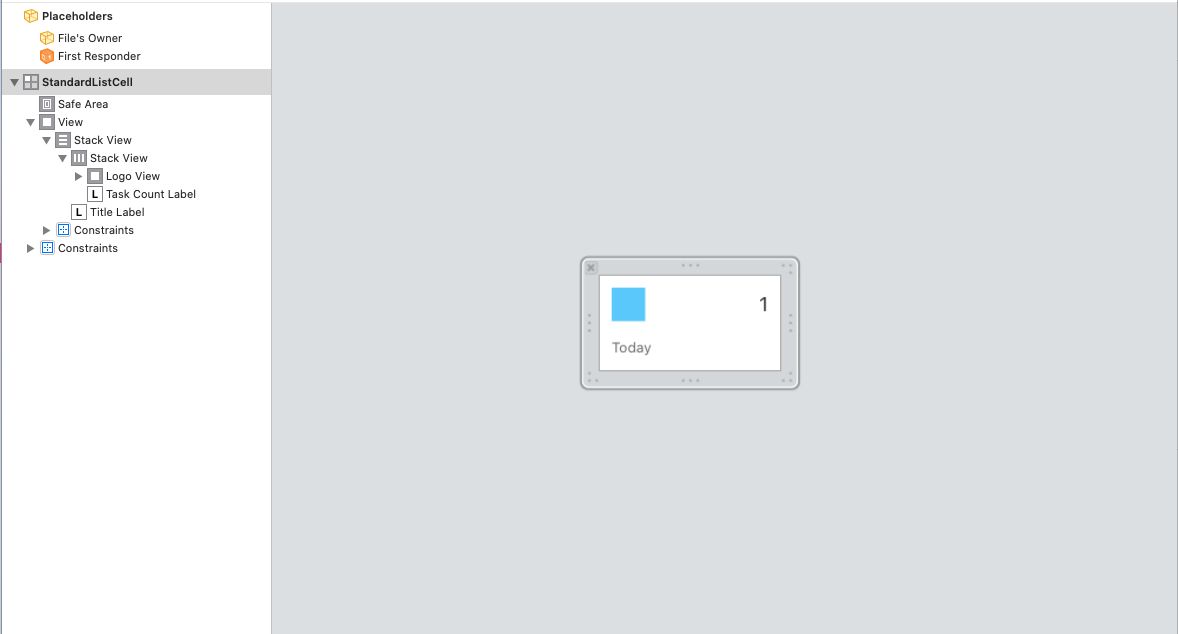
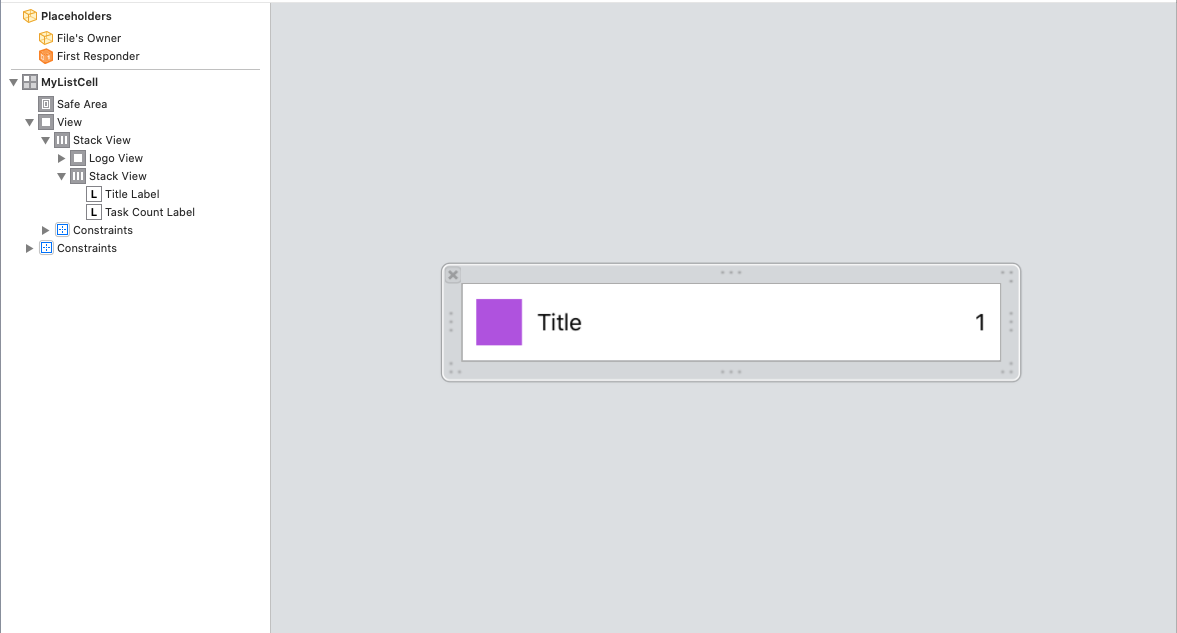
xibのレイアウトはそれぞれこんな感じです!! ↓↓↓↓↓↓↓
それぞれ、"StandardListCell", "MyListCell"でreuseIdentifierを設定してください!!
(AutoLayout等の説明はこの記事の趣旨から外れるので省かせていただきます..)
Cellの実装
まずは、StandardListCollectionViewCellから!!
import UIKit

final class StandardListCollectionViewCell: UICollectionViewCell {
    @IBOutlet private weak var logoView: UIView!
    @IBOutlet private weak var taskCountLabel: UILabel!
    @IBOutlet private weak var titleLabel: UILabel!

    override func awakeFromNib() {
        super.awakeFromNib()
        self.layer.cornerRadius = 12
        self.clipsToBounds = true
        logoView.clipsToBounds = true
    }

    override func layoutIfNeeded() {
        super.layoutIfNeeded()
        logoView.layer.cornerRadius = logoView.bounds.height * 0.5
    }

    func configure(taskCount: Int, title: String) {
        taskCountLabel.text = String(taskCount)
        titleLabel.text = title
    }
}
特に特別な実装はしていないのですが、一点だけlayoutIfNeeded()関数について説明させていただきます。
この関数内のlogoView.layer.cornerRadius = logoView.bounds.height * 0.5この実装は本来、AutoLayoutを使わない実装ではawakeFromNib()関数内に書くと思うのいます。ですが今回の僕の場合はAutoLayoutで割合を計算して制約をつけているので描画処理の順番の関係でawakeFromNib等の関数内に書くとlogoView.bounds.heightで取れるlogoViewの高さがAutoLayout適用前のものになってしまい、本来角に高さの半分の角丸をつけて円を作りたいのに、円の形がいびつ担ってしまう....ぴえん。なんてことになるのでこういった実装をしています。
(上記、「もっといい実装あるよ!!」というような意見があればお聞きしたいです!!)
続いて、MyListCollectionViewCellを実装していきます!!
import UIKit

final class MyListCollectionViewCell: UICollectionViewCell {
    @IBOutlet private weak var logoView: UIView!
    @IBOutlet private weak var taskCountLabel: UILabel!
    @IBOutlet private weak var titleLabel: UILabel!

    override func awakeFromNib() {
        super.awakeFromNib()
        logoView.clipsToBounds = true
    }

    override func layoutIfNeeded() {
        super.layoutIfNeeded()
        logoView.layer.cornerRadius = logoView.bounds.height * 0.5
    }

    func configure(cellType: CellType, taskCount: Int, title: String) {
        taskCountLabel.text = String(taskCount)
        titleLabel.text = title
        switch cellType {
        case .first:
            self.layer.cornerRadius = 12
            self.layer.maskedCorners = [.layerMinXMinYCorner, .layerMaxXMinYCorner]
            self.clipsToBounds = true
        case .normal:
            self.layer.cornerRadius = 0
        case .last:
            self.layer.cornerRadius = 12
            self.layer.maskedCorners = [.layerMinXMaxYCorner, .layerMaxXMaxYCorner]
            self.clipsToBounds = true
        }
    }
}

enum CellType {
    case first, normal, last
}
このコードも特に特別な実装をしている分けでは無いのですが、先ほど説明したlayoutIfNeeded()ともう一点、最初のCellと最後のCellだけ上下それぞれの角を丸めるといった実装をしています。こちらは難しい事は何もしておらず、単にCellを最初に構成するメソッドconfigure()にCollectionViewのデータソースからそのCellが何番目のCellなのか(最初なのか、間にあるのか、最後にあるのか)をCellTypeというenumを作って渡しています!!
CollectionViewのデータソースを実装
今回はsectionが2つある影響もありViewControllerが若干見にくくなってしまったのでextensionではなくUICollectionViewDataSourceのサブクラスを作っていきたいと思います!!
import UIKit

final class CollectionViewDataSource: NSObject, UICollectionViewDataSource {
    func numberOfSections(in collectionView: UICollectionView) -> Int {
        return 2
    }

    func collectionView(_ collectionView: UICollectionView, numberOfItemsInSection section: Int) -> Int {
        switch section {
        case 0:
            return 4
        case 1:
            return 12
        default:
            return 0
        }
    }

    func collectionView(_ collectionView: UICollectionView, cellForItemAt indexPath: IndexPath) -> UICollectionViewCell {
        switch indexPath.section {
        case 0:
            guard let standardListCell = collectionView.dequeueReusableCell(withReuseIdentifier: "StandardListCell", for: indexPath) as? StandardListCollectionViewCell else {
                return UICollectionViewCell()
            }
            standardListCell.layoutIfNeeded()
            standardListCell.configure(taskCount: indexPath.row, title: "AAA\(indexPath.row)")
            return standardListCell
        case 1:
            guard let myListCell = collectionView.dequeueReusableCell(withReuseIdentifier: "MyListCell", for: indexPath) as? MyListCollectionViewCell else {
                return UICollectionViewCell()
            }
            var cellType: CellType = .normal
            if indexPath.row == 0 {
                cellType = .first
            } else if indexPath.row == 11 {
                cellType = .last
            }
            myListCell.layoutIfNeeded()
            myListCell.configure(cellType: cellType, taskCount: indexPath.row, title: "LLL\(indexPath.row)")
            return myListCell
        default:
            break
        }
        return UICollectionViewCell()
    }
}
本題のCompositionalLayoutまでの道のりが長くて申し訳ないです..()
こちらのコードは上から順に関数ごとの説明をしていきたいと思います。
numberOfSections
こちらは1つのCollectionViewに持たせるsectionの数を返す関数なので今回は2を返しています。
collectionView(_ collectionView: UICollectionView, numberOfItemsInSection section: Int)
こちらの関数はsectionごとに(sectionが一つの場合は分岐は必要ない)必要なcellの数を返しています。今回は上部のStandardListCollectionViewCell用に4個、MyListCollectionViewCell用に12個返していますが、本来はアプリのデータの数(lists.count的な)を返します。
collectionView(_ collectionView: UICollectionView, cellForItemAt indexPath: IndexPath) -> UICollectionViewCell
最後にこの関数でsectionごとに、それぞれStandardListCollectionViewCellとMyListCollectionViewCellを返します。この関数内で注目して欲しいのがstandardListCell.layoutIfNeeded()とmyListCell.layoutIfNeeded()です。ここで何をしているかというと先ほど説明したそれぞれのCellのlogoViewに正しい角丸をつける関数を呼び出しているだけなのですが、初心者の勘違いポイントとしてawakeFromNibや、`layoutSubViews'のように勝手に呼ばれると考えてしまうことがあると思うので、要注意です!!
ようやくLayoutを組む
ようやく本題のCompositionalLayoutを使ってレイアウトを組んでいきたいと思います!!
ViewController本体のコード量が非常に少なくなったのでViewControllerのコードもまとめて載せていきます!!
class ViewController: UIViewController {

    @IBOutlet private weak var collectionView: UICollectionView!
    private let dataSource: CollectionViewDataSource = .init()

    override func viewDidLoad() {
        super.viewDidLoad()

        collectionView.dataSource = dataSource
        collectionView.contentInset = UIEdgeInsets(top: 10, left: 0, bottom: 0, right: 0)
        collectionView.collectionViewLayout = createLayout()
        collectionView.register(UINib(nibName: "StandardListCollectionViewCell", bundle: nil), forCellWithReuseIdentifier: "StandardListCell")
        collectionView.register(UINib(nibName: "MyListCollectionViewCell", bundle: nil), forCellWithReuseIdentifier: "MyListCell")
    }
}

extension ViewController {
    private func createLayout() -> UICollectionViewLayout {
        let layout = UICollectionViewCompositionalLayout {(
            sectionIndex: Int,
            layoutEnvironment: NSCollectionLayoutEnvironment) -> NSCollectionLayoutSection? in
            if sectionIndex == 0 {
                return self.createStanadardListLayout()
            } else if sectionIndex == 1 {
                return self.createMyListLayout()
            } else {
                return nil
            }
        }
        return layout
    }

    private func createStanadardListLayout() -> NSCollectionLayoutSection {
        let itemSize = NSCollectionLayoutSize(widthDimension: .fractionalWidth(0.5), heightDimension: .fractionalWidth(0.28))
        let item = NSCollectionLayoutItem(layoutSize: itemSize)
        item.contentInsets = NSDirectionalEdgeInsets(top: 0, leading: 10, bottom: 15, trailing: 10)
        let groupSize = NSCollectionLayoutSize(widthDimension: .fractionalWidth(1), heightDimension: .fractionalWidth(0.3))
        let group = NSCollectionLayoutGroup.horizontal(layoutSize: groupSize, subitems: [item])
        let section = NSCollectionLayoutSection(group: group)
        section.contentInsets = NSDirectionalEdgeInsets(top: 10, leading: 10, bottom: 0, trailing: 10)
        return section
    }

    private func createMyListLayout() -> NSCollectionLayoutSection {
        let itemSize = NSCollectionLayoutSize(widthDimension: .fractionalWidth(1), heightDimension: .fractionalWidth(1 / 7))
        let item = NSCollectionLayoutItem(layoutSize: itemSize)
        let groupSize = itemSize
        let group = NSCollectionLayoutGroup.horizontal(layoutSize: groupSize, subitems: [item])
        let section = NSCollectionLayoutSection(group: group)
        section.contentInsets = NSDirectionalEdgeInsets(top: 10, leading: 20, bottom: 0, trailing: 20)
        return section
    }
}
まずはViewController本体のコードを手短に説明します。
private let dataSource: CollectionViewDataSource = .init()
collectionView.dataSource = dataSource
普段extensionのみで実装している方もいらっしゃるかと思いますので一応説明しておきます。先ほど実装したCollectionViewDataSourceを初期化し、collectionView.dataSourceに代入しています。
collectionView.register(UINib(nibName: "StandardListCollectionViewCell", bundle: nil), forCellWithReuseIdentifier: "StandardListCell")
collectionView.register(UINib(nibName: "MyListCollectionViewCell", bundle: nil), forCellWithReuseIdentifier: "MyListCell")
こちらのコードはcollectionViewにcellを登録しているコードです!!ViewController内でCollectionViewに直接Cellを貼り付けた場合は必要ないですが、カスタムでxibファイルを使って実装した場合は必要になってきます。
CompositionalLayoutの実装について
僕はCompositionalLayoutにかかわらずUIStackViewを使ってレイアウトを組むときにも1度コンポーネント設計のようなことをしてから実装しています。参考になるかはわかりませんが簡単な図を載せておきます。
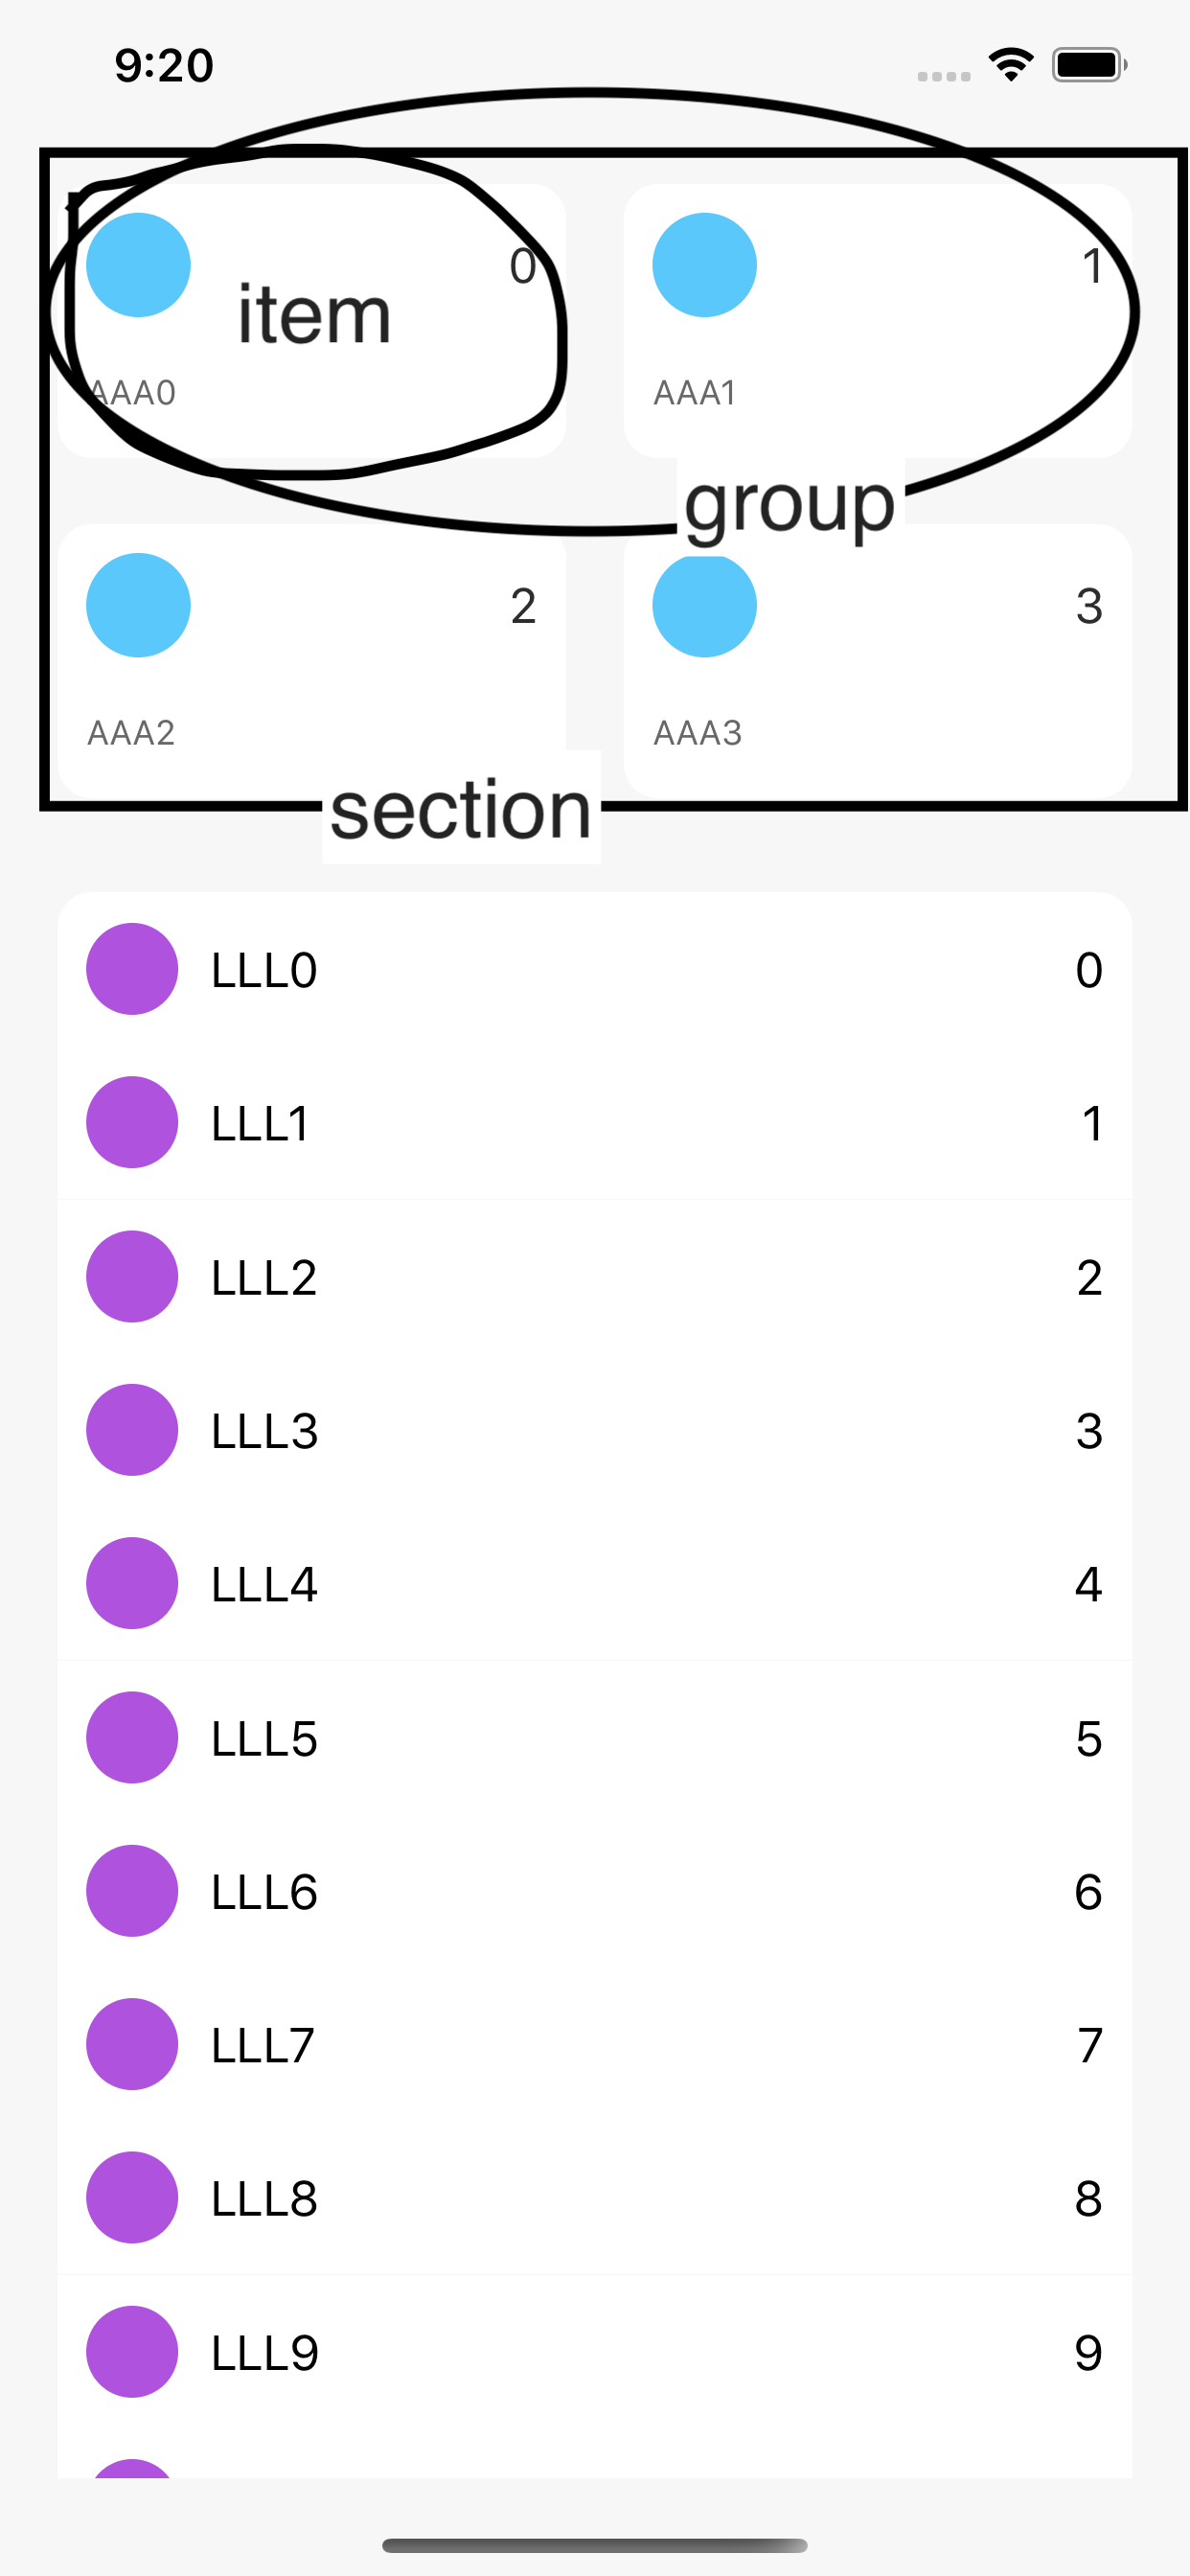
CompositionalLayoutは上記の図のように、item, group, section3つの単位を組み立てていきます。感覚でいうとStackViewに似たところを感じます。それではコードの説明をしていきます!!
private func createLayout() -> UICollectionViewLayout {
    let layout = UICollectionViewCompositionalLayout {(
        sectionIndex: Int,
        layoutEnvironment: NSCollectionLayoutEnvironment) -> NSCollectionLayoutSection? in
        if sectionIndex == 0 {
            return self.createStanadardListLayout()
        } else if sectionIndex == 1 {
            return self.createMyListLayout()
        } else {
            return nil
        }
    }
    return layout
}
こちらのコードはsectionの数だけ呼ばれるクロージャの中に、sectionIndexに応じてそれぞれcreateStandardListLayout(), createMyListLayout()という風に分けてUICollectionViewCompositionalLayoutを初期化し、返すというような実装をしています。
private func createStanadardListLayout() -> NSCollectionLayoutSection {
    let itemSize = NSCollectionLayoutSize(widthDimension: .fractionalWidth(0.5), heightDimension: .fractionalWidth(0.28))
    let item = NSCollectionLayoutItem(layoutSize: itemSize)
    item.contentInsets = NSDirectionalEdgeInsets(top: 0, leading: 10, bottom: 15, trailing: 10)
    let groupSize = NSCollectionLayoutSize(widthDimension: .fractionalWidth(1), heightDimension: .fractionalWidth(0.3))
    let group = NSCollectionLayoutGroup.horizontal(layoutSize: groupSize, subitems: [item])
    let section = NSCollectionLayoutSection(group: group)
    section.contentInsets = NSDirectionalEdgeInsets(top: 10, leading: 10, bottom: 0, trailing: 10)
    return section
}
順を追って説明していくと、まず一番小さい単位であるitemのサイズを初期化します。詳細にはCollectionViewの横幅の半分(0.5)のwidthとCollectionViewの横幅*0.28のheigthを返すというようなことをしています。
itemSizeを基に、itemを初期化し、itemにcontentInset(内側の余白)を設定していきます。(webでいうとpaddingのようなもの)
次にその親となるgroupのサイズを初期化していくのですが、今回の場合だと横に並んだ2つのcellを1つのグループとして扱いたいので、横幅は先ほど初期化したitemの2倍の1、高さはitemと同じ0.28に設定し、horizontalGroupを初期化します。
最後にgroupを使用してsectionを初期化して終わりです!!!!
ここまでの流れがCompositionalLayoutの基本的な実装フローになってきます。もう片方のcreateMyListsLayout()も結果的には同じことをしているので説明は省かせていただきます。
まとめ
いかがでしたでしょうか?
今回は「CompositionalLayoutでリマインダー風のレイアウトを実装する」というタイトルではありましたが、viewの描画順やdataSourceクラスの切り分け、複数sectionを使ったCollectionViewの実装、カスタムCellの実装など、色々な概念の説明をしてきました。
この記事の内容に疑問、間違い等ございましたらコメントいただけると幸いです!!
(Qiita初投稿なのでお手柔らかにお願いします!!)
tips的な
iOS12でもCompositionalLayoutが使えるライブラリがあるらしい?
こちら