ざっくり
このサイトのvideoを参考に作りました。 https://developer.apple.com/tech-talks/videos/
iOS7で新しく追加されたMotionとUIViewControllerとTextkitについて説明。特にcustom transitionについて詳しく説明していた。
Motion
Motion Effects
iOS7ではデバイスの合わせて画像を動かすことで奥行きを作ってよりリアルな体験を提供している。
UIMotionEffectは、abstract classで、簡単にsubclassが作成できる。加速度センサーの情報を受け取っており、UIInterpolatingMotionEffectで使われている。
使い方の例はこちら。
UIInterpolatingMotionEffect *xAxis;

xAxis = [[UIInterpolatingMotionEffect alloc] initWithKeyPath:@"center.x"           type:UIInterpolatingMotionEffectTypeTiltAlongHorizontalAxis];

xAxis.minimumRelativeValue = @-40;
xAxis.maximumRelativeValue = @40;

UIInterpolatingMotionEffect *yAxis;

yAxis = [[UIInterpolatingMotionEffect alloc] initWithKeyPath:@"center.y"           type:UIInterpolatingMotionEffectTypeTiltAlongVerticalAxis];

yAxis.minimumRelativeValue = @-40;
yAxis.maximumRelativeValue = @40;

UIMotionEffectGroup *group = [[UIMotionEffectGroup alloc] init];
group.motionEffects = @[xAxis, yAxis];

[view addMotionEffect:group];
Dynamics
よりリアルさを追求できる、物理エンジンで、衝突やバネや重力を実装できる。強調させたいときに使えるテク。
ロック画面からカメラを出すときなどに使われている。
Custom Transitions
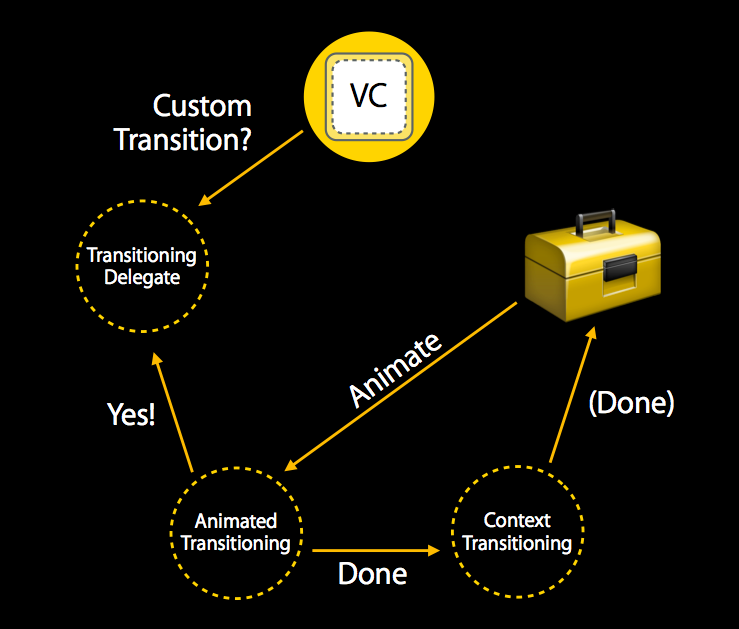
custom transitionsは、protocolによって定義されたオブジェクトで、sandboxの中で実行される。完了した時にnotificationを送らなければいけない。
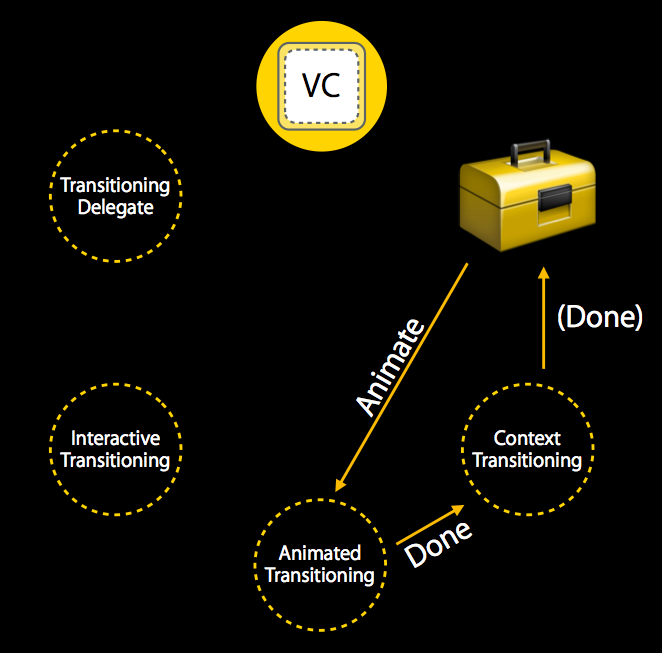
view controllerがどのように変化したかtransitioning delegateに聞く。変化のタイミングをコントロールできるオブジェクトを提供している。
Animated Transitioning Objectは、transition中に定義されていて、変化のアニメーションを実行している。animationが完全に終わったときに知らせをする。
Transition Contextは、system-providedなobjectでtransitionのメタデータを提供していて、animationが完全に終わったことを示すために使われる。
interactive transition
animationの前にinteractionを起こしたいときや、Transition delegateでメソッドを定義したいときは、interactive transitionを利用する。
UIPercentDrivenInteractiveTransitionは、cancelとupdateとfinishをanimated tansitioningに伝えることができる。またUIViewのanimationと一緒に使用することができる。
Custom Transitionの使用例
http://www.doubleencore.com/2013/09/ios-7-custom-transitions/
UIViewController
topbar
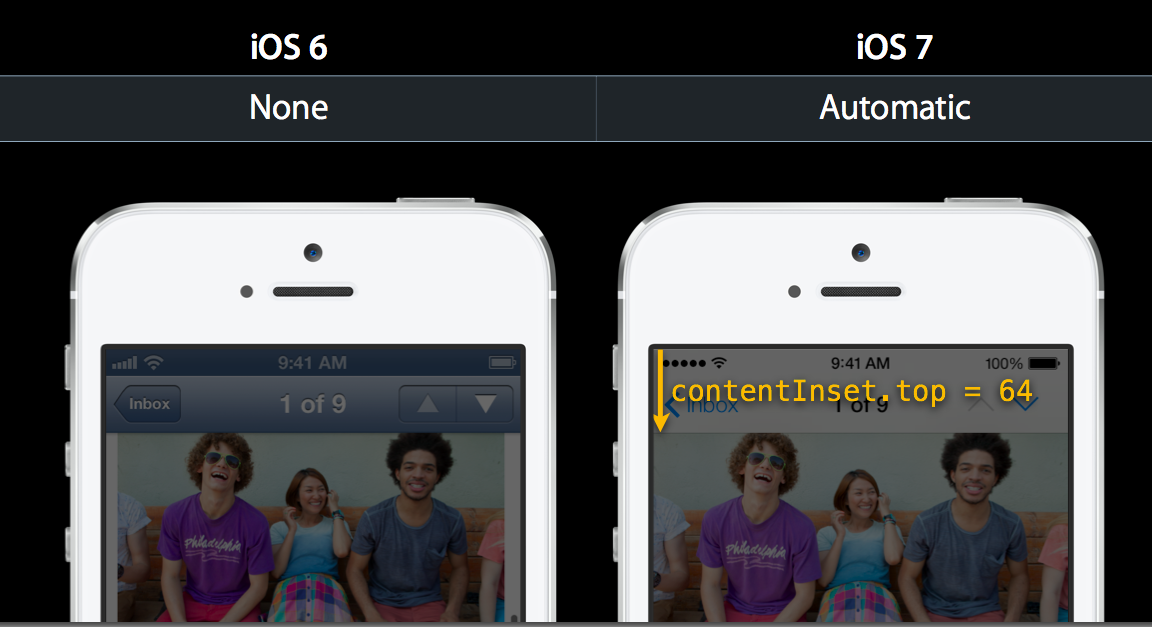
UIViewControllerの大きさは、iOS6ではnavigation barやstatus barの下からだったが、iOS7ではbarの下にUIViewControllerがある。
scrollViewの場合は、contentInset.topがデフォルトで64になる
statusbar
status barのカスタマイズもview controllerごとに可能になり、styleやanimationを追加することができる。animationのtimingもカスタムすることができる
@property BOOL shouldBeHidingStatusBar;

- (BOOL)prefersStatusBarHidden {
    return self.shouldBeHidingStatusBar;
}

- (IBAction)hideStatusBar {
    self.shouldBeHidingStatusBar = YES;
    [UIView animateWithDuration:0.5 animations:^{
        [self setNeedsStatusBarAppearanceUpdate];
    }];
}

- (UIStatusBarAnimation)preferredStatusBarUpdateAnimation {
    return UIStatusBarAnimationSlide;
}
Textkit
文字の大きさをシステムで指定した大きさに動的に変更することができる。
UIContentSizeCategoryDidChangeNotificationというnotificationを受け取ることで、customのフォントでも大きさを変更させることができる。
- (void)dynamicTypeChanged:(NSNotification *)note {
    UIApplication *app = [UIApplication sharedApplication];
    NSString *category = app.preferredContentSizeCategory;

    if ([category isEqual:UIContentSizeCategorySmall]) {
        ...
    } else if ([category isEqual:UIContentSizeCategoryMedium]) {
        ...
    } else if ([category isEqual:UIContentSizeCategoryLarge]) {
        ...
    }
}
備考
wantedlyでは、iOSアプリのテストと、iOSエンジニアとの交流を目的に募集出してみます。気軽に遊びにきてください!
https://www.wantedly.com/projects/5444


