初めまして、れいです。
Flutter Advent Calendar#2 の12日目を書いていこうと思います。
今回はFlutter+GCPを使用したストリーミング配信サービスを作ってみます。
※思ったよりボリュームが大きくなってしまい、時間ギリギリになってしまったので後半だいぶ雑です・・・!
長い+見にくい記事ですが最後まで見ていただけたら幸いです・・・!
GCP上にストリーミング配信サーバーを立ち上げる
GCP上にUbuntuの仮想マシンを構築、nginxを使用して動画配信サーバを作成します。
ストリーミング技術は以下を使用します。
配信側→RTMP
視聴側→HLS
GCPで仮想マシン(VM)を作成
Google Cloud Platform の無料枠を使っています。
https://cloud.google.com/free/
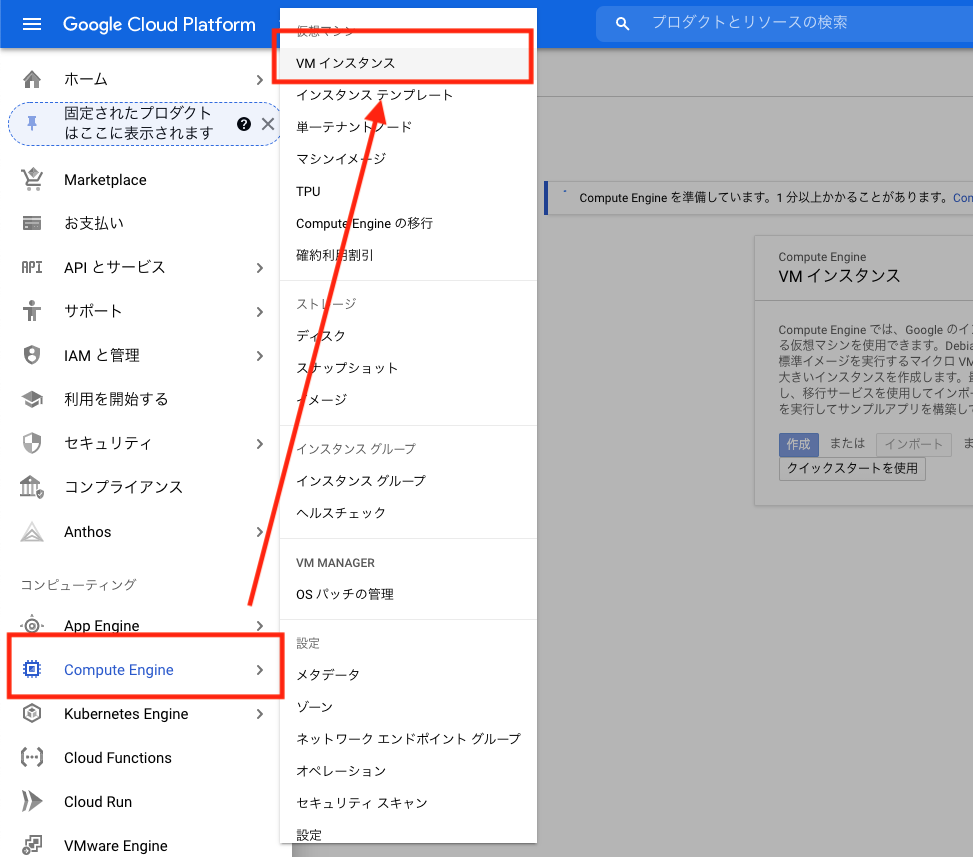
まずはComputeEngineでインスタンスを作成します。

今回は以下のようなスペックで作成しました。大したことはしないので低めの設定で作っています。
- Ubuntu 18.04.1 LTS x86_64
- e2-medium(2vCPU 4GB)
- asia-northeast-1
- ディスク10GB
- http,httpsトラフィックを許可する
作成した仮想マシンにSSH接続
次に、作成したインスタンスにSSHで接続します。
gcloudコマンドツールを使用して接続します。
インストール
https://cloud.google.com/sdk/gcloud
gcloudコマンドでログイン、接続していきます。
以下をターミナルに打ち込んでいきます。
# ログイン
gcloud auth login
# 接続
gcloud compute ssh --project=PROJECT_ID --zone=ZONE VM_NAME
PROJECT_ID: インスタンスが含まれているプロジェクトのID
ZONE: インスタンスが存在するゾーンの名前(今回はasia-northeast-1)
VM_NAME: インスタンスの名前
接続するとパスワードを聞かれるので、入力してEnterで接続できます。
生成されたsshKeyは以下の箇所に保存されるようです。
/Users/user/.ssh/google_compute_engine
仮想マシンにnginxをインストールする
接続できたら、ComputeEngineにnginxとrtmpのモジュールをインストールしていきます。
インストールするもの
nginx本体(2020/12/11安定版1.18.0)http://nginx.org/en/download.html
rtmpモジュールhttps://github.com/arut/nginx-rtmp-module
# 必要なものインストール
$sudo apt-get install build-essential libpcre3 libpcre3-dev libssl-dev unzip zlib1g-dev

# ninxのソースコードダウンロード
$wget http://nginx.org/download/nginx-1.18.0.tar.gz

# rtmpモジュールをダウンロード
$wget https://github.com/arut/nginx-rtmp-module/archive/master.zip

# それぞれ解凍
$tar xvzf nginx-1.18.0.tar.gz
$unzip master.zip

# 解凍できたかlsで確認
$ls
master.zip  nginx-1.18.0  nginx-1.18.0.tar.gz  nginx-rtmp-module-master

# nginxソースコードディレクトリでビルド
$cd nginx-1.18.0/
$./configure --with-http_ssl_module --add-module=../nginx-rtmp-module-master
$make
$sudo make install
./configureの時にエラーがでた場合
$./configure --with-http_ssl_module --add-module=../nginx-rtmp-module-master

checking for OS
 + Linux 5.4.0-1029-gcp x86_64
checking for C compiler ... found
コンパイラが無いらしいのでinstall
$sudo apt-get install gcc
次は別のエラー・・・
./configure: error: the HTTP rewrite module requires the PCRE library.
You can either disable the module by using --without-http_rewrite_module
option, or install the PCRE library into the system, or build the PCRE library
statically from the source with nginx by using --with-pcre=<path> option.
別の足りないモジュールがあるようなのでインストール
$sudo apt-get install libpcre3-dev
$sudo apt-get install libssl-dev
もう一度./configure --with-http_ssl_module --add-module=../nginx-rtmp-module-masterしたら成功しました。
以下のような表示が出れば成功です。
nginxのインストール先などが表示されています。
Configuration summary
  + using system PCRE library
  + using system OpenSSL library
  + using system zlib library

  nginx path prefix: "/usr/local/nginx"
  nginx binary file: "/usr/local/nginx/sbin/nginx"
  nginx modules path: "/usr/local/nginx/modules"
  nginx configuration prefix: "/usr/local/nginx/conf"
  nginx configuration file: "/usr/local/nginx/conf/nginx.conf"
  nginx pid file: "/usr/local/nginx/logs/nginx.pid"
  nginx error log file: "/usr/local/nginx/logs/error.log"
  nginx http access log file: "/usr/local/nginx/logs/access.log"
  nginx http client request body temporary files: "client_body_temp"
  nginx http proxy temporary files: "proxy_temp"
  nginx http fastcgi temporary files: "fastcgi_temp"
  nginx http uwsgi temporary files: "uwsgi_temp"
  nginx http scgi temporary files: "scgi_temp"
nginxの起動と確認
xginxの起動を確認していきます。
# nginx起動
$sudo /usr/local/nginx/sbin/nginx

# nginxが起動しているか確認
$ps aux | grep nginx
root     14331  0.0  0.0  32876   820 ?        Ss   13:02   0:00 nginx: master process nginx
nginx    14332  0.0  0.0  37700  4388 ?        S    13:02   0:00 nginx: worker process
ticktackclock    15004  0.0  0.0  14856  1096 pts/0    R+   14:53   0:00 grep --color=auto nginx
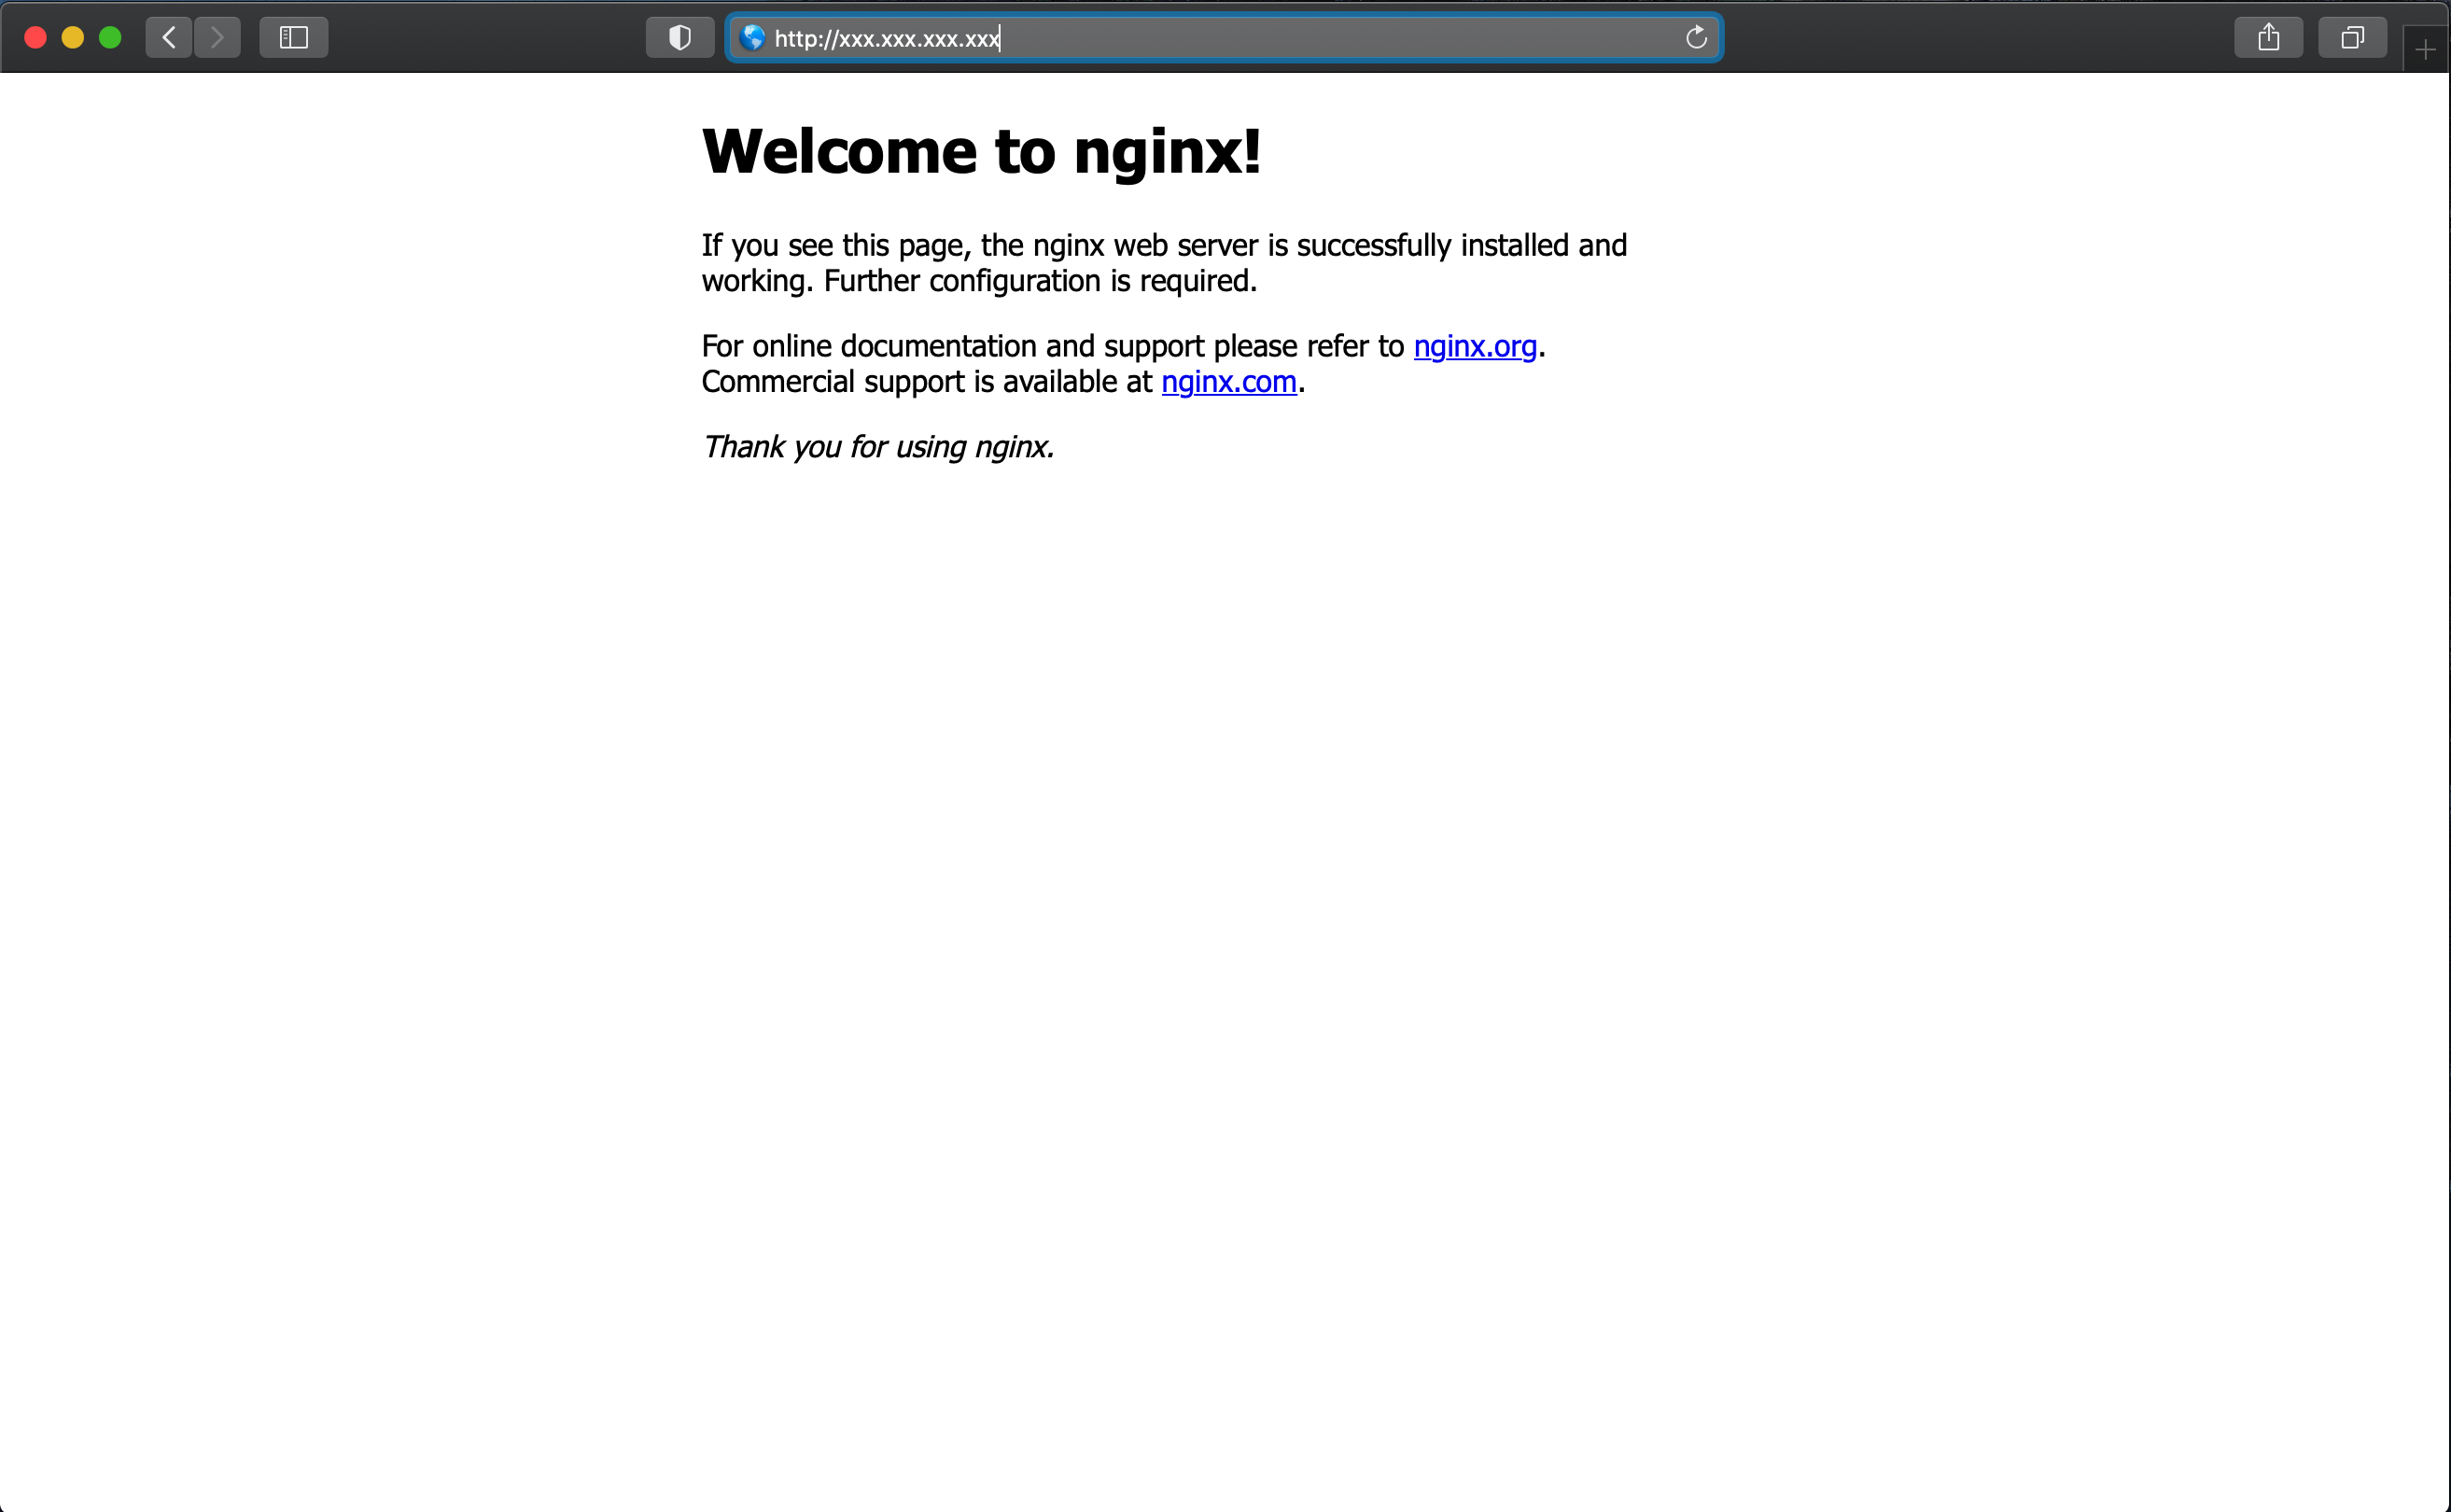
ブラウザからも確認してみます。
http://xxx.xxx.xxx.xxx
xxx.xxx.xxx.xxx にはCumputeEngineの外部IPが入ります。


GCPにrtmp通信用のport:1935を開通する
rtmpはTCP上で動き、ポート番号は1935です。
GCPのデフォルトではこのポート(1935)はファイアウォールの設定をしておらず、rtmp通信しても弾かれてしまうので、ポートを開けます。
ファイアウォールルールの設定
GCPのサイドメニューから以下のように入っていってください。
ネットワーキング>VPCネットワーク>ファイアウォールルール>ファイアウォールルールを作成
以下のように設定します。

作成したルールをVMインスタンスに適用します。
VMインスタンスのネットワークタグに上記で作成したルールのタグを設定します(今回の場合はallow1935-server)

nginxにRTMPとHLSの設定をする
$sudo vim /usr/local/nginx/conf/nginx.conf
# user  nobody;
worker_processes  1;

rtmp_auto_push on;

rtmp {
  server {
    listen 1935;
    chunk_size 4096;

    application live {
            live on;

            # HLSの記述欄
            hls on;
            # hlsデータをどこに置くか
            hls_path /usr/local/nginx/html/live/hls;

            #hlsの分割単位
            hls_fragment 1s;

            # FLVの記述欄 録画用の設定です。
            record all;
            record_path /usr/local/nginx/html/record/hls;
            record_unique on;
    }
  }
}

events {
    worker_connections  1024;
}

http {
    server {
        listen  80;
        include mime.types;
        default_type    application/octet-stream;
        server_name localhost;
        add_header  Access-Control-Allow-Origin *;

        # hls 視聴用の設定
        location /hls {
            types {
                 application/vnd.apple.mpegurl m3u8;
            }
            root /usr/local/nginx/html/;
        }
    }
}
上記で指定したディレクトリを作成しておきます。
$sudo mkdir -p /usr/local/nginx/html/record/hls
$sudo mkdir -p /usr/local/nginx/html/live/hls
設定ができたら、nginxを再起動します。
$sudo /usr/local/nginx/sbin/nginx -s stop
$sudo /usr/local/nginx/sbin/nginx
これでGCPでの設定は完了しました!!!
あとはFlutterで配信、視聴できるアプリを作成していきます。
RTMPでの配信、HLS視聴ができるFlutterアプリを作る
以下のライブラリを使用して実装していきます。
- RTMP配信用
- HLS視聴用
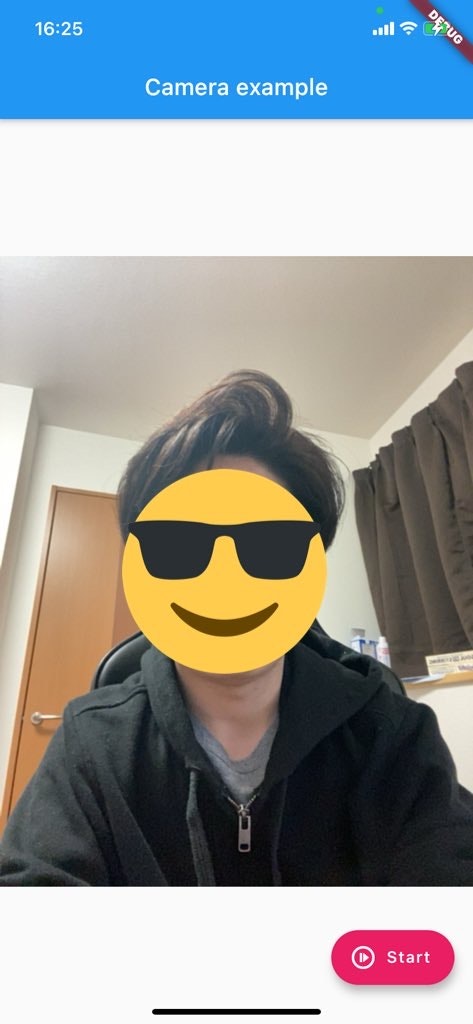
RTMP配信画面
まずは配信画面を作成していきます。
pubspec.yamlに以下の記述を追加してライブラリを追加します。
dependencies:
  flutter:
    sdk: flutter

  camera_with_rtmp: ^0.3.2
※注意点として、このライブラリはAndroidとiOS用で、Webには対応していないようなのでご注意ください。
端末機能へのアクセス許可
次に、端末にカメラ、マイクのアクセスを許可するための記述をしていきます。
iOS
まずはiOSから設定していきます。
ios/Runner/Info.plist に以下の記述を追加します。
<key>NSCameraUsageDescription</key>
<string>Can I use the camera please?</string>
<key>NSMicrophoneUsageDescription</key>
<string>Can I use the mic please?</string>
また、今回はGCPをSSL化していないのでhttp通信となります!以下の記述もしておきましょう
<key>NSAppTransportSecurity</key>
<dict>
  <key>NSAllowsArbitraryLoads</key>
  <true/>
</dict>
※こちらはアプリをリリースする時にはSSL化して上記の記述を消すようにしてください!
Android
次はAndroidです。
AndroidSDKの最小バージョンを21以上に変更してください。
minSdkVersion 21
packagingOptions {
    exclude 'project.clj'
}
画面を作成
それでは下準備が整ったので画面を作ります。
以下が配信用画面の全体コードです。
import 'package:camera_with_rtmp/camera.dart';
import 'package:flutter/material.dart';

List<CameraDescription> cameras;

Future<void> main() async {
  WidgetsFlutterBinding.ensureInitialized();
  cameras = await availableCameras();
  runApp(MyApp());
}

class MyApp extends StatefulWidget {
  @override
  _MyAppState createState() => _MyAppState();
}

class _MyAppState extends State<MyApp> {

  @override
  void initState() {
    super.initState();
  }

  @override
  Widget build(BuildContext context) {
    return MaterialApp(
      title: "mypage",
      home: Home(),
    );
  }
}

class Home extends StatefulWidget {
  @override
  _HomeState createState() => _HomeState();
}

class _HomeState extends State<Home> with WidgetsBindingObserver {
  CameraController controller;
  String url;
  TextEditingController _textFieldController = TextEditingController(
      text: "rtmp://xxx.xxx.xxx.xxx/live/ios");

  @override
  void initState() {
    super.initState();
    WidgetsFlutterBinding.ensureInitialized();
    controller = CameraController(
      cameras[1],
      ResolutionPreset.medium,
      enableAudio: true,
      androidUseOpenGL: true,
    );

    controller.addListener(() {
      if (mounted) setState(() {});
    });

    controller.initialize().then((_) {
      if (!mounted) {
        return;
      }
      setState(() {});
    });

    WidgetsBinding.instance.addObserver(this);
  }

  @override
  void dispose() {
    controller?.dispose();
    super.dispose();
  }

  @override
  Widget build(BuildContext context) {
    if (!controller.value.isInitialized) {
      return Container();
    }
    return MaterialApp(
      title: "",
      home: Scaffold(
        appBar: AppBar(
          title: const Text('Camera example'),
        ),
        body: Container(
          child: Center(
            child: AspectRatio(
              aspectRatio: controller.value.aspectRatio,
              child: CameraPreview(controller),
            ),
          ),
        ),
        floatingActionButton: FloatingActionButton.extended(
          onPressed: () {
            controller.value.isStreamingVideoRtmp ?
            onStopButtonPressed() :
            onVideoStreamingButtonPressed();
          },
          label: Text('Start'),
          icon: Icon(
            controller.value.isStreamingVideoRtmp ? Icons.stop : Icons.not_started_outlined,
          ),
          backgroundColor: Colors.pink,
        ),
      ),
    );
  }

  void onVideoStreamingButtonPressed() {
    print("pressStreaming");
    startVideoStreaming().then((String url) {
      if (mounted) setState(() {});
    });
  }

  void onStopButtonPressed() {
    stopVideoStreaming().then((_) {
      if (mounted) setState(() {});
    });
  }

  Future<String> startVideoStreaming() async {
    if (!controller.value.isInitialized) {
      return null;
    }

    if (controller.value.isStreamingVideoRtmp) {
      return null;
    }

    String myUrl = await _getUrl();

    try {
      url = myUrl;

      if (url == null) {
        return null;
      }

      await controller.startVideoStreaming(url);
    } on CameraException catch (e) {
      return null;
    }
    return url;
  }

  // 配信URL設定用ダイアログ表示
  Future<String> _getUrl() async {
    String result = _textFieldController.text;

    return await showDialog(
        context: context,
        builder: (context) {
          return AlertDialog(
            title: Text('Url to Stream to'),
            content: TextField(
              controller: _textFieldController,
              decoration: InputDecoration(hintText: "Url to Stream to"),
              onChanged: (String str) => result = str,
            ),
            actions: <Widget>[
              FlatButton(
                child: Text(
                    MaterialLocalizations.of(context).cancelButtonLabel),
                onPressed: () {
                  Navigator.pop(context);
                },
              ),
              FlatButton(
                child: Text(MaterialLocalizations.of(context).okButtonLabel),
                onPressed: () {
                  Navigator.pop(context, result);
                },
              )
            ],
          );
        },
    );
  }

  Future<void> stopVideoStreaming() async {
    if (!controller.value.isStreamingVideoRtmp) {
      return null;
    }

    try {
      await controller.stopVideoStreaming();
    } on CameraException catch (e) {
      return null;
    }
  }
}
まずmain()で端末で使用できるカメラインスタンスを取得しています。
Future<void> main() async {
  WidgetsFlutterBinding.ensureInitialized();
  cameras = await availableCameras();
  runApp(MyApp());
}
次にinitState()の中身です。
controller = CameraController(
      cameras[1],
      ResolutionPreset.medium,
      enableAudio: true,
      androidUseOpenGL: true,
    );
ここで今回のキモとなるCameraControllerのインスタンスを作成しています。
このControllerを使用してRTMP配信を行います。
cameras[1]でmain()で取得したカメラをコントローラーの中に入れています。
カメラはデフォルトだと2つ取れるようで、
- cameras[0]: 外カメ
- cameras[1]: 内カメ
となっています。
※外カメだとエラーが出てうまくいかないので、今回は内カメだけで実装します。解決次第更新いたします。🙇♂️
そして以下の箇所で配信用URLを設定、ストリーミング配信のスタートを行なっています。
    if (controller.value.isStreamingVideoRtmp) {
      return null;
    }

    // ダイアログを表示してURLを設定
    String myUrl = await _getUrl();

    try {
      url = myUrl;

      if (url == null) {
        return null;
      }
    // ストリーミング配信スタート
      await controller.startVideoStreaming(url);
    } on CameraException catch (e) {
      return null;
    }
    return url;
  }
RTMP用のURL
_getUrl()にてダイアログを表示してURLの設定を行いますが、コードの頭の方でTextEditingControllerの初期化をしている箇所のテキストが初期値で入れられます。以下の箇所です。
TextEditingController _textFieldController = TextEditingController(
      text: "rtmp://xxx.xxx.xxx.xxx/live/ios");
RTMPのURLは **rtmp://{VMの外部IP}/live/{ストリームキー}**となっています。
URL末尾の/liveは?
nginxのconfで設定したapplication名のことです。
rtmp {
・・・
    # ここで設定したliveが「rtmp://xx.xx.xx.xx/live」という配信URLになる
    application live {
      ・・・
    }
・・・
}
ストリームキーとは?
ライブ配信するときの固有IDとなるものです。
このストリームキーを固有のものにすることで、Aさんの配信、Bさんの配信というものを切り分けることができます。
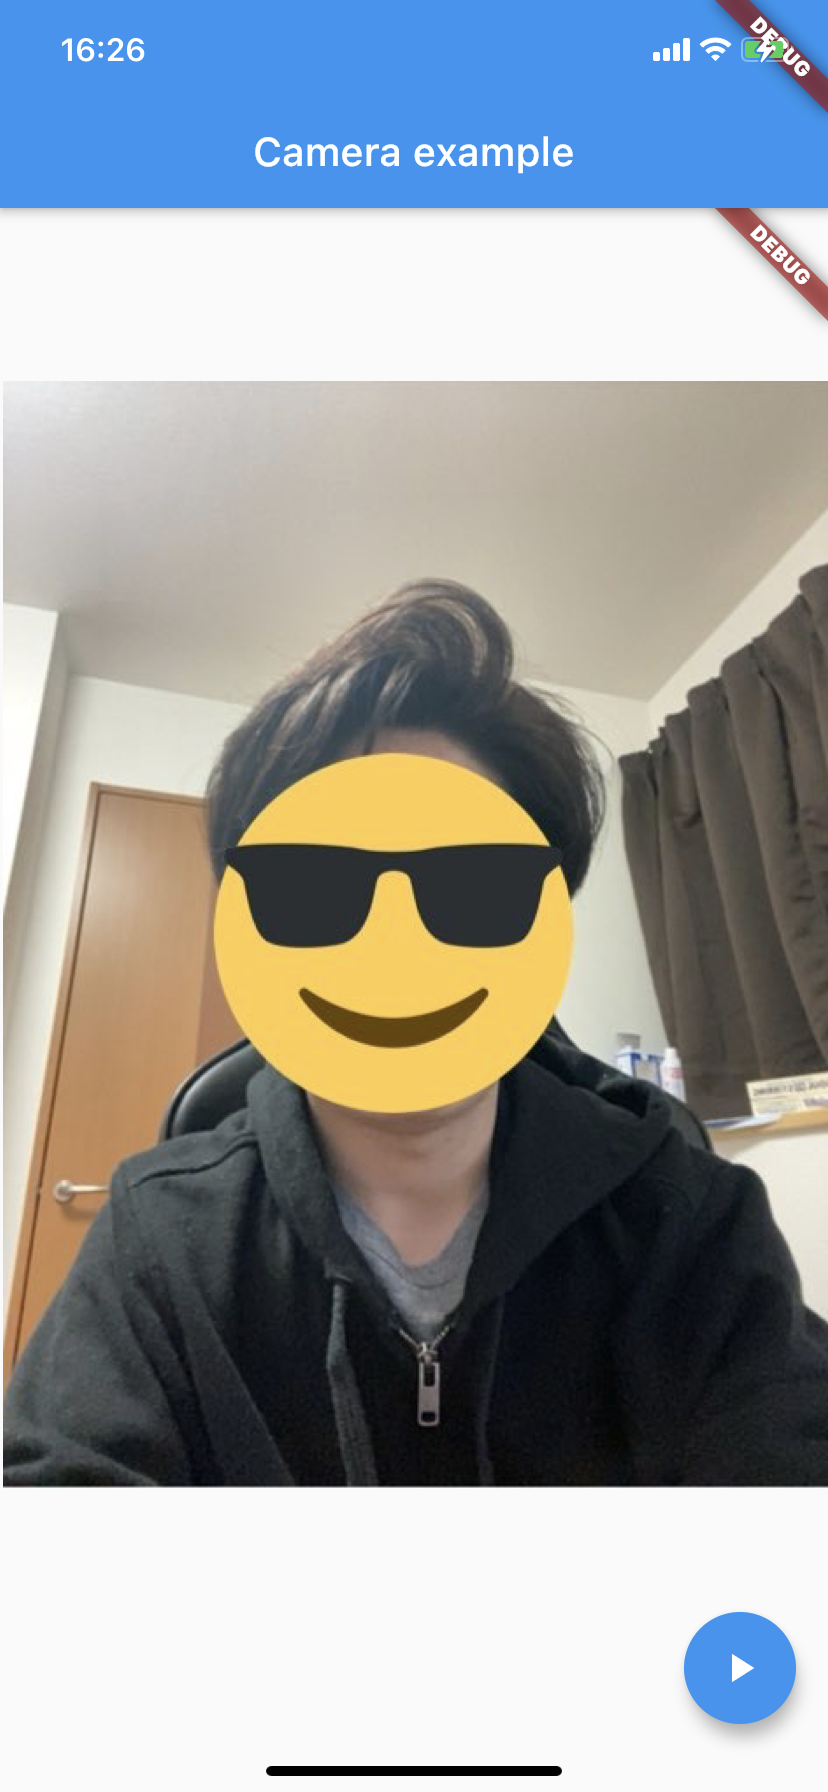
HLS視聴画面
では次にHLS視聴画面を作成していきます。
まずはライブラリを追加するためpubspec.yamlに
video_player: ^1.0.1
こちらを追加します。
dependencies:
  flutter:
    sdk: flutter

  camera_with_rtmp: ^0.3.2
  video_player: ^1.0.1
画面を作成
以下がHLS視聴画面の全体コードです。
import 'package:video_player/video_player.dart';
import 'package:flutter/material.dart';

class HlsPage extends StatefulWidget {
  @override
  _HlsPageState createState() => _HlsPageState();
}

class _HlsPageState extends State<HlsPage> {
  VideoPlayerController _controller;

  @override
  void initState() {
    super.initState();
    _controller = VideoPlayerController.network(
        'http://35.243.76.27/live/hls/test.m3u8')
      ..initialize().then((_) {
        setState(() {});
      });
  }

  @override
  Widget build(BuildContext context) {
    return MaterialApp(
      title: 'Video Demo',
      home: Scaffold(
        body: Center(
          child: _controller.value.initialized
              ? AspectRatio(
                  aspectRatio: _controller.value.aspectRatio,
                  child: VideoPlayer(_controller),
                )
              : Container(),
        ),
        floatingActionButton: FloatingActionButton(
          onPressed: () {
            setState(() {
              _controller.value.isPlaying
                  ? _controller.pause()
                  : _controller.play();
            });
          },
          child: Icon(
            _controller.value.isPlaying ? Icons.pause : Icons.play_arrow,
          ),
        ),
      ),
    );
  }

  @override
  void dispose() {
    super.dispose();
    _controller.dispose();
  }
}
こちらも順を追って解説します。
VideoPlayerControllerの初期化
initState() にて、VideoPlayerControllerの初期化を行なっています。
このControllerは動画を再生するのに必要なものになります。
  void initState() {
    super.initState();
    _controller = VideoPlayerController.network(
        'http://xxx.xxx.xxx.xxx/live/hls/ios.m3u8')
      ..initialize().then((_) {
        setState(() {});
      });
  }
HLSのURL
HLSのURLは http://{VMの外部IP}/live/hls/{ストリームキー}.m3u8となっています。
こちらもnginxのconfで設定したpathを参照するようになっています。
 # hlsのpathを設定
 hls_path /usr/local/nginx/html/live/hls;
VideoPlayereの表示
以下の箇所でビデオプレイヤー再生用のWidgetを定義しています。
上記のControllerのイニシャライザに失敗していたらContainerを表示するようにしています。
          child: _controller.value.initialized
              ? AspectRatio(
                  aspectRatio: _controller.value.aspectRatio,
                  child: VideoPlayer(_controller),
                )
              : Container(),
再生とストップ
ボタンアクションで動画の再生とストップができるようにしてあります。
        floatingActionButton: FloatingActionButton(
          onPressed: () {
            setState(() {
              _controller.value.isPlaying
                  ? _controller.pause()
                  : _controller.play();
            });
          },
TabBarで両方表示させる
これでRTMPとHLS両方の画面が完成しました。
どちらも1つのアプリで確認したいのでmain.dartを少しいじってタブ表示させたいと思います。
・・・

class _MyAppState extends State<MyApp> with SingleTickerProviderStateMixin {
  TabController _tabController;

  @override
  void initState() {
    super.initState();

    _tabController = TabController(
        length: 2, vsync: this
    );
  }

  final _tab = <Tab> [
    Tab( text:'RTMP', icon: Icon(Icons.not_started_outlined)),
    Tab( text:'HLS', icon: Icon(Icons.ondemand_video)),
  ];

  @override
  Widget build(BuildContext context) {
    return MaterialApp(
      title: "mypage",
      home: Scaffold(
          appBar: AppBar(
            title: const Text('Camera example'),
            bottom: TabBar(
              controller: _tabController,
              tabs: _tab,
            ),
          ),
          body: TabBarView(
              controller: _tabController,
              children: [
                Home(),
                HlsPage(),
              ]
          ),
      ),
    );
  }
}

・・・
完成!
これでRTMPとHLSがタブで切り替えられるようになりました!

終わり
少し長くなりましたがこれでCGPの構築+アプリの作成は終わりです!
最後まで見ていただいてありがとうございます。
今回の記事では書ききれないことなどもたくさんあったので、また次の機会に記事にできたらなと思います!
また今回作成したアプリコードGithubに載せましたので、そちらも見ていただければと思います。
https://github.com/reiji012/live_stream_app
また最後に、宣伝にはなってしまいますが現在Flutter+ストリーム配信技術でサービスを作っています。
こちらももしご興味があれば見ていただければ嬉しいです!
https://it-live-streaming.studio.site
参考にした記事
GCP上に動画配信サーバーを作成する
gcloud でプロジェクトの切り替え設定
HLSライブストリーミングサーバーの構築


