概要
EC2インスタンスを起動して、Apache2.4とPHP7.2とMySQL5.7をインストールしてみたのでメモしておく。
インスタンス起動
学習用の起動なので、スタンドアロンで起動してすべてインストールするので、インスタンスを1つ起動。
EC2 -> インスタンス -> インスタンスの作成

※ Amazon Linux AMIを選択
※ セキュリティグループは、80ポートと22ポートを解放する。
(22ポートは不要だが学習用なので簡略化のため設定)
サーバへ接続する
ターミナルを使って起動したEC2インスタンスに接続する。
※ IAMユーザーにてssh接続。
※ アカウントは、多要素認証 (MFA) を設定し、利用しない。
$ ssh aws

       __|  __|_  )
       _|  (     /   Amazon Linux AMI
      ___|\___|___|

https://aws.amazon.com/amazon-linux-ami/2018.03-release-notes/
Run "sudo yum update" to apply all updates.
とりあえず、yumを更新しておく。
$ sudo yum update -y
PHP7.2
yumコマンドでインストールする。
# インストール可能なものを確認
$ sudo yum list available | grep php72

# インストール
$ sudo yum install -y \
  php72 php72-devel php72-fpm php72-gd php72-mbstring \
  php72-mysqlnd php72-pdo \
  php72-xml php72-json

# インストール済みのものを確認
$ sudo yum list installed | grep php72

# 環境設定
$ sudo vi /etc/php.ini

# バージョン確認
$ php -v
PHP 7.2.11 (cli) ...
MySQL5.7
yumコマンドでインストールする。
# インストール可能なものを確認
$ sudo yum list available | grep mysql*

# インストール
$ sudo yum install -y mysql57-server

# インストール済みのものを確認
$ sudo yum list installed | grep mysql*

# 有効化
$ sudo chkconfig mysqld on
$ sudo chkconfig --list mysqld

# 起動
$ sudo service mysqld start

# バージョン確認
$ mysql --version
mysql  Ver 14.14 Distrib 5.7.24, ...

# セキュリティ設定
$ sudo mysql_secure_installation
Would you like to setup VALIDATE PASSWORD plugin?
Press y|Y for Yes, any other key for No:
New password:
Re-enter new password:
Remove anonymous users? (Press y|Y for Yes, any other key for No) :
Disallow root login remotely? (Press y|Y for Yes, any other key for No) :
Remove test database and access to it? (Press y|Y for Yes, any other key for No) :
Reload privilege tables now? (Press y|Y for Yes, any other key for No) :
Apache2.4
yumコマンドでインストールする。
# インストール可能なものを確認
$ sudo yum list installed | grep httpd24

# インストール
$ sudo yum -y install httpd24

# 環境設定
$ sudo vi /etc/httpd/conf/httpd.conf
--------------------------------------------------------
-「Forbidden」ページからOS,IP,Apacheなどの情報を非表示にする
ServerTokens Prod
ServerSignature Off

<Directory "/var/www/html">
  - ディレクトリ構造を表示しない
  Options -Indexes FollowSymLinks

  - htaccessを有効にする
  AllowOverride All
</Directory>
--------------------------------------------------------

# 環境設定ファイルのチェック
$ sudo httpd -t

# 起動
$ sudo service httpd start
$ sudo service httpd status

# 有効化
$ sudo chkconfig httpd on
$ sudo chkconfig --list httpd

# バージョン確認
$ httpd -v
Server version: Apache/2.4.34 (Amazon)
ec2-userにapacheグループを追加する。
# apacheグループ追加
$ sudo usermod -a -G apache ec2-user

# ssh再接続して、所属グループを確認
$ exit
$ ssh aws
$ groups
ec2-user wheel apache
所有者の変更
$ sudo chown -R ec2-user:apache /var/www
$ sudo chmod 2775 /var/www
$ ls -la /var/
drwxrwsr-x  7 ec2-user apache 4096 12月 12 15:14 www
パーミッションの変更。
# パーミッション変更
$ find /var/www -type d -exec sudo chmod 2775 {} \;
$ find /var/www -type f -exec sudo chmod 0664 {} \;
$ ls -la /var/www/
drwxrwsr-x  2 ec2-user apache 4096  8月 17 22:22 cgi-bin
drwxrwsr-x  3 ec2-user apache 4096 12月 12 15:14 error
drwxrwsr-x  2 ec2-user apache 4096  8月 17 22:22 html
drwxrwsr-x  3 ec2-user apache 4096 12月 12 15:14 icons
drwxrwsr-x  2 ec2-user apache 4096 12月 12 15:14 noindex
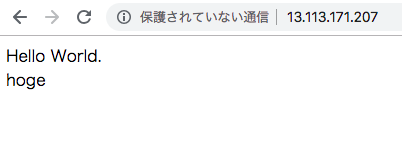
index.phpファイルを配置
<html>
<body>
Hello World.<br>
<?php echo 'hoge'; ?>
</body>
</html>
テスト
起動したインスタンスの「パブリック DNS (IPv4)」に記載されているIPアドレスにアクセスしてみる。
※ 今回のIPアドレス: IPv4 パブリック IP 13.113.171.207
