初めに
学習した内容をもとにjavascriptとsassでthumbnailの矢印ボタンをクリックしたら中央の写真が切り替わるカルーセルを作ってみました。
※内容に間違いなどがある場合はご指摘をよろしくお願いします。
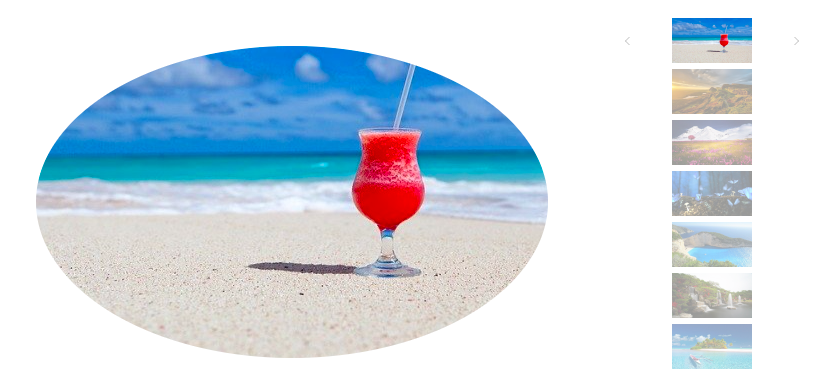
完成形のイメージ
作業の手順
- 画像を集める
- 画像を軽量化
- 画像サイズを変更
- html、sassやjavascriptファイルの配置
- htmlで骨組みを作る
- sassでanimation&見た目をよくする
- javascriptでボタンをクリックした時の動きをプログラミングする
画像を集める
無料素材を使いした。画像無料素材と検索すると色々出てきますが、そんな中でpixabayが良さそうだったので使ってみました。合計7枚をダウンロード。
https://pixabay.com/ja/
画像をカスタマイズ
ダウンロードした画像はそのままでは重いので、軽量化することに。サイズを減らすことでローディングに時間が掛からないようにしてパフォーマンスを上げることができます。imageoptimというツールがあるのでそれを利用しました。使い方についての関連記事は以下のとおり。
https://akihiko-s.com/imageoptim
画像サイズを変更
画像高さを360pxに調整しました。画像がはみ出ると見栄えが良くないので、7枚の写真の高さを揃えます。画像編集ツールはなんでもいいですが、今回使用したのはSketchBookです。
https://www.autodesk.co.jp/products/sketchbook/overview
html、sassやjavascriptファイルの配置
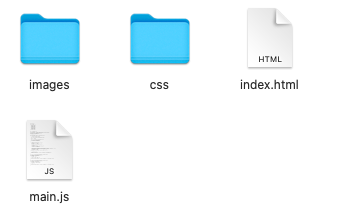
htmlファイルとjavascriptファイルはそれぞれメインのフォルダーに置きました。また、画像はimagesフォルダーにsassはcssフォルダーに配置します。
htmlで骨組みを作る
carouselというsectionの中にcarousel_mainとcarousel_thumbnails_wrapperを用意します。mainのところに表示させるターゲットの画像が入り、thumbnailsには全ての画像を一覧表示するようにします。また、ボタンになるprevやnextを用意します。thumbnail画像はulタグの中でリストとして表示させたいので、carousel__thumbnailsもあわせて用意します。id名はjavascriptで使うようにし、class名はsassの記述に使うようにしています。
<!DOCTYPE html>
<html lang="ja">

<head>
  <meta charset="UTF-8">
  <meta name="viewport" content="width=device-width, initial-scale=1.0">
  <link rel="stylesheet" href="css/app.css">
  <title>Carousel</title>
</head>

<body>

  <section id="carousel" class="carousel">
    <div class="carousel__main"><img id="carousel__main"></div>
    <div class="carousel_thumbnails_wrapper">
      <div id="carousel__prev" class="carousel_thumbnails_wrapper__prev"></div>
      <div id="carousel__next" class="carousel_thumbnails_wrapper__next"></div>
      <ul class="carousel__thumbnails"></ul>
    </div>
  </section>

  <script src="main.js"></script>

</body>

</html>
sassでanimation&見た目をよくする
mainとthumbnailsのエリアは横並びにしたいので、displayをflexにします。また、mainの画像はclip-pathを使って表示させたい画像を楕円形に切り抜きます。また、表示する画像はfade inアニメーションを適用したいので@keyframesを使って透明度を0~1に0.8秒間に渡って変化するようにします。タイミングはボタンをクリックした時にアニメーション処理をしたいので、mainクラスの直下のimgタグのactiveクラスに記述します。activeクラスはjavascriptで付けたり外したりの処理を行います。
thumbnailsの画像は透明度を0.4にします。こうすることによって選択されているかいないかが分かります。現在選択したthumbnailsの画像にはcurrentクラスのところにopacityを1にして不透明にします(鮮明に見えるようにする)。currentクラスも後からjavascriptで処理します。
.carousel {
  width: 840px;
  height: 400px;
  margin: 0 auto;
  position: relative;
  display: flex;
  &__main {
    width: 640px;
    height: 400px;
    margin: 0 auto;
    clip-path: ellipse(40% 39% at 50% 50%);
    & > .active {
      animation: fadeImg 0.8s;
    }
  }
  &__thumbnails {
    list-style: none;
    padding: 0;
    & li {
      cursor: pointer;
      opacity: 0.4;
      &:hover {
        opacity: 1;
      }
      &.current {
        opacity: 1;
      }
    }
    & img {
      width: 80px;
    }
  }
}

@keyframes fadeImg {
  from {
    opacity: 0;
  }
  to {
    opacity: 1;
  }
}
続いて矢印ボタンをcssで作成します。作り方は前回の記事を参考にしました。prevが"<"矢印でnextが">"です。
.carousel_thumbnails_wrapper {
  position: relative;
  &__prev {
    position: absolute;
    top: 23px;
    left: 110px;
    cursor: pointer;
    color: lightgray;
    width: 30px;
    height: 30px;
    &:hover {
      transition-duration: 0.2s;
      transform: translateX(-10px);
    }
    &::before {
      content: "";
      display: block;
      width: 5px;
      height: 5px;
      position: absolute;
      top: 50%;
      left: 10px;
      margin-top: -2.5px;
      border-top: 1px solid #ccc;
      border-right: 1px solid #ccc;
      transform: rotate(45deg);
    }
  }

  &__next {
    position: absolute;
    top: 23px;
    right: 110px;
    cursor: pointer;
    color: lightgray;
    width: 30px;
    height: 30px;
    &:hover {
      transition-duration: 0.2s;
      transform: translateX(10px);
    }
    &::after {
      content: "";
      display: block;
      width: 5px;
      height: 5px;
      position: absolute;
      top: 50%;
      right: 10px;
      margin-top: -2.5px;
      border-top: 1px solid #ccc;
      border-right: 1px solid #ccc;
      transform: rotate(-135deg);
    }
  }
}
javascriptの記述
最後にjavascriptでボタンをクリックした際の動きを書いていきます。
Main Concept
①imagesフォルダーにある画像は配列の形(images配列)にして格納する
②currentIndexという変数を用意し、現在選択されている画像のindexを取得する
③for文を使い、配列のindexと値(image)をそれぞれ取り出してmainやthumbnailに画像を表示させる
④prevやnextをクリックした時にtargetという変数を用意し、現在選択されている画像のindexを+もしくは-する処理をする
"use strict";

// imagesという定数に画像を配列として格納する
const images = [
  "images/1.jpg",
  "images/2.jpg",
  "images/3.jpg",
  "images/4.jpg",
  "images/5.jpg",
  "images/6.jpg",
  "images/7.jpg",
];

//現在選択した画像のindex番号をcurrentIndexとして初期化する
let currentIndex = 0;

//メインの画像が配置されるimgタグをmainImageとして取得。srcメソッドで配列の画像をcurrentIndexを添字にして表示
const mainImage = document.getElementById("carousel__main");
mainImage.src = images[currentIndex];

// 配列imagesからindexと中身imageを一つひとつ取り出し、thumbnails画像を表示する
for (let [index, image] of images.entries()) {

// thumbnails用のimgタグを生成して、imageを格納する
  const img = document.createElement("img");
  img.src = image;

//liタグを作り、liタグの子要素にimgタグを配置する
  const li = document.createElement("li");
  li.appendChild(img);
  document.querySelector(".carousel__thumbnails").appendChild(li);

// thumbnailsの画像を配置するliを作成する。for文のindexが現在選択されているcurrentIndexと同じ場合はliタグにcurrentクラスを付与する(不透明になる)
  if (index === currentIndex) {
    li.classList.add("current");
  }

//thumbnails(liタグ)をクリックした時の処理  ---❶
  li.addEventListener("click", () => {
//main画像は配列から取り出したimageになる。また、activeクラスを付与してfade inアニメーションを適用する
    mainImage.src = image;
    mainImage.classList.add("active");

//activeクラスは0.8秒後に消えるようにする。理由は他のthumbnail画像(liタグ)をクリックした時にactiveクラスがすでに存在する状態だとアニメーションがスタートしないため
    setTimeout(() => {
      mainImage.classList.remove("active");
    }, 800);

//thumbnailsという定数にthumbnails画像が入っているliタグ全てを取得して格納(配列の形になる)
    const thumbnails = document.querySelectorAll(".carousel__thumbnails > li");
//現在選択されているindexに該当する配列thumbnailsのli要素にcurrentクラスを外して初期化する
    thumbnails[currentIndex].classList.remove("current");
//currentInexにクリックしたliタグのindex番号をセットし直し、currentクラスを付与する(currentが付いていると不透明になる)
    currentIndex = index;
    thumbnails[currentIndex].classList.add("current");
  });
}
//nextボタンをクリックした時の処理。変数targetを用意してcurrentIndexに1を引いた値を格納する
const next = document.getElementById("carousel__next");
next.addEventListener("click", () => {
  let target = currentIndex - 1;
//もしtarget(添字)が0以下の場合は7番目の画像から1を引くようにする。
  if (target < 0) {
    target = images.length - 1;
  }
//liタグを全て取得し(配列の形)添字のtargetを指定。.click()メソッドでliタグがクリックされた時と同じ処理をするようにする(❶の処理)
  document.querySelectorAll(".carousel__thumbnails > li")[target].click();
});

//prevボタンをクリックした時の処理。変数targetを用意してcurrentIndexに1を足した値を格納する
const prev = document.getElementById("carousel__prev");
prev.addEventListener("click", () => {
  let target = currentIndex + 1;
//もしtarget(添字)がimages画像の最後の番号である場合には8番目の画像はないため、0にする。
  if (target === images.length) {
    target = 0;
  }
//liタグを全て取得し(配列の形)添字のtargetを指定。.click()メソッドでliタグがクリックされた時と同じ処理をするようにする(❶の処理)
  document.querySelectorAll(".carousel__thumbnails > li")[target].click();
});
参考記事
https://developer.mozilla.org/ja/docs/Web/API/HTMLElement/click
https://qiita.com/righteous/items/e38ce1d1c7861d02b87d