ほとんどの環境下において、ユーザの文字入力はオンスクリーンキーボードを前提にすることができます。ただ、私がつくっているwinecodeというアプリで、そうではない事例があったのでご紹介します。
これは私が相談を受けた飲食店の例なのですが
- 外部キーボードを接続してる
- 営業外は、外部キーボードで入力できるから問題ない(大量のデータ入力があるため)
- 営業中、外部キーボードは邪魔なので横にどけている(ほとんどの入力が画面タップで済むため)
予約状況などを管理するのでiPadを厨房の導線上に置くことは必要だけど、営業中なのでiPad付近にも皿を置く必要があり、キーボードは横にどける必要があるという事例でした。導線を確認して説明を受けたのですが、たしかにこれは仕方ない。
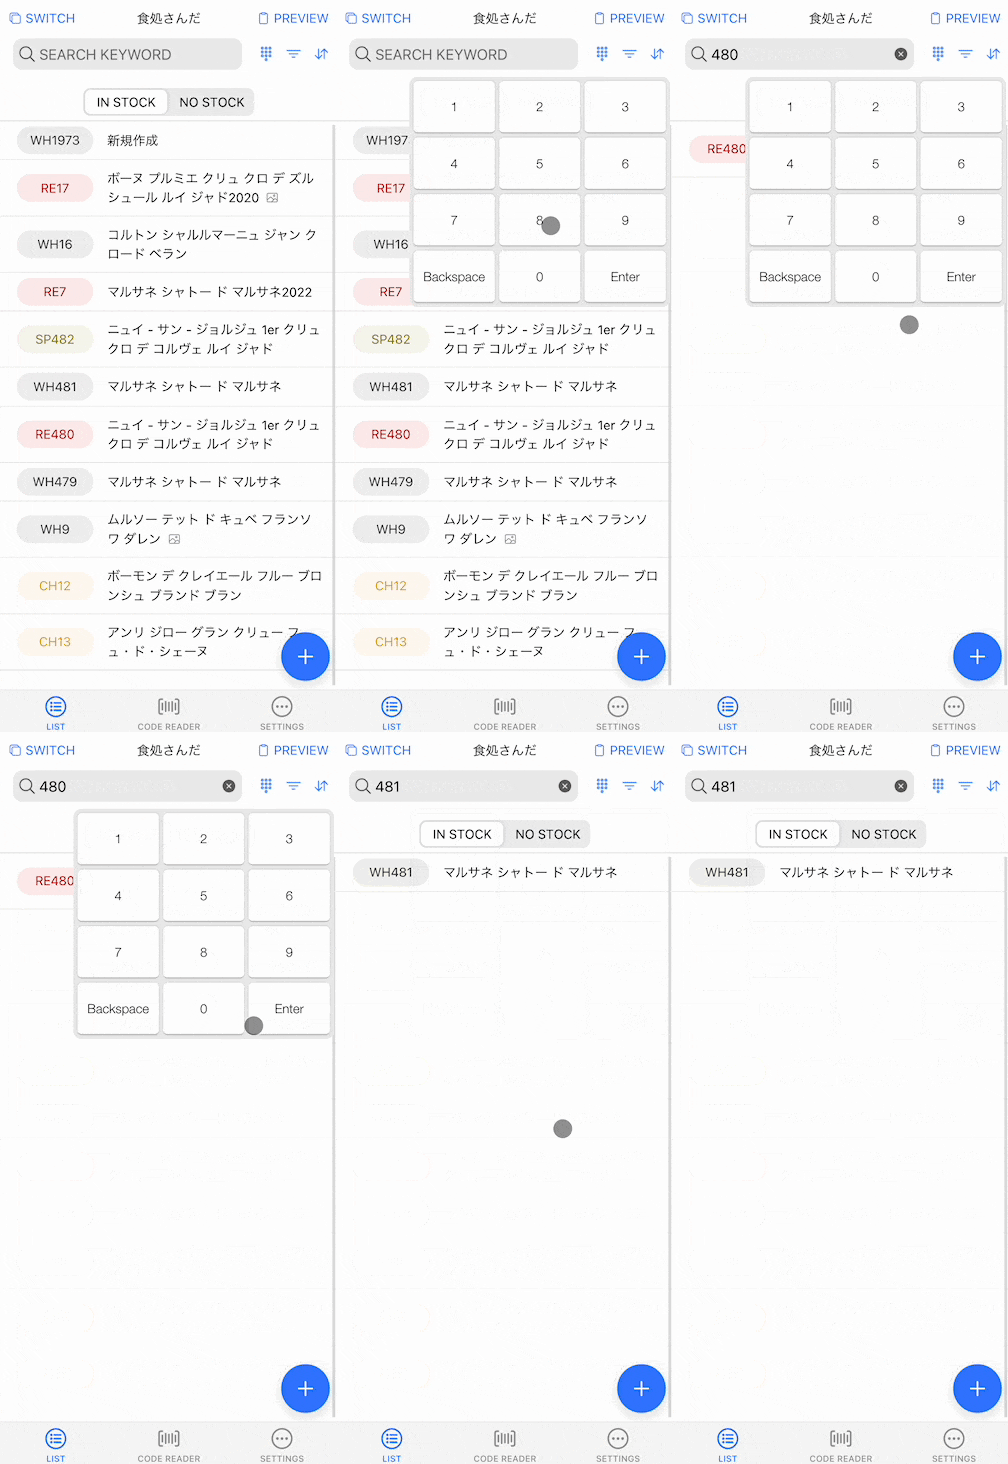
一方で、「営業中、ほとんどの入力が画面タップで済む」としながら、数字ぐらいは入力する必要がありました。けど外部キーボードを接続しているので、Input要素にカーソルをあわせてもオンスクリーンキーボードは立ち上がらない。そこで、UIにキーボードを用意しました。
完成はこんな感じ。
では簡単に実装をご紹介します。キーボードは1から作ろうと思ったのですが、 simple-keyboard という質のいいライブラリがあったのでこれを採用しました。
% npm i simple-keyboard
まず、 simple-keyboard のスタイルを global.scss で読み込みます。以下を追記ください。
@import '~simple-keyboard/build/css/index.css';
キーボードはion-popoverで出現させるのですが、キーボード自体をコンポーネントにしたいので、キーボードコンポーネントを作成しましょう。
% ionic g co simpleKeyboard
TypeScriptはこのようにします。入力途中であることを考慮して、 value というInputを用意します。
import { AfterViewInit, Component, EventEmitter, Input, OnInit, Output } from '@angular/core';
import Keyboard from 'simple-keyboard';
import { PopoverController } from '@ionic/angular';

@Component({
  selector: 'app-simple-keyboard',
  templateUrl: './simple-keyboard.component.html',
  styleUrls: ['./simple-keyboard.component.scss'],
})
export class SimpleKeyboardComponent implements AfterViewInit {
  public keyboard: Keyboard;
  @Input() value = '';
  _value = '';
  @Output() valueEmitter: EventEmitter<string> = new EventEmitter();

  constructor(private popoverCtrl: PopoverController) {}

  ngAfterViewInit() {
    this.keyboard = new Keyboard({
      onChange: (input) => this.onChange(input),
      onKeyPress: (button) => this.onKeyPress(button),
      layout: {
        default: ['1 2 3', '4 5 6', '7 8 9', '{bksp} 0 {enter}'],
      },
      display: {
        '{bksp}': 'Backspace',
        '{enter}': 'Enter',
      },
      theme: 'hg-theme-default hg-layout-numeric numeric-theme',
    });
    this.keyboard.setInput(this.value);
    this._value = this.value;
  }

  onChange = (input: string) => {
    this._value = input;
    this.valueEmitter.emit(input);
  };

  onKeyPress = (button: string) => {
    if (button === '{enter}') {
      this.popoverCtrl.dismiss(true);
    }
  };

  onInputChange = (event: any) => {
    this.keyboard.setInput(event.target.value);
  };
}
HTMLテンプレートはこれだけ。
<div class="simple-keyboard"></div>
あと、キーボードが大きくなりすぎないようにStyleにmax-widthを設定しておきます。
.simple-keyboard {
  max-width: 850px;
}
これで用意完了です。簡単ですね。これを使う時は、インラインのpopoverで使います。上記のsearchbarの横に置いている例では、以下のようになります。
<ion-toolbar>
    <ion-searchbar [(ngModel)]="searchWord"></ion-searchbar>
    <ion-buttons slot="end">
      <ion-button id="show-keyboard" (click)="$event.stopPropagation()">
        <ion-icon name="keypad-outline" slot="icon-only"></ion-icon>
      </ion-button>
      <ion-popover trigger="show-keyboard" triggerAction="click" showBackdrop="false" style="--min-width: 300px">
        <ng-template>
          <app-simple-keyboard [value]="searchWord" (valueEmitter)="this.searchWord = $event"></app-simple-keyboard>
        </ng-template>
      </ion-popover>
    </ion-buttons>
  </ion-toolbar>
簡単ですね。現場導入する業務向けアプリの場合、使用環境や制約が特殊であることが多いので、ぜひ現場で利用シーンを見に行くことをおすすめします。
それではまた。
