はじめに
本記事では、Ubuntu 22.04でLVM(論理ボリュームマネージャー)を使用して論理ボリュームを拡張する方法について紹介します。Gitlabサーバーを例に説明しますが、同様の手順で他のサーバーでも実行可能です。手順はESXi上で実行されます。
使用環境説明
対象サーバ:Ubuntu 22.04
ホスト:ESXi 6.7
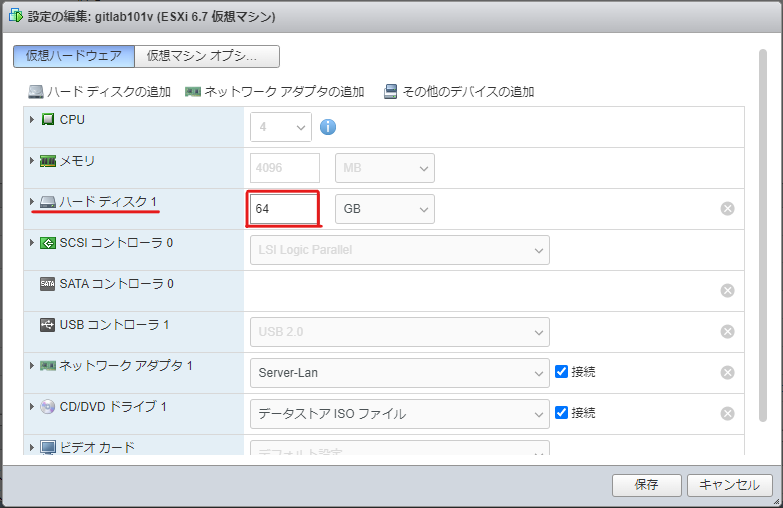
HDD容量:32GB → 64GB
RAM:4GB
vCPU:4
前提条件
- ESXi6.7がインストールされていること。
- Ubuntu22.04がESXi6.7上で動作していること。
- 論理ボリュームを拡張するために、ホスト側でHDD容量の追加が必要であること。
- ログインしているユーザがsudo権限を持っていること。
手順
-
対象の仮想マシンをシャットダウンします。
-
仮想マシンを起動します。
-
ターミナルを開き、以下のコマンドを実行します。
sudo fdisk -l
このコマンドで、変更したHDDのデバイス名を確認します。gitlab101v:~$ fdisk -l ~中略~ Disk /dev/sda: 64 GiB, 68719476736 bytes, 134217728 sectors ←64GiBに拡張されている Disk model: Virtual disk Units: sectors of 1 * 512 = 512 bytes Sector size (logical/physical): 512 bytes / 512 bytes I/O size (minimum/optimal): 512 bytes / 512 bytes Disklabel type: gpt Disk identifier: 695CD222-C5C1-41E7-A21A-A13913F01B90 Device Start End Sectors Size Type /dev/sda1 2048 4095 2048 1M BIOS boot /dev/sda2 4096 4198399 4194304 2G Linux filesystem /dev/sda3 4198400 67106815 62908416 30G Linux filesystem ←パーティションナンバーが3まであることを確認 Disk /dev/mapper/ubuntu--vg-ubuntu--lv: 15 GiB, 16101933056 bytes, 31449088 sectors Units: sectors of 1 * 512 = 512 bytes Sector size (logical/physical): 512 bytes / 512 bytes I/O size (minimum/optimal): 512 bytes / 512 bytes -
デバイス名を確認したら、以下のコマンドを実行して拡張したディスク領域を新しいパーティションとして作成します。
sudo fdisk /dev/sdaパーティション作成方法
- 「n」キーを押して新しいパーティションを作成します。
- パーティションナンバーを指定します。(デフォルトでもOK)
今回はナンバーが3まで使われているので4から指定。 - 新しいパーティションのサイズ(最初のセクターと最後のセクター)を指定します。(デフォルトでもOK)
- 「w」キーを押して変更を保存します。
下記は実行例です。
# sudo fdisk /dev/sda Welcome to fdisk (util-linux 2.37.2). Changes will remain in memory only, until you decide to write them. Be careful before using the write command. GPT PMBR size mismatch (67108863 != 134217727) will be corrected by write. The backup GPT table is not on the end of the device. This problem will be corrected by write. This disk is currently in use - repartitioning is probably a bad idea. It's recommended to umount all file systems, and swapoff all swap partitions on this disk. Command (m for help): n Partition number (4-128, default 4): 4 First sector (67106816-134217694, default 67106816): Last sector, +/-sectors or +/-size{K,M,G,T,P} (67106816-134217694, default 134217694): Created a new partition 4 of type 'Linux filesystem' and of size 32 GiB. Command (m for help): w The partition table has been altered. Syncing disks. -
新しいパーティションをフォーマットして、Ubuntuサーバーで使用できるようにします。以下のコマンドを実行してください。
sudo mkfs.ext4 /dev/sdaX※/dev/sdaXは、実際のデバイス名に読み替えてください。
下記は実行例
$ sudo mkfs.ext4 /dev/sda4 mke2fs 1.46.5 (30-Dec-2021) Creating filesystem with 8388608 4k blocks and 2101248 inodes Filesystem UUID: d8e9f523-3e10-4fe5-926c-bc3de809372f Superblock backups stored on blocks: 32768, 98304, 163840, 229376, 294912, 819200, 884736, 1605632, 2654208, 4096000, 7962624 Allocating group tables: 0/256 done Writing inode tables: 0/256 done Creating journal (65536 blocks): done Writing superblocks and filesystem accounting information: 0/256 done -
再度以下のコマンドを実行して、パーティションが作成されているか確認します。
sudo fdisk -l下記は実行例
$ sudo fdisk -l ~中略~ Disk /dev/sda: 64 GiB, 68719476736 bytes, 134217728 sectors Disk model: Virtual disk Units: sectors of 1 * 512 = 512 bytes Sector size (logical/physical): 512 bytes / 512 bytes I/O size (minimum/optimal): 512 bytes / 512 bytes Disklabel type: gpt Disk identifier: 695CD222-C5C1-41E7-A21A-A13913F01B90 Device Start End Sectors Size Type /dev/sda1 2048 4095 2048 1M BIOS boot /dev/sda2 4096 4198399 4194304 2G Linux filesystem /dev/sda3 4198400 67106815 62908416 30G Linux filesystem /dev/sda4 67106816 134217694 67110879 32G Linux filesystem ←新しいパーティションが作成されていることを確認 Disk /dev/mapper/ubuntu--vg-ubuntu--lv: 15 GiB, 16101933056 bytes, 31449088 sectors Units: sectors of 1 * 512 = 512 bytes Sector size (logical/physical): 512 bytes / 512 bytes I/O size (minimum/optimal): 512 bytes / 512 bytes -
以下コマンドを実行して、既存のボリュームグループを確認します。
df -h --total下記は実行例
$ df -h --total Filesystem Size Used Avail Use% Mounted on tmpfs 393M 1.3M 392M 1% /run /dev/mapper/ubuntu--vg-ubuntu--lv 15G 15G 0 100% / tmpfs 2.0G 0 2.0G 0% /dev/shm tmpfs 5.0M 0 5.0M 0% /run/lock /dev/sda2 2.0G 247M 1.6G 14% /boot tmpfs 393M 4.0K 393M 1% /run/user/1000 total 20G 15G 4.3G 78% - -
/dev/sdaX を物理ボリュームとして LVM に追加します。以下のコマンドを実行してください。
sudo pvcreate /dev/sdaX
※/dev/sdaXは、実際のデバイス名に読み替えてください。下記は実行例です。
$ sudo pvcreate /dev/sda4 WARNING: ext4 signature detected on /dev/sda4 at offset 1080. Wipe it? [y/n]: y Wiping ext4 signature on /dev/sda4. Physical volume "/dev/sda4" successfully created. -
ボリュームグループ(論理ボリュームをまとめたグループ)に追加します。以下のコマンドを実行してください。
※ubuntu-vgはデフォルトのボリュームグループ名です。もし別の名前を使っている場合は、適宜読み替えてください。*sudo vgextend ubuntu-vg /dev/sdaX下記は実行例です。
$ sudo vgextend ubuntu-vg /dev/sdaX Volume group "ubuntu-vg" successfully extended -
論理ボリュームを拡張します。以下のコマンドを実行してください。
sudo lvextend -r -l +100%FREE /dev/mapper/ubuntu--vg-ubuntu--lv下記は実行例です。
$ sudo lvextend -r -l +100%FREE /dev/mapper/ubuntu--vg-ubuntu--lv
	  Size of logical volume ubuntu-vg/ubuntu-lv changed from <15.00 GiB (3839 extents) to 61.99 GiB (15870 extents).
  Logical volume ubuntu-vg/ubuntu-lv successfully resized.
resize2fs 1.46.5 (30-Dec-2021)
Filesystem at /dev/mapper/ubuntu--vg-ubuntu--lv is mounted on /; on-line resizing required
old_desc_blocks = 2, new_desc_blocks = 8
The filesystem on /dev/mapper/ubuntu--vg-ubuntu--lv is now 16250880 (4k) blocks long.
※/dev/mapper/ubuntu--vg-ubuntu--lvは利用環境によって適宜読み替えてください。
-
以下コマンドを実行して、ボリュームグループを確認します。
df -h --total下記は実行例です。
※ボリューム拡張前

$ df -h --total
Filesystem                         Size  Used Avail Use% Mounted on
tmpfs                              393M  1.3M  392M   1% /run
+ /dev/mapper/ubuntu--vg-ubuntu--lv   61G   15G   44G  26% /
tmpfs                              2.0G   28K  2.0G   1% /dev/shm
tmpfs                              5.0M     0  5.0M   0% /run/lock
/dev/sda2                          2.0G  247M  1.6G  14% /boot
tmpfs                              393M  4.0K  393M   1% /run/user/1000
total                               66G   15G   48G  24% -

************************************************************************
※ボリューム拡張後

$ df -h --total
Filesystem                         Size  Used Avail Use% Mounted on
tmpfs                              393M  1.3M  392M   1% /run
- /dev/mapper/ubuntu--vg-ubuntu--lv   15G   15G     0 100% /
tmpfs                              2.0G     0  2.0G   0% /dev/shm
tmpfs                              5.0M     0  5.0M   0% /run/lock
/dev/sda2                          2.0G  247M  1.6G  14% /boot
tmpfs                              393M  4.0K  393M   1% /run/user/1000
total                               20G   15G  4.3G  78% -

