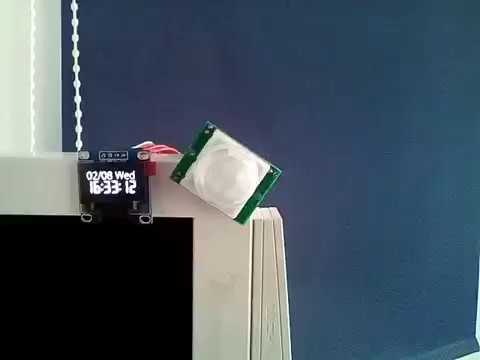
使用部品
raspberry pi zero
OLEDモジュール(0.96/白色/I2C)
PIRセンサーモジュール [DSUN-PIR]
合計で1500円ぐらい
有機ELを買う
最近、有機ELが気になってしまったので買っちゃった。めっちゃ安い。
買ったのはこれ、
OLEDモジュール(0.96/白色/I2C)
http://www.aitendo.com/product/14958
ただ、有機ELの焼き付きの問題が怖いので人がいない時は消灯させようと考えた。
(壊れたらもう一個買ってもいいかな?)
端子部分
4つ付いている。
VCCとGNDはそのまんまの通り、VCCは3.3Vでも動く。ただし、VCCとGNDは逆にすると即壊れるらしい。
残り2つはI2C接続、GPIOの3.3v付近にあるのがI2C。
I2C設定
おおまかな設定は以下のサイトを参考にしました。
Make.
http://make.bcde.jp/raspberry-pi/i2c%E3%82%92%E4%BD%BF%E3%81%86%EF%BC%88%E8%A8%AD%E5%AE%9A%E7%B7%A8%EF%BC%89/
繋げて以下のコマンド、
sudo i2cdetect -y 1
     0  1  2  3  4  5  6  7  8  9  a  b  c  d  e  f
00:          -- -- -- -- -- -- -- -- -- -- -- -- --
10: -- -- -- -- -- -- -- -- -- -- -- -- -- -- -- --
20: -- -- -- -- -- -- -- -- -- -- -- -- -- -- -- --
30: -- -- -- -- -- -- -- -- -- -- -- -- 3c -- -- --
40: -- -- -- -- -- -- -- -- -- -- -- -- -- -- -- --
50: -- -- -- -- -- -- -- -- -- -- -- -- -- -- -- --
60: -- -- -- -- -- -- -- -- -- -- -- -- -- -- -- --
70: -- -- -- -- -- -- -- --
接続したデバイスのアドレスが現れる。
有機ELの動かし方
今回使う有機ELはSSD1306コントローラである。
https://learn.adafruit.com/ssd1306-oled-displays-with-raspberry-pi-and-beaglebone-black/overview
有機ELを使うためにAdafruitのライブラリのインストール。
git clone https://github.com/adafruit/Adafruit_Python_SSD1306.git
cd Adafruit_Python_SSD1306
sudo python setup.py install
ここでPillowというイメージライブラリがないと動かないということで、
sudo pip install Pillow
このときpythonライブラリやpython-pipが必要。
時計本体
実際に作った時計のコード、
# !/usr/bin/python
# coding: UTF

import math
import time
import datetime
import RPi.GPIO as GPIO
import os

import Adafruit_GPIO.SPI as SPI
import Adafruit_SSD1306

from PIL import Image
from PIL import ImageFont
from PIL import ImageDraw

RST = 24
disp = Adafruit_SSD1306.SSD1306_128_64(rst=RST)
disp.begin()
width = disp.width
height = disp.height
disp.clear()
disp.display()
image = Image.new('1', (width, height))
draw = ImageDraw.Draw(image)
SENSOR_PIN = 25
GPIO.setmode(GPIO.BCM)
GPIO.setup(SENSOR_PIN, GPIO.IN, pull_up_down=GPIO.PUD_UP)
GPIO.setup(RST ,GPIO.OUT)

while True:

  pin_status = GPIO.input(SENSOR_PIN)
  print pin_status
  time.sleep(1)
  while pin_status==1:

            time.sleep(0.2)
            pin_status = GPIO.input(SENSOR_PIN)
            print pin_status

            font = ImageFont.truetype('/home/pi/font/OpenSans-Light.ttf', 22, encoding='unic')
            date_str = datetime.datetime.now().strftime(" %m/%d %a")
            maxwidth, unused = draw.textsize(date_str, font=font)
            draw.rectangle((0,0,width,height), outline=0, fill=0)
            x=0
            for i, c in enumerate(date_str):
                if x > width:
                    break
                if x < -20:
                    char_width, char_height = draw.textsize(c, font=font)
                    x += char_width
                    continue
                y = 2
                draw.text((x, y), c, font=font, fill=255)
                char_width, char_height = draw.textsize(c, font=font)
                x += char_width

            font = ImageFont.truetype('/home/pi/font/7barP.TTF', 35, encoding='unic')
            time_str = datetime.datetime.now().strftime("%H:%M:%S")
            maxwidth, unused = draw.textsize(time_str, font=font)
            x=2
            for i, c in enumerate(time_str):
                if x > width:
                    break
                if x < -20:
                    char_width, char_height = draw.textsize(c, font=font)
                    x += char_width
                    continue
                y = 29
                draw.text((x, y), c, font=font, fill=255)
                char_width, char_height = draw.textsize(c, font=font)
                x += char_width

            disp.image(image)
            disp.display()

            if pin_status==0:
                disp.clear()
                disp.display()
人感センサは
PIRセンサーモジュール [DSUN-PIR]
http://www.aitendo.com/product/10254
SENSOR_PIN = 25を使用。遊び方は↓の通り
http://qiita.com/raoakakaaakaua/items/7f93400a0834b97124bb
構成
importあたり
①有機ELやら人感センサーの設定。
↓
while True:
②人感センサーからの情報を取り込む。
↓
while pin_status==1:
③pin_status==1で人がいると判断して時計の表示。
↓
if pin_status==0:
④pin_status==0で人がいないと判断して画面の情報を消してwhile Trueに戻る。
disp.clear()
disp.display()
文字フォント
font = ImageFont.truetype
ここで文字の大きさやフォントを指定できる。時計向きなフォントを持ってこれると見やすい。
time.sleepについて
これがないとやっぱりきついみたい、1時間ぐらいすると時計止まる。
電流値の挙動がおかしかったな...。
おためし
動画(手ブレやらピントあってないと見にくいかもしれませんがご了承)
![alt]()
使用感
消費電力はそこまで増えてないと感じる。
電流値は0.07A増加したが、正直誤差かな。
こんご
日付を日本語表記にしたい。
天気予報だしたい。
適当な性格上、勉強不足なところありますがよろしくお願いします。

