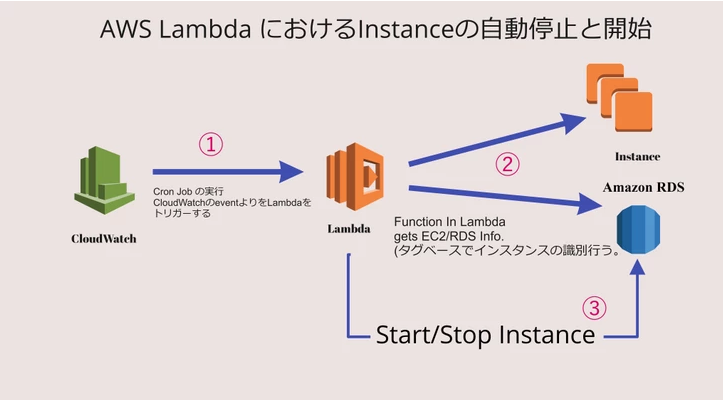
開発用のRDSインスタンスやEC2インスタンスを夜間や土日に停止して平日の朝に起動したい場合はLambdaとCloudWatch Eventの使って自動停止起動させるという方法がありますね。AWS Instance Schedulerとか便利な機能もありますが、もっと節約したい。
構成
- IAM Ruleの作成 → Policy Create
- Lambdaの作成
- Cloudwatch Ruleの作成
- インスタンスにタグを付ける
1:IAM Rolesの作成。
Roleの作成。
IAM >> Roles >> Create role
AWS Serviceを選択し、Lambdaのロールを使用して、次のアクセス権限をクリックする。
Policyの作成
サービス >> IAM >> Policies >> Create policy
    "Version": "2012-10-17",
    "Statement": [
        {
            "Sid": "VisualEditor0",
            "Effect": "Allow",
            "Action": [
                "ec2:DescribeInstances",
                "ec2:StartInstances",
                "ec2:StopInstances",
                "logs:*",
                "rds:DescribeDBInstances",
                "rds:ListTagsForResource",
                "rds:StartDBInstance",
                "rds:StopDBInstance"
            ],
            "Resource": "*"
        }
    ]
}
ポリシーの名前をAutoStartStopInstanceにして、新しいポリシーを作成する。
ロールの作成画面に戻り、作成したポリシー「AutoStartStopInstance」をAttachする。
2:Lamdaの作成する。
サービス >> Lambda >> 関数の作成。
一から作成を選択し、基本的な情報を入力する
| パラメーター | 値 |
|---|---|
| 関数名 | AutoStartStopInstance |
| 既存のロール | AutoStartStopInstanceのロールを選択する |
| ランタイム | Python3.7 |
| 実行ロール | 既存のロールを使用する。 |
lambda_function.pyファイルに下記のコードを貼り付ける。
# coding: utf-8
import boto3
import traceback

ec2 = boto3.client('ec2')
rds = boto3.client('rds')

# Note for beginner: Python is an indentation sensitive language.

def lambda_handler(event, context):

    try:
        start_stop_ec2_instances(event, context)
        start_stop_rds_instances(event, context)
    except Exception as e:
            displayException(e)

            traceback.print_exc()
def start_stop_ec2_instances(event, context):

    # イベントからアクションパラメータを取得。
    action = event.get('action')
    if action is None:
        action = ''
    # アクションのチェック。
    if action.lower() not in ['start', 'stop']:
        print ("action was neither start nor stop. start_stop_ec2_instances aborted.")
    else:
        # フィルタ条件に一致するec2インスタンスをすべて取得。
        filtered_ec2 = ec2.describe_instances(
            Filters=[
                {'Name': 'tag-key', 'Values': ['Auto-StartStop-Enabled', 'auto-startstop-enabled']},
                {'Name': 'instance-state-name', 'Values': ['running', 'stopped']}
            ]
        ).get(
            'Reservations', []
        )
        instances_ec2 = sum(
            [
                [i for i in r['Instances']]
                for r in filtered_ec2
            ], [])

        print ("Found " + str(len(instances_ec2)) + " EC2 instances that can be started/stopped")

        # Loop through instances
        for instance_ec2 in instances_ec2:

            try:
                instance_id = instance_ec2['InstanceId']
                # インスタンスのタグを取得。
                for tag in instance_ec2['Tags']:
                    if tag['Key'] == 'Name':
                        instance_name = tag['Value']
                        print ("instance_name: " + instance_name + " instance_id: " + instance_id)
                        continue

                # インスタンス状態を取得。
                instance_state = instance_ec2['State']['Name']
                print ("Current instance_state: %s" % instance_state)

                # インスタンス状態を判断し、アクションより開始と停止。
                if instance_state == 'running' and action == 'stop':
                    ec2.stop_instances(
                        InstanceIds=[
                            instance_id
                            ],
                        # DryRun = True
                        )
                    print ("Instance %s comes to stop" % instance_id)

                elif instance_state == 'stopped' and action == 'start':
                    ec2.start_instances(
                        InstanceIds=[
                            instance_id
                            ],
                        # DryRun = True
                        )
                    print ("Instance %s comes to start" % instance_id)

                else:
                    print ("Instance %s(%s) status is not right to start or stop" % (instance_id, instance_name))

            except Exception as e:
                displayException(e)
                # traceback.print_exc()

# 注意:RDSインスタンスは7日間停止した後にAWSによって自動的に起動されます。
def start_stop_rds_instances(event, context):

    # イベントからアクションパラメータを取得。
    action = event.get('action')
    if action is None:
        action = ''

    # アクションのチェック。
    if action.lower() not in ['start', 'stop']:
        print ("action was neither start nor stop. start_stop_rds_instances aborted.")
    else:
        # フィルタ条件に一致する全てRDSインスタンスをすべて取得。
        instances_rds = rds.describe_db_instances().get('DBInstances', [])

        print ("Found " + str(len(instances_rds)) + " RDS instances")

        # Loop through instances
        for instance_rds in instances_rds:

            try:
                instance_state = instance_rds['DBInstanceStatus']
                instance_id = instance_rds['DBInstanceIdentifier']

                # RDSインスタンスのタグを取得。
                tags = rds.list_tags_for_resource(ResourceName = instance_rds['DBInstanceArn']).get('TagList',[])
                for tag in tags:
                    # タグに基づいてインスタンスをフィルタする
                    if tag['Key'] == 'Auto-StartStop-Enabled':
                        print ("Current instance_state of %s is %s" % (instance_id, instance_state))
                        # アクションよりRDSの開始と停止。
                        if instance_state == 'available' and action == 'stop':
                            rds.stop_db_instance(
                                DBInstanceIdentifier = instance_id,
                                # DryRun = True
                            )
                            print ("Instance %s comes to stop" % instance_id)

                        elif instance_state == 'stopped' and action == 'start':
                            rds.start_db_instance(
                                DBInstanceIdentifier = instance_id,
                                # DryRun = True
                            )
                            print ("Instance %s comes to start" % instance_id)

                        else:
                            print ("Instance %s status is not right to start or stop" % instance_id)

            except Exception as e:
                displayException(e)
                # traceback.print_exc()

def displayException(exception):
    exception_type = exception.__class__.__name__
    exception_message = str(exception)

print("Exception type: %s; Exception message: %s;" % (exception_type, exception_message))
※ 基本設定のところでタイムアウトの値を30秒にする
3:CloudWatchEventsの作成。
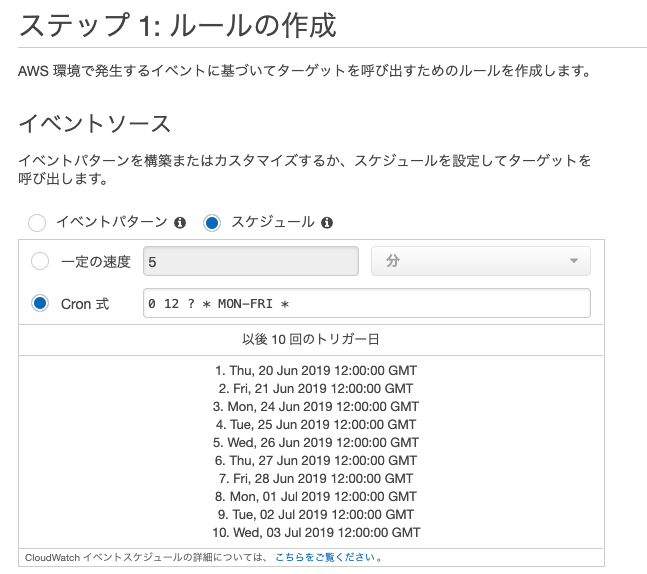
StopInstanceの作成
サービス >> CloudWatch >> イベント >> 「Get started」をクリック。
以下の通り設定する。
ステップ 1: ルールの作成
イベントソース
スケジュール:✔ Cron式:✔
スケジュールの書き方については以下リンクを参考にしてください。
ルールのスケジュール式(AWS公式)
↑上記を適切な形式で入力出来たらサンプルイベントが表示されます。
表示されない場合は形式が誤っているので修正してください。
また、指定時間はUTC時間になるので、実行したい時間-9時間で指定してください。
月曜から金曜の 21:00pm (UTC) /12:00:00 (GMT)
ターゲット
Lambda関数から機態をAutoStartStopInstancesにする
入力設定をクリックし、定数 (JSON テキスト)の入力欄に入力する。
{"action":"stop"}
ターゲットが複数ある場合は「ターゲットの追加」をクリックし、
同様に設定してください。
また、ターゲットでは「SNS トピック」も指定できるので、
イベント発生時に通知設定をすることも可能です。
上記を入力し終わったら画面右下の「設定の詳細」をクリックする。
| ステップ 2: ルールの詳細を設定する |
|---|
| 名前:StopInstance |
| 説明:毎○○時にターゲットインスタンスが自動停止されます。by Ramesh |
StartInstanceの作成
サービス >> CloudWatch >> イベント >> 「Get started」をクリック。
以下の通り設定する。
ステップ 1: ルールの作成
イベントソース
スケジュール:✔ Cron式:✔
月曜から金曜の 9:30am(UTC)
30 00 ? * MON-FRI *
ターゲット
Lambda関数から機態をAutoStartStopInstancesにする
入力設定をクリックし、定数 (JSON テキスト)の入力欄に以下を入力する。
{"action":"start"}
上記を入力し終わったら画面右下の「設定の詳細」をクリックする。
| ステップ 2: ルールの詳細を設定する |
|---|
| 名前:StartInstance |
| 説明:毎○○時にターゲットインスタンスが自動開始されます。by Ramesh |
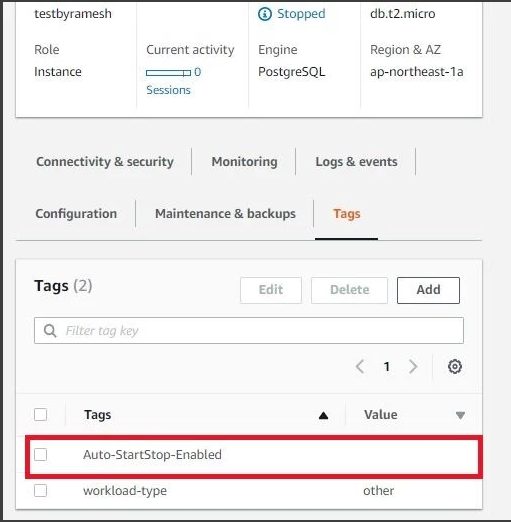
4.インスタンスにタグを付ける。
対象のRDSのインスタンスやEC2インスタンスにタグをつける。
タグ名:Auto-StartStop-Enabled
終わりに
AWSのサービスを組み合わせるだけで自動停止や自動開始することが実現ができました。これでインフラ部分でかかるコスト削減にも繋げていくと思います。ぜひ今までできなかったことを実現するにはちょっと工夫が必要になるとことが理解して新しいものを作りましょう。