概要
Denoで動作する対話的なDiscord botを作成し、Herokuにデプロイするまでの手順についてまとめます。
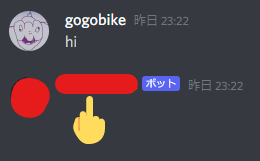
以下のスクリーンショットのように、投稿したテキストメッセージの内容に応じてDiscord botがメッセージを送信するものを作成します。

準備
Denoのインストール
Installation | Manual | Deno に従ってインストールします。
curl -fsSL https://deno.land/x/install/install.sh | sh
$ deno --version
deno 1.19.1 (release, x86_64-unknown-linux-gnu)
v8 9.9.115.7
typescript 4.5.2
Denonのインストール
Denoで作成したプログラムを簡単に実行するために、denonをインストールします。
denonは様々な機能を提供していますが、今回はnpm scriptsの代替として利用します。プログラムが複雑になるまではシェルスクリプトで代用する方法でも良いと思います。
deno install -qAf --unstable https://deno.land/x/denon/denon.ts
$ denon --version
[*] [main] v2.5.0
Discord botの設定
-
Discord Developer Portalにアクセスし、New Application -> Nameを入力 -> Create でDiscord アプリケーションを作成します。
-
Settings -> Bot -> Add Bot で Botの機能を有効化します。
Herokuの設定
The Heroku CLI | Heroku Dev Center の手順に従ってインストールします。
curl https://cli-assets.heroku.com/install.sh | sh
$ heroku --version
heroku/7.59.2 linux-x64 node-v12.21.0
Discord botのプログラムを作成する
ディレクトリ構成
$ tree
.
├── .envrc
├── .gitignore
├── Procfile
├── scripts.yml
├── src
│   └── main.ts
└── runtime.txt
ソースコード
Discordのライブラリとしてdiscordeno/discordeno: Discord API library for Denoを使用しています。
import {
  createBot,
  startBot,
  getUser
} from "https://deno.land/x/discordeno@13.0.0-rc22/mod.ts";

const bot = createBot({
  token: Deno.env.get("DISCORD_TOKEN")!,
  intents: ["GuildMessages"],
  botId: BigInt(Deno.env.get("APPLICATION_ID")!),
  events: {
    ready() {
      console.log("Successfully connected to gateway");
    },
    async messageCreate(bot, message) {
      console.log(message.content)
      if (message.channelId === BigInt(Deno.env.get("CHANNEL_ID")!)) {
        if (message.content === "bye") {
          const user = await getUser(bot, message.authorId)
          bot.helpers.sendMessage(
            message.channelId,
            {
              content: `die ${user.username} :-1:`,
            },
          );
        } else if (!message.isBot) {
          bot.helpers.sendMessage(
            message.channelId,
            {
              content: ":middle_finger:",
            },
          );
        }
      }
    },
  },
});

await startBot(bot);
各種設定ファイル
環境変数
# https://discord.com/developers/applications
# Settings -> Bot -> TOKEN
export DISCORD_TOKEN=XXXXXXXXXXXXXXXXXXXXXXXX.XXXXXX.XXXXXXXXXXXXXXXXXXXXXXXXXXX
# General Information -> APPLICATION ID
export APPLICATION_ID=000000000000000000

# チャンネルを右クリック -> IDをコピー
export CHANNEL_ID=000000000000000000
Denonの設定ファイル
scripts:
  start:
    cmd: "deno run --allow-env --allow-net ./src/main.ts"
    desc: "run discord bot"
Herokuの設定ファイル
Worker: deno run --allow-env --allow-net ./src/main.ts
v1.19.1
.gitignore
.envrc
動作確認
$ denon start
[*] [main] v2.5.0
[*] [daem] watching path(s): **/*.*
[*] [daem] watching extensions: ts,tsx,js,jsx,json
[!] [#0] starting `deno run --allow-env --allow-net ./src/main.ts`
Successfully connected to gateway
hi
:middle_finger:
bye
die gogobike :-1:
Herokuにデプロイする
heroku create --buildpack https://github.com/chibat/heroku-buildpack-deno.git
heroku config:set DISCORD_TOKEN=XXXXXXXXXXXXXXXXXXXXXXXX.XXXXXX.XXXXXXXXXXXXXXXXXXXXXXXXXXX
heroku config:set APPLICATION_ID=000000000000000000
heroku config:set CHANNEL_ID=000000000000000000

git init
git add -A
git commit -m 'Initial commit'
git push heroku main:main

heroku ps:scale Worker=1:Free
参考


