以前ReactでLINEログインAPIの実装について説明したときに
状態管理としてReduxを使っていました。
その後状態管理について調べていたら
最近はReduxの上位互換のRecoilというのが
出ているらしいので、
そちらを使ったほうが世間で通用すると思い
ここにまとめておきます。
参考資料
Shinさん。
Reactの勉強をするのによく拝見しています。
簡単に特徴説明
ReduxはStoreを一元管理。
Recoilは複数のStoreを管理(単位: atom)
useContextはStoreが変わると
最上位コンポーネントまで変わり、再レンダリング。
Recoilは再レンダリングしない。
0.インストール
npm install recoil
1.適用範囲を決める: RecoilRoot
RecoilRootをインポートし、
適用したい範囲をタグで囲む。
通常index.tsxの下記箇所を囲う。
import React from 'react';
import ReactDOM from 'react-dom/client';
import './index.css';
import App from './App';
+ import { RecoilRoot } from "recoil";

const root = ReactDOM.createRoot(
  document.getElementById('root') as HTMLElement
);
root.render(
  <React.StrictMode>
+   <RecoilRoot>
      <App />
+   </RecoilRoot>
  </React.StrictMode>
);
2.storeを作成: atom
ファイルを作成
src>stores>testStore.ts
import { atom } from "recoil";

export const testStore = atom<string>({
    key: "testStore",
    // デフォルト値を指定する。
    default: "default value",
});
ここではtestStoreという文字列型のstoreを作成
数字やオブジェクトリストを格納したい場合は型を変更
import { atom } from "recoil";

export const testStore = atom<number>({
    key: "testStore",
    default: 0,
});
import { atom } from "recoil";

type OrgType = {
    id: string,
    title: string
}

// オブジェクト配列を作成する場合は型も定義しておく
export const testStore = atom<Array<OrgType>>({
    key: "testStore",
    default: [],
})
この後は文字列のほうで進める。
3.store値を取得/更新: useHooks
ファイルを作成
src>Components>TestComponent.tsx
値参照: useRecoilValue
storeを参照したいコンポーネントで
useRecoilValueを呼ぶ。
+ import { useRecoilValue } from 'recoil';
// 作成したstoreを読み込んでuseRecoilValueに渡す。
+ import { testStore } from '../stores/testStore';
const TestComponent = () => {
+ const testText = useRecoilValue(testStore);
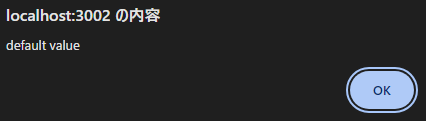
const handleClick = () => {
alert(testText)
}
return (
<div>
<button onClick={()=>handleClick()}>click</button>
</div>
)
}
export default TestComponent

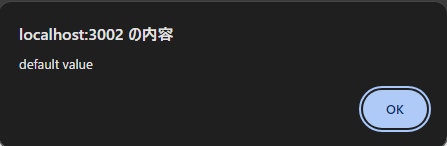
動作確認完了。
値変更: useSetRecoilState;
storeを変更したいコンポーネントで
useSetRecoilStateを呼ぶ。
// 'useSetRecoilState'を追加でimport
+ import { useRecoilValue, useSetRecoilState } from 'recoil';
import { testStore } from '../stores/testStore';

const TestComponent = () => {
    const testText = useRecoilValue(testStore);
+   const setTestText = useSetRecoilState(testStore)
    const handleClick = () => {
        alert(testText)
    }

    // setする関数を追加。
+   const handleClickSet = () => {
+       setTestText("setしました。")
+   }

    return (
        <div>
            <button onClick={()=>handleClick()}>click</button>
+           <button onClick={()=>handleClickSet()}>set</button>
        </div>
    )
}
export default TestComponent
click押下
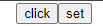
set押下→click押下
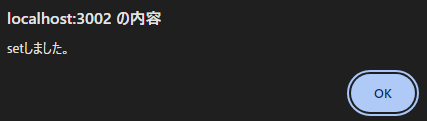
storeの値が変わっていることが確認できる
値取得/変更: useRecoilState;
storeを取得/変更したいコンポーネントで
useRecoilStateを呼ぶ。
- import { useRecoilValue, useSetRecoilState } from 'recoil';
+ import { useRecoilState } from 'recoil';
import { testStore } from '../stores/testStore';

const TestComponent = () => {
-   const testText = useRecoilValue(testStore);
-   const setTestText = useSetRecoilState(testStore)
+   const [testText, setTestText] = useRecoilState(testStore)
    const handleClick = () => {
        alert(testText)
    }
    const handleClickSet = () => {
        setTestText("setしました。")
    }

    return (
        <div>
            <button onClick={()=>handleClick()}>click</button>
            <button onClick={()=>handleClickSet()}>set</button>
        </div>
    )
}
export default TestComponent
使い方はuseRecoilValue, useSetRecoilStateと同じ。
4.派生状態を取得: selector
storeの値を取得するだけなら
useRecoilStateを使えば十分だが、
Recoilを学ぶにあたってselector
という概念が出てくる。
selectorは加工したstore値を返却する。
例
・フィルターされた todo リスト
・Todo リスト統計
selectorの作成方法
単純なstore値に文字列を付け加える処理
+ import { atom, selector } from "recoil";

export const testStore = atom<string>({
    key: "testStore",
    default: "default value",
});

// 返り値の型を指定してあげる
+ export const testSelector = selector<string>({
+   key: "testSelector",
// get内でstore値に加えたい処理を記載する
+   get: ({ get })=>{
+       return `selected ${get(testStore)}`;
+   }
+})
selectorの使用方法
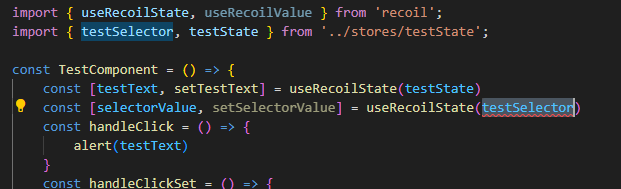
+ import { useRecoilState, useRecoilValue } from 'recoil';
import { testSelector, testStore } from '../stores/testStore';

const TestComponent = () => {
    const [testText, setTestText] = useRecoilState(testStore)
+   const selectorValue = useRecoilValue(testSelector)
    const handleClick = () => {
        alert(testText)
    }
    const handleClickSet = () => {
        setTestText("setしました。")
    }
+   const handleClickSelector = () => {
+       alert(selectorValue)
+   }
    return (
        <div>
            <button onClick={()=>handleClick()}>click</button>
            <button onClick={()=>handleClickSet()}>set</button>
+           <button onClick={()=>handleClickSelector()}>selector</button>
        </div>
    )
}
export default TestComponent
気になったので試してみたこと
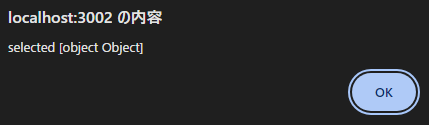
get(testStore)しないと正しく文字列を取得できない。
最初testStoreにそのまま文字列をつけようとしたが、
冷静に考えるとtestStoreはobjectなので、
そのまま追加はできない。
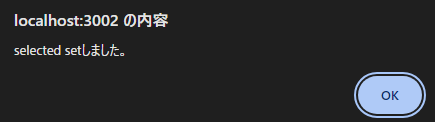
return `selected ${testStore}`;
こちらでalertしてみると一目瞭然。
selectorに対してsetは使わないが、
試しにuseRecoilStateで呼び出してみることに。
そりゃ普通のtestStoreとtestSelectorとで
宣言方法が違うのでエラーになる。
おまけ: 「state」と「store」の違い
私自身この記事を書いていて
stateと記述するかstoreと記述するか
迷っていたので、GPTに聞いてみた。
Reactにおける「state」と「store」は、
アプリケーションの状態管理に関連するが、
役割と範囲が異なる概念です。State(ステート)
定義:
Stateは、Reactコンポーネント内の状態を表します。
これは、コンポーネントが保持するデータであり、
コンポーネントのレンダリングと行動に影響を与えます。範囲:
Stateは通常、単一のコンポーネントに局所的です。
つまり、あるコンポーネントのStateは、
そのコンポーネント内でのみ管理され、
必要に応じて子コンポーネントに
プロパティ(props)として渡されます。Store(ストア)
定義:
Storeは、アプリケーションの全体的な状態を
管理するための仕組みです。
これは、状態管理ライブラリ(例:Redux、MobXなど)
によって提供されます。範囲:
Storeはアプリケーション全体にまたがる
グローバルな状態を管理します。
これにより、異なるコンポーネント間で状態を共有し、
同期することが可能になります。