概要
Gatlingとは、負荷試験のためのテストツールです。
社内ツールの負荷試験のために初めて使用したので、インストールからGatling実行結果を確認するまでの手順をまとめました。
インストール
OpenJDKのインストール
GatlingはJavaでテストシナリオを書いていきます。
以前はScalaのみ対応だったのですが、Gatling 3.7からJava(とKotlin)で書けるようになりました。
Oracle公式サイトからJDKをダウンロード、インストールします。
インストール後、以下を実行し、Javaのバージョンが表示されていればインストール完了です。
java -version
Gatlingのインストール
Gatling公式サイトからzipパッケージをダウンロードし、解凍します。
コマンドでも取得できます。
// ダウンロード
wget https://repo1.maven.org/maven2/io/gatling/highcharts/gatling-charts-highcharts-bundle/3.1.3/gatling-charts-highcharts-bundle-3.1.3-bundle.zip

// zipファイルを解凍
unzip gatling-charts-highcharts-bundle-3.1.3-bundle.zip
動作確認
インストールが完了したらGatlingが実行できるようになっていることを確認します。
解凍したフォルダに移動し、以下を実行します。
Linux/Unixの場合
bin/gatling.sh
Windowsの場合
bin/gatling.bat
実行すると、このように表示されます。
Do you want to run the simulation locally, on Gatling Enterprise, or just package it?
Type the number corresponding to your choice and press enter
[0] <Quit>
[1] Run the Simulation locally
[2] Run the Simulation on Gatling Enterprise Cloud
[3] Package the Simulation for Gatling Enterprise
1を押してこのように表示されれば、Gatlingが実行できる状態です。
computerdatabase.ComputerDatabaseSimulation is the only simulation, executing it.
Select run description (optional)
1行目では、「実行できるファイルは"computerdatabase.ComputerDatabaseSimulation"しかありませんよ」と教えてくれています。
2行目はオプションの指定ですが、特に気にせず、Enterを押して"computerdatabase.ComputerDatabaseSimulation"に定義されたシナリオを実行しましょう。
実行中は試験の途中経過が表示され、試験が終わると試験結果が表示されます。
================================================================================
---- Global Information --------------------------------------------------------
> request count                                        102 (OK=102    KO=0     )
> min response time                                    171 (OK=171    KO=-     )
> max response time                                    765 (OK=765    KO=-     )
> mean response time                                   247 (OK=247    KO=-     )
> std deviation                                        178 (OK=178    KO=-     )
> response time 50th percentile                        184 (OK=184    KO=-     )
> response time 75th percentile                        189 (OK=189    KO=-     )
> response time 95th percentile                        740 (OK=740    KO=-     )
> response time 99th percentile                        760 (OK=760    KO=-     )
> mean requests/sec                                  5.368 (OK=5.368  KO=-     )
---- Response Time Distribution ------------------------------------------------
> t < 800 ms                                           102 (100%)
> t ≥ 800 ms <br> t < 1200 ms                            0 (  0%)
> t ≥ 1200 ms                                            0 (  0%)
> failed                                                 0 (  0%)
================================================================================
最後に、実行結果を保存しているファイルを教えてくれます。
Reports generated in 0s.
Please open the following file: $GATLING_HOME/results/computerdatabasesimulation-20220908060440069/index.html
試験結果はresultsフォルダに保存されます。htmlファイルを開くと、グラフ化された試験結果を確認することができます。
独自シナリオの作成
user-files/simulations/computerdatabaseに負荷試験のシナリオを定義したファイルを作成します。
シナリオはsetUp内に定義します。
この例は、デフォルトで用意されている"ComputerDatabaseSimulation.java"ファイルのファイル名だけ変更したものです。
package computerdatabase;

import static io.gatling.javaapi.core.CoreDsl.*;
import static io.gatling.javaapi.http.HttpDsl.*;

import io.gatling.javaapi.core.*;
import io.gatling.javaapi.http.*;

import java.util.concurrent.ThreadLocalRandom;

/**
 * This sample is based on our official tutorials:
 * <ul>
 *   <li><a href="https://gatling.io/docs/gatling/tutorials/quickstart">Gatling quickstart tutorial</a>
 *   <li><a href="https://gatling.io/docs/gatling/tutorials/advanced">Gatling advanced tutorial</a>
 * </ul>
 */
public class SimulationTest extends Simulation {

    FeederBuilder<String> feeder = csv("search.csv").random();

    ChainBuilder search =
        exec(http("Home").get("/"))
            .pause(1)
            .feed(feeder)
            .exec(
                http("Search")
                    .get("/computers?f=#{searchCriterion}")
                    .check(
                        css("a:contains('#{searchComputerName}')", "href").saveAs("computerUrl")
                    )
            )
            .pause(1)
            .exec(
                http("Select")
                    .get("#{computerUrl}")
                    .check(status().is(200))
            )
            .pause(1);

    // Repeat is a loop resolved at RUNTIME
    ChainBuilder browse =
        // Note how we force the counter name, so we can reuse it
        repeat(4, "i").on(
            exec(
                http("Page #{i}")
                    .get("/computers?p=#{i}")
            ).pause(1)
        );

    // Note we should be using a feeder here
    // Let's demonstrate how we can retry: let's make the request fail randomly and retry a given
    // number of times
    ChainBuilder edit =
        // Let's try at max 2 times
        tryMax(2)
            .on(
                exec(
                    http("Form")
                        .get("/computers/new")
                )
                    .pause(1)
                    .exec(
                        http("Post")
                            .post("/computers")
                            .formParam("name", "Beautiful Computer")
                            .formParam("introduced", "2012-05-30")
                            .formParam("discontinued", "")
                            .formParam("company", "37")
                            .check(
                                status().is(
                                    // We do a check on a condition that's been customized with
                                    // a lambda. It will be evaluated every time a user executes
                                    // the request.
                                    session -> 200 + ThreadLocalRandom.current().nextInt(2)
                                )
                            )
                    )
            )
            // If the chain didn't finally succeed, have the user exit the whole scenario
            .exitHereIfFailed();

    HttpProtocolBuilder httpProtocol =
        http.baseUrl("https://computer-database.gatling.io")
            .acceptHeader("text/html,application/xhtml+xml,application/xml;q=0.9,*/*;q=0.8")
            .acceptLanguageHeader("en-US,en;q=0.5")
            .acceptEncodingHeader("gzip, deflate")
            .userAgentHeader(
                "Mozilla/5.0 (Macintosh; Intel Mac OS X 10.8; rv:16.0) Gecko/20100101 Firefox/16.0"
            );

    ScenarioBuilder users = scenario("Users").exec(search, browse);
    ScenarioBuilder admins = scenario("Admins").exec(search, browse, edit);

    {
        setUp(
            users.injectOpen(rampUsers(5).during(10)),
            admins.injectOpen(rampUsers(2).during(10))
        ).protocols(httpProtocol);
    }
}
新たにファイルを作成し再び以下を実行します。
bin/gatling.sh
先ほどと同じように以下のように表示されます。
Do you want to run the simulation locally, on Gatling Enterprise, or just package it?
Type the number corresponding to your choice and press enter
[0] <Quit>
[1] Run the Simulation locally
[2] Run the Simulation on Gatling Enterprise Cloud
[3] Package the Simulation for Gatling Enterprise
1を押して次に進むとこのように表示されます。
GATLING_HOME is set to /Users/...
Choose a simulation number:
     [0] computerdatabase.ComputerDatabaseSimulation
     [1] computerdatabase.SimulationTest
このとき、実行できるシナリオ(ファイル)が全て表示されます。
実行したいファイルの番号(今回は1)を押して選択します。
Select run description (optional)
Enterを押して実行します。
レコーダーを使ったシナリオ作成
Gatlingにはレコーダーというツールがあります。
このツールを使うと、webアプリ上でのアクションを記録し、負荷試験のシナリオとしてファイルにコードを自動で書き起こしてくれます。
これによって、コードを書く手間を省くことができます。
まずレコーダーを実行します。
Linux/Unixの場合
bin/recorder.sh
Windowsの場合
bin/recorder.bat
実行すると次のようなウィンドウが表示されます。
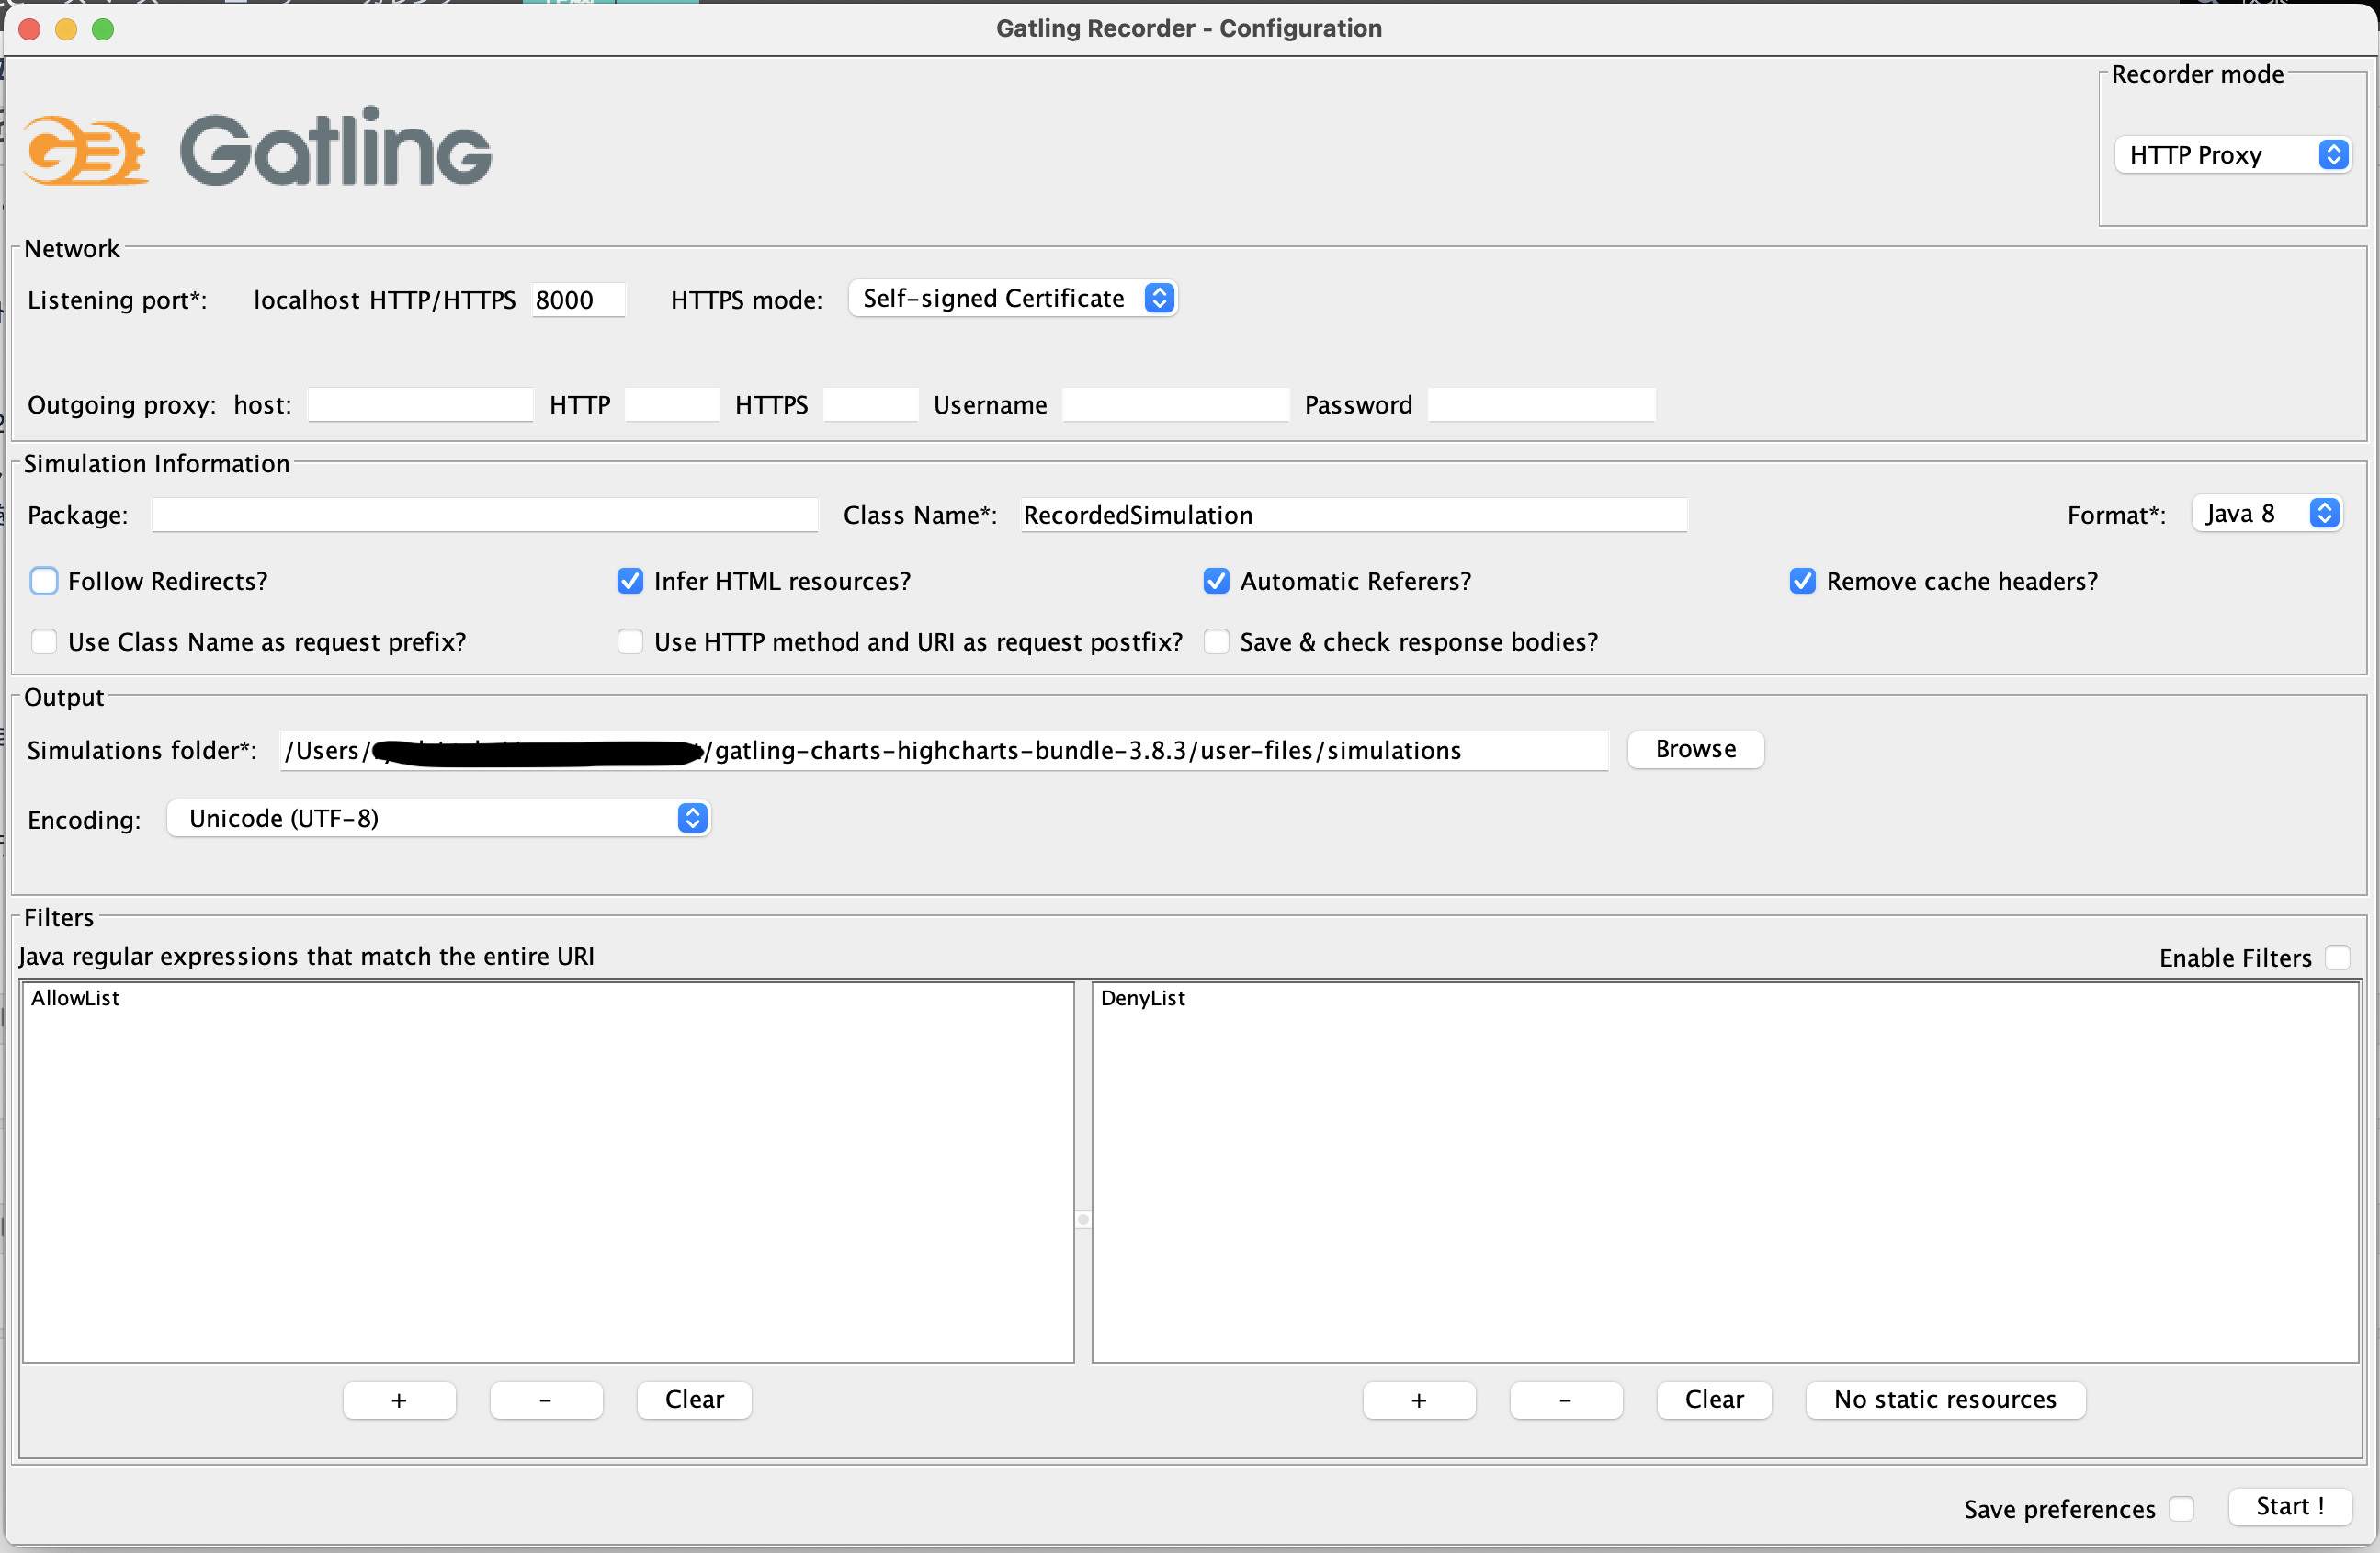
右上のRecorder modeで、2種類のうち1つ実行方法を選択します。
以下の2種類の中から選択します。
- HTTP Proxy:HTTPプロキシとして実行する方法
- HAR Converter:HARファイルを変換して実行する方法
HTTPプロキシとして実行
この方法では、PC 上に HTTP プロキシを立てて端末の通信をキャプチャし、それをもとにシナリオを作成する方法です。
この方法で自分はうまく動かせなかったのですが、流れだけ説明します。
- Recorder modeでHTTP Proxyを選択
- localhostのポート番号を設定
- CA 証明書をブラウザのキーストアにインポート
- Package, Class Nameを設定
- Start!
(自分はCA証明書を発行できず、断念しました。)
HARファイルを変換して実行
まず、Recorder modeでHAR Converterを選択します。
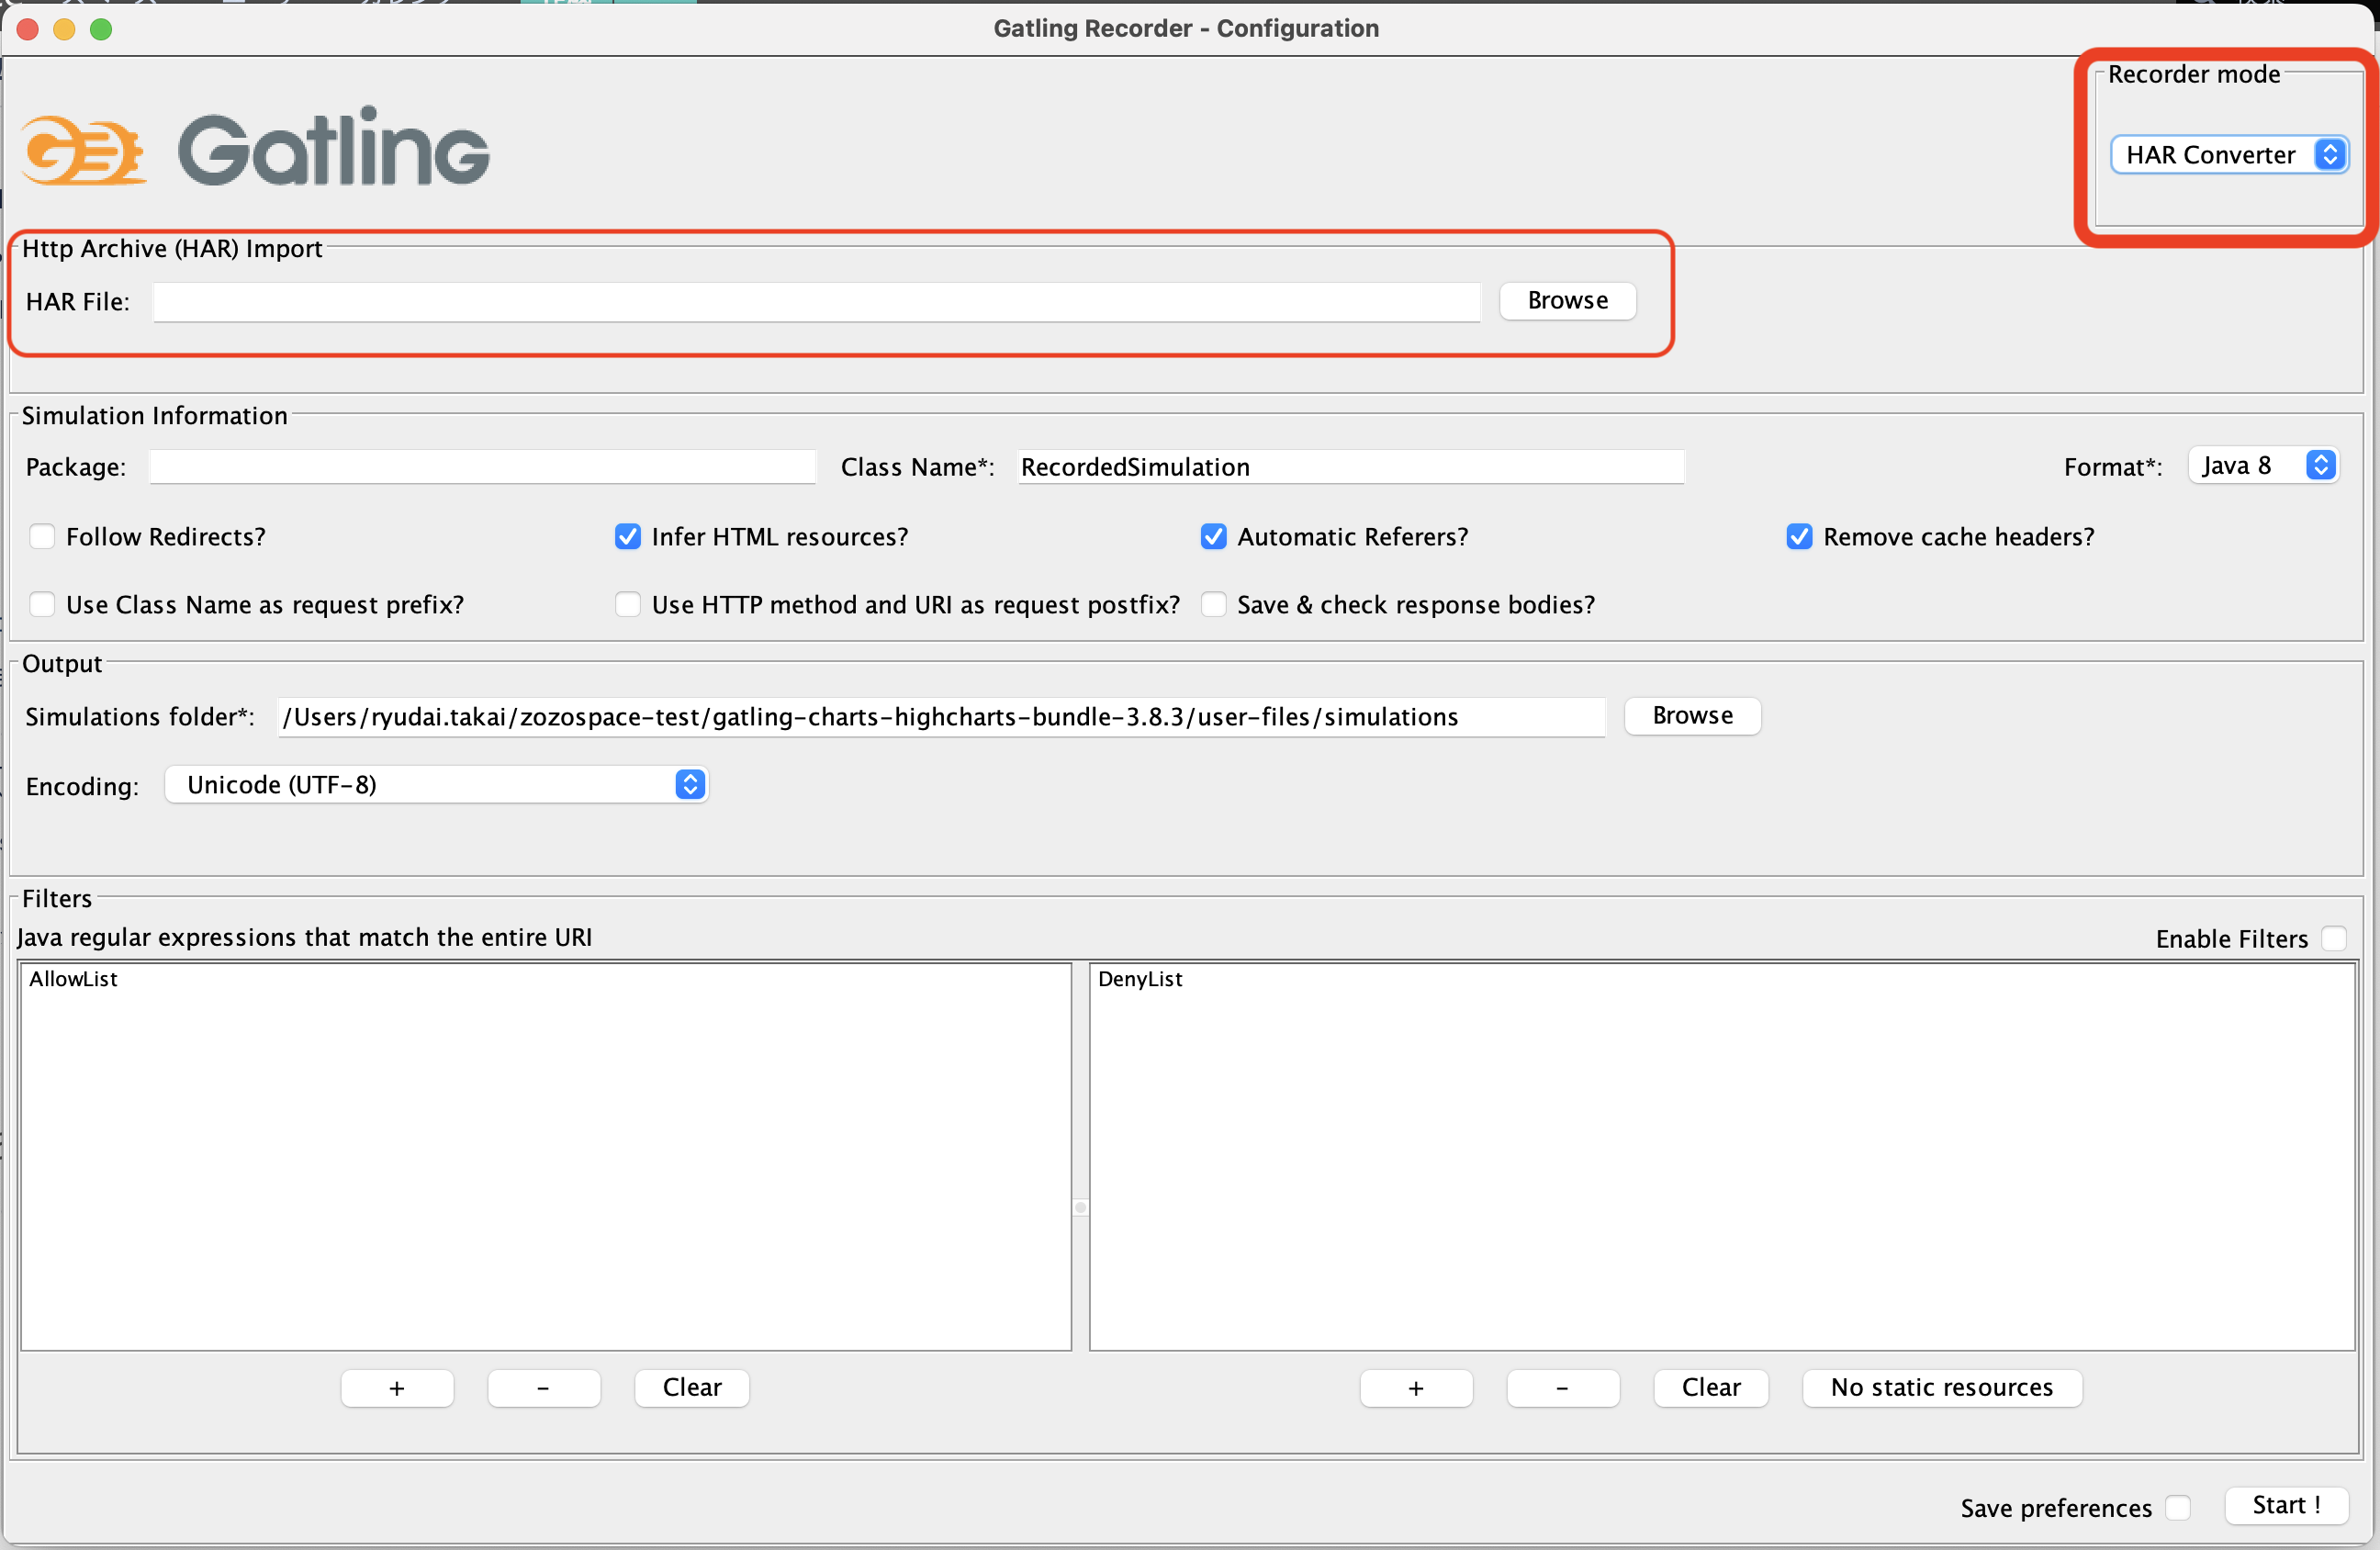
Http Archive (HAR) Import
という項目が現れます。
次にHARファイルを用意していきます。
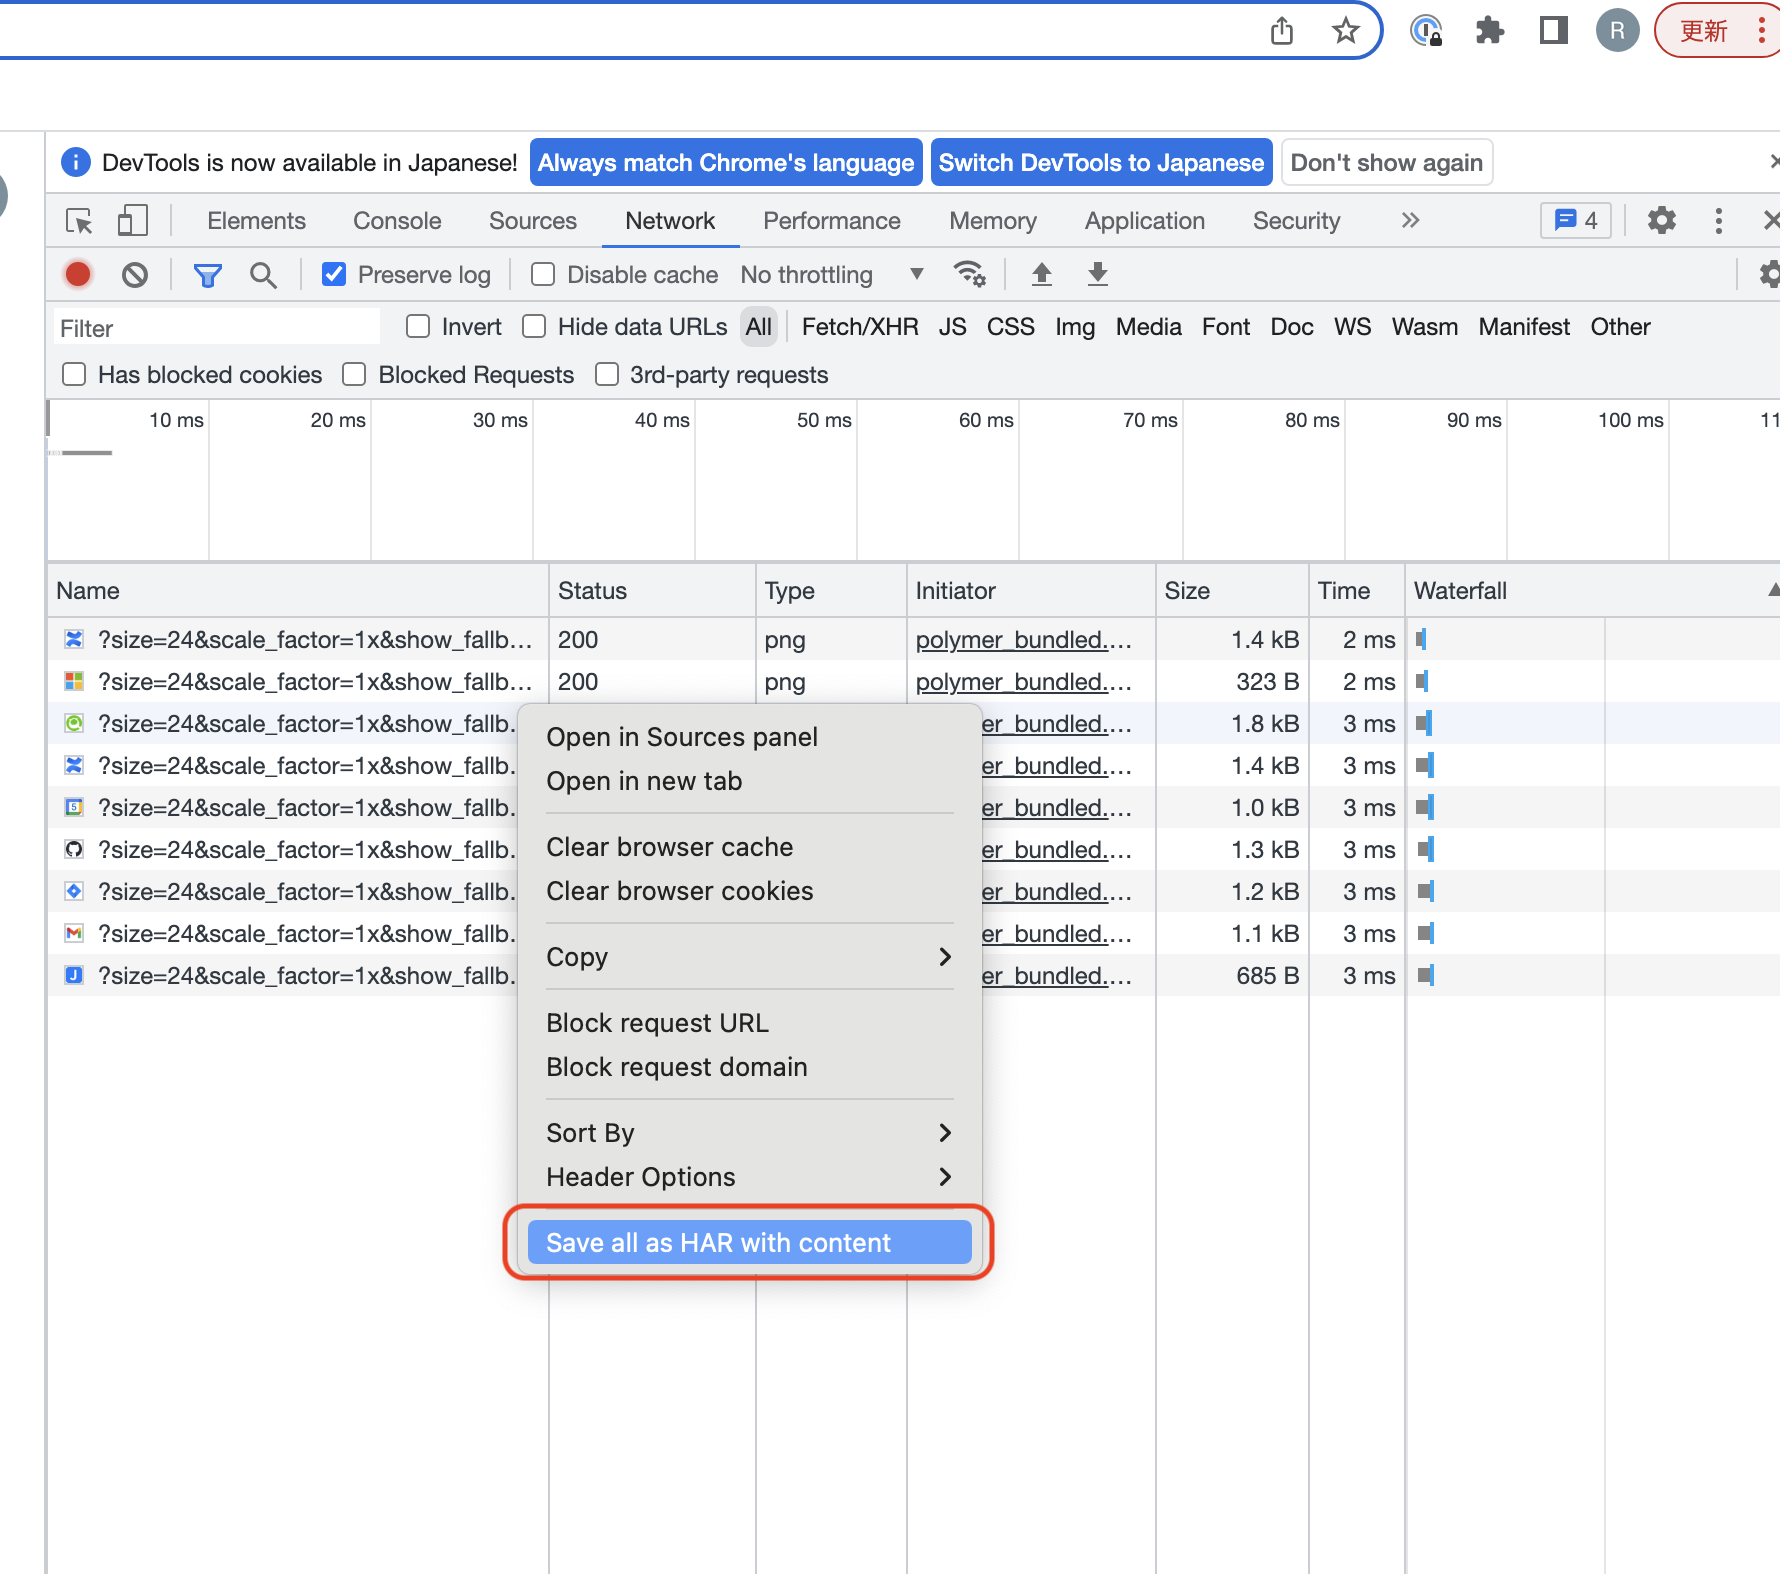
負荷試験を行いたいWebアプリケーションを開き、その画面で、その他のツール→デベロッパーツールを選択します。
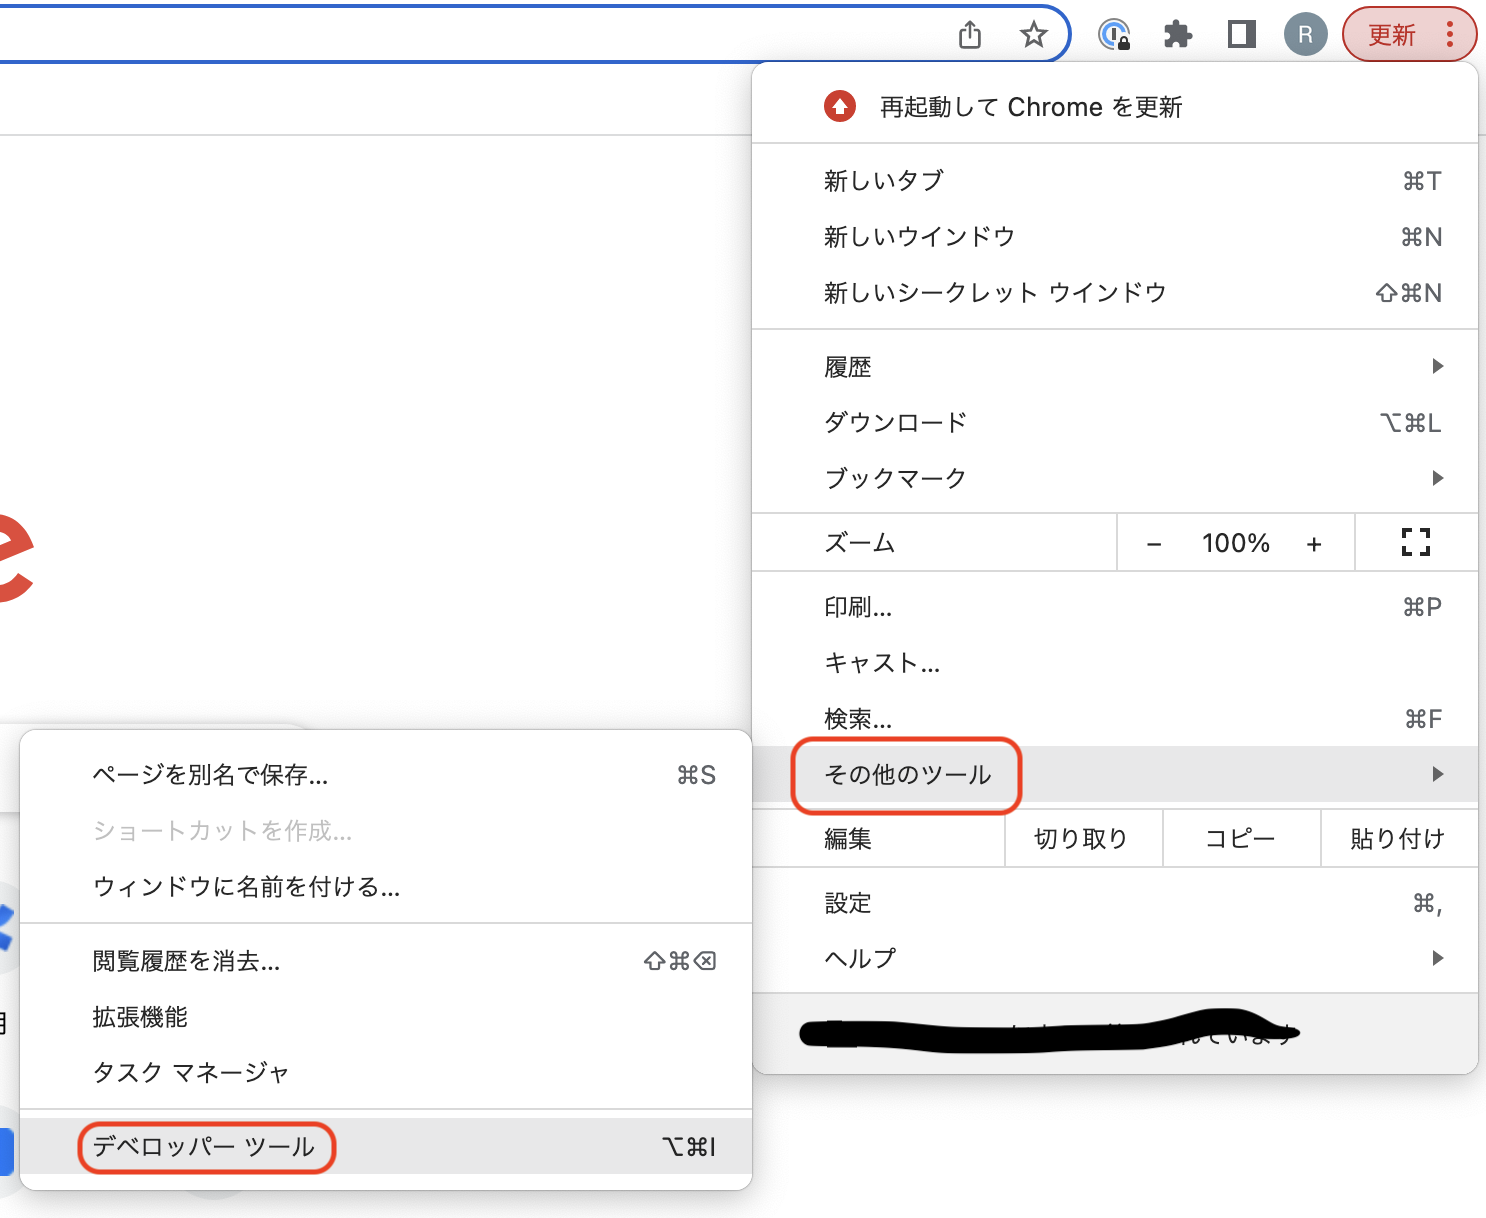
次にNetworkを選択します。
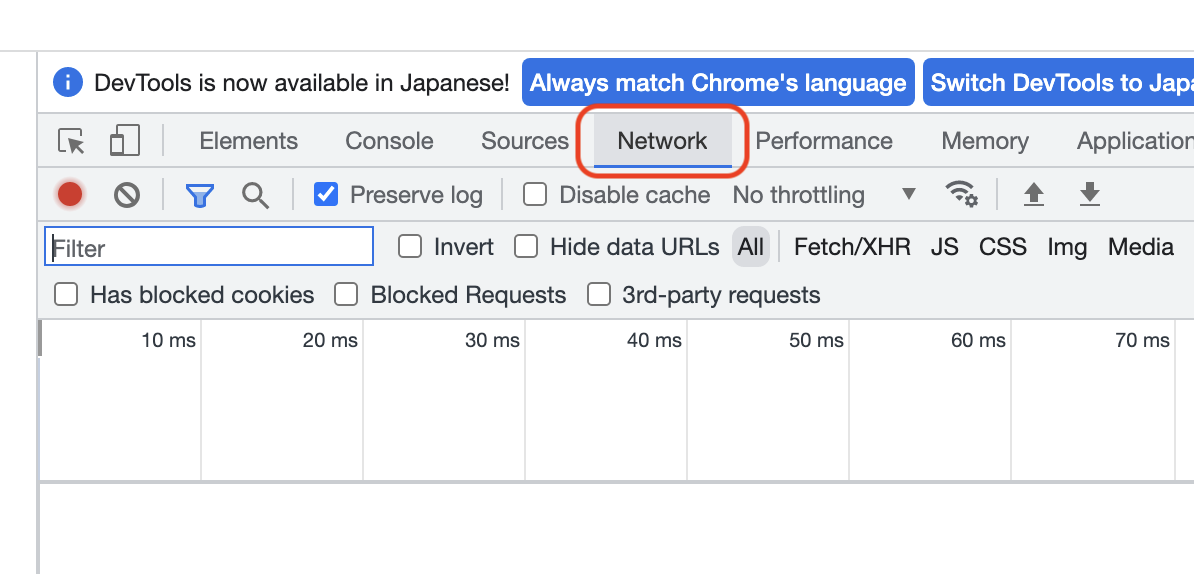
テストを行いたいアクションをアプリ上で行います。(リンクをクリック、コメント投稿など)
そうすると、リクエストやレスポンスの情報が流れてきます。
テストしたいアクションを終えたら、画面中央で右クリックし、Save all as HAR with contentを押して、HARファイルを作成&保存します。
レコーダーのウィンドウに戻り、保存したHARファイルを選択します。
最後にPackage, Class Nameを設定します。
Start!で実行するとアクション通りに自動でシナリオが生成されています。
シナリオコードを読み解く
Gatlingのサンプルコードのために用意されているhttp://computer-database.gatling.ioのページを使った簡単なシナリオコードから、処理の流れを追ってみましょう。
大まかな流れとしては以下のようになります。
- シュミレーションクラスの定義
- url,headerなどテストに使用するhttp関連の設定をするオブジェクトの定義
- テストシナリオオブジェクトの定義
- setUp処理の呼び出し
シナリオの中身はこんな感じです。
package computerdatabase;

// 使用するライブラリのimport
import static io.gatling.javaapi.core.CoreDsl.*;
import static io.gatling.javaapi.http.HttpDsl.*;

import io.gatling.javaapi.core.*;
import io.gatling.javaapi.http.*;
import java.util.concurrent.ThreadLocalRandom;

// シュミレーションクラスを記述
public class SimulationTest extends Simulation {

  {
	// テストを行うために必要なhttp関連の設定オブジェクトを作成する
    HttpProtocolBuilder httpProtocol = http
      .baseUrl("http://computer-database.gatling.io") // baseとなるUrlの指定。以降に扱うurlのrootになる。
      .acceptHeader("text/html,application/xhtml+xml,application/xml;q=0.9,*/*;q=0.8") // Accept Headerの設定
      .doNotTrackHeader("1") // DNT Headerの拒否設定
      .acceptLanguageHeader("en-US,en;q=0.5") // Accept-Language Headerの設定
      .acceptEncodingHeader("gzip, deflate") // Accept-Encoding Headerの設定
      .userAgentHeader("Mozilla/5.0 (Macintosh; Intel Mac OS X 10.8; rv:16.0) Gecko/20100101 Firefox/16.0"); // User-Agent Headerの設定

    // テストシナリオオブジェクトを作成
    ScenarioBuilder scn = scenario("Scenario Name") // A scenario is a chain of requests and pauses
      .exec(
        http("request_1") // リクエストにラベリングする名前。後のテスト結果・レポートなどで利用するだけなので好きな名前をつければよい。
          .get("/") // http://computer-database.gatling.io/ にGETリクエストを投げる
      )
      .pause(7) // 7秒間停止する
      .exec(
        http("request_2")
          .get("/computers?f=macbook") // http://computer-database.gatling.io/ にGETリクエストを投げる
      )
      .pause(2)
      .exec(
        http("request_3")
          .get("/computers/6")
      )

      .exec(
        http("request_10")
          .post("/computers") // POSTリクエスト
          .formParam("name", "Beautiful Computer")  // 送信するフォームデータを定義
          .formParam("introduced", "2022-09-16")
          .formParam("discontinued", "")
          .formParam("company", "37")
      );

    // セットアップ処理
    // テストシナリオ(scn) を 先に定義したhttp設定(httpProtocol)を使って10秒間10ユーザで実行する。
    setUp(scn.injectOpen(rampUsers(10).during(10)).protocols(httpProtocol));
  }
}
テストしたいツールのヘッダー情報やリクエスト情報などは、デベロッパーツールやCharlesから調べて設定しましょう。
シナリオ
setUpで指定できるシナリオは他にもあります。
| シナリオ | 説明 |
|---|---|
| nothingFor(5 seconds) | 指定した時間、一時停止する |
| atOnceUsers(10) | 指定したユーザ数での同時アクセスを一回行う |
| rampUsers(10) during(5 seconds) | 指定した時間で、指定したユーザ数のアクセスが線形に立ち上がる。左の例だと、5秒間で10ユーザが立ち上がる(総リクエスト数は10) |
| constantUsersPerSec(20) during (15 seconds) | 指定した時間、1秒ごとに指定したユーザ数が立ち上がる。左の例だと、15秒の間、秒間20ユーザが立ち上がる(総リクエスト数は300) |
| constantUsersPerSec(20) during (15 seconds) randomized | 指定した時間、1秒ごとに指定したユーザ数が立ち上がるが、ユーザの立ち上がりの間隔がランダムになる |
| rampUsersPerSec(10) to 20 during (10 minutes) | 指定した時間の間で、指定した開始時の秒間ユーザ数から終了時の秒間ユーザ数まで一定の間隔で上げていく。左の例だと、開始時は秒間10ユーザが立ち上がるが、一定の間隔で秒間ユーザ数を上げ、終了時には秒間20ユーザが立ち上がっている状態 |
| rampUsersPerSec(10) to 20 during (10 minutes) randomized | 指定した時間の間で、指定した開始時の秒間ユーザ数から終了時の秒間ユーザ数まで上げていくが、上げていく間隔がランダムになる |
| constantConcurrentUsers(10) during (10 seconds) | 指定した時間、同時にアクセスしてくるユーザ数を指定した数に制限する。左の例では、同時にアクセスできるユーザ数は最大10まで |
| rampConcurrentUsers(10) to (20) during (10 seconds) | 指定した時間の間で、同時にアクセスしてくるユーザ数の最大値を指定した開始時の値から終了時の値まで上げていく。左の例だと、開始時の同時にアクセスできるユーザ数は最大10だが、終了時には20ユーザが最大になる |
まとめ
Gatlingを使うと、負荷テストの結果わかりやすく表示してくれるのでとても使いやすかったです。
また、レコーダーのような機能も付いているので、簡単にシナリオも作れ、初心者にも優しいなと思いました!
負荷試験のツールは他にもいくつかあります。私は使ったことがなく比較できませんが、簡単に負荷試験を行いたいという方にはGatlingをおすすめします!