はじめに
- SteamVR Plugin 2.0.1
- Unity 5.5.4p4 Personal
- テレポート移動についてはサンプルファイルがあるので割愛
- viveコントローラーのパッドをクリックして単純なスライドを実装したかったのですが、良い日本語のリファレンスが見つからなかった。
- Unity、C#共に歴は浅いです。
準備
- アセットストアからSteamVR Pluginをダウンロードする。
- SteamVRのセッティングウィンドウが出てきますがAccept Allですべて許可する。
- 地面用のPlaneオブジェクトを作成
- デフォルトでヒエラルキー内にあるMain Cameraを削除
移動用オブジェクト作成
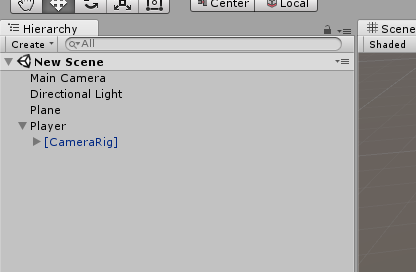
- ヒエラルキー内でCreate Emptyを選択し、移動用のオブジェクトを作成します。
名前はPlayerとします。(座標は全て0に) - アセット欄からSteamVR→Prefabs→[CameraRig]をシーンに設置。
- 移動用オブジェクト(Player)の子要素に入るように[CameraRig]を設定します。(こちらの[CameraRig]も座標を全て0に)
SteamVR Input設定
-アセットストアからプラグインをダウンロードすると、WindowメニューにSteamVR Inputが追加されているので選択。
- exampleファイルをコピーするか聞かれるのでOKに。
- デフォルトの設定ではトラックパッド用のアクションが無いので追加する。
- 名前は何でもいいです。ここではtpadとします。
- Typeはvector2にする。
- save and generateした時にサンプルシーンが読み込まれることがありますが落ち着いて元のシーンを読み込みます。

- saveが完了したらopen binding UIを開きます。
- ブラウザが立ち上がり、専用ページが表示されます。
- current bindingをeditします。
- Trackpadの+ボタンからTRACKPADを選択し追加
- tpadをPositionに割り当てる
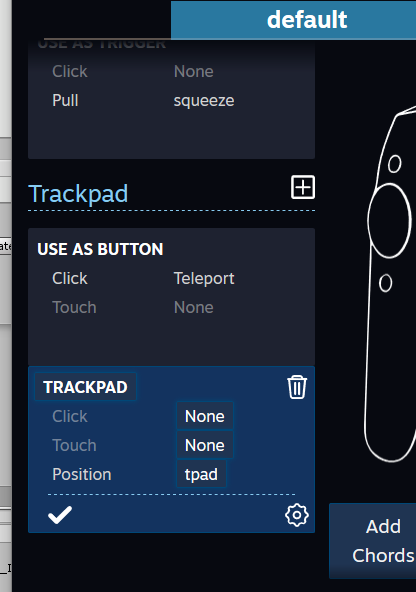
- Save Parsonal Bindingで保存
スクリプトを書く
playerのAdd Componetから以下のスクリプトを追加します。
using System.Collections;
using System.Collections.Generic;
using UnityEngine;

namespace Valve.VR
{
	public class player : MonoBehaviour {

		private SteamVR_ActionSet[] actionSets;
		private SteamVR_ActionSet set;
		private SteamVR_Action action;
		private SteamVR_Action tpad;

		private SteamVR_Input_Sources[] sources;
		private SteamVR_Input_Sources source;
		private SteamVR_Action_Boolean actionBoolean;
		private SteamVR_Action_Vector2 actionVector2;

		private bool click;
		private float tpad_x;
		private float tpad_y;

		private float mv_sp=0.01f;

		// Use this for initialization
		void Start () {
			sources = SteamVR_Input_Source.GetUpdateSources();
			source = sources[1];//righthand

			if (actionSets == null) {
				actionSets = SteamVR_Input_References.instance.actionSetObjects;
			}
			set = actionSets [0];//default
			action = set.allActions [1];//teleport click
			tpad = set.allActions [8];//tpad

			actionBoolean = (SteamVR_Action_Boolean)action;
			actionVector2 = (SteamVR_Action_Vector2)tpad;
		}

		// Update is called once per frame
		void Update () {
			click = actionBoolean.GetState(source);
			tpad_x = actionVector2.GetAxis(source).x;
			tpad_y = actionVector2.GetAxis(source).y;

			if (Input.GetKey(KeyCode.W) || (click && tpad_y>0 && tpad_x<0.7f && tpad_x>-0.7f)) {
				transform.position = new Vector3(transform.position.x,0f,transform.position.z+mv_sp);
			}
			if (Input.GetKey(KeyCode.A) || (click && tpad_x<0 && tpad_y<0.7f && tpad_y>-0.7f)) {
				transform.position = new Vector3(transform.position.x-mv_sp,0f,transform.position.z);
			}
			if (Input.GetKey(KeyCode.S) || (click && tpad_y<0 && tpad_x<0.7f && tpad_x>-0.7f)) {
				transform.position = new Vector3(transform.position.x,0f,transform.position.z-mv_sp);
			}
			if (Input.GetKey(KeyCode.D) || (click && tpad_x>0 && tpad_y<0.7f && tpad_y>-0.7f)) {
				transform.position = new Vector3(transform.position.x+mv_sp,0f,transform.position.z);
			}
		}
	}
}
- これで右手のトラックパッドの上下左右クリックでぬるぬる動いていけるはずです。
- sources[1]など数字で直接アクセスしていますが、文字列で参照できる方法があるはずです。ですが自分の力量では分かりませんでした・・・。
- 添字の内容に関してはwindowメニューのSteamVR Input Live Viewから探しました。
- トラックパッドの上の箇所をクリックしたら、とかに直接割り当てるとか出来なかったのでこのようになってます。
最後に
公式が早くリファレンスを充実させてくれることを祈っています。