注意点
Compose Materialが提供するComposableはMaterial Designに準拠するように実装されているため、デフォルトの実装のまま使用すると意図したレイアウトにならないことがあります。
例
具体的な例を示して説明します。
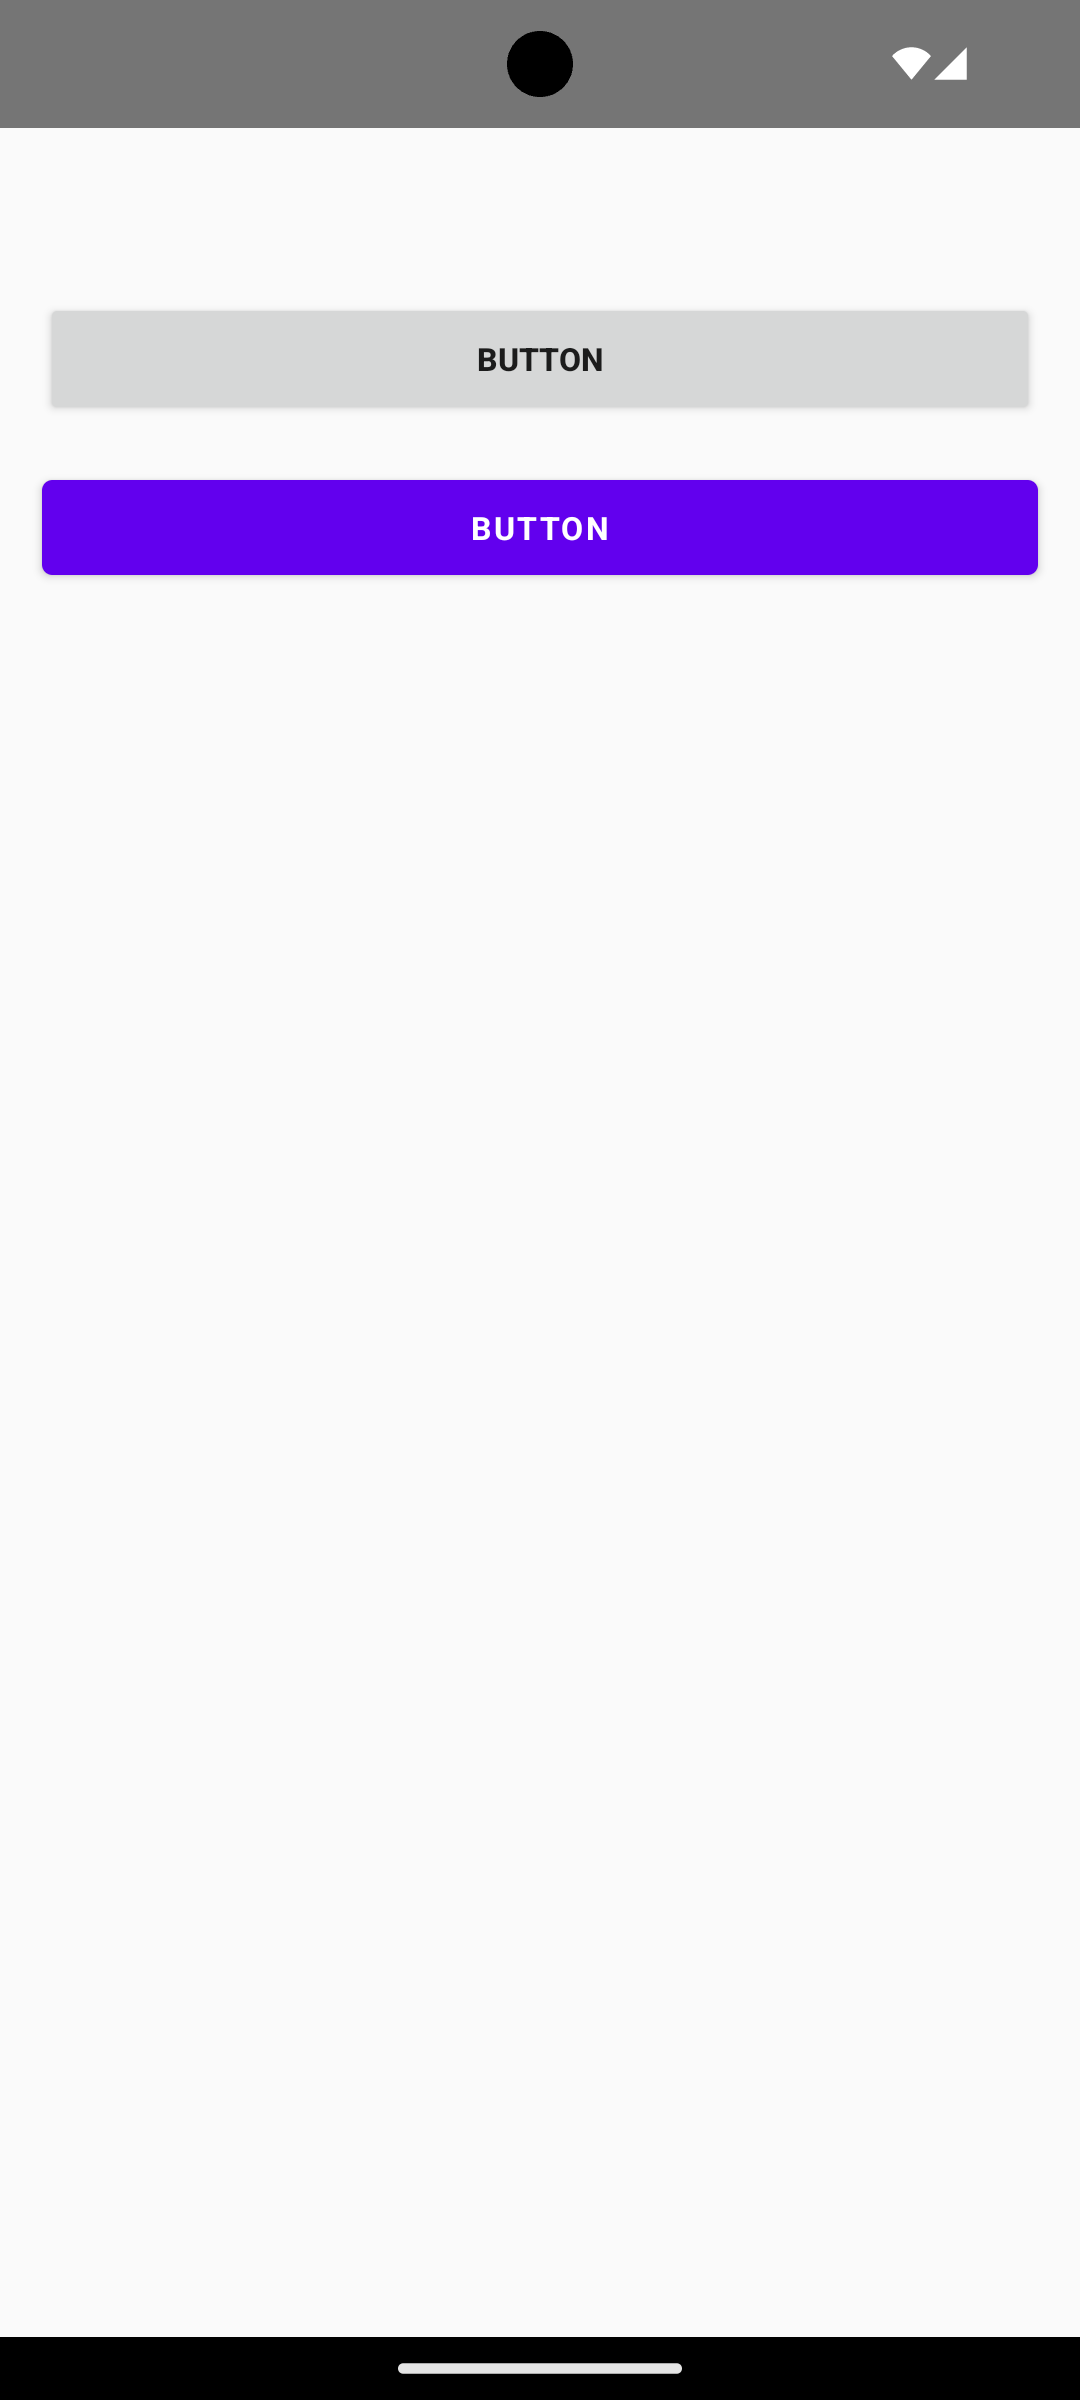
以下の例はandroid.widget.Buttonとandroidx.compose.material.Buttonを縦に並べたものです。
上のボタンがandroid.widget.Button、下のボタンがandroidx.compose.material.Buttonを使って実装したものです。

以下のように2つのボタンには横幅、フォントサイズ、フォントウェイト、表示するテキストを同じ値で指定しています。
<Button
    android:id="@+id/button"
    android:layout_width="match_parent"
    android:layout_height="wrap_content"
    app:layout_constraintTop_toTopOf="parent"
    app:layout_constraintStart_toStartOf="parent"
    app:layout_constraintEnd_toEndOf="parent"
    android:text="BUTTON"
    android:textSize="12sp"
    android:textStyle="bold" />
Button(
    modifier = Modifier.padding(horizontal = 16.dp),
    onClick = {}
) {
    Text(
        text = "BUTTON",
        fontSize = 12.sp,
        fontWeight = FontWeight.Bold
    )
}
しかし、2つのボタンをよく見比べてみるとandroid.widget.Buttonよりもandroidx.compose.material.Buttonの方が表示されている「BUTTON」の文字間隔が広がっていることがわかると思います。
原因
この原因を調べるためにandroidx.compose.material.Buttonのソースコードを見てみます。
@OptIn(ExperimentalMaterialApi::class)
@Composable
fun Button(
    onClick: () -> Unit,
    modifier: Modifier = Modifier,
    enabled: Boolean = true,
    interactionSource: MutableInteractionSource = remember { MutableInteractionSource() },
    elevation: ButtonElevation? = ButtonDefaults.elevation(),
    shape: Shape = MaterialTheme.shapes.small,
    border: BorderStroke? = null,
    colors: ButtonColors = ButtonDefaults.buttonColors(),
    contentPadding: PaddingValues = ButtonDefaults.ContentPadding,
    content: @Composable RowScope.() -> Unit
) {
    val contentColor by colors.contentColor(enabled)
    Surface(
        onClick = onClick,
        modifier = modifier.semantics { role = Role.Button },
        enabled = enabled,
        shape = shape,
        color = colors.backgroundColor(enabled).value,
        contentColor = contentColor.copy(alpha = 1f),
        border = border,
        elevation = elevation?.elevation(enabled, interactionSource)?.value ?: 0.dp,
        interactionSource = interactionSource,
    ) {
        CompositionLocalProvider(LocalContentAlpha provides contentColor.alpha) {
            ProvideTextStyle(
                value = MaterialTheme.typography.button
            ) {
                Row(
                    Modifier
                        .defaultMinSize(
                            minWidth = ButtonDefaults.MinWidth,
                            minHeight = ButtonDefaults.MinHeight
                        )
                        .padding(contentPadding),
                    horizontalArrangement = Arrangement.Center,
                    verticalAlignment = Alignment.CenterVertically,
                    content = content
                )
            }
        }
    }
}
androidx.compose.material.Buttonの内部ではCompositionLocalProviderを使ってTextStyleがMaterialTheme.typography.buttonに上書きされています。
次にMaterialTheme.typography.buttonの値を見てみます。
button: TextStyle = TextStyle(
    fontWeight = FontWeight.Medium,
    fontSize = 14.sp,
    letterSpacing = 1.25.sp
),
MaterialTheme.typography.buttonではletterSpacing = 1.25.spが設定されています。
この設定によってandroid.widget.Buttonよりもandroidx.compose.material.Buttonの方が文字間隔が広げられていることがわかります。
そして、Material Designのガイドラインを見てみるとletterSpacing = 1.25.spという値はMaterial Designのガイドラインに従った値であることもわかります。
ButtonというComposableの関数名だけを見ていると忘れてしまいがちですが、Compose MaterialはデフォルトでMaterial Designに従うように実装されています。
調整方法
androidx.compose.material.Buttonでandroid.widget.Buttonと同じ文字間隔を実現したい場合はletterSpacing = 0.spを設定すればよいです。
Button(
    modifier = Modifier.padding(horizontal = 16.dp),
    onClick = {}
) {
    Text(
        text = "BUTTON",
        fontSize = 12.sp,
        fontWeight = FontWeight.Bold,
        letterSpacing = 0.sp,
    )
}

まとめ
今回紹介したようにCompose Materialが提供するComposableはMaterial Designに準拠するように実装されているため、デフォルトの実装のまま使用すると意図しないレイアウトになってしまうことがあります。
更にCompose Materialのバージョンアップによって内部の実装が変わり見た目が変わってしまう可能性もあります。
Material Designに準拠するのではなく、独自のデザインに合わせたい場合はCompose Materialが提供するComposableを調整して使うか、Compose Materialを使わずにComposableを自作する必要があります。
またComposeはAndroid Studioでソースコードを簡単に見ることができるので、ライブラリが提供するComposableを使う場合は内部の実装を理解してから使うようにすることも重要だと思います。