概要
WiFiの接続情報は、時と場合によって変わります。
その都度PCとケーブルで繋いでプログラムし直すのは大変面倒です。
@exabugsさんのこちらの投稿がとても良いアイデアだなぁと思い、
温湿度計+光度計に実装してみました。
今回は、SSID/PWだけではなく、
データの送信先hostとpathもブラウザから変更できるようにしました。
起動モードを「セットアップモード」と「測定モード」にわけて、ピン状態で起動し分けるようにしています(後述)。
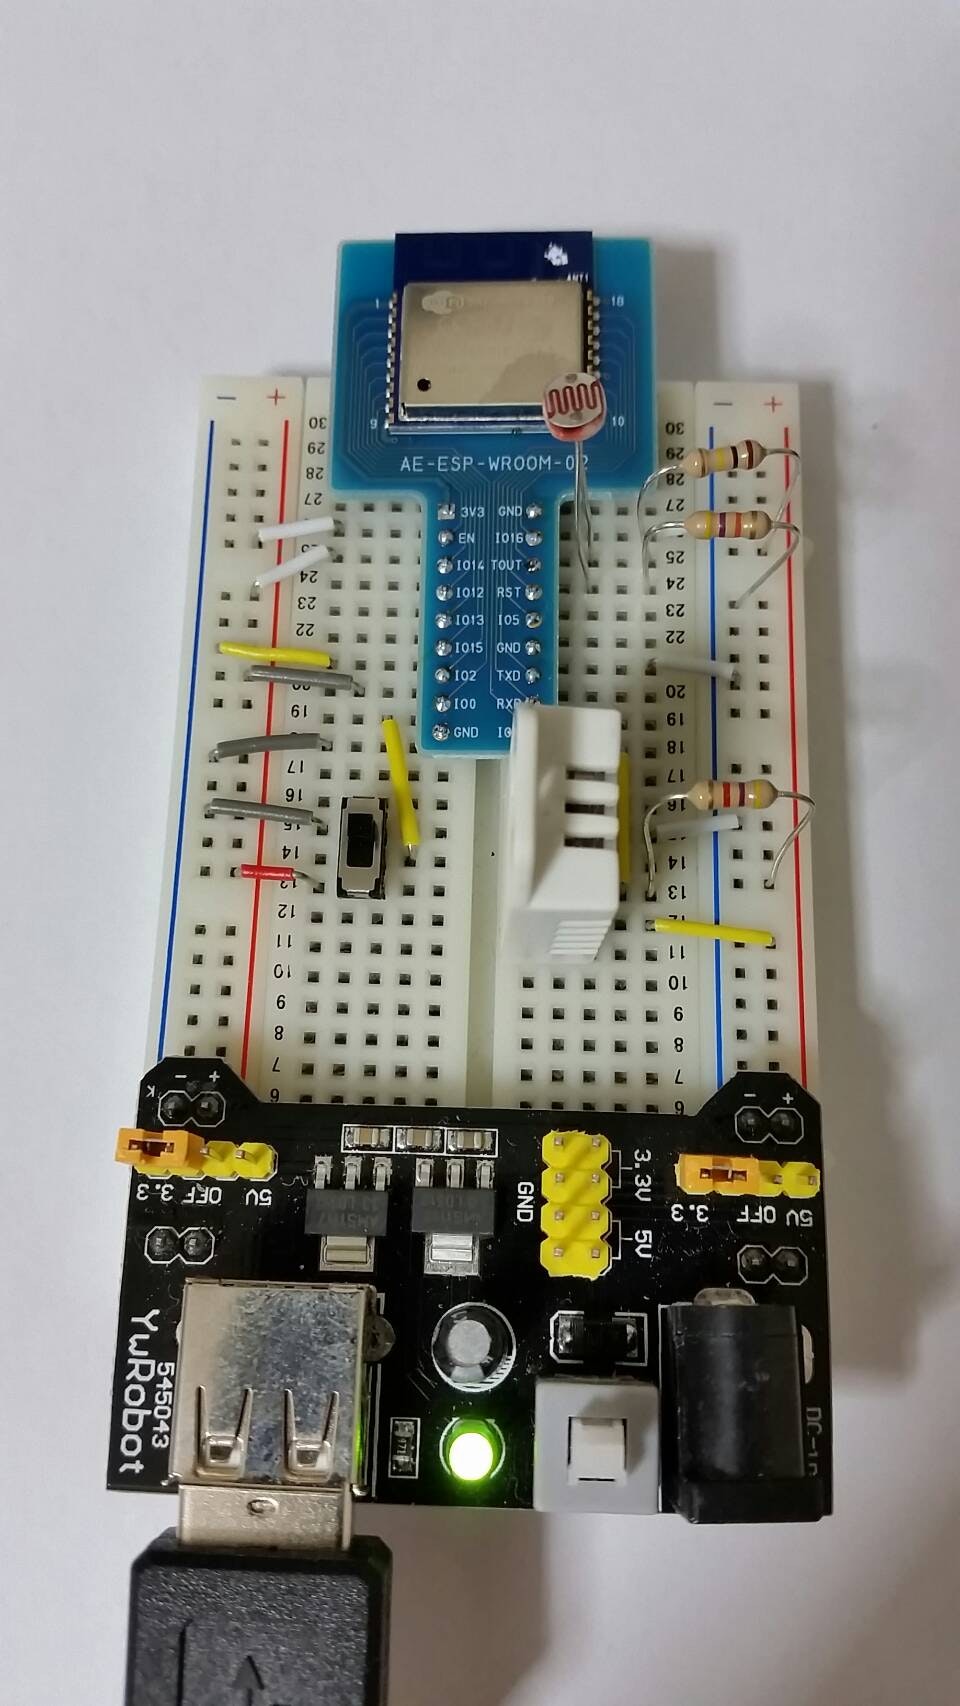
使用材料
- ESP-WROOM-02 (秋月電子で650円)
- DHT22(ebayで350円程度)
- CDSセル(秋月電子で100円4個入)
- スライドスイッチ(秋月電子で100円4個入)
- ジャンパピン
- ブレッドボード
- ブレッドボードパワーモジュール(ebayで90円程度)
- USB-TTLシリアルコンバータ(ebayで100円程度)
ブレッドボードパワーモジュールは、3.3v, 5.vの両方が出力でき、ブレッドボードにそのままさせて、とても便利でおすすめです。
※但しUSBコネクタ部がメスなので、type Aのオスオスケーブルが必要になります(こういうのです)。
図

WROOM-02のパーツ部品がfritzingにないので、適当なICを代わりに用いております。読み替えて下さい。。。
- 光センサは、WROOM-02のADC機能を持ったTOUT PINに接続します。
- 0V - 1Vの間での測定ですので、100kと47kの抵抗で分圧しています。
- スライドスイッチ
- 左にして起動:WROOM-02 プログラムモード
- 右にして起動:WROOM-02 通常起動
- IO5ピンをLOWにすると、セットアップモードで起動(後述)
スケッチ
今回は、下記のモジュールを用いました。
- FS.h
- データ永続化用
- RestClient.h
- HTTP Rest Client ライブラリの管理から、restで検索すると出てきます。
- DHT.h
- DHT22のライブラリ
# include <ESP8266WebServer.h>
# include <RestClient.h>
# include <FS.h>
# include <DHT.h>

/////////////////////////
/// definitions
// setupモード時のssid/password
# define SSID "esp8266"
# define PASSWORD "12345678"

// このピンがLOWならば強制セットアップモード
# define PIN_FORCE_SETUP 5

// 永続化ファイル名
# define WIFI_CONFIG "/wifi.conf"
# define DATA_SEND_URL_CONFIG "/data_send.txt"

// 温湿度計
# define DHTPIN 4
# define DHTTYPE DHT22

// CDSセルのピン(ESP8266にはADCは1つしか無く、0V-1Vの範囲を10bit分解能で読めるらしい
// ピンはTOUT固定。
# define CDSPIN A0
// memo : 秋月のCDS、実測で5k(明) - 500k(液晶ディスプレイの光)だった
//       手で覆うと15M程度まで上がった
// http://akizukidenshi.com/catalog/g/gI-00110/
// 100k と 47kで分圧して、A0で測定すると、約920~20くらいまで変化する

// 設定のformページ
# define INDEX_HTML \
  "<html><head><meta name='viewport' content='width=device-width,initial-scale=1'></head><body>" \
  "<form method='GET' action='/set_ssid'><div>SSID:<input name='ssid'></div>" \
  "<div>PW:<input name='pw'></div>" \
  "<button>OK</button></form>" \
  "<hr>" \
  "<form method='GET' action='/set_data_url'><div>send host:<input name='host'></div>" \
  "<div>send path:<input name='path'></div>" \
  "<button>OK</button></form>" \
  "</body></html>"
/////////////////////////


/////////////////////////
// グローバル変数
ESP8266WebServer *server;
RestClient *client;
// データ送信先のホスト
// memo: RestClientがhostをポインタで保存するので、消さないでおく必要がある。。
char host[100];
// データ送信先のパス
char path[100];
// 温湿度計
DHT dht(DHTPIN, DHTTYPE);

/////////////////////////


/////////////////////////
// 関数

int try_connect(const char *, const char *);

// setupモードハンドラ:index
void handleIndex() {
  server->send(200, "text/html", INDEX_HTML);
}

// setupモードハンドラ:SSID/PWの設定
void handle_set_ssid() {
  String ssid = server->arg("ssid");
  String pw   = server->arg("pw");

  if (ssid.length() > 0 && pw.length() > 0) {
    // ok
    // 接続してみる
    try_connect(ssid.c_str(), pw.c_str());
    if (! is_wifi_connected()) {
      // 接続失敗
      setup_config_mode();
      /*
      WiFi.softAPdisconnect(true);
      WiFi.disconnect(true);
      WiFi.mode(WIFI_AP);
      WiFi.softAP(SSID, PASSWORD);
      */
      Serial.println("connection failed!");
    }
    else {
      // 接続成功
      // wifi設定保存
      save_wifi_config(ssid, pw);
      Serial.println("successfully connected!");
    }
  }
  else {
    server->send(200, "text/html", "need ssid and pw");
  }
}

// setupモードハンドラ:データ送信先の設定
void handle_set_data_url() {
  String host = server->arg("host");
  String path = server->arg("path");

  if (host.length() > 0 && path.length() > 0) {
    // ok
    save_data_send_config(host, path);
    server->send(200, "text/html", "OK!");
  }
  else {
    server->send(200, "text/html", "need host and path");
  }
}

// WIFI設定のセーブ
void save_wifi_config(String ssid, String pw) {
  File f  = SPIFFS.open(WIFI_CONFIG, "w");
  f.println(ssid);
  f.println(pw);
  f.close();
}

// WIFI設定のロード
void load_wifi_config(char *out_ssid, char *out_pw) {
  File f  = SPIFFS.open(WIFI_CONFIG, "r");
  String ssid = f.readStringUntil('\n');
  String pw   = f.readStringUntil('\n');
  ssid.trim();
  pw.trim();
  sprintf(out_ssid, "%s", ssid.c_str());
  sprintf(out_pw, "%s", pw.c_str());
  f.close();
  Serial.println("ssid : " + ssid);
  Serial.println("pw   : " + pw);
}

// データ送信先設定のセーブ
void save_data_send_config(String host, String path) {
  File f  = SPIFFS.open(DATA_SEND_URL_CONFIG, "w");
  f.println(host);
  f.println(path);
  f.close();
}

// データ送信先のロード
void load_data_send_config(char *o_host, char *o_path) {
  File f  = SPIFFS.open(DATA_SEND_URL_CONFIG, "r");
  String host  = f.readStringUntil('\n');
  String path  = f.readStringUntil('\n');
  host.trim();
  path.trim();
  sprintf(o_host, "%s", host.c_str());
  sprintf(o_path, "%s", path.c_str());
  Serial.println("host : " + host);
  Serial.println("path : " + path);
  f.close();
}

// WIFIつながっている?
bool is_wifi_connected() {
  return WiFi.status() == WL_CONNECTED;
}

// WIFIに接続する
int try_connect(const char  *ssid, const char *pw) {
  Serial.println("ssid : " + String(ssid));
  Serial.println("pw   : " + String(pw));
  WiFi.softAPdisconnect(true);
  WiFi.disconnect(true);
  WiFi.mode(WIFI_STA);
  WiFi.begin(ssid, pw);
  int wait = 20;
  while (! is_wifi_connected()) {
    delay(500);
    if (wait-- == 0)  break;
  }

  Serial.println("");
  Serial.print("Connected to ");
  Serial.println(ssid);
  Serial.print("IP address: ");
  Serial.println(WiFi.localIP());

  return WiFi.status();
}

// サーバ立てる
void setup_config_mode() {
  WiFi.softAP(SSID, PASSWORD);
  if (server != NULL) {
    delete server;
  }
  server  = new ESP8266WebServer(80);
  server->on("/", handleIndex);
  server->on("/set_ssid", handle_set_ssid);
  server->on("/set_data_url", handle_set_data_url);
  server->begin();
  Serial.println("server started");
}

// 温湿度の読み込み
bool read_hum_temp(float *o_hum, float *o_temp) {
  *o_hum    = dht.readHumidity();
  *o_temp   = dht.readTemperature();

  if (isnan(*o_hum) || isnan(*o_temp)) {
    // 読み込み失敗
    return false;
  }
  return true;
}


//////////////////////
void setup() {
  // ファイルシステム開始
  SPIFFS.begin();
  // 温湿度計開始
  dht.begin();
  // SerialにException (29):がでたら下記を実施してみる
  // https://github.com/esp8266/Arduino/issues/1648#issuecomment-185856545
  //ESP.eraseConfig();
  // ESP.reset();
  // http://qiita.com/exabugs/items/2f67ae363a1387c8967c

  Serial.begin(9600);

  // 強制セットアップモードピン
  pinMode(PIN_FORCE_SETUP, INPUT_PULLUP);
  delay(200);
  int setupMode = digitalRead(PIN_FORCE_SETUP);

  if (setupMode == HIGH) {
    // セットアップピンがHIGHならば、WiFiに接続する
    Serial.println("Setup pin = HIGH");
    load_data_send_config(host, path);
    char ssid[64];
    char pw[64];
    load_wifi_config(ssid, pw);
    Serial.println("load done");
    try_connect(ssid, pw);
    Serial.println("HIGH done");
  }
  else {
    Serial.println("Setup pin = LOW");
    WiFi.disconnect();
  }

  // WiFiに繋がったかチェック
  if ((! is_wifi_connected()) || setupMode == LOW) {
    // Config Mode
    Serial.println("entering setup config mode");
    setup_config_mode();
  }
  else {
    // データ送信モード
    client  = new RestClient(host);
    Serial.println("RestClient setup done");
  }
}


void loop() {
  if (is_wifi_connected()) {
    // WiFi接続時のメイン処理
    // 明るさ
    int brightness  = analogRead(CDSPIN);
    // 湿度
    float humidity;
    // 温度
    float temperature;
    if (read_hum_temp(&humidity, &temperature) == false) {
      // 読み込み失敗
      Serial.println("hum temp read failed");
      delay(2000);
      return;
    }
    String req_path = String(path);
    req_path  += String("?hum=") + humidity + "&temp=" + temperature + "&bri=" + brightness;
    Serial.println(req_path);

    String response = "";
    int status = client->get(req_path.c_str(), &response);
    Serial.print("status = ");
    Serial.println(status);
    //Serial.println(response);
    //Note: responseがあまりにも大きいと、システムが落ちる
    delay(60000);
  }
  else {
    //setup_config_mode();
    server->handleClient();
  }
}
起動モード説明
- 次の2種類のモードがあります
- セットアップモード
- Webサーバ、APとして起動し、各種の設定がWebブラウザから可能なモード
- 測定モード
- 温湿度、光度を計測し、送信するモード
- セットアップモード
- 永続化されたWiFiのssid/pwがない場合は、セットアップモードで起動します
- IO5番ピンをLOWにして起動すると、強制的にセットアップモードで起動します
まとめ
WROOM-02の設定をブラウザで実施できるようにしました。
開発環境いらずで、設置したい場所の状況に応じてSSIDや送信先がスマホブラウザで変更可能となりました。
雑感
WROOM-02はフラッシュの容量が大きくて、コードサイズをatmega328等と比べ、あまり意識しなくてもいいため良いですね。
また、ArduinoはStringクラスが用意されているため、sprintfいらずなのもgoodです。
会社に持って行って、グラフ化してみようと思います。