はじめに
Djangoを使って将棋の棋譜管理アプリを作っていくなかでの備忘録、第5回です。
作業環境
今回の作業環境は以下の通りです
- Windows 10 Pro
- Anaconda
- version1.7.2
- python 3.7
- django 2.2.5
- git
- version 2.25.0.windows.1
- mysql
- ver 8.0.15 for Win64 on x86_64
また、Djangoのディレクトリ構造は次のようになります。
- kifu_app_project/
    - kifu_app_project/
        - __init__.py
        - setting.py
        - urls.py
        - wsgi.py
    - kifu_app/
        - migrations/
        - templates/
            - index.html
        - __init__.py
        - admin.py
        - apps.py
        - models.py
        - tests.py
        - urls.py
        - views.py
    - manage.py
    - .gitignore
本稿の内容
- DBからViewへデータを読み込み、Templateで一覧表示
- 各データに対し、一覧画面から詳細画面へ遷移
- View作成のための便利機能を使ってみる(generic)
一覧画面の作成
まずはDBにいくつかデータを登録しておきましょう。
そして、そのデータをViewで取り出して、Templateで表示するようにします。
ここではInformationテーブルからデータを取り出し、一覧表示します。
URLの作成
urls.pyに、新たにinformationListのURLを作成します。
from django.urls import path

from . import views

app_name = 'kifu_app'

urlpatterns = [
    path('', views.index, name='index'),
    path('informationList', views.informationList, name='informationList'),  # 追加
]
Viewでデータを取り出す
views.pyを以下のように変更し、informationListメソッドを追加します。
from django.shortcuts import render
from .models import Information         # 追加(Informationテーブルを操作できるようにする)

# ~省略~

def informationList(request):
    data = Information.objects.all()
    return render(request, 'informationList.html', {'data': data})
大事なところはInformation.objects.all()です。この部分でInformationテーブルからデータを取り出しています。
ここではallメソッドによって、全てのデータを取り出しています。
他にも特定の条件に合うものを取り出したり、並び替えたりということが、適切なメソッドを選択することでできます。
下記の方がまとめてくださっているので、参考になると思います。
Django データベース操作 についてのまとめ
受け取ったデータをTemplateで表示する
次にinformationList.htmlを作成し、Viewから渡ってきたデータを取り敢えず表示して見ましょう。
<!DOCTYPE html>
<html lang="ja">
    <head>
        <meta charset="utf-8">
        <title>Kifu APP</title>
    </head>
    <body>
        <h3>{{ data }}</h3>
    </body>
</html>
受け取ったデータを1つずつTemplateで表示する
次にデータをforで回して、一つずつ取り出してみましょう
    <body>
        {% for each_data in data %}
        <h3>{{ each_data }}</h3>
        {% endfor %}
    </body>
 これだと、対局日時しか取り出せていないように感じます。
しかしこれは、第3回でmodels.pyのInformationクラスに\_\_str__メソッドを追加した際に、self.dateを返すようにしたからであり、実際はObjectという認識でいいと思います。
個々のカラムのデータを表示する
そこで、Object内に保持されている、個々のデータを取り出してみましょう。
個々のデータにアクセスするには、models.pyで定義したカラム変数を.演算子で繋ぎます。
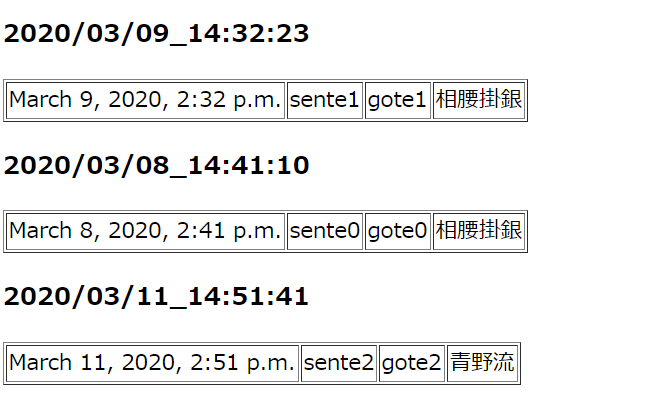
    <body>
        {% for each_data in data %}
            <h3>{{ each_data }}</h3>
            <table border="1">
                <tr>
                    <td>{{ each_data.date }}</td>
                    <td>{{ each_data.sente }}</td>
                    <td>{{ each_data.gote }}</td>
                    <td>{{ each_data.small_class }}</td>
                </tr>
            </table>
        {% endfor %}
    </body>

ちゃんと個々のデータを表示できました!
個々のデータから詳細画面に遷移できるようにする
次に、先程の一覧画面から、個々の詳細ページに遷移できるようにします。
TemplateからViewに情報を渡したい
詳細ページを作ろうとするときに、各データに対しHTMLファイルを作るのは現実的ではありません。
詳細画面のTemplateを用意しておいて、選択されたデータに応じて、表示する値を変えるのが一般的です。
その際に必要なことが、どのデータが選択されたかという情報を、Template(一覧画面)の方から、Viewに送らなくてはいけないということです。
これがないと、Viewとしては、どの詳細なデータをTemplate(詳細画面)に渡せばよいのか分かりません。
よくあるやり方としては、URLに情報をのせるというやり方です
例えばデータのIDをURLにのせることにします。すると/informationDetail/2というURLであれば、ID=2 のデータを取ってくればいい、ということがViewで判断できます。
それでは、このような機能の実装を行っていきます。
URLの作成
まずはURLを作成します。
ただ今までと違い、IDをのせる部分は固定値ではなく変動値なので、これを許容できる書き方にします。
具体的には以下の通りです。
urlpatterns = [
    path('', views.index, name='index'),
    path('informationList', views.informationList, name='informationList'),
    path('informationDetail/<int:information_id>', views.informationDetail, name='informationDetail'),
]
変動値にしたい部分は<型:変数名>の形でURLを記述すればOKです。
(とっても簡単!)
一覧で選択されたIDをViewで受け取る
次に、Viewは下のようになります。
from django.shortcuts import render
from .models import Information
from django.shortcuts import get_object_or_404      # 追加

# ~省略~

def informationDetail(request, information_id):
    detail = get_object_or_404(Information, pk=information_id)
    return render(request, 'informationDetail.html', {'detail': detail})
先程のURLの設定で、変数名をinformation_idとしたので、呼び出すメソッドの引数にinformation_idを加えます。
この変数名をURLで書いたものと違うものにすると、エラーになるので注意してください。
更に新しくget_object_or_404というメソッドが出てきていますが、これは
    try:
        detail = Information.objects.get(pk=information_id)
    except Information.DoesNotExist:
        raise Http404("Information does not exist")
の働きを一行で書いたものだと認識しておけばOKです。
詳細画面のTemplateを作成
簡単に以下のようにします。
<!DOCTYPE html>
<html lang="ja">
    <head>
        <meta charset="utf-8">
        <title>Kifu APP</title>
    </head>
    <body>
        <h3>{{ detail }}</h3>
        <table border="1">
            <tr>
                <td>{{ detail.id }}</td>
                <td>{{ detail.date }}</td>
                <td>{{ detail.sente }}</td>
                <td>{{ detail.gote }}</td>
                <td>{{ detail.result }}</td>
                <td>{{ detail.my_result }}</td>
                <td>{{ detail.small_class }}</td>
                <td>{{ detail.created_at }}</td>
                <td>{{ detail.updated_at }}</td>
            </tr>
        </table>
    </body>
</html>
Templateでリンクを作成する
最後に、informationList.htmlにリンクを作成し、informationDetail.htmlに遷移できるようにします。
リンクを作成するには、TemplateでもHTMLと同様aタグを使いますが、href属性に行き先をどのように指定するのかが問題です。
この先プロジェクトが大きくなっていくと、ディレクトリ構造が変化するかもしれません。
そのような時に、href属性を相対パスで指定していると、パスをいちいち書き直さなくてはならず、とても面倒です。
そこで、Djangoでは、パスを具体的に書かず、「URLの名前」を使って行き先を指定します。
具体的には以下の通りです。
<td><a href="{% url 'kifu_app:informationDetail' %}">{{ each_data.date }}</a></td>
{%%}で囲った後、urlと記述します。
続けて、urls.pyでURLを作成したときに、name属性に指定したURL名を、そのurls.pyのapp_nameと共に記述します。
つまり、「kifu_appという名前のURLConfの、informationDetailというURLのパスに従ってね」ということです。
リンクに値を渡す
更に今回はパスに値を渡したいのですが、それは次のように書きます。
<td><a href="{% url 'kifu_app:informationDetail' each_data.id %}">{{ each_data.date }}</a></td>
これで、指定されたURLにeach_data.idの値が渡されます!
実際に確認してみると...

更にリンクをクリックしてみると...

無事うまくいきました!
ListとDetailを簡単に実装する
と、ここまでListとDetailの機能を実装してきましたが、プロジェクトを作るうえでこの機能はよく使うので、Viewの部分を簡単に実装できるようにDjangoではなっています。
詳細については、以下の方がとても分かりやすく・詳しく書いて下さっているので、参考にしてみてください。
Djangoにおけるクラスベース汎用ビューの入門と使い方サンプル
