この記事はリンク情報システムの2018年アドベントカレンダーのリレー記事です。
engineer.hanzomon のグループメンバーによってリレーされます。
(リンク情報システムのFacebookはこちらから)
アドベントカレンダー11日目を担当します、@r-kanaiです。
今回がQiitaへの初めての投稿です!!
なぜBuefyでスケジュール管理 ?
最近buefyに触れる機会があり、とても簡単にwebサイトに必要な部品(タブやフォーム)を実装することができ、「なんて便利なんだ!」と興味を持ちました。
公式サイトを見ると、そのまま使えそうなサンプルがいろいろあったので、
これを使って何か簡単に作れないかなと、サイトを眺めて数時間。。。
カレンダーと思しきものを見つけ、
これを使って「スケジュール管理してみよう!」と思い立ちました。
目標
Buefyを使って、web上でスケジュールを入力し、カレンダーに印を表示させる。
-
スケジュールを入力
- 「Form controls」の DatePicher を使用して、日付選択
- 「Form controls」の radio を使用して、スケジュールのカテゴリを選択
- ボタンを押して、スケジュールを反映
-
カレンダーに印を表示
- 「Form controls」の DatePicker のイベント機能を利用し、カテゴリに対応する色の印を予定がある日付に表示
環境構築
- vue-cliのインストール
- Buefyのインストール
★こちらのサイトを参考に構築しました。
https://tonyo.design/program/buefy/ui-component_buefy/
実装
今回作成・修正したファイルは以下の3ファイルです。
- App.vue
- component/ScheduleManage.vue
- component/InputSchedule.vue
<template>
  <div id="app">
    <ScheduleManage />
  </div>
</template>

<script>
import ScheduleManage from './components/ScheduleManage.vue'
export default {
  name: 'app',
  components: {
    ScheduleManage,
  }
}
</script>

<style>
/** style内はdefaultのまま */
</style>
<template>
  <div>
    <InputSchedule v-on:commitSchedule="commitSchedule" />
    <span>
      <!-- カレンダー上に出す予定の印の切替(dot or bar) -->
      <b-field>
        <b-switch v-model="bars">Bars</b-switch>
      </b-field>
      <!-- スケジュール表示用カレンダー -->
      <b-datepicker
          inline
          v-model="date"
          :first-day-of-week="1"
          :events="events"
          :indicators="indicators">
      </b-datepicker>
    </span>
  </div>
</template>
<script>
import InputSchedule from './InputSchedule.vue'
const thisMonth = new Date().getMonth();
export default {
  components: {
    InputSchedule,
  },
  computed: {
    indicators() {
      return this.bars ? 'bars' : 'dots'
    }
  },
  data() {
    return {
      date: new Date(2017, thisMonth, 1),
      events: [],
      bars: false,
      radio: 'default',
      size: 'is-large',
    }
  },
  methods: {
    commitSchedule($event){
      var newEvent = null;
      if (!$event.type) {
        newEvent = {
          date: new Date($event.year, $event.month -1, $event.day),
        }
      } else {
        newEvent = {
          date: new Date($event.year, $event.month -1, $event.day),
          type: $event.type
        }
      }
      this.events.push(newEvent);
    }
  },
}
</script>
<template>
  <div id="inputArea">
  <!-- スケジュール入力用カレンダー -->
    <b-field label="Select a date">
      <b-datepicker v-model="date"
        :first-day-of-week="1"
        placeholder="Click to select...">

        <button class="button is-primary"
          @click="date = new Date()">
          <b-icon icon="calendar-today"></b-icon>
          <span>Today</span>
        </button>

        <button class="button is-danger"
          @click="date = null">
          <b-icon icon="close"></b-icon>
          <span>Clear</span>
        </button>
      </b-datepicker>
    </b-field>
  <!-- スケジュールのカテゴリ選択 -->
    <section>
      <div class="field">
        <b-radio v-model="radio"
          native-value="default">
          work
        </b-radio>
      </div>
      <div class="field">
       <b-radio v-model="radio"
          native-value="is-info"
          type="is-info">
          travel
        </b-radio>
      </div>
      <div class="field">
        <b-radio v-model="radio"
          native-value="is-success"
          type="is-success">
          sports
        </b-radio>
      </div>
      <div class="field">
        <b-radio v-model="radio"
          native-value="is-danger"
          type="is-danger">
          friends
        </b-radio>
      </div>
      <div class="field">
        <b-radio v-model="radio"
          native-value="is-warning"
          type="is-warning">
          study
        </b-radio>
      </div>
    </section>
  <!-- スケジュール登録 -->
    <button @click="setSchedule">click</button>
  </div>
</template>
<script>
export default {
  data() {
    return {
      radio: 'default',
      date: new Date(),
      schedule: {
        year: '',
        month: '',
        day: '',
      },
    }
  },
  methods: {
    setSchedule() {
      if (this.radio !==  'default') {
        this.schedule.type = this.radio;
      }

      this.schedule.year = this.date.getFullYear();
      this.schedule.month = this.date.getMonth() + 1;
      this.schedule.day = this.date.getDate();

      this.$emit('commitSchedule', this.schedule);
    },
  }
}
</script>
上記のソースにスタイルを少し加えたら...完成!!
こんな感じになりました。↓↓
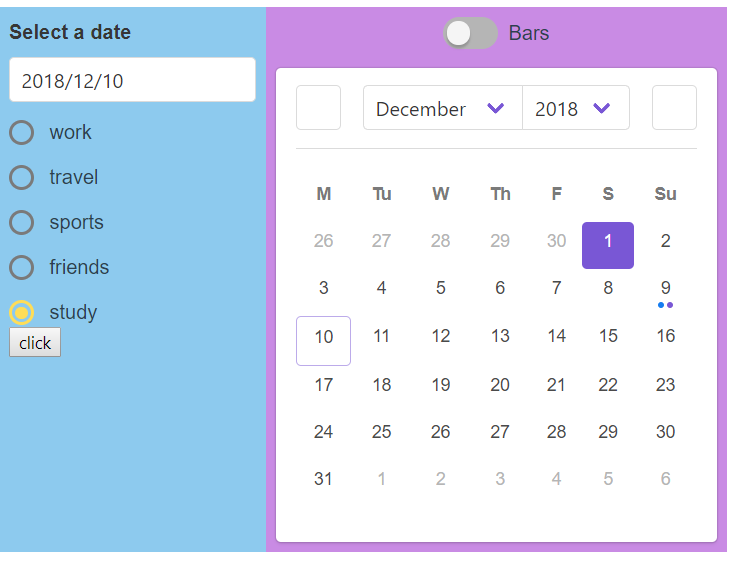
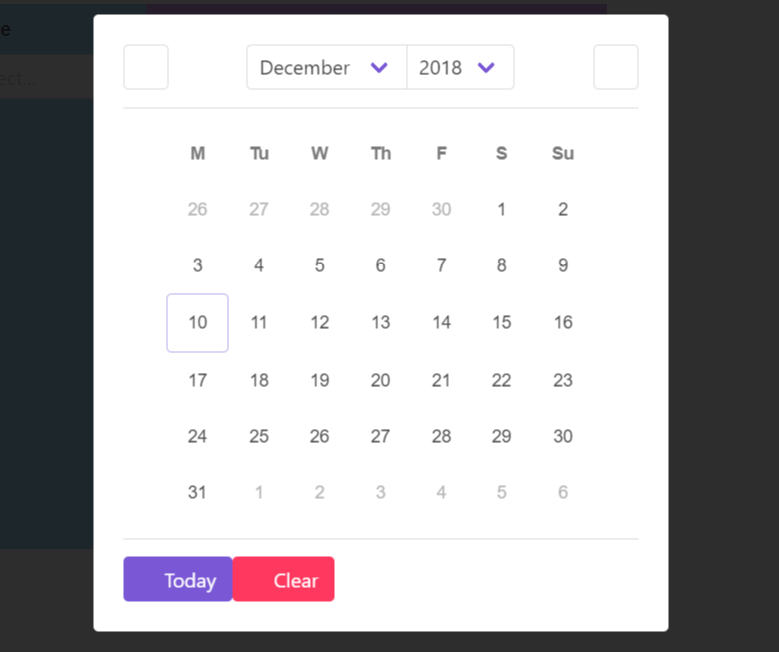
「Select a date」の下のフォームをクリックすると、
日付選択のカレンダーが表示されます。↓↓
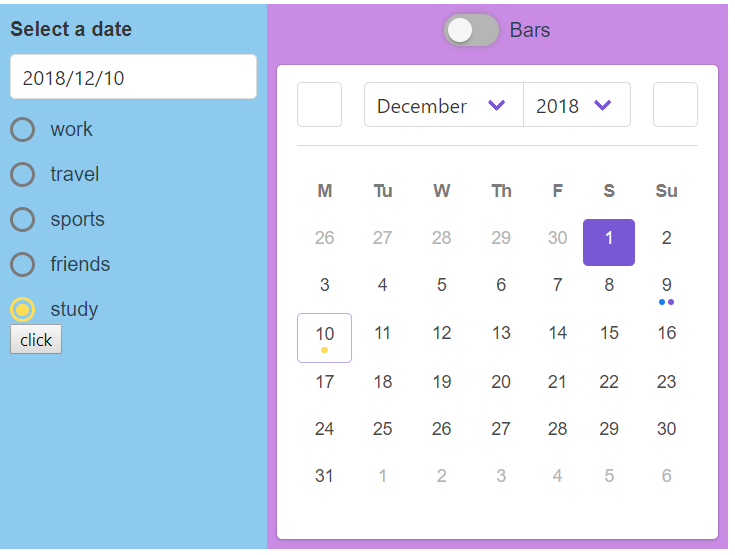
日付を選んで、予定のカテゴリを選択して、「click」をクリックすると、
選択したカテゴリと同じ色の印が右のカレンダーに追加されました!
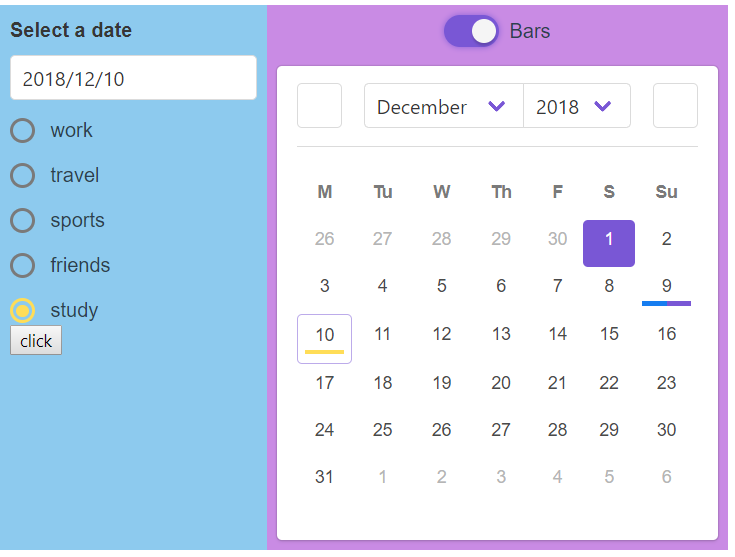
右上の「Bars」をクリックすると、予定のカテゴリの印が、バーに変更されます!
最後に
今回『スケジュール管理』と銘打ったものの、
ブラウザの更新ボタンを押すと入力したスケジュールは消えてしまいます...。
実用化する為には、
- 入力情報を保持できること
- スケジュール詳細を文章で入力できること
- スケジュール詳細を確認することができること
...などの機能の追加が必要だなと感じました。
至らない点も多々ありますが、Buefyを使って動くものができて満足です(笑)![]()
明日はアドベントカレンダー12日目、@huraさんです!!