Orthanc を使ってみた-その2
その1からの続きです。
今回やってみたいことはこちら。
- テスト用に orthanc のコンテナを同時に2つ立ち上げる
- Docker compose を使う
- REST API を使う
- Lua 言語を使う
- 受信したデータのtagを調べる
- 受信したデータをファイルとして出力する
- 受信したデータを別の orthanc へ転送する
orthanc のコンテナを同時に2つ立ち上げる
作るコンテナの設定内容はこちら。
- Orthanc 1
- Container name: orthanc1
- IP: 192.168.10.11
- container name: orthanc1
- HTTP port number: 50010
- AET: ORTHANC1
- Dicom port number: 60010
- PostgreSQL 1
- Container name: orthanc-postgres1
- IP: 192.168.10.12
- Port: 5432
- Database: orthanc
- Username: otpostgres
- Password: otpassword
- Orthanc 2
- Container name: orthanc2
- IP: 192.168.10.13
- container name: orthanc2
- HTTP port number: 50020
- AET: ORTHANC2
- Dicom port number: 60020
- PostgreSQL 2
- Container name: orthanc-postgres2
- IP: 192.168.10.14
- Port: 5432
- Database: orthanc
- Username: otpostgres
- Password: otpassword
DB の初期化
Orthanc2 用の設定ファイルと Database のディレクトリを作成し、Orthanc2 用の database を生成しておきます。その1と同じ手順です。
$ mkdir ~/Orthanc/Config2/
$ mkdir ~/Orthanc/DB2/
$ docker run -d --name orthanc-postgres2 \
    -v /etc/localtime:/etc/localtime:ro \
    -v /etc/timezone:/etc/timezone:ro \
    -v /home/hogehoge/Orthanc/DB2/:/var/lib/postgresql/data \
    -e POSTGRES_USER=otpostgres \
    -e POSTGRES_PASSWORD=otpassword \
    --net=orthanc_nw --ip=192.168.10.14 \
    postgres:13.3
$ docker run -it --link orthanc-postgres2:postgres \
    --net=orthanc_nw --rm postgres:13.3 \
    sh -c 'echo "CREATE DATABASE orthanc;" \
    |exec psql -h 192.168.10.14 -p 5432 -U otpostgres -h 192.168.10.14'
パスワードの入力を求められるので、 "otpassword" と入力します。これで database が出来ました。
"orthanc-postgres2" を停止、削除します。
$ docker stop orthanc-postgres2
$ docker rm orthanc-postgres2
設定ファイルの編集
オリジナルの設定ファイルをエクスポートして、編集します。これもその1と同じ手順です。
$ docker run --rm --entrypoint=cat \
    jodogne/orthanc-plugins:1.9.6 \
    /etc/orthanc/orthanc.json > ~/Orthanc/Config2/orthanc.json
  // HTTP port 番号の変更 (line 81)
  "HttpPort" : 50010,

  // AET の変更 (line 119)
  "DicomAet" : "ORTHANC2",

  // DICOM port 番号の変更 (line 126)
  "DicomPort" : 60010,

  // すべての SOP class を受け入れる (line 160)
  "UnknownSopClassAccepted" : true,

  // ID, Password を入力させるための "//" の削除 (line 229)
  "RegisteredUsers" : {
    "alice" : "alicePassword"
  },

  // 末尾に "," の追加 (line 826)
  "SynchronousZipStream" : true,

  // PostgreSQL を使うための設定 (line 827)
  "PostgreSQL":{
    "EnableIndex":true,
    "EnableStorage":true,
    "Host":"192.168.10.14",
    "Port":5432,
    "Database":"orthanc",
    "Username":"otpostgres",
    "Password":"otpassword"
  }
Orthanc1 と orthanc2 で通信をしますので、~/Orthanc/Config1/orthanc.json を編集します。
  // 下記の行を追加 (line 322)
    "ORTHANC1" : ["ORTHANC1", "192.168.10.11", 60010],
    "ORTHANC2" : ["ORTHANC2", "192.168.10.13", 60010]
編集後は構文チェックします。
$ cat ~/Orthanc/Config1/orthanc.json |json_verify -c
JSON is valid
$ cat ~/Orthanc/Config2/orthanc.json |json_verify -c
JSON is valid
これで下準備は完了です。
Docker compose
その1ではコマンドラインでコンテナを起動していましたが、毎度合計4つのコンテナを起動するためにいちいちコマンドを打ち込む(又はコピペする)のも大変なので、docker compose を使用します。~/Orthanc/docker-compose.ymlを作成します。
version: "3"

networks:
  orthanc_nw:
    driver: bridge
    ipam:
      driver: default
      config:
        - subnet: 192.168.10.0/24

services:
  orthanc1:
    image: jodogne/orthanc-plugins:1.9.6
    container_name: orthanc1
    ports:
      - 50010:50010
      - 60010:60010
    volumes:
      - /etc/localtime:/etc/localtime:ro
      - /etc/timezone:/etc/timezone:ro
      - /home/hogehoge/Orthanc/Config1/:/etc/orthanc/
    networks:
      orthanc_nw:
        ipv4_address: 192.168.10.11
    restart: always
  orthanc2:
    image: jodogne/orthanc-plugins:1.9.6
    container_name: orthanc2
    ports:
      - 50020:50010
      - 60020:60010
    volumes:
      - /etc/localtime:/etc/localtime:ro
      - /etc/timezone:/etc/timezone:ro
      - /home/hogehoge/Orthanc/Config2/:/etc/orthanc/
    networks:
      orthanc_nw:
        ipv4_address: 192.168.10.13
    restart: always
  postgres1:
    image: postgres:13.3
    container_name: orthanc-postgres1
    volumes:
      - /etc/localtime:/etc/localtime:ro
      - /etc/timezone:/etc/timezone:ro
      - /home/hogehoge/Orthanc/DB1/:/var/lib/postgresql/data
    networks:
      orthanc_nw:
        ipv4_address: 192.168.10.12
    restart: always
  postgres2:
    image: postgres:13.3
    container_name: orthanc-postgres2
    volumes:
      - /etc/localtime:/etc/localtime:ro
      - /etc/timezone:/etc/timezone:ro
      - /home/hogehoge/Orthanc/DB2/:/var/lib/postgresql/data
    networks:
      orthanc_nw:
        ipv4_address: 192.168.10.14
    restart: always
起動前に、その1で作ったネットワークを削除しておきます。
$ docker network rm orthanc_nw
それでは docker compose でコンテナを起動させます。
$ cd ~/Orthanc
$ docker-compose up -d
Creating network "orthanc_orthanc_nw" with driver "bridge"
Creating orthanc1          ... done
Creating orthanc-postgres2 ... done
Creating orthanc-postgres1 ... done
Creating orthanc2          ... done
コンテナ起動成功です。 http://localhost:50010 (Orthanc1) と http://localhost:50020 (Orthanc2) にアクセスして Orthanc explorer が見えればOKです。
Orthanc1 にはすでにデータがあるはずですので、"Do lookup" をクリックして確認し、表示されたデータをクリックします。データの詳細が示されます。ここで orthanc2 にデータを送るために、 "Send to DICOM modality" をクリックします。 "Chose target" というダイアログが表示されます。
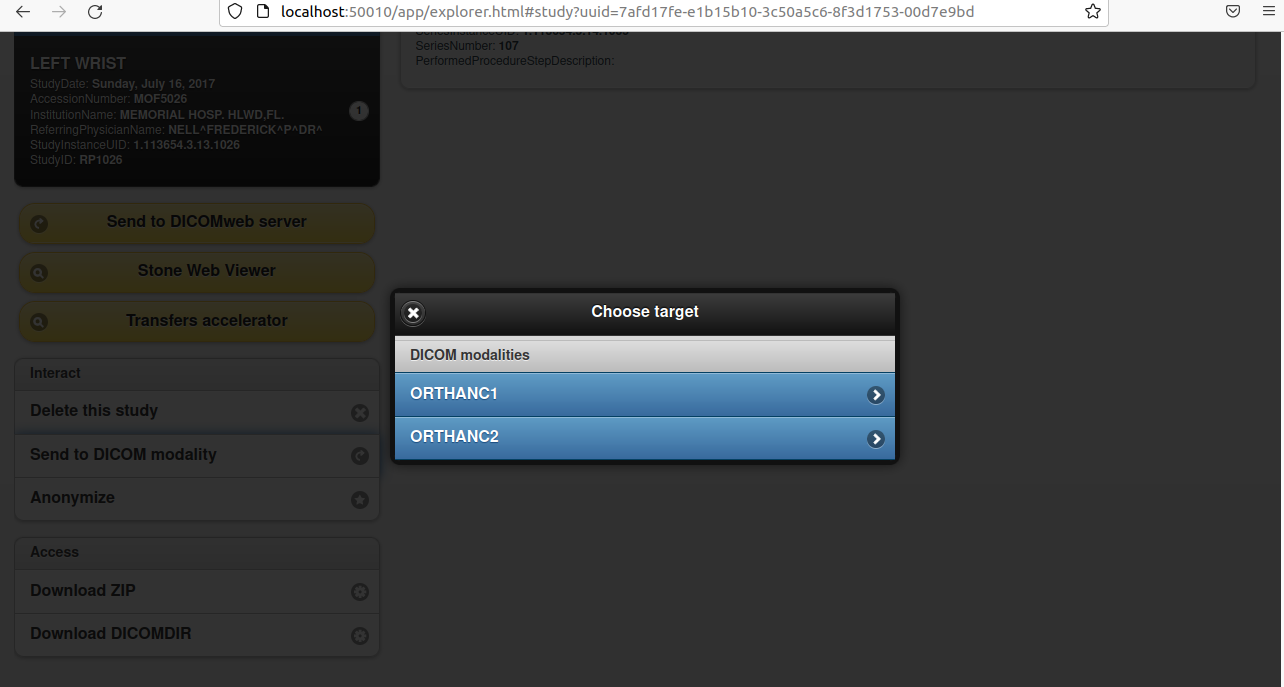
"DICOM modalities" の ORTHANC2 をクリックするとデータが送信され、Job の画面になります。http://localhost:50020 の Orthanc explorer で "Do lookup" をクリックすると、先程送信したデータが受信されているのが確認できます。
このようにして、2つの orthanc を一つの端末で同時に起動することができますので、試してみたいなと思ったことが自由にできます。基本的な動作確認や設定ファイルのデバッグなどに役立つと思います。
設定ファイルの検証の例
一例として、設定ファイルの一部の項目の動作を見てみましょう。
"DicomAlwaysAllowStore" : true,
デフォルトでは、どの端末からも送られてきたデータを受け取るという設定になっています。この true を false に変更して、データを送ってみます。あらかじめ、http://localhost:50020 でデータを削除してから、コンテナを再起動して、もう一度 "DICOM modalities" の ORTHANC2 をクリックしてデータを送信してみます。
今回は転送できなくなりました。先程の設定が効いているようです。では受け取るにはどうするか。~/Orthanc/Config2/orthanc.json を編集します。
  // 下記の行を追加 (line 322)
    "ORTHANC1" : ["ORTHANC1", "192.168.10.11", 60010],
    "ORTHANC2" : ["ORTHANC2", "192.168.10.13", 60010]
これで、先程のコンテナ再起動・データ転送コマンドを実行するとデータが受け取れたことがわかります。
このようにして、2つの orthanc を一つの端末で同時に起動することで、設定ファイルの項目調査という使い方ができます。次に紹介する REST API や Lua スクリプトの紹介でもそのような使い方をしています。
REST API
Ortrhanc は "build-in REST API" を持っています。公式マニュアルはこちらです。
https://book.orthanc-server.com/users/rest.html
それでは使ってみます。あらかじめ、http://localhost:50020 でデータを削除しておきます。下記に走らせたコマンド例と結果を示します。
# 20130101-20210101 の期間のデータを検索する
$ curl -u alice:alicePassword -v \
http://localhost:50010/modalities/ORTHANC1/query \
-d '{"Level":"Study","Query":{"StudyDate":"20130101-20210101"},"Normalize":false}'
# 途中出力省略
{0c9ecd1c-007e-4656-8f0b-ffc3b3cec442
   "ID" : "d97e5dd7-3a8d-4c27-a487-bc67d03061a9",
   "Path" : "/queries/d97e5dd7-3a8d-4c27-a487-bc67d03061a9"
}

# インスタンスの表示
$ curl -u alice:alicePassword --request GET --url \
http://localhost:50010/queries/d97e5dd7-3a8d-4c27-a487-bc67d03061a9/answers
[ "0" ]

# Orthanc2 へデータ送信
$ curl -u alice:alicePassword --request POST --url \
http://localhost:50010/queries/d97e5dd7-3a8d-4c27-a487-bc67d03061a9/retrieve \
--data ORTHANC2
{
   "Description" : "REST API",
   "LocalAet" : "ORTHANC1",
   "Query" : [
      {
         "0008,0050" : "MOF5026",
         "0008,0052" : "STUDY",
         "0010,0020" : "583295",
         "0020,000d" : "1.113654.3.13.1026"
      }
   ],
   "RemoteAet" : "ORTHANC2"
}
こんな感じでデータの処理が可能です。
Lua スクリプト
Orthanc は Lua スクリプトが利用できます。
Official web site
http://www.lua.org/
実は Orthanc を触るまでは聞いたことのない言語でした。こちらのサイトを参考にしました。
http://www.rtpro.yamaha.co.jp/RT/docs/lua/tutorial/index.html
公式のマニュアルはこちらです。
https://book.orthanc-server.com/users/lua.html
今回のデモの内容はこの内容にします。
- DICOM tag を表示する
- データを Orthanc1 から Orthanc2 へ送信する
- DICOM ファイルをローカルにエクスポートする
~/Orthanc/Config1/demo.lua を作成します。
function OnStoredInstance(instanceId, tags, metadata, origin)
  -- Show all dicom tags
  for key, val in pairs(tags) do
    print(key, val)
  end

  -- Send data to orthanc2
  SendToModality(instanceId, 'ORTHANC2')
  print("Send data to ORTHANC2")

  -- Export data on the local directory
  local DirName = '/root/DicomData/'
  os.execute('mkdir -p "' .. DirName .. '"')
  local target_data = assert(io.open(DirName .. tags['SOPInstanceUID'] .. '.dcm', 'wb'))
  local dicom = RestApiGet('/instances/' .. instanceId .. '/file')
  target_data:write(dicom)
  target_data:close()
end
DICOM ファイルをエクスポートするディレクトリを作成します。
$ mkdir ~/Orthanc/ExportData
データ出力先の指定のために ~/Orthanc/docker-compose.yml を、Lua スクリプトのソースコードを指定するために ~/Orthanc/Config1/orthanc.json をそれぞれ編集します。
      # 次の行を追加する (line 22)
      - /home/hogehoge/Orthanc/ExportData/:/root/
      // 次の行を追加する (line 47)
      "/etc/orthanc/demo.lua"
現在動作しているコンテナを停止して、再度起動させます。
$ docker stop orthanc1 orthanc2 orthanc-postgres1 orthanc-postgres2
$ docker rm orthanc1 orthanc2 orthanc-postgres1 orthanc-postgres2
$ cd ~/Orthanc/
$ docker-compose up -d
データの転送状況を確認するために、 http://localhost:50020 からデータをすべて削除しておきます。次に、手動で http://localhost:50010 にあるデータを自分自身 (Orthanc1) に転送します。これで Lua スクリプトが動作したはずです。結果は下記のようにログに表示されます。
$ docker logs -f orthanc1
(データ受信までの部分は省略)
0813 00:09:00.536300 HttpServer.cpp:1238] (http) POST /modalities/ORTHANC1/store
I0813 00:09:00.538883 JobsRegistry.cpp:724] New job submitted with priority 0: 643b03a9-b3df-4b29-949b-c9abcdedc196
I0813 00:09:00.539011 JobsEngine.cpp:133] (jobs) Executing job with priority 0 in worker thread 1: 643b03a9-b3df-4b29-949b-c9abcdedc196
I0813 00:09:00.539103 DicomModalityStoreJob.cpp:61] Sending instance b53d548b-392f4581-24ac12a6-efcb04ec-f13a5415 to modality "ORTHANC1"
I0813 00:09:00.552187 DicomAssociation.cpp:274] (dicom) Opening a DICOM SCU connection without DICOM TLS from AET "ORTHANC1" to AET "ORTHANC1" on host 192.168.10.11:60010 (manufacturer: Generic, timeout: 10s)
I0813 00:09:00.554891 CommandDispatcher.cpp:332] (dicom) Association Received from AET ORTHANC1 on IP 192.168.10.11
I0813 00:09:00.567950 main.cpp:311] Incoming connection from AET ORTHANC1 on IP 192.168.10.11, calling AET ORTHANC1
I0813 00:09:00.568268 CommandDispatcher.cpp:663] (dicom) Association Acknowledged (Max Send PDV: 16372) to AET ORTHANC1 on IP 192.168.10.11
I0813 00:09:00.569806 main.cpp:344] Incoming Store request from AET ORTHANC1 on IP 192.168.10.11, calling AET ORTHANC1
I0813 00:09:00.577605 HttpServer.cpp:1238] (http) GET /system
I0813 00:09:00.587953 ServerContext.cpp:628] Already stored
W0813 00:09:00.588318 LuaContext.cpp:93] Lua says: ContrastBolusAgent,
W0813 00:09:00.588357 LuaContext.cpp:93] Lua says: EchoTime, 11.000000
W0813 00:09:00.588374 LuaContext.cpp:93] Lua says: BitsAllocated, 16
(一部略)
W0813 00:09:00.588608 LuaContext.cpp:93] Lua says: SOPInstanceUID, 1.113654.5.15.1504
(一部略)
0813 00:09:00.589455 LuaContext.cpp:93] Lua says: Send data to ORTHANC2
I0813 00:09:00.604404 JobsRegistry.cpp:724] New job submitted with priority 0: 5384b4e9-4b12-4506-9388-aef0ddc75ee1
I0813 00:09:00.604560 JobsEngine.cpp:133] (jobs) Executing job with priority 0 in worker thread 1: 5384b4e9-4b12-4506-9388-aef0ddc75ee1
I0813 00:09:00.604827 StoreScuOperation.cpp:59] Lua: Sending instance b53d548b-392f4581-24ac12a6-efcb04ec-f13a5415 to modality "ORTHANC2"
I0813 00:09:00.608776 DicomAssociation.cpp:274] (dicom) Opening a DICOM SCU connection without DICOM TLS from AET "ORTHANC1" to AET "ORTHANC2" on host 192.168.10.13:60020 (manufacturer: Generic, timeout: 10s)
I0813 00:09:00.612131 HttpServer.cpp:1238] (http) GET /jobs/643b03a9-b3df-4b29-949b-c9abcdedc196
I0813 00:09:00.644702 SequenceOfOperationsJob.cpp:340] Executing the trailing timeout in the sequence of operations
I0813 00:09:05.644874 SequenceOfOperationsJob.cpp:347] The sequence of operations is over
I0813 00:09:05.645085 JobsRegistry.cpp:498] Job has completed with success: 5384b4e9-4b12-4506-9388-aef0ddc75ee1
I0813 00:09:05.645187 TimeoutDicomConnectionManager.cpp:94] (dicom) Closing inactive DICOM association with modality: ORTHANC2
ログを見ると、 DICOM tag がズラッと並んでいることがわかります。そのうちの SOPInstanceUID は 1.113654.5.15.1504 となっています。 ~/Orthanc/ExportData/DicomData の中に 1.113654.5.15.1504.dcm が出力されているはずです。そして、 http://localhost:50020 には先程のデータが転送されているはずです。
このように Lua スクリプトでデータの処理ができます。このほかにデータの編集などもできるようです。
まとめ
その1の続きとして、ほんのちょっと発展させたことを備忘録的にまとめてみました。今回やったことは Orthanc が持つ本来の性能のほんの一部だと思います。これ以上のことをする予定はないのでここで手を止めますが、 orthanc.json を眺めるだけでもいろいろな設定ができそうだということがわかります。 Python も使えるようになっています。DICOM の worklist も対応しているようです。うまくやれば、ユーザーの希望をあらかた叶えるシステムになるんじゃないでしょうか。
Orthanc のフォーラムも非常に活発で、しかも作者が丁寧に回答しておられます。ますます多機能になりつつ性能も向上していくようです。今後が楽しみなソフトウエアです。
おわり